background image

S

y

st

em S

etup

English - 29

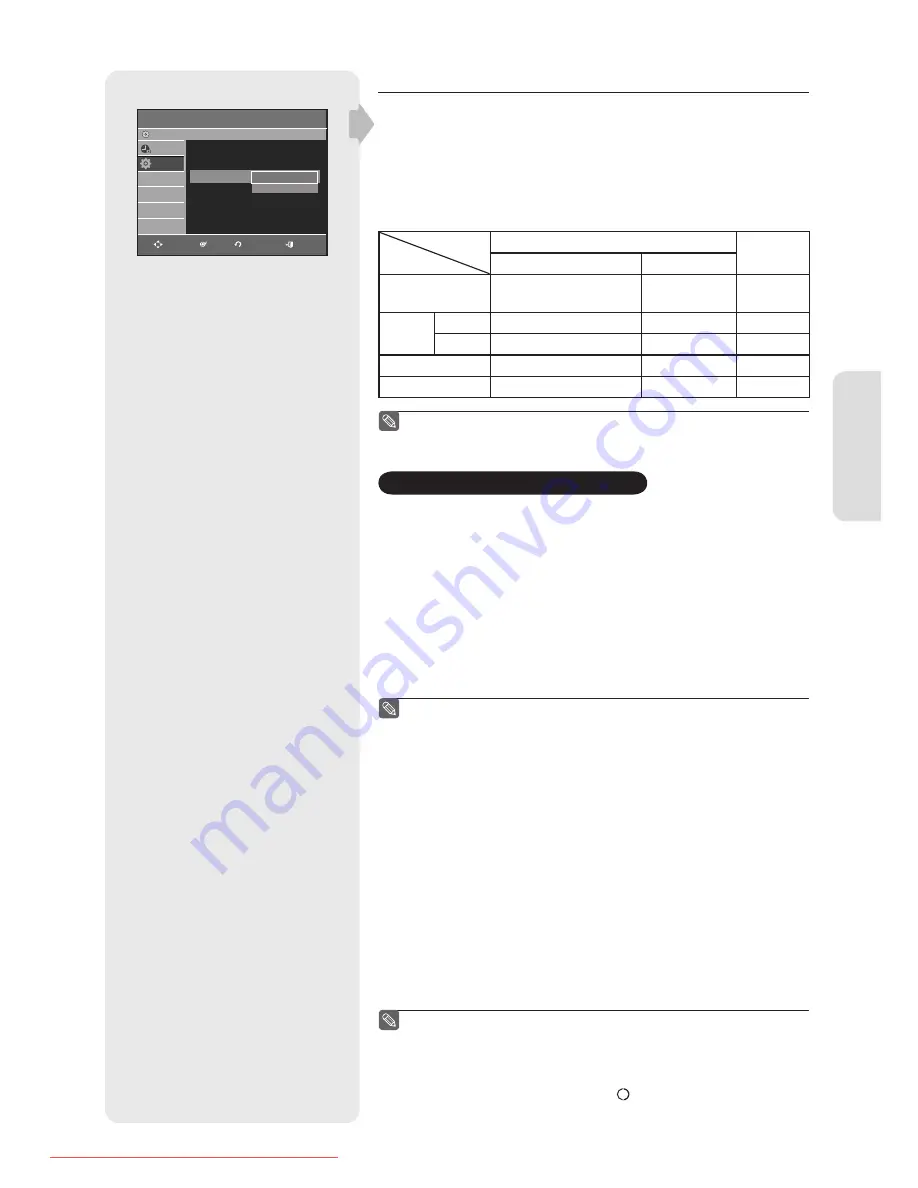
Video output

•  Component

 : Select this when the DVD Recorder is connected to a TV with 

Component jack.

•  RGB

 : Select this when the DVD Recorder is connected to your TV using 

SCART cable.

In Component mode, you can set video output to Progressive(P.SCAN) or 
Interlace, see below. When the HDMI cable is not connected, available video 
output jacks are as follow.

Setting mode

Output jack

Component mode

RGB Mode

P.SCAN off  mode (Interlace mode) P.SCAN on mode

Component Output

(Y, P

B

, P

R

)

O

O

(TV in progressive mode)

X

AV1 Scart

R, G, B

X

X

O

Composite

O

X

X

Composite Video out

O

X

O

S-Video out

O

X

O

 When the HDMI cable is connected, other A/V output does not 
operate.

Progressive scan

If the TV supports Progressive Scan, press the P.SCAN button on the front of 
the DVD Recorder to enjoy.

Setting up the Progressive scan

1.

  With the DVD Recorder in Stop mode, press the 

P.SCAN

 button on the front 

of the DVD Recorder.
The message “Press [Yes] to confi rm Progressive scan mode. Otherwise, 
press [No].” will appear.

2.

 Press the


 buttons to select 

Yes

, and then press the 

OK

 button.

3.

 Set your TV to Progressive input (using the TV remote control.)

When the HDMI cable is connected, this screen is not displayed.

 Do not press the 

P.SCAN

 button if you are using a TV that does not 

support Progressive mode. Nothing will be displayed on the screen if 
pressed.

 Progressive setting is only available when the Video Out is set to 
Component.

 Progressive setting is only available when the DVD recorder is in stop 
mode.

Canceling the Progressive scan

1.

  With the DVD Recorder in Stop mode, press the 

P.SCAN

 button on the front 

of the DVD Recorder.
The message “Press [Yes] to confi rm Interlace scan mode. Otherwise, press 
[No].” will appear.

2.

 Press the 


 buttons to select 

Yes

, and then press the 

OK

 button.

3.

 Set your TV to Interlace input (using the TV remote control.)

 If you press the 

P.SCAN

 button by mistake when your TV does not 

support Progressive mode, you need to release the Progressive mode. 
To release the Progressive mode, press the

 P.SCAN

 button on the front 

panel 2 times.

 The screen will recover after the 

PS     

 LED on the front panel display 

turns off .


Video

DVD-Recorder

Programme

Setup

TV Aspect 

: 16:9 Wide 

3D Noise Reduction  : Off 

Video Output 

: Component 

DivX(R) Registration  

Component

RGB

No Disc

MOVE

OK

RETURN

EXIT

01273A(01)R150,155-XEU-ENG.indb   29

01273A(01)R150,155-XEU-ENG.indb   29

2007-02-27   오후 4:35:59

2007-02-27   오후 4:35:59

Downloaded From Disc-Player.com Samsung Manuals

Summary of Contents for DVD-R149

Page 1: ...www samsung com uk AK68 01273A 01 Instruction Manual DVD R150 DVD R155 Downloaded From Disc Player com Samsung Manuals ...

Page 2: ...se The value of the fuse is indicated on the pin face of the plug If it requires replacing a fuse approved to BS1362 of the same rating must be used Never use the plug with the fuse cover omitted if the cover is detachable If a replacement fuse cover is required it must be of the same colour as the pin face of the plug Replacement covers are available from your dealer If the fitted plug is not sui...

Page 3: ...Recorder be sure to turn them all off Do not move the DVD Recorder while a disc is being played or the disc may be scratched or broken the DVD Recorder s internal parts may be damaged Do not put a flower vase filled with water or any small metal objects on the DVD Recorder Be careful not to put your hand into the disc tray Do not place anything other than the disc in the disc tray Exterior interfe...

Page 4: ...00 folders Maximum size of progressive JPEG is 3M pixels MOTION JPEG is not supported DVD RAM RW R discs that contain JPEG files can be played back Using CD R RW Use a 700MB 80 minutes CD R RW disc If possible do not use a 800MB 90 minutes or above disc as the disc may not play back If the CD R RW disc was not recorded as a closed session you may experience a delay in the early playback time all r...

Page 5: ...nly connect your DVD recorder directly to your TV not to a VCR Connecting to a VCR results in a distorted picture from copy protected DVD discs This DVD Recorder incorporates copyright protection technology that is protected by methods claims of certain U S patents and other intellectual property rights owned by Macrovision Corporation and other rights owners Use of this copyright protection techn...

Page 6: ...1 Connecting a VCR Set Top Box STB DVD player or Camcorder to the AV3 IN jacks 20 Case 2 Connecting a Camcorder to the DV IN jack 20 System Setup On Screen Menu Navigation 21 Plug Auto Setup 21 Setting the Clock 22 Presetting Channels with the Auto Setup function 22 Presetting Channels with the Manual Setup function 23 Setting up the Language Options 24 Setting up the System Options 25 EP Mode Tim...

Page 7: ...rker 50 Playing back an Audio CD CD DA MP3 51 Buttons on the Remote Control used for Audio CD CD DA MP3 playback 51 Playing an Audio CD CD DA 51 Playing back an MP3 Disc 52 Repeat Playback of an Audio MP3 Disc 52 Play Option Mode 53 To Programme Tracks 53 Playing back a Picture Disc 53 Playing back MPEG4 Disc 54 Playing the Title List 55 Title List Screen Elements 55 Recording on Free space 55 Edi...

Page 8: ...o the free disc space See page 39 Creating a DVD video title using DVD RW DVD R disc With the DVD Recorder you can create your own DVD Video titles on 4 7 GB DVD RW DVD R or 8 5 GB DVD R discs Copying data from a digital camcorder using a DV input jack Record DV Device video onto DVD RAM DVD RW or DVD R discs using the DV input jack IEEE 1394 4pin 4pin See page 37 High quality progressive scan Pro...

Page 9: ...atedly record on the same disc or you want to edit the disc after recording select a rewritable DVD RW or DVD RAM type disc If you want to save recording without any change choose a non rewritable DVD R DVD R150 DVD R155 Step 2 Format the disc to start recording The DVD Recorder automatically starts formatting when an unused disc is inserted This is required for the preparation of recording on a d...

Page 10: ...e the disc When using a DVD RW disc in VR Mode Although finalising is generally unnecessary when playing the disc on a VR Mode compatible component a finalised disc should be used for playback When using a DVD RW disc in Video Mode The disc should be finalised first to enable playback on anything other than this DVD Recorder No more editing or recording can be made on the disc once it has been fin...

Page 11: ...DIOMARELLI 57 RCA 45 46 REX 74 SABA 57 72 73 74 75 BRAND BUTTON SALORA 74 SANYO 41 42 43 44 48 SCHNEIDER 06 SELECO 74 SHARP 36 37 38 39 48 SIEMENS 71 SINGER 57 SINUDYNE 57 SONY 35 48 TELEAVA 73 TELEFUNKEN 67 73 75 76 THOMSON 72 73 75 THOMSON ASIA 80 81 TOSHIBA 47 48 49 50 51 52 WEGA 57 YOKO 06 ZENITH 63 Result If your television is compatible with the remote control it will switch off It is now pr...

Page 12: ...quipment 3 DV IN Connects extermal digital equipment with a DV jack such as a camcorder 4 DISC TRAY Opens to accept a disc 5 P SCAN Selects the progressive scan mode 6 OPEN CLOSE Opens and closes the disc tray 7 DISPLAY Displays the playing status title chapter time etc 8 PROG Select TV preset Channels Same as PROG button on the remote control 9 REC Starts recording 10 SEARCH SKIP Go to the next t...

Page 13: ...55 1 In from aerial connector 2 Out to TV connector 3 AV2 EXT INPUT SCART Connector 4 AV1 TV OUTPUT SCART Connector 5 HDMI OUT Connects the input of external equipment using a HDMI HDMI cable or HDMI DVI cable 6 DIGITAL AUDIO OUT OPTICAL Connects to an amplifier having a digital optical audio input jack 7 DIGITAL AUDIO OUT COAXIAL Connects to an amplifier having a digital coaxial audio input jack ...

Page 14: ...P EP 16 EZ REC MODE Button 17 OPEN CLOSE Button To open and close the disc tray 18 AUDIO Button Use this to access various audio functions on a disc DVD mode 19 Play Pause Button Press to play a disc or pause playback recording 20 PROG Buttons Select preset channels in a specific order Same as PROG buttons in front panel 21 RETURN Button Returns to a previous menu 22 PLAY LIST TITLE MENU Button Us...

Page 15: ...rder sends only signals of TV You must connect SCART cable or Audio Video cables to watch a signal from your DVD Recorder TV mode Press the TV DVD button on remote control then TV appear on Front LED display or turn off DVD Recorder Additional connections You can connect your DVD Recorder to a satellite or digital tuner DVD mode 1 Connect the AV2 connector of DVD Recorder and VCR Satellite receive...

Page 16: ...age than interlaced video This is only available with TVs that support progressive scan Progressive Scan Output 576p Consumers should note that not all high definition television sets are fully compatible with this DVD Recorder and may cause artifacts to be displayed in the picture in case of 576 progressive scan picture problems It is recommended that the user switch the connection to the standar...

Page 17: ... OUT jacks on the DVD Recorder and AUDIO IN jacks on TV or AV amplifier See page 18 3 After connecting refer to the page 28 to 29 You will enjoy high quality and accurate colour reproduction images The Component jacks will not output video resolutions above 576p To view 720p and 1080i connect the DVD Recorder to your TV with the supplied HDMI cable With HDMI connected press the P SCAN button to al...

Page 18: ... trademarks of DTS Inc Case 1 Connecting to yourTV If your TV has audio input jacks use this connection Case 2 Connecting to a stereo amplifier with AV output jacks If your stereo amplifier only has AUDIO INPUT jacks L and R use the AUDIO OUT jacks Case 3 Connecting to an AV amplifier with a digital output jack If your AV amplifier has a Dolby Digital MPEG2 or DTS decoder and a digital input jack ...

Page 19: ...EC See page 26 Please check the logo If your TV has an logo then it supports Anynet function To change HDMI output resolution see page 30 HDMI High Definition Multimedia Interface HDMI is an interface to enable the digital transmission of video and audio data with just a single connector Since HDMI is based on DVI it is completely compatible with DVI The only difference between HDMI and DVI is tha...

Page 20: ...AV3 IN jacks of the DVD Recorder You can record from connected equipment VCR STB DVD player or Camcorder AV 3 in selection will be automatically done If the input is not selected automatically use INPUT SEL button to select proper input Copy protected content cannot be recorded Case 2 Connecting a Camcorder to the DV IN jack If your digital camcorder has a DV output jack connect it to the DV input...

Page 21: ... 3 Press the OK button or wait for a few seconds to start the auto setup 4 Auto Channel scan will be started The number of stations automatically stored by the DVD Recorder depends on the number of stations that it has found 5 Check the date and time If it is correct press the OK button then the date and time will be saved If you don t press the OK button the date and time will be saved automatica...

Page 22: ...t need the Auto clock set function select Off Presetting Channels with the Auto Setup function This feature allows you to manually set the DVD Recorder tuner band to Antenna or Cable whichever you connected to the Antenna In jack during initial setup 1 With the DVD Recorder in Stop mode No Disc mode press the MENU button 2 Press the buttons to select Setup then press the OK or button 3 Press the b...

Page 23: ...r Swap using the buttons then press the OK or button Edit You can add or edit PR programme After change PR informations CH Name Decoder MFT select Done then press the OK button CH Tune the channel using buttons Name Display station name automatically detected in broadcasting signal If not detected you can edit name by using buttons MFT You can tune up the channel frequency better using buttons Del...

Page 24: ...nglish Faeroese Finnish French German Icelandic Indonesian Italian Malay Norwegian Portuguese Spanish Swahili and Swedish Central English Albanian Croatian Czech Hungarian Polish Romanian Serbian Latin Slovak and Slovenian Greek English and Greek Cyrillic English Azeri Belarusian Bulgarian Kazakh Macedonian Russian Serbian Tatar Ukrainian and Uzbek 5 Press the buttons to select the desired languag...

Page 25: ...ress the OK button A new chapter is created according to the selected recording mode A chapter will be about 5 minutes long in XP and SP and about 15 minutes long in LP and EP mode 3 Press the STOP button to stop recording 4 To display the created chapters finalise the disc see page 67 and then press the DISC MENU button The chapter menu will be displayed 5 Press the buttons to select desired chap...

Page 26: ...d to control the DVD Recorder and buttons button When you press Anynet button on the TV remote control the OSD to the left will appear Select Device Use this option to select device Record Use this option to start recording or stop recording Menu on Device Same as MENU button on the DVD Recorder remote control Device Operation Same as ANYKEY button on the DVD Recorder remote control By pressing th...

Page 27: ...our AV receiver or AV amplifier have Dolby Digital or MPEG 2 Decoder Digital output setting is equally applied to both Dolby Digital and MPEG 2 audio LPCM sound track is always outputted as PCM It has no relation with Digital Output setting Be sure to select the correct Digital Output or you will hear no sound or loud noise DTS Off Doesn t output DTS signal Select this when your AV receiver or AV ...

Page 28: ... the OK or button TV Aspect Depending on the type of television you have you may want to adjust the screen setting aspect ratio 4 3 LetterBox Select when you want to see the total 16 9 ratio screen DVD supplies even though you have a TV with a 4 3 ratio screen Black bars will appear at the top and bottom of the screen 4 3 Pan Scan Select this for conventional size TV when you want to see the centr...

Page 29: ... 3 Set your TV to Progressive input using the TV remote control When the HDMI cable is connected this screen is not displayed Do not press the P SCAN button if you are using a TV that does not support Progressive mode Nothing will be displayed on the screen if pressed Progressive setting is only available when the Video Out is set to Component Progressive setting is only available when the DVD rec...

Page 30: ...ding Progressive Scan settings in the TV s menu system If Video Output is set incorrectly the screen may be blocked The resolutions available for HDMI DVI output depend on the connected TV or projector For details see the user s manual of your TV or projector When the resolution is changed it may take a few seconds for a normal image to appear If you set the HDMI output resolution 720p or 1080i HD...

Page 31: ...OK or button For example if you select up to Level 6 discs that contain Level 7 8 will not play A larger number indicates that the programme is intended for adult use only About the Change Password 1 Press the buttons to select Change Password 2 Press the OK or button The Enter the password message will be displayed 3 Enter the 4 digit password using the 0 to 9 buttons on the remote control The Co...

Page 32: ...le notfinalised Recordable V Mode Samsung finalised Not recordable notfinalised Recordable OtherCompany finalised Not recordable not finalised Not recordable DVD R V Mode Samsung finalised Not recordable notfinalised Recordable OtherCompany finalised Not recordable notfinalised Not recordable DVD RW Samsung X Recordable OtherCompany X Not recordable in some cases DVD R Samsung finalised Not record...

Page 33: ...D RW discs in Video mode with the Chapter Creator has been set to On The chapter s length interval between chapters varies according to the recording mode Simple editing erasing titles changing title name DVD RAM RW VR mode This mode allows multiple editing functions such as deletion of the whole title partial deletion of a title etc Various editing options using a created Playlist DVD RW You can ...

Page 34: ... Approx 1 hour about 8 Mbps SP standard quality mode Select to record in standard quality Approx 2 hours about 4 Mbps LP long recording mode Select when a long recording time is required Approx 4 hours about 2 Mbps EP extended mode Select when a longer recording time is required Approx 6 hours about 1 2 Mbps Approx 8 hours about 0 8 Mbps FR Flexible Recording for timer recording only see page 39 A...

Page 35: ...ate a key to decrypt the contents of the disc If the contents of the disc are copied to other media the ID will be absent or wrong and the data will not be decryptable About INFO Button The INFO function allows you to view the current status and progress of playback and recording When recording on an used disc make sure that there is enough disc space for recording Press the INFO button The displa...

Page 36: ...he front panel Recording from external equipment you are watching 1 Press the INPUT SEL button to select the input source according to the connection you made The front panel display changes in the following sequence PR Number AV1 AV2 AV3 DV 2 Press the REC MODE button repeatedly or press the REC MODE button then press button to select the recording speed quality SP LP EP XP 3 Press the REC button...

Page 37: ...il LOAD disappears from the front panel display 3 Press the REC MODE button repeatedly to select the recording speed quality SP LP EP XP 4 Press the INPUT SEL button to select DV If the input is set to DV a playback record menu that enables camcorder control appears on the top of the screen 5 To play the camcorder and find the starting point to be copied select the play icon on the top of the scre...

Page 38: ...lly To access on the screen controls during recording press or button Making a OneTouch Recording OTR You can set the DVD Recorder to record in preset increments by pressing the REC button repeatedly 1 If you want to record a TV channel press the PROG or number buttons to select a desired channel If you want to record through a connected external component press the INPUT SEL button to select an a...

Page 39: ...lected only one mode in XP SP LP and EP modes and you can use this mode for timer recording XP high quality Select when video quality is important Approx 1 hour SP standard quality Select to record in standard quality Approx 2 hours LP low quality Select when a long recording time is required Approx 4 hours EP extended Select when a longer recording time is required Approx 6 hours or 8 hours PDC P...

Page 40: ... The timer recording time may differ from the set time depending on disc status and overall timer recording status for example recording times overlapping or when the previous recording ends within 2 minutes before the start time of the next recording You can make the Timer Recording up to 12 programmes Editing the Scheduled Record List Follow these directions to edit the timer record list 1 With ...

Page 41: ... enter the PR number manually by pressing the buttons 6 If the programme and times are correct press the OK button 7 Turn the power off by pressing the STANDBY ON button to activate the timer recoding setting Refer to pages 39 40 if you want to Check whether the timer Recording has set correctly or not Cancel a preset recording The numbers next to each TV programme listing in the magazines or news...

Page 42: ... recording on at least 30 of the disc The tray will open after the disc has been finalised When the disc is full it will finalise automatically and the Recorder will remain in stop mode When you make a timer recording and it occupies at least 30 of the disc the disc will finalise automatically and the Recorder will power off Please note that auto finalisation will not work if the Recorder has more...

Page 43: ...Single sided 5 4 7GB 1hr XP ExcellentQuality 2hrs SP StandardQualit 4hrs LP Long Playback 6 or 8hrs EP Extended VIDEO AUDIO Double sided 5 9 4GB 2hr XP ExcellentQuality 4hrs SP StandardQualit 8hrs LP Long Playback 12or16hrs EP Extended DVD RW VIDEO AUDIO 5 4 7GB 1hr XP ExcellentQuality 2hrs SP StandardQualit 4hrs LP Long Playback 6 or 8hrs EP Extended DVD R VIDEO AUDIO Single Layer 5 4 7GB 1hr XP ...

Page 44: ... Recorder does not play discs automatically after the initial power on When the DVD Recorder is powered on and a disc is in the tray the DVD Recorder will be activated and wait in stop status Press the PLAY button to start playback 4 Press the STOP button to stop playback When you stop playing disc the DVD Recorder remembers where you stopped When you press the PLAY button again it will pick up wh...

Page 45: ... recorded if one title is deleted that title cannot be played again PLAY LIST Press the PLAY LIST button This refers to a unit of playback which is made by selecting a desired scene in the entire Title List When one playlist is played only the scene selected by the user will play and then stop Since only the information necessary for playing a desired scene is included in a playlist even if that p...

Page 46: ...In pause mode press the SEARCH button on the remote control If you press the SEARCH button Slow 1 Slow 2 Slow 3 If you press the SEARCH button Slow 1 Slow 2 Slow 3 Press and hold the SEARCH button during pause the disc will play slowly at a Slow 1 speed If the button is released the pause operation will resume To return to normal speed playback press the PLAY button The speed marked in this functi...

Page 47: ...want to play repeatedly 3 Press the OK button To return to normal playback Select Off on the Repeat item or press the CANCEL button DVD RAM DVD RW VR mode unfinalised DVD R and unfinalised DVD RW Video mode do not repeat a chapter To make the screen disappear press the ANYKEY again Playing a Certain section Repeatedly 1 Press the ANYKEY button during playback 2 Press the buttons to select Repeat t...

Page 48: ...pear press the ANYKEY again Using one Touch button By pressing the audio button you can access function directly Changing the Camera Angle When a DVD VIDEO contains multiple angles of a particular scene you can select the Angle function This is only available during playback If the disc contains multiple angles the ANGLE mark appears on the screen 1 Press the ANYKEY button during playback 2 Press ...

Page 49: ... desired scene appears The number 1 is displayed and the scene is memorized 3 Press the button to move to the next position 4 Press the OK button when the desired scene appears The number 2 is displayed and the scene is memorized Repeat above to bookmark other positions You can bookmark up to 10 scenes When the disc tray is opened and then closed bookmarks will disappear Playing back a bookmark 1 ...

Page 50: ...Press the MARKER button during playback 2 Press the buttons to select a bookmarked scene 3 Press the OK or PLAY button to start playing from the selected scene If you press the SKIP button it moves to the beginning of the marker Pressing the button once again within 3 seconds returns to the beginning of the previous marker If you press the SKIP button it moves to the next marker Clearing a Marker ...

Page 51: ...creen display Repeat or Play Option Playing an Audio CD CD DA 1 Insert an audio CD CD DA into the disc tray The audio CD menu appears and the tracks songs are played automatically 2 Press the buttons to select the track you want to hear then press the OK or button Audio CD CD DA Screen Elements 1 Play mode icon 2 Current track song 3 Displays the current play index and total track number 4 Shows t...

Page 52: ...he Repeat mode will be highlighted 2 Press the buttons to select the desired repeat mode you want to play repeatedly then press the OK button Repeat Track CD CD DA MP3 Repeat Folder MP3 Repeat Disc CD CD DA MP3 To return to normal playback 3 Press the CANCEL button to return to normal playback Music List MP3 ROOT SONG01 002 SONG02 003 SONG03 004 SONG04 005 SONG05 006 SONG06 SONG01 01 13 MP3 0 00 1...

Page 53: ...elected track to the Playlist If you playlisted a wrong track press the button then press the buttons to select the wrong track then press the CANCEL button 4 Press the PLAY button to playback the playlist Playing back a Picture Disc 1 Insert a JPEG into the disc tray 2 Press the buttons to select Disc Navigation and then press the OK or button 3 Press the buttons to select Photo and then press th...

Page 54: ... button 5 When MPEG4 file is played you can use following functions Pressing the STOP button once during playback will display the file list pressing the button again will exit the menu screen MPEG4 Function Description Function Description Skip Scene During playback press the SKIP or button it moves forward or backward 5 minutes Search Scene During playback press the SEARCH or button and press ag...

Page 55: ...on is only available with DVD RW discs If existing titles are deleted new free space will be created When you operate free space function on air TV images will appear on the left side of the title list 1 Press the TITLE LIST button The Title List screen is displayed 2 Press the button to select Free Space then press the OK or button On air TV images will appear on the left side of the title list 3...

Page 56: ...tle of a recorded programme 1 Press the TITLE LIST button The Title List screen is displayed 2 Press the buttons to select an entry you want to rename from theTitle List then press the OK or button 3 Press the buttons to select Rename then press the OK button The Rename screen is displayed 4 Press the buttons to select the desired characters then press the OK button Back Space Deletes the characte...

Page 57: ...ayed The message may depend on the type of disc 4 Press the buttons to select Yes then press the OK button You cannot delete a protected entry If you want to delete a protected entry select Off in the Title Protection menu When the Disc Protection has been set to Protected you cannot delete titles See page 66 Once an entry is deleted from the Title List it cannot be recovered Once DVD R DVD RW is ...

Page 58: ...press the buttons to select Return Edit Title List Screen Elements 1 Playback bar 2 Playtime 3 Section deletion starting point window and time 4 Section deletion end point window and time Select the start and end points of the section you want to delete using the playback related buttons The length of the section to be deleted must be at least 5 seconds long End point cannot be marked earlier than...

Page 59: ...edited chapters are shown on existing DVD players only after performing the Edit Compatible function See page 68 If you add a chapter the title is divided at that point If you add a chapter onto a title that has only one chapter it creates another chapter Deleting a chapter 4 Select a chapter you want to delete using the playback related buttons 5 Press the buttons to select Delete and then press ...

Page 60: ...tton The Title List screen is displayed 2 Press the buttons to select a title you want to divide from the Title List then press the OK or button 3 Press the buttons to select Divide Title then press the OK or button The Divide Title screen is displayed 4 Select the point you want to divide using the playback related buttons then press the OK button 5 Press the buttons to select Divide then press t...

Page 61: ...nd of disc the displayed screen may have a slight difference A disc that is recorded on this unit cannot be displayed playlist menu if EZ REC MODE set to On Playing Entries in the Playlist Follow these instructions to play the playlist entries 1 With the DVD Recorder in Stop mode press the PLAY LIST button The Edit Playlist screen is displayed 2 Press the buttons to select the title you want to ed...

Page 62: ...D Recorder in Stop mode press the PLAY LIST button The Edit Playlist screen is displayed 2 Press the buttons to select the title you want to edit from the Playlist then press the OK or button 3 Press the buttons to select Edit Scene then press the OK button The Edit Scene screen is displayed Playing a Selected Scene 4 Press the buttons to select the scene you want to play then press the OK button ...

Page 63: ...n The selected scene is moved to the selected position You cannot move the selected scene to the position of the next scene because the selected scene should be inserted before that position which requires no action Depending on the kind of disc the displayed screen may have a slight difference Edit Scene DVD Recorder Scene No 2 7 Playlist No 3 DVD RW VR 01 00 00 26 02 00 00 07 Play Modify Move Ad...

Page 64: ... in page 62 4 Press the buttons to select the scene you want to delete then press the OK button 5 Press the buttons to select Delete then press the OK button Edit Scene DVD Recorder Scene No 4 7 Playlist No 3 DVD RW VR 01 00 00 26 02 00 00 07 03 00 00 04 Play Modify Move Add Delete 04 00 00 03 05 00 00 11 06 00 00 04 MOVE OK RETURN EXIT 00 00 15 Add Scene DVD Recorder DVD RW VR Scene No 004 Start ...

Page 65: ...sor Space Enters a blank and moves the cursor one forward to the right Delete Deletes the character at the cursor position Clear Deletes all the character inputs Save Registers the character inputs The maximum number of characters that can be entered is 31 All 31 characters can be displayed by pressing the INFO button twice 5 Press the buttons to select Save then press the OK button A disc name is...

Page 66: ...press the OK button You will be prompted again with the message All data will be deleted Do you want to continue 4 Press the buttons to select Yes then press the OK button The disc is formatted DVD VR DVD V DISC DVD RAM DVD RW DVD RW DVD R DVD VR and DVD V are defined according to their recording format DVD R155 only DVD RAM RW DVD RW Disc Manager DVD Recorder Title List Playlist Disc Manager Prog...

Page 67: ...ress the buttons to select Disc Manager then press the OK or button 3 Press the button to select Disc Unfinalise then press the OK or button You will be prompted with the message Do you want to unfinalise disc 4 Press the buttons to select Yes then press the OK button You will be prompted again with the message Disc will be unfinalised Do you want to continue 5 Press the buttons to select Yes then...

Page 68: ...isc Manager and then press the OK or button 3 Press the buttons to select Edit Compatible and then press the OK or button 4 Press the buttons to select Yes and then press the OK button The Edit Compatible process will start After performing Edit Compatible you can move to the title menu of the disc by pressing the TITLE MENU button If you don t performing Chapter Edit you will be prompted with the...

Page 69: ...pter or scan time that is out of range Play mode settings are different from the settings configured in the Settings menu The disc does not support all selected functions In this case some settings configured in the settings menu may not work properly Cannot change the aspect ratio The aspect ratio is fixed for DVD discs See page 28 The angle operation does not work while playing a DVD disc The an...

Page 70: ...nverted from 50Hz to 60Hz for 720p 1080i HDMI High Definition Multimedia Interface Output Please refer to the user s manual of your TV Remote Control Unit The remote control doesn t work Point the remote control at the remote control sensor on your DVD recorder Allow for proper distance Remove obstacles between your DVD recorder and the remote control Check whether the batteries are empty Check fo...

Page 71: ...eo Composite Video Video output jack x 1 S Video output x 1 Y 1 0Vp p C 0 286Vp p at 75Ω load Component output x 1 Y 1 0Vp p Pb 0 70Vp p Pr 0 70Vp p at 75Ω load HDMI DVI output x 1 576p 720p 1080i DVD R155 only Scart Jack AV1 Scart TV Video Composite RGB Audio analogue Recording Picture Compression format MPEG II Audio Compression format Dolby Digital 2ch 256Kbps MPEG II Recording Quality XP about...

Page 72: ...repair work will not be covered by this warranty 4 This product is not considered to be defective in materials nor workmanship by reason that it requires adaptation in order to conform to national or local technical or safety standards in force in any Country other than the one for which the product was originally designed and manufactured This warranty will not cover and no re imburse ment will b...

Page 73: ...HUNGARY 06 80 SAMSUNG 7267864 www samsung com hu ITALIA 800 SAMSUNG 7267864 www samsung com it LUXEMBURG 0032 0 2 201 24 18 www samsung lu NETHERLANDS 0900 20 200 88 0 10 Min www samsung com nl NORWAY 815 56 480 www samsung com no POLAND 0 801 801 881 www samsung com pl PORTUGAL 80 8 200 128 www samsung com pt SLOVAKIA 0800 SAMSUNG 726786 www samsung com sk SPAIN 902 10 11 30 www samsung com es SW...

Page 74: ...rom uncontrolled waste disposal please separate this from other types of wastes and recycle it responsibly to promote the sustainable reuse of material resources Household users should contact either the retailer where they purchased this product or their local government office for details of where and how they can take this item for environmentally safe recycling Business users should contact th...

Reviews: