R
ecording
English - 87
4
Press the
…†
buttons to select Info, then press the
OK or
√
button.
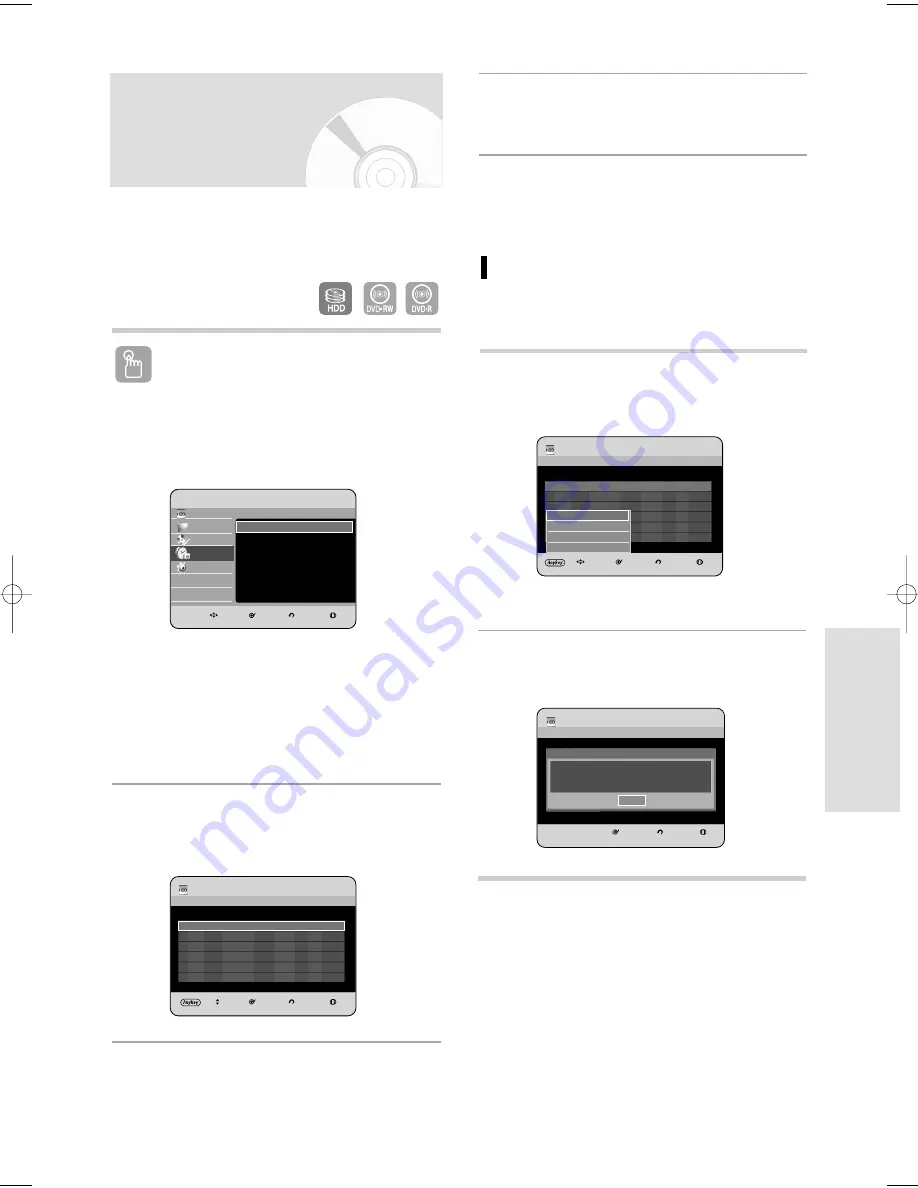
Information about Recorded List
Informs whether the selected Recorded List performed a
Timer Recording successfully.
3
-1 Press the
…†
buttons to select the number of the
Recorded List, then press the ANYKEY button.
HDD
Recorded List
MOVE
SELECT
RETURN
EXIT
No.
To
Source
Date
Start
End
Mode
V/P
Status
01 HDD PR 01
JAN 01
17:30
18:30
SP
On
OK
02 HDD PR 01
JAN 01
21:00
22:00
SP
On
OK
03 HDD PR 01
JAN 01
23:15
23:45
SP
On
OK
01 HDD
PR 01
JAN 01
17:30
18:30
SP
On
OK
info
Delete
List Clear
Go to Scheduled List
Info
SELECT
RETURN
EXIT
HDD
Recorded List
No.
To
Source
Date
Start
End
Mode
V/P
Status
Timer rec was finished successfully
OK
Go To Recorded List
Using the TIMER button
1
With the unit in Stop mode/Playback mode, press
the TIMER button. The Programme screen is
displayed.
Using the MENU button.
• With the unit in Stop mode/Playback mode, press
the MENU button.
• Press the
…†
buttons to select Programme,
then press the OK or
√
button.
2
Press the
…†
button to select Recorded List,
then press the OK or
√
button.
The Recorded List screen is displayed.
You can confirm the performance results of title lists that have
passed the reserved recording time.
3
Press the MENU button after finishing the operation.
The Recorded List screen will disappear.
HDD
Recorded List
MOVE
SELECT
RETURN
EXIT
No.
To
Source
Date
Start
End
Mode
V/P
Status
01 HDD PR 01
JAN 01
17:30
18:30
SP
On
OK
02 HDD PR 01
JAN 01
21:00
22:00
SP
On
OK
03 HDD PR 01
JAN 01
23:15
23:45
SP
On
OK
HDD
Library
Disc Manager
Programme
Setup
HDD & DVD RECORDER
Programme
Scheduled List
√
Recorded List
√
MOVE
SELECT
RETURN
EXIT
Programme
Scheduled List
√
01 HDD
PR 01
JAN 01
17:30
18:30
SP
On
OK
01082E_HR735_EUR_59~89 4/11/06 8:54 PM Page 87


