background image

18

Instructions on how to use the memory card

If you open the memory card cover when the camera power is turned on, the power
will turn off automatically.
Don't remove the memory card when the camera status lamp(Green) is blinking as
this may cause damage to data in the memory card.

INFORMATION

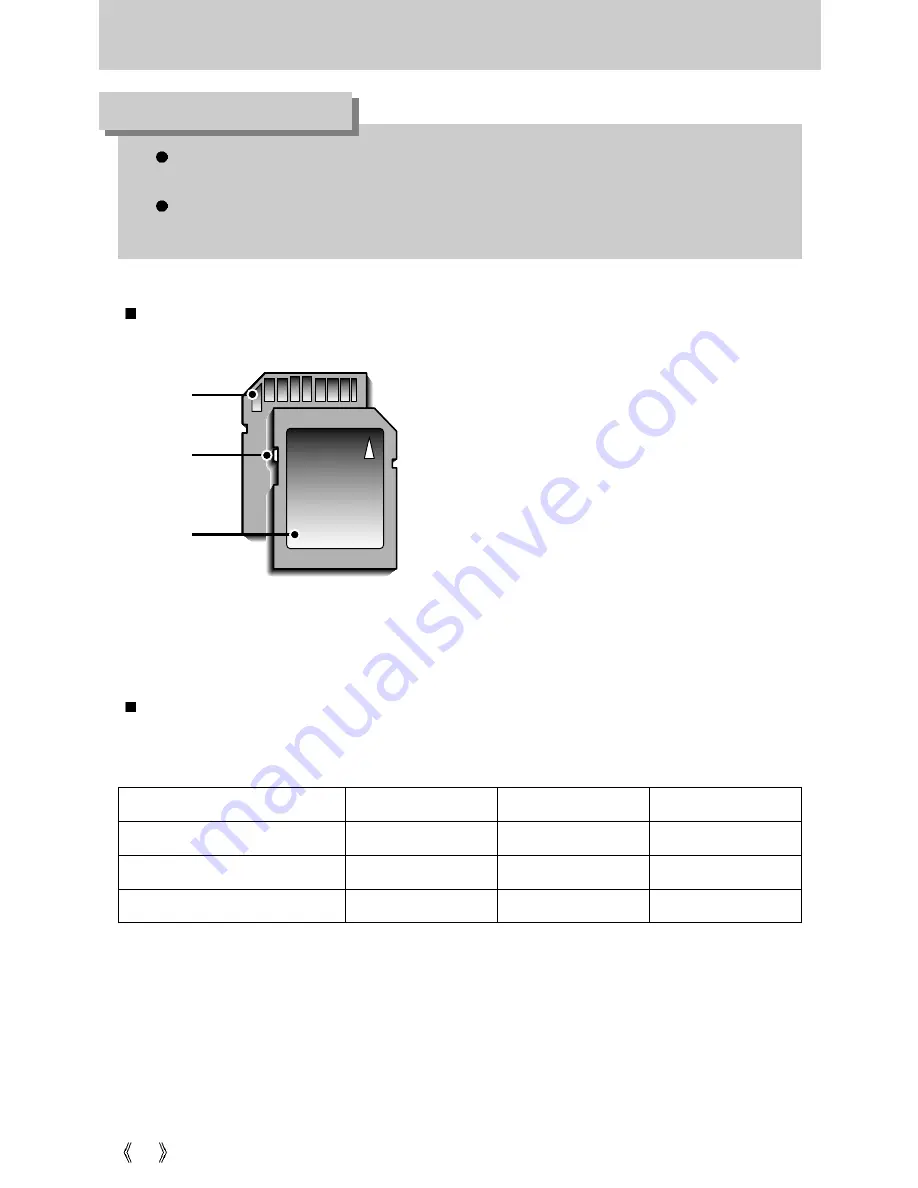
[ SD(Secure Digital) memory card ]

Write protect

switch

Label

Card

pins

Recorded image size

Super fine

Fine

Normal

1600X1200  (1600) 

8

15

22

1024X7684  (1024) 

17

31

45

6400X4804  (640)

37

65

90

You can use an SD memory card and MMC(Multi Media Card).

The SD memory card has a write protect
switch that prevents image files from being
deleted or formatted.
By sliding the switch to the bottom of the SD
memory card, the data will be protected. By
sliding the switch to the top of the SD memory
card, the data protection will be canceled.
Slide the switch to the top of the SD memory
card before taking a picture.

When using a 6MB internal memory, the specified shooting capacity will be as follows.
(These figures are intended as an indication of expected performance). These figures are
approximate as image capacities can be affected by variables such as subject matter.

Summary of Contents for DIGIMAX 202

Page 1: ...ung Camera This manual will guide you through using the Digimax 202 including capturing images downloading images and using the MGI PhotoSuite III SE software Please read this manual carefully before using your new camera ENGLISH ...

Page 2: ...p 80 Check the camera s power If the power is turned off press the camera button to power it on p 25 Take a picture Check the camera s power Check Removable Disk Open Window s EXPLORER and search for Removable Disk p 81 If you use a card reader to copy the images on the memory card to your PC the images could be damaged When transferring the images taken with the camera to your PC be sure to use t...

Page 3: ...rd 19 Removing the memory card 19 LCD monitor indicator 20 Starting the recording mode 21 Using the camera buttons to adjust the camera 25 POWER button 25 SHUTTER button 25 WIDE TELE button 25 Up Down button 27 FLASH LEFT button 27 Self timer Right button 28 button 30 Focus lever 31 MENU OK button 32 LCD button 32 Using the LCD monitor to adjust the camera settings 33 How to use the menu 34 Size 3...

Page 4: ...g date recording 60 Beep 60 Frequency 61 Quick view 62 Initialization RESET ALL 62 Latest 63 Setting up the MYCAM menu 63 Start up sound 64 Start up image 64 Important notes 65 Warning indicator 67 Before contacting a service center 68 Specifications 70 Software Notes 72 System Requirements 72 About the software 73 Setting up the application software 74 Starting PC Mode 80 Removing the USB Driver ...

Page 5: ...ft Windows and Windows logo are registered trademarks of Microsoft Corporation incorporated in the United States and or other countries All brand and product names appearing in this manual are registered trademarks of their respective companies This manual contains instructions on using this camera that will help you to use this camera safely and correctly This will help prevent danger and injury ...

Page 6: ...o close to your subject s eyes may cause eyesight damage When taking photographs never point the lens of the camera directly into very strong light This may result in permanent damage to your eyesight For safety reasons keep this product and accessories out of reach of children or animals to prevent accidents e g Swallowing batteries or small camera accessories If an accident should occur please c...

Page 7: ...ords or cables and cause a fire or electric shock An FCC warning This device has been tested in accordance with the limits of a class B digital device under item 15 of the FCC rules These limits are designed to provide protection against harmful interference in commercial installation This equipment generates absorbs and can emit radio frequency energy If it is not installed and used in accordance...

Page 8: ...ting images using a dedicated printer DPOF compatible printer or DPOF equipped photo lab refer to page 51 Downloading image files from camera to computer refer to page 81 Editing images on a PC refer to page 88 Taking a picture refer to page 21 ...

Page 9: ...rectly into any electronic document Taking a self portrait and using the image to personalize name cards You can even create your own unique gift wrap paper by using your digital images Creation of a digital photo album Recording a movie clip refer to page 22 ...

Page 10: ...this product marked contents are optional Digital Camera USB cable Pouch 2 AA Alkaline Batteries Camera strap Software CD Product warranty User manual AC adapter 3 3V Battery pack SBP 3603 SD memory card Battery charger AC adapter 5V Rechargeable battery Digimax Battery I Pack SBP 1103 KIT ...

Page 11: ...inder The picture will be taken in the composition of the picture as it appears on the LCD monitor Shutter button Self timer lamp Viewfinder DCinput connectionpoint USB connection terminal Focus lever Lens Flash Power button LCD monitor Viewfinder Mode dial Camera status lamp WIDE THUMBNAIL button TELE Digital zoom button 5 function button Strap eyelet Tripod socket LCD button Play mode button DEL...

Page 12: ...ry card slot Battery chamber Memory card cover Battery chamber cover FLASH LEFT button MENU OK button Play Pause DOWN button SELF TIMER RIGHT button UP button MySET mode Two types of focus modes allow users to shoot still images from 0 19 m to infinity Their focus ranges are as follows Macro mode 0 19 0 21m Normal mode 1 0m infinity This mode allows users to save frequently used shooting settings ...

Page 13: ...can be recorded for as long as the available recording time of the memory capacity allows Image size 320X240 Movie clip file type avi Movie clip mode Converts the image to black and white B W mode Captured images will be stored in a sepia tone a gradient of yellowish brown colours SEPIA mode Icon Mode dial Camera working mode Icon Mode dial Camera working mode Still image mode MySET mode Photo Fra...

Page 14: ...eep twice and short beep twice Normal beep a short beep When an error occurs Rotating the mode dial pressing the camera buttons Power beep When the camera power is turned on off Self timer beep Beeps simultaneously with the Self timer lamp blinking To hear the beep sound you have to set the beep sound to on in the setup mode menu There are two ways in which to provide the camera with power You can...

Page 15: ...lose power over time and are prone to leaking if kept inside the camera We recommend high capacity ALKALINE batteries as manganese batteries cannot deliver sufficient power Low temperatures below 0 can affect the performance of the batteries and you may experience reduced battery life Batteries will usually recover at normal temperatures Do not use old and new batteries at the same time During ext...

Page 16: ... direction of the arrow If the camera does not turn on after you have inserted batteries please check whether the batteries are inserted with the correct polarity and Using the batteries Inserting the AA type battery Inserting the CR V3 type battery The Digimax Battery Pack is a rechargeable external Li ion battery for use with most digital cameras These optional battery packs provide long lasting...

Page 17: ...ore in an environment where there are extremes in temperature Do not allow the memory card to become dirty or to come into contact with any liquid Should this happen clean the memory card with a soft cloth Please keep the memory card in its case when not in use During and after periods of extended use you may notice that the memory card is warm This is perfectly normal Do not use a memory card tha...

Page 18: ...5 90 You can use an SD memory card and MMC Multi Media Card The SD memory card has a write protect switch that prevents image files from being deleted or formatted By sliding the switch to the bottom of the SD memory card the data will be protected By sliding the switch to the top of the SD memory card the data protection will be canceled Slide the switch to the top of the SD memory card before ta...

Page 19: ... close push the card cover until you hear a click If the memory card does not slide in smoothly do not attempt to insert it by force Check the direction of insertion and then insert it correctly 2 Have the front of the memory card facing toward the front of the camera lens and the card pins toward the back of the camera LCD monitor and then push the memory card into the card slot until you hear a ...

Page 20: ...hake warning p 24 4 Flash p 28 5 Self timer p 29 6 Macro p 31 7 Metering p 36 37 8 Time 01 00 PM p 59 9 Date 2004 01 01 p 59 10 Exposure compensation 2 0 0 2 0 EV p 30 11 White Balance p 38 12 Card Inserted indicator p 19 13 Sharpness p 37 The LCD monitor displays information about the shooting functions and selections ...

Page 21: ...card If the memory card is inserted an image will be stored on the memory card 3 Close the memory card cover 4 Press the power button to turn on the camera If the date time that is displayed on the LCD monitor is incorrect reset the date time before taking a picture p 59 5 Select the STILL IMAGE mode by rotating the mode dial 6 Point the camera towards the subject and compose the image by using ei...

Page 22: ...ttings you changed in Step 6 Recording a Movie clip Steps from 1 4 are the same as those for recording a still image 5 Select the MOVIE CLIP mode by rotating the mode dial 6 The MOVIE CLIP mode icon and available recording time will display on the LCD monitor 7 Point the camera towards the subject and compose the image by using either the viewfinder or LCD monitor Press the shutter button and movi...

Page 23: ...Press the shutter button to capture an image Captured images will be stored in a sepia tone a gradient of yellowish brown colours B W mode Steps from 1 4 are the same as those for recording a still image 5 Rotate the Mode Dial to B W mode 6 Point the camera towards the subject and compose the image by using either the viewfinder or LCD monitor 7 Press the shutter button to capture an image The ima...

Page 24: ...ure an image As there can be some differences between what is seen through the Viewfinder and the resulting image when taken at a range closer than 1 5m it is recommended that you use the LCD monitor to compose these shots Using the LCD monitor extensively will drain the batteries We recommend turning off the LCD monitor and using the optical viewfinder as often as possible in order to extend batt...

Page 25: ... the camera s power on off If there is no operation during the specified time the camera s power will be turned off automatically to save battery life Used for taking an image in the RECORDING mode In MOVIE CLIP mode Pressing the shutter button down fully starts the process for recording a movie clip Press the shutter button once and the movie clip is recorded for as long as the available recordin...

Page 26: ... bar WIDE zoom Digital zoom 2 0X Pressingthe TELEbutton WIDE Zoom Digital zoom WIDE Pressing the zoom button W will reduce the digital zooming in steps Releasing zoom button W stops digital zooming Digital zoom 2 0X WIDE zoom Pressing the WIDE button To use the digital zoom the LCD monitor has to be turned on Images taken using the digital zoom may take a little longer for the camera to process Al...

Page 27: ...e the mode dial to select the STILL IMAGE mode 2 Press the Flash button until the desired flash mode indicator displays on the LCD monitor 3 A flash mode indicator will be displayed on the LCD monitor Use the correct flash to suit the environment MODE ISO Flash range STILL IMAGE mode AUTO 1 0 2 5m FLASH LEFT button Using the flash frequently will reduce the life of the batteries Under normal opera...

Page 28: ...shwilloperate automatically Autoflash Auto Red eye reduction Slowsynchro Fill in flash Flashoff Ifasubjectorbackgroundisdark thecameraflashwillwork automaticallyandwillreducethered eyeeffectbyusingthered eye reduction function Theflashwilloperateinconjunctionwithaslowshutterspeedinorderto obtainthecorrectexposure Werecommendusingatripodforthisfunction Whenyoutakeanimageinaconditionwithpoorlight th...

Page 29: ...1 Rotate the Mode Dial to select the desired recording mode 2 Press the SELF TIMER button until the desired mode indicator displays on the LCD monitor A 10 second 2 second or Double self timer icon appears on the LCD monitor In Movie Clip mode only the 10 second self timer will work 10SEC self timer Pressing the shutter button will allow an interval of 10 seconds before the image is taken 2SEC sel...

Page 30: ...n you press the button the exposure compensation menu bar and the exposure compensation icon will appear as shown 2 Use the LEFT and RIGHT buttons to set the desired exposure compensation factor Ev 3 Press the button again The value you set will be saved and the Exposure Compensation setup mode will close If you change the exposure value the exposure indicator will be displayed on the bottom of th...

Page 31: ...ect this focus mode Macro focus mode The focus range is 0 19m 0 21m A Macro icon will display on the LCD monitor when you select this focus mode Before taking an image you have to check that the Focus lever is in the desired position As there can be some differences between what is seen through the Viewfinder and the resulting image when taken at a range closer than 1 5m it is recommended that you...

Page 32: ...D monitor Press the button again to return to the previous state LCD button Image full information Image basic information LCD off You can check the recording status in the LCD monitor Each time you press the LCD button in a recording mode the LCD monitor display changes as follows Pressing the LCD button Pressing the LCD button Pressing the LCD button Menu on Menu off Pressing the MENU button SIZ...

Page 33: ...er button is being operated While image data is being processed when the camera status lamp next to the viewfinder illuminates When there is no battery capacity When the menu is showing on the LCD monitor it is not possible to operate the shutter button i e capture an image To capture an image simply cancel the menu display by pressing the MENU button INFORMATION Menu tab Main menu Sub menu Camera...

Page 34: ...Use the LEFT and RIGHT buttons to navigate through the menus PresstheLEFTor RIGHTbutton PresstheLEFTor RIGHTbutton PresstheUPor DOWNbutton PresstheUPor DOWNbutton SIZE 1600X1200 1024X768 640X480 1600 1024 640 QUALITY S FINE FINE NORMAL METERING MULTI SPOT SIZE 1600X1200 1024X768 640X480 1600 1024 640 SIZE 1600X1200 1024X768 640X480 1600 1024 640 SIZE 1600X1200 1024X768 640X480 1600 1024 640 Menu t...

Page 35: ...tion images Quality You can select the compression ratio appropriate for your application of the captured images The higher the compression ratio the lower the picture quality This menu is not available in the MOVIE CLIP mode Mode Icon Sub menu S FINE FINE NORMAL File Format jpeg jpeg jpeg STILL IMAGE mode STILL IMAGE mode SIZE 1600X1200 1024X768 640X480 1600 1024 640 STILL IMAGE mode QUALITY S FI...

Page 36: ...r your needs This file format complies with the DCF Design rule for Camera File system JPEG Joint Photographic Experts Group JPEG is the image compression standard developed by the Joint Photographic Experts Group This type of compression is most commonly used for compressing photos and graphics because it can compress the files efficiently without damaging the data INFORMATION Metering MULTI Expo...

Page 37: ...memory This menu is available in every recording mode Spot metering zone Sub menu Icon Description The edges of the image are softened This effect is suitable for editing images on your PC The edges of the image are sharp This is suitable for printing The edges of the image are emphasized The edges will appear sharp but noise may occur in the recorded image VIVID NORMAL SOFT SPOT The indicated are...

Page 38: ...ng to the shooting condition Different lighting conditions may cause a colour cast on your images Using the Custom White Balance The White Balance settings may vary slightly depending on the shooting environment You can select the most appropriate white balance setting for a given shooting environment by setting up the custom white balance 1 Select the CUSTOM menu of the White Balance 2 Place a sh...

Page 39: ...you reset the camera pictures will be taken using the photo frame number 1 By using the camera s digital processor it is possible to add special effects to your images You can select from MOVIE CLIP PHOTO FRAME and MySET modes B W Converts the image to black and white NORMAL No effect is added to the image SEPIA Captured images will be stored in a sepia tone a gradient of yellowish brown colours P...

Page 40: ...ing time FLASH NONE Whether or not the flash is used If you press the LCD button you can check the following recording information SIZE 1024X768 DATE 2004 01 01 TIME 17 40 21 FLASH NONE No Description Icon Page 1 Battery p 16 2 Play mode p 41 3 File Type 4 Protect indicator p 48 5 DPOF indicator p 51 6 Card Inserted indicator p 19 7 Stored image number 100 0009 ...

Page 41: ...pressing the play mode button 2 The last image stored on the memory is displayed on the LCD monitor 3 Select an image that you want to play back by pressing the LEFT RIGHT button Press and hold the LEFT or RIGHT button to play back the images quickly If the memory card is inserted in the camera all the camera functions apply only to the memory card If the memory card is not inserted in the camera ...

Page 42: ...pause a movie clip file while playing it back press the play pause button again Press the play pause button and the movie clip file will restart To stop playback of the movie clip press the menu button Using the camera buttons to adjust the camera You can view multiple pictures or enlarge a selected picture Thumbnail display 1 While an image is displayed full screen press the thumbnail button 2 Th...

Page 43: ... button to return to the image before it was selected If there is little memory space to save the trimmed image the image can t be trimmed Image enlargement 1 Select an image that you want to enlarge and press the enlargement button 2 Different parts of the image can be viewed by pressing the 5 function button 3 Pressing the thumbnail button will zoom back to the original full sized image You can ...

Page 44: ...is displayed on the LCD monitor pressing the UP button makes the menu cursor move up LEFT button While the menu is showing press the LEFT button to select the menu tab to the left of the cursor RIGHT button While the menu is showing press the RIGHT button to select the menu tab to the right of the cursor MENU button When you press the MENU button the play mode menu will be displayed on the LCD mon...

Page 45: ...ory card Deleting Images in Play Mode 1 Select an image that you want to delete by pressing the LEFT RIGHT button and press the DELETE button 2 A message will display as shown alongside on the LCD monitor 3 Press the OK button to delete the image Press the LEFT button to cancel the deletion Before deleting images from the camera you should protect or download images to your computer that you wish ...

Page 46: ...llows To capture an image after setting up the play menu press the play mode button Menu tab Main menu Sub menu Secondary menu Page OFF UNLOCK LOCK UNLOCK LOCK NO YES ONE PIC ALL PICS ONE PIC 0 30 PRINTS ALL PICS 0 30 PRINTS OFF ROTATE SET 1024X768 640X480 S IMAGE SLIDE PROTECT DEL ALL COPY TO CARD DPOF ROTATE ON RESIZE 1 2 10SEC REPEAT ON OFF p 47 p 48 p 49 p 50 p 51 p 52 p 53 ONE PIC ALL PICS Me...

Page 47: ...ge is completed the slide show will continue to repeat itself OFF If a cycle is completed the slide show will stop automatically 6 Press the OK button and the slide show will start To pause the slide show press the play pause button To start the slide show again press the play pause button again Press the menu button again and the slide show will stop The loading time depends on the image size and...

Page 48: ...K Cancels the protect function LOCK Sets up the protect function If you select the ONE PIC sub menu at step 3 you can protect or unprotect another image by pressing the LEFT RIGHT button If you protect an image the protect icon will be displayed on the LCD monitor An unprotected image has no indicator An image in LOCK mode will be protected from DELETE or DELETE ALL functions but will NOT be prote...

Page 49: ... press the OK button Selecting NO The display returns to the initial menu Selecting YES When you press the OK button a PLEASE WAIT message will display while all the unprotected images are deleted Remember that this will permanently delete unprotected images Important shots should be stored on a computer before deletion takes place The startup image is stored in the camera s system i e not on the ...

Page 50: ...PY TO CARD if the amount of free space on the memory card is less than the total size of the images you selected from the internal memory 6MB only as many images as space allows will be copied After the images have been copied if there is insufficient memory space the CARD FULL message will be displayed when you rotate the Mode Dial to Movie Clip or Still Image Please be sure to delete any unneces...

Page 51: ...he next picture Press the SHUTTER button to switch to Play mode If ALL PICS is selected Use the UP and DOWN buttons to set the desired number of prints and then press the OK button The PLEASE WAIT message will be displayed and the Play mode screen will appear 4 Once the DPOF setting is finished the number of prints will be displayed at the left side of the LCD monitor The number of prints that can...

Page 52: ...e will appear Use the UP and DOWN buttons to select ROTATE and then press the OK button The image will continue to rotate 90 degrees When the image is in the desired orientation use the UP and DOWN buttons to select SET and then press the OK button 4 The rotated image will be saved with a new file name and the menu screen will disappear If you display the rotated image on the LCD monitor empty spa...

Page 53: ...iles can be resized AVI Files cannot be resized You cannot resize a JPEG image even if the image has a 4 3 frame aspect ratio 1600x1200 1024x768 or 640x480 unless the image is compressed in JPEG 4 2 2 format If the memory capacity is insufficient to store the resized image a CARD FULL message will display on the LCD monitor and the resized image will not be stored INFORMATION Image Resize Types RE...

Page 54: ...re default settings Menu tab Main menu Sub menu Secondary menu Page RESET SERIES ENGLISH KOREAN FRENCH GERMAN SPANISH ITALIAN S CHINESE T CHINESE NO YES YY MM DD MM DD YY DD MM YY OFF DATE DATE TIME FILE PWR OFF LANGUAGE FORMAT DATE TIME 16 43 D TYPE IMPRINT CANCEL 1 10MIN p 55 56 p 56 p 57 p 57 58 p 58 p 59 p 59 p 60 2004 01 01 ...

Page 55: ...GHT button 4 Select a desired sub menu by pressing the UP DOWN button and press the OK button RESET After using the reset function the next file name will be set from 0001 even after formatting deleting all or inserting a new memory card SERIES Under this system the file name will directly follow the last stored file name regardless of any actions such as file deletion or formatting 5 Press the me...

Page 56: ...he automatic power off function will not operate if the camera is in PC mode slide show playing back a movie clip INFORMATION Auto power off Setting Power Off 1 Press the MENU button 2 Press the LEFT RIGHT button and select the SETUP menu tab 3 Select the PWR OFF menu by pressing the UP DOWN button and press the RIGHT button 4 Select a desired sub menu by pressing the UP DOWN button and press the ...

Page 57: ...d If Yes is selected A PLEASE WAIT message appears and the memory card will be formatted If you ran FORMAT in Play mode a NO IMAGE message will appear There is a choice of languages that can be displayed on the LCD monitor Even if the batteries or AC adapter are removed and inserted again the language setting will be preserved Formatting a memory card This is used for formatting the memory card If...

Page 58: ...ovable Disk in the Windows Explorer Setting up the Date type You can set up the date type Selecting Date Format 1 Press the MENU button 2 Press the LEFT RIGHT button and select the SETUP menu tab 3 Use the UP and DOWN buttons to select D TYPE and then press the RIGHT button 4 Use the UP and DOWN buttons to select the desired date format and then press the OK button The following date formats are a...

Page 59: ...ress the menu button twice and the menu will disappear Time Setup You can change the date that will be displayed on the captured images Setting the Date 1 Press the MENU button 2 Press the LEFT RIGHT button and select the SETUP menu tab 3 Select the DATE menu by pressing the UP DOWN button and press the RIGHT button 4 Use the UP DOWN LEFT and RIGHT buttons to select the desired submenu value and t...

Page 60: ...e MENU button 2 Press the LEFT RIGHT button and select the SETUP menu tab 3 Select the IMPRINT menu by pressing the UP DOWN button and press the RIGHT button 4 Use the UP and DOWN buttons to select the desired date imprint type and then press the OK button OFF The DATE TIME will not be imprinted on the image file DATE Only the DATE will be imprinted on the image file DATE TIME The DATE TIME will b...

Page 61: ...lect the SETUP menu tab 3 Select the FREQUENCY menu by pressing the UP DOWN button and press the RIGHT button 4 Select a desired sub menu by pressing the UP DOWN button and press the OK button FREQUENCY sub menu 50Hz 60Hz 5 Press the menu button twice and the menu will disappear 60Hz U S A Canada Japan South Korea Taiwan Mexico 50Hz Australia Austria Belgium China Denmark Finland Germany U K Holla...

Page 62: ...ime 5 Press the menu button twice and the menu will disappear All camera menu and function settings will be restored to their default values However values for DATE TIME LANGUAGE and the FREQUENCY will not be changed Initializing the Camera 1 Press the MENU button 2 Press the LEFT RIGHT button and select the SETUP menu tab 3 Select the RESET menu by pressing the UP DOWN button and press the RIGHT ...

Page 63: ...ected The changed camera functions will not be saved If YES is selected The changed camera functions will be saved 5 Press the menu button twice and the menu will disappear The menus to which the changed values are saved regardless of the Latest function are as follows SIZE QUALITY PHOTO FRAME all SETUP menus and all MyCAM menus When the LATEST is YES the menus to which the changed values are alwa...

Page 64: ...age that is first displayed on the LCD monitor whenever the camera is turned on Setting a Startup Image 1 Press the MENU button 2 Press the LEFT RIGHT button and select the MYCAM menu tab 3 Select the S IMAGE menu by pressing the UP DOWN button and press the RIGHT button 4 Select a desired sub menu by pressing the UP DOWN button and press the OK button If OFF is selected The startup image will not...

Page 65: ... sand Doing so may result in failure or may permanently render the unit unusable Extremes in temperature may cause problems If the camera is transferred from a cold to a warm and humid environment condensation can form on the delicate electronic circuitry If this occurs turn the camera off and wait for at least 1 hour until all moisture is dispersed Moisture build up can also occur in the memory c...

Page 66: ... as benzol insecticide thinners etc This may damage the body shell of the camera and also affect its performance Rough handling can damage the LCD monitor Take care to avoid damage and keep the camera in its protective carry case at all times when not in use Do not attempt to disassemble or modify the camera Under certain conditions static electricity can cause the flash unit to fire This is not h...

Page 67: ...FULL LOW LIGHT CARD LOCKED NO IMAGE CARD ERROR MEMORY ERROR Use a tripod and take pictures in Flash Photography mode Slide the write protect switch to the top of the memory card p 18 Take images Insert a memory card that is holding some images Insert a new card or format the memory Format the memory with the memory card removed p 57 A battery indicator blinks There is low battery capacity Insert f...

Page 68: ...Camera does not take images when pressing the Shutter button Insert fresh batteries Press the power button to reactivate camera Remove and re insert the plug Keep the camera in warm conditions i e inside a coat or jacket and only remove it in order to take images Insert fresh batteries all of which should be of the same type After turning the camera off insert a new memory card or delete unnecessa...

Page 69: ...LCD Date imprint function is set to OFF Date is not displayed on the LCD monitor in the PLAY mode Switch the Date imprint function ON Incorrect file name Violation of DCF format The images don t play back Do not change the image file name Cable connection is incorrect The camera is off There are no batteries the batteries are exhausted or the AC adapter is not connected The operating system is not...

Page 70: ... Normal 1 4 1 4000 sec Control Program AE Exposure Compensation 2 0EV 0 5EV steps ISO AUTO Mode Auto Auto Red eye reduction Fill in flash Slow sync Flash off Flash Range Macro 0 2m Normal 1 0m 2 5m Recharging Time Approx 8sec Effect B W Normal Sepia Photo Frame 4 frames White balance Auto Daylight Cloudy Fluorescent Tungsten Sunset Custom Sharpness Soft Normal Vivid Size 320x240 Recording time mem...

Page 71: ...connector USB DC power input connector 3 3V Supplied AA type alkaline primary batteries Not Supplied Non rechargeable Battery AA type Ni Mn Ni Zn and Lithium CR V3 type Lithium batteries Rechargeable Battery AA type Ni Mh Ni Cd 1000mA or above CR V3 type Digimax Battery I Pack SBP 1103 Battery Pack Digimax Battery Pack SBP 3603 Included battery may vary depending on sales region Dimensions WxHxD 9...

Page 72: ...opriate use Using a Hand made PC or a PC and OS that has not been guaranteed by the manufacturer is not covered by the Samsung warranty Before reading this manual you should have a basic knowledge of computers and O S Operating Systems System Requirements For Windows For Macintosh Windows 98 98SE 2000 ME XP Mac OS 9 1 10 2 USB port USB port CD ROM drive CD ROM drive PC with processor better than M...

Page 73: ...h the Application CD But you can use the camera with Mac OS 9 1 10 2 Digimax Viewer 2 0 This is a program for viewing stored images You can see the stored images in the memory directly on a PC monitor You can also copy move or delete the images and enlarge downscale the image sizes with Digimax Viewer This software is only compatible with Windows MGI PhotoSuite III SE Image editing program You can...

Page 74: ...ncel at the step 2 the application program installation will be cancelled INFORMATION Close other programs before installing the application software Before installing the application software disconnect the USB connection INFORMATION 1 Click the Install menu in the Autorun frame The Digimax 202 camera driver is installed automatically 2 Installation is complete A window for which you can select a...

Page 75: ... the window will then move to the next step If you disagree click No and the installation program will be canceled 5 A destination selection window will open Click Next To copy the files to another folder click Browse R and choose a folder you want 6 A window will open asking you to choose a folder to which program icons will be added Click Next If you want to add the program icons to a different ...

Page 76: ...xt step If you disagree click No and the installation program will be canceled If you click Cancel in Step 7 the MGI PhotoSuite III SE installation will be canceled and the Restart Computer window will appear INFORMATION Click Click Click 10 The Setup Type window will appear Click Next Full the program will be installed with all the options Custom you can choose what you would like to install Clic...

Page 77: ...ter button If you click the Register button without connecting to the Internet an error message will be displayed on the screen Click OK to proceed to the next screen 14 MGI PhotoSuite III SE installation is complete Click the Finish button Click Click Click A Read Only File Dectected window may be displayed Click the No button Click Click The MGI III file will open Click on the Close button to cl...

Page 78: ...mage viewer program will open If the image viewer program opens the camera driver was setup successfully 19 If you can see Removable Disk under My computer the camera driver installation was successful Now you can transfer image files from the camera to PC via the USB cable 17 After restarting the computer connect the PC to the camera with the USB cable Click 16 To apply changes you must restart t...

Page 79: ...mera driver After installing the camera driver you have to restart your PC If you connect the camera to the PC before installing the camera driver the Found New Hardware Wizard will open In this case cancel the Found New Hardware Wizard and disconnect the camera Install the camera driver and connect the camera to the PC again p 73 Should the computer not find the camera driver after installation p...

Page 80: ...ower on 2 Turn the camera power on 3 Connect the PC and the camera via the USB cable Connect the small end of the USB cable to the USB port on the camera Connect the large end of the USB cable to the USB port on the computer Make sure the connectors are fully seated Disconnecting the camera and PC Refer to the following page WIN 98SE p 85 WIN 2000 ME XP p 85 86 The camera driver must be installed ...

Page 81: ...mages You can download the still images stored on the camera to your PC s hard disk and print them or use a photo editing software to edit them 1 Connect the camera to your PC with the USB cable 2 On your computer s desktop display select My computer and double click Removable Disk DCIM 100SSCAM The image files will then be displayed 5 Click a folder where you want to paste the file ...

Page 82: ... the camera to your PC You can view the pictures on the memory card if it is inserted into the camera If the memory card is not inserted the pictures stored in the internal memory will appear By using Digimax Viewer you can see the stored images in the memory directly on the PC monitor and you can copy or move the image files ...

Page 83: ... shown below 1 Trace Start Settings and click Control Panel Click Click 4 A window will open Click the YES button and the camera driver will be removed 2 Double click Add Remove programs 3 The Add Remove Programs Properties window will open Click Digimax 202 and click the Add Remove button ...

Page 84: ...the PC to view them Opening images directly from the removable disk may be subject to unexpected disconnection When uploading images from the PC to the camera ensure that the uploaded file names are not the same as those already stored on the memory When you upload a file that is not taken by this camera to Removable Disk the FILE ERROR message will be displayed on the LCD monitor in the PLAY mode...

Page 85: ...the camera and PC are transferring a file If the camera status lamp blinks you have to wait until the lamp illuminates 2 Double click the Unplug or Eject Hardware icon on the task bar 3 The Unplug or Eject Hardware window will open Select the USB Mass Storage Device and click the Stop button 4 The Stop a Hardware device window will open Select the SAMSUNG DIGIMAX 202 USB Device and click the OK bu...

Page 86: ...l be displayed on the desktop after connecting the camera to the MAC Using the USB Driver for MAC Setting up the USB Driver for MAC 1 Double click a new icon Untitled on the desktop and the folder in the memory will be displayed 2 Select an image file and copy or move it to MAC If you use Mac OS 10 0 or later you may experience an error occurring when you transfer files from the PC to the camera I...

Page 87: ...y upon recognizing the camera Refer to the Help menu in Digimax viewer 2 0 for further information INFORMATION 3 You can easily use the Digimax viewer program as it offers FILE menu and TOOL bar And you can use the pop up menu Click an image and press the right mouse button Digimax Viewer functions are listed below Basic function Copy Move Delete Rotate Rename changing file type Resize Property Ad...

Page 88: ...ite lll SE will then open An introduction to the Welcome screen Get Get images Prepare A number of photo editing activities can be performed within this module Compose Use your photos in a variety of fun creative and interesting ways Organize Organize your photos and other media files into albums Share Save your results to show to others Print Print hard copies of photos and projects ...

Page 89: ...ow Get Get images Prepare A number of photo editing activities can be performed within this module Compose Use your photos in a variety of fun and interesting ways Organize Organize your photos and other media files into albums Share Save your results to show to others Print Print hard copies of photos and projects Browse Browse the web site ...

Page 90: ...ose Removable Disk and click open for the open file window to be displayed To obtain images from the computer 1 To acquire images Click the large Get button on the Welcome screen or the Get button on the Navigation bar Click Computer from the list of options displayed on the activity panel 2 The Open file selector is displayed Now select the image file and click open 3 The Welcome screen will chan...

Page 91: ... Computer and Album Only 1 To acquire images click the large Get button on the Welcome screen or the Get button on the Navigation bar Click Album from the list of options displayed on the activity panel Acquiring images from an Album When you use the Digimax camera only Computer and Album from the list of options displayed are available You will be able to obtain images from the digital camera ...

Page 92: ... more information about creating an Album Prepare When the image is loaded the step changes to Prepare automatically Menu for PREPARE steps Rotate Crop You can rotate flip or crop images along with a host of other things Touchup Remove Red eye Remove Scratches etc are available in this menu Special Effects A number of special effects can be applied Stitching Join a series of photos together to cre...

Page 93: ...te items such as Gift Tags Greeting Cards Invitations Postcards and Sports Cards Calendars Use your photos to create a variety of calendars monthly quarterly seasonal yearly Collections Photos can also be used to create a variety of items for business purposes Fun stuff You can create magazine covers Backgrounds etc in this menu Business You can make business items such as business cards certifica...

Page 94: ... action below Open Open selected image Delete Delete selected image Properties view image information Choose an action to manage your album Add click Add to add an image to an Album Sort click Sort to Sort saved images Search click Search to Search saved images Reset click Reset to reset the setting Update click Update to update images Create Slide Show click Create Slide Show to create a Slide Sh...

Page 95: ...he Organize button on the Navigation bar 2 Click Album in Choose a photo album to view or edit 3 The Master Album window will be displayed then click New 4 Put a new Album name in the New Album window and click OK A new album will now be created 5 A Master Album window will open Click the OK button Click Click Click Click ...

Page 96: ...o the album 2 Click Computer in Add Photos menu Digital Camera Direct Scanner TWAIN Digital Camera TWAIN sources can t be used Add images to the album Click Click 3 A Add photo to Album window will open Select images that you want to add Click the Add button 4 Adding images is complete Click ...

Page 97: ...r sharing images Share Print Menu for the PRINT steps You can print images Print Printing images Print Multiples Print multiple copies of a photo or project or one copy of each of the photos included in an album according to a predefined template Choose a printer an orientation the print size and the number of copies You can then print the images For more information please refer to the Help file ...

Page 98: ...the camera driver correctly Turn off the camera remove the USB cable plug in the USB cable again and then turn on the camera Case 5 There is an unexpected error during file transfer Turn the camera power off and on again Transfer the file again Case 6 How do I know my computer supports a USB Interface Check the USB port in your computer or keyboard Check the OS version A USB Interface is available...

Page 99: ...era may malfunction when it is connected to the PC at the same time as another USB cable In this case disconnect the other USB cable and connect only one USB cable to the camera Case 9 When I open the Device Manager by clicking Start Settings Control Panel Performance and Maintenance System Hardware Device Manager there are Unknown Devices or Other Devices entries with a yellow question mark besid...

Page 100: ......

Reviews: