background image

Chapter One: Overview of Your Monitor

3

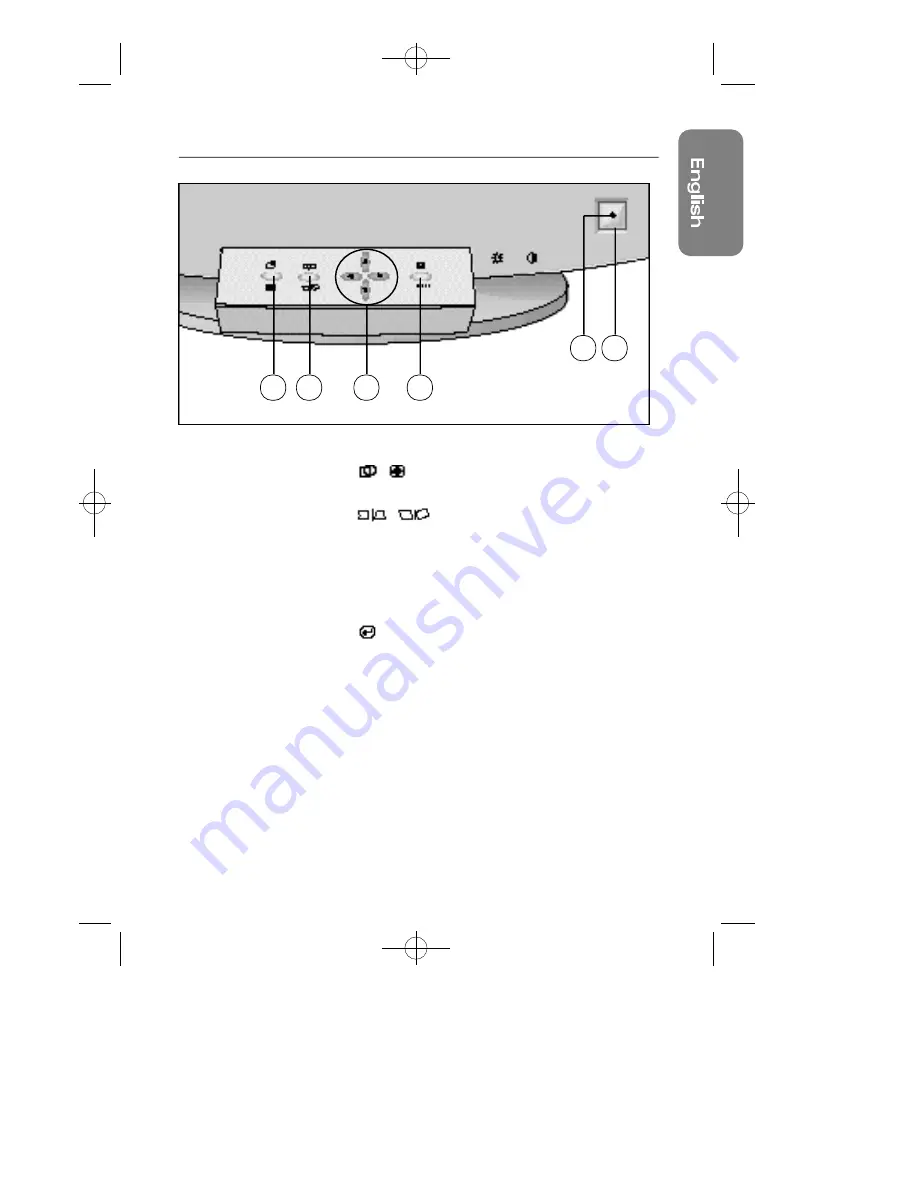
Front Panel

1

,

button

Use this button to adjust the position or size.

2

,             

button

Use this button to adjust the pincushion/trapezoid
or parallel/rotation.

3

,

,

$

buttons

Use these buttons to choose or adjust items in the
on-screen display.

4

MENU button

Use this button to activate the on-screen display, to
enter a selection in the on-screen display, or to exit
the on-screen displays.

5

Power indicator

This light glows green during normal operation, and
blinks amber once as your adjustments are saved.

6

Power button

Use this button to turn the monitor on and off.

1

2

3

4

5

6

CS9839-E  10/8/98 10:52 AM  Page 3

Summary of Contents for CSE 9839L

Page 1: ...CSE 9839L Color Monitor Owner s Instructions CS9839 E 10 8 98 10 51 AM Page i ...

Page 2: ...ous voltage within the product s enclosure that may be of sufficient magnitude to constitute a risk of electric shock The exclamation point within an equilateral triangle is intended to alert the user to the presence of important operating and servicing instructions in the literature accompanying the appliance Unpacking your Monitor Please make sure the following items are included with your compu...

Page 3: ... Direct Access Features 7 Position 7 Size 7 Pincushion Trapezoid 7 Parallel Rotation 8 Menu Features 8 Color temperature 8 Color Control 9 Degauss 9 Recall 9 Menu Position 10 Menu Duration 10 D SUB BNC 11 Pinbalance 11 Clear Moire 11 Language 12 Display Timing 12 Video Input Level 12 Sync Input Type 13 Exit 13 PowerSaver 14 Troubleshooting 15 Appendix 16 Specifications 16 Pin Assignments 17 Displa...

Page 4: ... If you put the moni tor in a bookcase or some other enclosed space be sure to pro vide adequate ventilation 7 Put your monitor in a location with low humidity and a minimum of dust Avoid places like damp basements or dusty hallways 8 Do not expose the monitor to rain or use it near water in kitchens next to swimming pools etc If the monitor accidentally gets wet unplug it and contact an autho riz...

Page 5: ...to choose or adjust items in the on screen display 4 MENU button Use this button to activate the on screen display to enter a selection in the on screen display or to exit the on screen displays 5 Power indicator This light glows green during normal operation and blinks amber once as your adjustments are saved 6 Power button Use this button to turn the monitor on and off 1 2 3 4 5 6 CS9839 E 10 8 ...

Page 6: ...our Monitor Rear Panel 1 Power port Connect the power cable here 2 Signal port Connect your signal cable here 3 BNC signal port Connect a BNC signal cable here BNC signal cable not included 3 1 2 CS9839 E 10 8 98 10 52 AM Page 4 ...

Page 7: ...cable with the adapter if necessary to the video port on the back of your computer This port might be directly attached to your computer or it might be part of a video board video card or graphics card 6 Connect the power cord for your monitor to the power port on the back of the monitor 7 Plug the power cords of your com puter and your monitor into a near by outlet 8 Turn on your computer and mon...

Page 8: ...you to change those set tings 1 Brightness This feature will adjust the overall brightness of the display image Rotate the rotary control to the right to increase the level of brightness or to the left to decrease the brightness 2 Contrast This feature will adjust the monitor s contrast Rotate the rotary control to the right to increase the contrast between dark colors and light colors or move it ...

Page 9: ...nitor s entire display Size Follow these instructions to change the size of the moni tor s entire display 1 With the menu off push the button twice The size display will appear 2 Push the or buttons to change the vertical size of the monitor s display push the or buttons to change the horizontal size of the monitor s display Pincushion Trapezoid Adjust the pincushion setting when the sides of the ...

Page 10: ...essed using your monitor s on screen menu system Follow the instructions below to adjust the features Once you are finished making adjustments to a feature push the MENU button to return to the Main Menu then push MENU again to turn off the menu Color Temperature Follow these steps to change the color temperature set ting Color temperature is a measure of the warmth of the image colors 1 With the ...

Page 11: ...once within a 30 minute period 1 With the menu off push the MENU button Push the button or button until the Degauss screen is displayed 2 Push the button The monitor will execute the degauss function then display the degaussing screen 3 After a few seconds the degauss main menu will appear Note The monitor may buzz momentarily the image colors may change and the image will jiggle for a few seconds...

Page 12: ...button Push the button or button until the Menu Position screen is displayed 2 Push the button The menu position adjustment screen will appear 3 Use the or buttons to place the menu in the position you prefer Menu Duration The menu will automatically turn off if no adjustments are made for a certain time period You can set the amount of time the menu will wait before it turns off 1 With the menu o...

Page 13: ...Adjust the pinbalance setting when the sides of the dis play are bowed towards the left or right 1 With the menu off push the MENU button Push the button or button until the Pinbalance screen is displayed 2 Push the button The pinbalance adjustment screen will appear 3 Use the button or button to adjust the pinbal ance setting Clear Moire A moire pattern can appear on your screen looking like a se...

Page 14: ...e settings that are available to your monitor This screen only displays this information you cannot select a new setting 1 With the menu off push the MENU button Push the button or button until the Display Timing screen is displayed 2 Push the button The Factory Timing screen will appear 3 Use the button or button to display the user and factory timing Video Input Level This feature will select th...

Page 15: ...to your computer or video card user s manual to determine the correct setting 1 With the menu off push the MENU button Push the button or button until the Sync Input Type screen is displayed 2 Push the button The sync input type selection screen will appear 3 Use the button or button to select Separate or Sync On Green Exit Once you are finished making adjustments to a feature use this menu to tur...

Page 16: ...ctive Active Inactive Inactive Video Active Blanked Blanked Blanked Power Green Amber Amber Green Amber Indicator Blinking Blinking Power 130W max 65W nominal Less than 15W Less than 5W Consumption 110W nominal NOTE This monitor automatically returns to normal oper ation when horizontal and vertical sync return This occurs when you move the computer s mouse or press a key on the keyboard This moni...

Page 17: ...gged in and turned on Image area is lightened but No image appears Check the signal cable connection between the computer and the monitor The image is too light or too dark Adjust the Brightness or Contrast settings The image is too large or too small Adjust the Size settings The colors are distorted with dark or shadowed areas Activate the Degauss feature Adjust the Color Control or Color Tempera...

Page 18: ...log 0 714 Vpp positive at 75 Ω Separate sync TTL Level positive or negative Composite sync TTL Level positive or negative Sync on Green Composite sync 0 286 Vpp negative Video 0 714 Vpp positive Maximum Pixel Clock 205 MHz Power Supply AC 100 240 Volt 10 60 Hz 50 Hz 3 Hz Power Consumption 130 Watt maximum Dimensions Weight Unit 468 x 499 x 483 2 mm 22 5 kg 18 4 x 19 6 x 19 in W x D x H 49 6 lbs Ca...

Page 19: ... GND Sense 0 5 DDC Return DDC Return DDC Return Green 6 GND R GND R GND R GND G 7 GND G GND G GND G Sense 1 8 GND B GND B GND B Reserved 9 Reserved Reserved Reserved Blue 10 GND Sync Self Raster GND Sync Self Raster GND Sync Self Raster Sense 2 11 GND GND GND GND 12 DDC Data DDC Data DDC Data V Sync 13 H Sync H V Sync Not Used GND B 14 V Sync Not Used Not Used GND 15 DDC Clock DDC Clock DDC Clock ...

Page 20: ... VGA3 640 x 480 VESA 640 x 480 VESA 800 x 600 VESA 1024 x 768 VESA 1024 x 768 VESA 1280 x 1024 VESA 1280 x 1024 VESA 1600 x 1200 MAC 1152 x 870 Horizontal Frequency kHz 31 469 31 469 43 269 53 674 68 677 81 400 79 976 91 146 93 750 68 681 Vertical Frequency Hz 70 087 59 940 85 008 85 061 84 997 100 000 75 025 85 024 75 000 75 062 Pixel Clock MHz 28 322 25 175 36 000 56 250 94 500 113 309 135 000 1...

Page 21: ...Logo This device complies with Part 15 of the FCC Rules Operation is subject to the following two conditions 1 this device may not causeharmful interference and 2 this device must accept any interference received includ ing interference that may cause undesired operation The party responsible for product compliance SAMSUNG ELECTRONICS CO LTD QA Lab of Samsung America 85 West Tasman Drive San Jose ...

Page 22: ...00 Esq Gavilan Col Guadalupe Del Moral Iztapalapa Mexico D F C P 09300 Tel 525 686 0800 Fax 525 686 5094 ESPAÑA Samsung Electrónics Comercial Ibérica S A Ciencies 55 65 Polígono Pedrosa 08908 Hospitalet de Llobregat Barcelona Tel 93 261 67 00 Fax 93 261 67 50 UK Samsung Electronics UK Ltd Samsung House 225 Hook Rise South Surbiton Surrey KT6 7LD Tel 0181 391 0168 Fax 0181 397 9949 European Service...

Reviews: