


Samsung Electronics
Service Manual
Disassembly and Reassembly
5-14
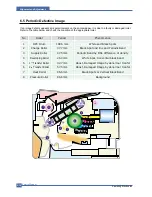
1. Follow step 1 through step 4 in Cover Unit
Disassembly
2. Remove the Main Board
3. Remove the SMPS
4. Unscrew 8 screws and then take out the Drive Ass’y.
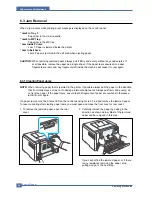
5.4.7 Drive Ass’y
1. Open Rear Cover.
2. Pull back the hook, which holds the Roller, like below
picture and remove the Transfer Roller
5.4.8 Transfer Roller
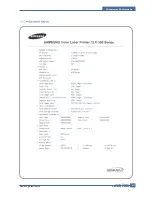
Summary of Contents for CLP-300
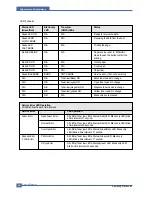
Page 14: ...Product Specifications Samsung Electronics Service Manual 2 3 2 2 2 Controller S W ...
Page 15: ...Samsung Electronics Service Manual Product Specifications 2 4 2 2 3 Paper Handling ...
Page 18: ...Product Specifications Samsung Electronics Service Manual 2 7 2 3 Model Comparison Table ...
Page 29: ...System Overview Samsung Electronics Service Manual 3 11 CHORUSm Internal Block Diagram ...
Page 45: ...Samsung Electronics Service Manual S W Structure and Descriptions 4 6 4 11 Initailize Flow ...
Page 46: ...S W Structure and Descriptions Samsung Electronics Service Manual 4 7 ...
Page 53: ...Disassembly and Reassembly Samsung Electronics Service Manual 5 7 ...
Page 54: ...Samsung Electronics Service Manual Disassembly and Reassembly 5 8 ...
Page 55: ...Disassembly and Reassembly Samsung Electronics Service Manual 5 9 ...
Page 70: ...Samsung Electronics Service Manual Alignment and Adjustmens 6 10 ...
Page 71: ...Samsung Electronics Alignment and Adjustmens Samsung Electronics Service Manual 6 11 ...
Page 83: ...Samsung Electronics Service Manual Troubleshooting 7 4 ...
Page 84: ...Troubleshooting Samsung Electronics Service Manual 7 5 ...
Page 85: ...Samsung Electronics Service Manual Troubleshooting 7 6 ...
Page 96: ...Troubleshooting Samsung Electronics Service Manual 7 17 7 8 5 Background 7 8 6 JAM 0 ...
Page 104: ...8 4 Front Cover 0 2 1 Samsung Electronics Service Manual 8 5 Exploded Views Parts List ...
Page 160: ...www s manuals com ...


