background image

Samsung Electronics

5-4 Ass'y Control In



CH140EAMC : DB93-04137A

5-1

4

Summary of Contents for CH070EAMC

Page 1: ...ng Outdoor Unit High Ceiling Operation Up to 3 6m height Built in Drain Pump Max 750mm Long Piping SERVICE Manual CH105EAMC UH105GAMC CH070EAMC UH070EAMC CH052EAMC CH094EAMC UH052EAMC UH094EAM1C Basic...

Page 2: ...Specifications of Product 2 3 2 5 Accessory and Option Specifications 2 4 3 Alignment and Adjustments 3 1 3 1 Indoor Display Error and Check Method 3 1 3 2 Setting Option Setup Method 3 4 14 Disassem...

Page 3: ...11 4 Wired Remote Controller Buttons and Display 11 10 12 Troubleshooting 12 1 12 1 Operation Specification 12 1 12 2 Troubleshooting 12 3 12 3 Sequence for trouble diagnosis 12 6 13 Block Diagram 13...

Page 4: ...an incorrect installation When installing the built in type air conditioner keep all electric cables such as the power cable and the connection cord in pipes ducts or cable channels to protect them f...

Page 5: ...SO standard for energy efficiency 1 3 During operation Do not repair the air conditioner at your discretion It is recommended to contact a service center directly Never spill any kind of liquid on the...

Page 6: ...echnology words the definition of technology terms Abbreviated technology words Definition of technology terms COMP Full name compressor One that compresses especially a machine used to compress gases...

Page 7: ...62YFAMT AN42YBFMT G5A240JUAEM Output Btu h 56 640 37 200 24 100 Protection External External Internal Refrigerant Type R410A R410A R410A Charge g 3 300 116 4oz 2 750 97 0oz 1 700 60oz Adding Charge g...

Page 8: ...Unit Outdoor Unit Net Weight Indoor Unit 29Kg 34Kg Outdoor Unit 121Kg 123Kg Outer Dimension WxHxD Indoor Unit 298 840 840mm 288 840 840mm Outdoor Unit 1128 932 375mm 1240 930 385mm Noise Indoor Unit 4...

Page 9: ...n in out DB62 03440H DB62 03439H 1 Insu Pipe Joint In 1 4 and 1 2 DB72 00143E DB72 00143G 1 Insu Pipe Joint Out 1 4 DB62 03439J 2 Cable tie DB65 10088C 8 Drain hose DB94 01065A 1 Pad Stopper DB69 0016...

Page 10: ...nstallation manual DB98 26328A 1 Accessories cont 2 5 2 Accessories Item Descriptions Code No Q TY Remark Wireless remote controller DB93 00251G 1 Battery DB47 90024A 2 Remote control holder DB61 0020...

Page 11: ...tapped screw 2 Owner s instructions DB98 05160A 1 Installation manual DB98 05186A 1 Wire kit DB39 00223A 1 Receiver display unit DB93 01066A 5 Standard type M4x16 tapped screw 7 Cable tie 2 Owner s i...

Page 12: ...e tie DB65 10088B 2 Cable clamp DB65 10074E 5 M4x16 tapped screw 6002 000474 7 Indoor unit power drawing cable DB39 00221A 1 Communication cable of the wired remote controller DB39 00933A 1 Wire joint...

Page 13: ...clamp DB65 10074E 5 M4x16 tapped screw 6002 000474 7 Owner s instructions DB98 12721A 1 Owner s instructions DB98 12722A 1 Function Controller Accessories Item Descriptions Code No Q TY Remark Functio...

Page 14: ...ode No Q TY Remark Transmitter 1 Transmitter power cable 1 Transmitter communication cable 1 Installation manual 1 7 day Scheduler Accessories Item Descriptions Code No Q TY Remark 7 day Scheduler 1 C...

Page 15: ...e sensor in the indoor unit Open Short X X X X Error of heat exchanger sensor in the indoor unit X X Error of the outdoor temperature sensor Error of the condensor temperature sensor Error of the disc...

Page 16: ...ge 1 No communication for 2 minutes between indoor units Communication error for more than 2 minutes 2 Indoor unit receiving the communication error from outdoor unit 3 Outdoor unit tracking 3 minutes...

Page 17: ...rost Error of the outdoor temperature sensor Open Short Error of condenser temperature sensor Open Short Error of discharge temperature sensor Open Short System down caused by communication error afte...

Page 18: ...repeatedly Push the button to set the display panel to Every time you push the button the display panel reads repeatedly Push the button to set the display panel to Every time you push the button the...

Page 19: ...ay part to and check the display part The display part shows Press the Mode Selection key to set the display part to and check the display part The display part shows Step 4 Pressing the ON OFF button...

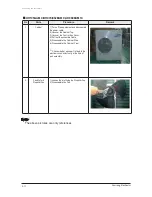
Page 20: ...Grille 1 Open the Front Grille at about 45 degrees and draw it forward 2 Disassemble the Safety Clip 3 Filter Disassembly 1 Draw the Dust Collecting Filter forward 2 Disassemble the Filter 4 Disassemb...

Page 21: ...Procedure Remark 4 Open the corner cover slowly to disas semble it There are three hooks 5 Pull the corner cover forward carefully by using two hands 6 Loosen four bolts of the front panel slowly 7 Lo...

Page 22: ...screws in the mark 2 Draw the both side hooks toward the arrow direction 9 Disassemble two cables between the indoor unit and panel Stepping motor connector Receiving display unit connector wire 10 Ho...

Page 23: ...Indoor and Outdoor Cables connected to the Terminal Board 3 Fan Motor 1 Disassemble the Fan Motor Wire Connector Thermistor Wire Connector Drain Pump Wire Connector and Float Switch Wire Connector 2...

Page 24: ...he water in In this point you can check the Drain Pump Impeller operates well or not 5 Loosen eight bolts in the mark At first there are 2 bolts per one corner and when reassembly there should be at l...

Page 25: ...s Procedure Remark 8 Take out the Washer 9 Lift the Fan to disassemble from the Motor 10 Loosen the screw and disassemble the Motor Connector to disassemble Motor 11 Loosen four screws in the mark Dis...

Page 26: ...ssemble the Hose from the Drain Pump 2 Loosen the 3 bolts to disassemble the Drain Pump from the main body 5 Heat Exchanger 1 Loosen 2 screws to disassemble the Cover Pipe beside the main body 2 Loose...

Page 27: ...Parts Procedure Remark 6 Front Panel PCB Part 1 Loosen two screws to disassemble the Cover PCB 2 Loosen the screw fixing the PCB to dis assemble it 3 Disassemble the PCB Wire from the PCB 4 Disassemb...

Page 28: ...o screws fixing the Cover Side There are 4 Cover Side 2 Draw two hooks then lift up the Cover Side 3 Disassemble the Stepping Motor Wire Connected 4 Disassemble the Stepping Motor from the Panel Front...

Page 29: ...he Control Box Cover 4 Pull out the assemble Cable 5 Disassemble the Cabinet Side 6 Disassemble the Cabinet Front Check whether each part is fixed to the electronic connector firmly at the time of par...

Page 30: ...l out the assemble Cable 5 Disassemble the Cabinet Side 6 Disassemble the Cabinet Front Check whether each part is fixed to the electronic connector firmly at the time of part assembly 2 Fan Motor Pro...

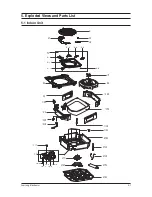
Page 31: ...Samsung Electronics 5 Exploded Views and Parts List 5 1 Indoor Unit 1 2 4 3 5 8 7 5 1 5 2 5 3 5 4 5 5 5 7 5 6 16 11 10 9 6 15 12 14 19 20 22 21 13 24 23 25 26 17 18 18 1 18 2 18 3 18 4 18 5 5 1...

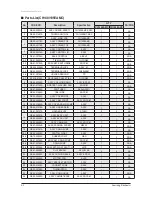
Page 32: ...1 1 SNA 8 DB67 00682A FAN TURBO ABS GF20 1 1 SA 9 DB64 01562A CABI SIDE SGCC M 2 2 SA 10 DB90 02692A ASSY COVER PIPE ASSY 1 1 SA 11 DB90 02690A ASSY CABI FRONT ASSY SGCC M 1 1 SA 12 DB90 01950B ASSY...

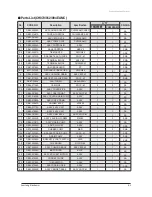
Page 33: ...M 2 2 SA 10 DB90 02692A ASSY COVER PIPE ASSY 1 1 SA 11 DB90 03189A ASSY CABI FRONT ASSY SGCC M 1 1 SA 12 DB90 01950B ASSY COVER DRAIN PUMP ASSY 1 1 SA 13 DB90 01389A ASSY HOSE DRAIN ASSY 1 1 SA 14 DB...

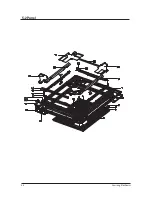
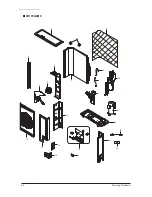
Page 34: ...Samsung Electronics 5 2 Panel 5 4...

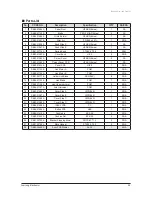
Page 35: ...11 DB63 01500A Cover PCB HIPS 1 SNA 12 DB66 01103A Link Motor A POM 1 SNA 13 DB66 01104A Link Motor B POM 1 SNA 14 DB61 02711A Holder Link Blade ABS BLK 8 SNA 15 DB66 01105A Link Blade POM 7 SNA 16 DB...

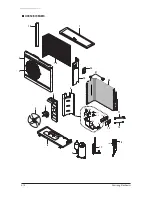
Page 36: ...Samsung Electronics 5 3 Outdoor Unit 16 14 9 11 25 18 13 15 19 4 24 17 23 20 2 3 5 6 22 21 12 1 7 8 20 6 20 5 20 1 20 4 20 3 20 2 10 UH140GAMC 5 6...

Page 37: ...SSEC 1 SNA 15 DB99 00795A ASS Y VALVE EXPANSION UH140GAMC SSEC 1 SNA 16 DB62 04288A INSU SOUND COMP UH140GAMC PVC FELT T11 5 SSEC 1 SNA 17 DB95 00564E ASS Y HEATER COMP UH140GZMC CHINA 1 SA 18 DB32 00...

Page 38: ...Operating Instructions and Installation Samsung Electronics 9 8 7 6 1 22 23 15 11 3 10 5 4 12 13 14 16 20 21 2 18 17 19 24 UH105GAMC Exploded Views and Parts List 5 8...

Page 39: ...EC 1 SA 11 DB90 01528A ASSY CABI FRONT RH ASS Y UH105GZMC 1 SNA 12 DB90 01526A ASSY PARTITION ASS Y UH105GZMC 1 SA 13 DB97 02613A ASSY BRACKET VAVLE ASSY SGCC M T1 6 SSEC 1 SA 14 DB61 01910A BRACKET W...

Page 40: ...Samsung Electronics UH052 070EAMC 17 16 19 8 14 15 18 1 6 20 21 3 2 12 11 13 10 5 7 10 2 10 10 1 10 3 10 8 10 7 10 6 10 4 5 9 4 16 1 Exploded Views and Parts List 5 10...

Page 41: ...0 6 2301 001379 C FILM LEAD OTHER 4000nF 10 5 450V BK 1 SNA 2301 001378 C FILM LEAD OTHER 4000nF 10 5 450V B 1 SNA 10 7 2501 001240 C OIL 50uF 450V BK 53x125mm 1 SNA 2501 001238 C OIL 50uF 450V BK 53x...

Page 42: ...16 2 2 2 1 2 4 18 20 26 2 8 14 15 6 25 24 22 23 3 21 12 11 13 10 5 7 17 10 2 10 10 1 10 3 10 8 10 7 10 6 10 4 18 1 5 9 4 17 1 2 3 UH094EAM1C Exploded Views and Parts List 19 1 5 12 Samsung Electronics...

Page 43: ...1 001367 C FILM LEAD OTHER 6000nF 10 5 450V BK 58x25x40mm 1 SA 10 7 2501 001236 C OIL 30uF 450V BK 53x85mm 20 6 2 SA 10 8 DB61 02319A CLIP CAPACITOR UH094EAMC SSEC 1 SA 11 DB32 00102A THERMISTOR OUT 2...

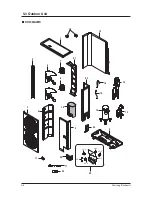
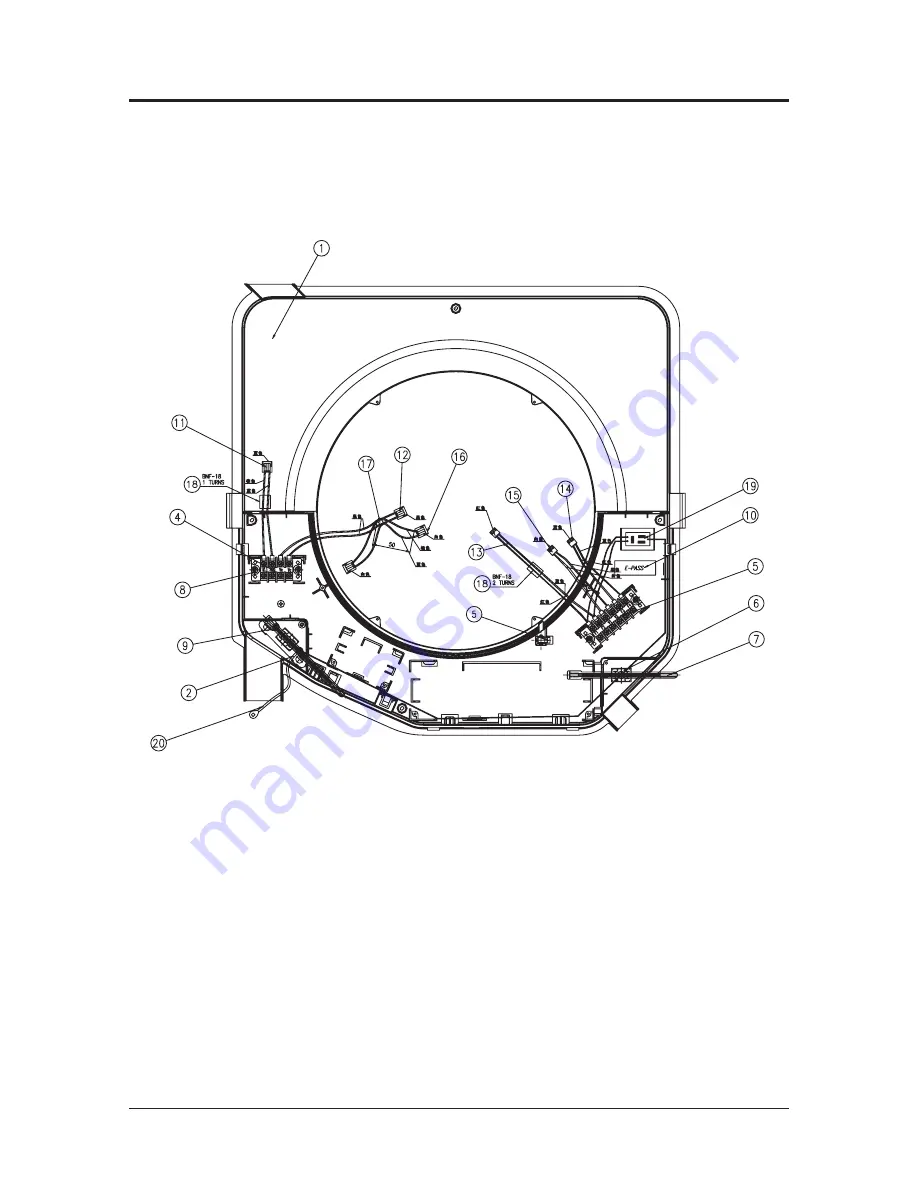
Page 44: ...Samsung Electronics 5 4 Ass y Control In CH140EAMC DB93 04137A 5 14...

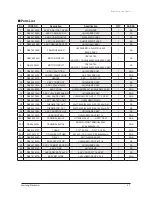
Page 45: ...A 7 SNA 9 6009 001001 SCREW SPECIAL TH M4 L8 ZPC WHT SWRCH18A 3 SNA 10 DB68 02809A LABEL BAR CODE W170 L115 FOR PACKING CASE 1 SNA 11 DB39 01249A CONNECT WIRE UL1007 AWG 18 3P 280 BRN 1 SNA 12 DB39 01...

Page 46: ...Samsung Electronics CH105EAMC DB93 04376A Exploded Views and Parts List 5 16...

Page 47: ...W SPECIAL TH M4 L8 ZPC WHT SWRCH18A 3 SNA 10 DB68 02809A LABEL BAR CODE W170 L115 FOR PACKING CASE 1 SNA 11 DB39 01249A CONNECT WIRE UL1007 AWG 18 3P 280 BRN 1 SNA 12 DB39 01250A CONNECT WIRE UL1007 A...

Page 48: ...Samsung Electronics CH052 070 094EAMC DB93 05254A Exploded Views and Parts List 5 18...

Page 49: ...NA 9 6009 001001 SCREW SPECIAL TH M4 L8 ZPC WHT SWRCH18A 3 SNA 10 DB68 02809A LABEL BAR CODE W170 L115 FOR PACKING CASE 1 SNA 11 DB39 01249A CONNECT WIRE UL1007 AWG 18 3P 280 BRN 1 SNA 12 DB39 01250A...

Page 50: ...Samsung Electronics 5 5Ass y Control Out UH140GAMC DB93 04138A Exploded Views and Parts List 5 20...

Page 51: ...DB39 00987A CONNECT WIRE COMM UH140GCM UL1007 AW22 3P 1 SNA 17 DB39 01005A CONNECT WIRE COMP SIGNAL UH105 140 GZM 1 SA 18 DB39 01008B CONNECT WIRE COMP UH140GZM UL 1 SA 19 DB39 01006A CONNECT WIRE MAI...

Page 52: ...Operating Instructions and Installation Samsung Electronics UH105GAMC DB93 04375A Exploded Views and Parts List 5 22...

Page 53: ...UH105GZM UL1015 AWG 18 1 SNA 16 DB39 00987A CONNECT WIRE COMM UH140GCM UL1007 AW22 3P 1 SNA 17 DB39 01005A CONNECT WIRE COMP SIGNAL UH105 140 GZM 1 SA 18 DB39 01008B CONNECT WIRE COMP UH140GZM UL 1 SA...

Page 54: ...Samsung Electronics UH052 070EAMC DB93 04731B DB98 04731A Exploded Views and Parts List 5 24...

Page 55: ...OR WIRE COMP AWG14 1 1 SNA 12 DB39 01251A CONNECT WIRE AWG22 L460 1 1 SNA 13 DB39 00938A CONNECT WIRE POWER AWG18 L300 1 1 SNA 14 DB93 02538A ASSY CONNECTOR WIRE POWER AWG14 L250 1 1 SNA 15 DB39 01005...

Page 56: ...CHIP 2203 000444 1nF 10 50V X7R 2012 C901 1 SNA DIODE SWITCHING 0401 000133 LL4148 100V 200MA SOD 80C TP D900 927 28 SNA FUSE 3601 001308 250V 1 6A TIME LAG PLASTIC 8 4x7 6mm F702 1 SNA IC TR ARRAY 0...

Page 57: ...112D3M 12VDC 3A RY70 RY71 2 SNA TRANS SWITCHING DB26 00046A EI2218 TINY PJT 110 240V FREE ST11 1 SNA SWITCH DIP 3407 000121 DS 04 24V 300mA SLIDE STAN DARD SW05 07 3 SNA RESONATOR CERAMIC 2802 001179...

Page 58: ...07V 600W SMB CD312 CD334 2 SNA DIODE RECTIFIER 0402 001194 GUF20D D101 D102 2 SNA IC PWM CONTROLLER 1203 002710 TNY267P DIP 8P 9 65X6 35MM PLAS IC01 1 SNA IC POSI FIXED REG 1203 000274 KA7805 TO 220...

Page 59: ...401 000133 LL4148 100V 200MA SOD 80C TP D201 D901 D916 17 SNA DIODE RECTIFIER 0402 000137 1N4007 1000V 1A DO 41 TP D105 D108 4 SNA R CARBON 2001 000068 5 1Kohm 5 1 4W TP 2 4X6 4MM RJ02 1 SNA R CARBON...

Page 60: ...V BLK CN71 1 SNA CONNECTOR HEADER 3711 000260 YW396 05AV BLU CN72 1 SNA CONNECTOR HEADER 3711 000262 YW396 05AV WHT CN73 1 SNA CONNECTOR HEADER 3711 000263 YW396 05AV YEL CN76 1 SNA CONNECTOR HEADER 3...

Page 61: ...L 0504 001064 DTC114EKA NPN 200MW 10K 10K SOT 23 TP Q101 1 SNA DIODE SWITCHING 0401 000133 LL4148 100V 200MA SOD 80C TP D201 D901 D916 17 SNA DIODE RECTIFIER 0402 000137 1N4007 1000V 1A DO 41 TP D105...

Page 62: ...NNECTOR HEADER 3711 000203 YW396 03AV WHT CN77 1 SNA CONNECTOR HEADER 3711 003406 YW396 03AV YEL CN74 1 SNA CONNECTOR HEADER 3711 003405 YW396 03AV BLK CN71 1 SNA CONNECTOR HEADER 3711 000262 YW396 05...

Page 63: ...1 4W TP 3216 1 SNA J8 R CHIP 2007 000033 0ohm 5 1 4W TP 3216 1 SNA J9 R CHIP 2007 000033 0ohm 5 1 4W TP 3216 1 SNA R201 R CHIP 2007 000300 10Kohm 5 1 8W TP 2012 1 SNA R302 R CHIP 2007 000300 10Kohm 5...

Page 64: ...DER BOARD TO CABLE 3711 000744 BOX 1P 1R 8MM STRAIGHT NI WHT 1 SNA CN11 HEADER BOARD TO CABLE 3711 000880 BOX 3P 1R 2 5MM STRAIGHT SN RED 1 SNA CN41 HEADER BOARD TO CABLE 3711 000940 BOX 4P 1R 2 5mm S...

Page 65: ...W TP 3216 1 SNA J8 2007 000033 R CHIP 0ohm 5 1 4W TP 3216 1 SNA J9 2007 000033 R CHIP 0ohm 5 1 4W TP 3216 1 SNA R201 2007 000300 R CHIP 10Kohm 5 1 8W TP 2012 1 SNA R302 R303 2007 000300 R CHIP 10Kohm...

Page 66: ...RAIGHT SN WHT 1 SNA CN70 3711 000744 HEADER BOARD TO CABLE BOX 1P 1R 8MM STRAIGHT NI WHT 1 SNA CN11 3711 000880 HEADER BOARD TO CABLE BOX 3P 1R 2 5MM STRAIGHT SN RED 1 SNA CN41 3711 000940 HEADER BOAR...

Page 67: ...ODE BRIDGE 0402 001298 DF06S 600V 1A SMD 4 BD71 1 C AL 2401 001397 470uF 20 25V GP TP 10x12 5mm C105 1 C AL 2401 000173 1000uF 20 35V GP TP 13x25 5 C101 C103 2 SWITCH PUSH 3404 001220 TSTB 2 K1 K4 4 R...

Page 68: ...315 YW 396 07AV W HT CN75 1 CONNE CTOR HE ADE R 3711 001001 B5B XH A BLU BOX 5P 1R 2 5mm S TR AIGHT S N CN61 1 CONNE CTOR HE ADE R 3711 000744 YDW 236 01 W HT BOX 1P 1R 6MM S TR AIGHT NI CN70 1 FUS E...

Page 69: ...Samsung Electronics 7 Wiring Diagram 7 1 Indoor Unit This Document can not be used without Samsung s authorization CH140EAMC 7 1...

Page 70: ...Samsung Electronics 7 2 Wiring Diagram This Document can not be used without Samsung s authorization CH105EAMC...

Page 71: ...Samsung Electronics This Document can not be used without Samsung s authorization CH052 070 094EAMC Wiring Diagram 7 3...

Page 72: ...Samsung Electronics Wiring Diagram UH140GAMC 7 2 Outdoor Unit This Document can not be used without Samsung s authorization 7 4...

Page 73: ...Samsung Electronics UH105GAMC This Document can not be used without Samsung s authorization 7 5 Wiring Diagram...

Page 74: ...Samsung Electronics 7 6 This Document can not be used without Samsung s authorization UH052 070EAMC Wiring Diagram...

Page 75: ...Samsung Electronics UH094EAM1C This Document can not be used without Samsung s authorization 7 7 Wiring Diagram...

Page 76: ...Samsung Electronics 7 8 MEMO...

Page 77: ...Samsung Electronics 8 Schematic Diagram This Document can not be used without Samsung s authorization 8 1 8 1 Indoor Unit...

Page 78: ...Samsung Electronics 8 2 8 2 Outdoor Unit e s a h p 3 V 0 8 3 i n u m m o C n o i t a c t i n U r o o d n I y l p p u S r e w o P...

Page 79: ...s 9 1 PCB Circuit Descriptions 9 Circuit Descriptions POWER AC220V C110 Voltage between two ends DC5V C107 Voltage between two ends DC12V C104 Voltage between two ends DC15V C101 Voltage between two e...

Page 80: ...9 2 Samsung Electronics Circuit Descriptions OUTDOOR UNIT e s a h p 3 V 0 8 3 i n u m m o C n o i t a c t i n U r o o d n I y l p p u S r e w o P...

Page 81: ...Way valve Expansion valve Filter Filter 3 Way valve Indoor Unit Outdoor Unit 9 2 Refrigerating Cycle Diagram Amount of refilling per extension length of 1mm when extending the pipe length by more than...

Page 82: ...on check Micon download SUB PCB connector Wire Remote Controller Power EEV Indoor Outdoor Communication BLDC MOTOR Wired Remote Controller Communication Thermistor Discharge EVA out sensor Indoor Pipe...

Page 83: ...or SMW250 10 WHT Display SMW200 09 WHT operation check SMW250 04 RED Micon download SMW200 10 BLK SUB PCB connector SMW250 05 YEL Wire Remote Controller Power YW396 02V WHT BLDC MOTOR YW396 06AV WHT I...

Page 84: ...smitter Power 12V Discharge Temperature Sensor Outdoor Temperature Sensor Outdoor Pipe Temperature Sensor Low Pressure S W Communication Transformer Out GROUND Main Power In Outdoor Fan 1 Outdoor Fan...

Page 85: ...WHT 3 Phase Check YW396 05AV YEL Communication YW396 02V RED Transformer Out SMW250 03 RED GROUND YDW236 01 WHT Main Power In YW396 07AV WHT Outdoor Fan 1 YW396 05AV WHT Outdoor Fan 2 YW396 05AV BLU...

Page 86: ...rature Sensor SMW250 04 WHT 3 Phase Check YW396 05AV YEL Communication YW396 02V RED Transformer Out SMW250 03 RED GROUND YDW236 01 WHT Main Power In YW396 07AV WHT Outdoor Fan 1 YW396 05AV WHT Low Pr...

Page 87: ...or Pipe Temperature Sensor SMW250 04 WHT Communication YW396 02V RED Transformer Out SMW250 03 RED GROUND YDW236 01 WHT Main Power In YW396 07AV WHT Outdoor Fan 1 YW396 05AV WHT Compressor Output YW39...

Page 88: ...nsor SMW250 04 WHT Outdoor Pipe Temperature Sensor SMW250 04 WHT Communication YW396 02V RED Transformer Out SMW250 03 RED GROUND YDW236 01 WHT Main Power In YW396 07AV WHT Outdoor Fan 1 YW396 05AV WH...

Page 89: ...Samsung Electronics 10 8 MEMO...

Page 90: ...11 1 1 Indoor Unit Timer indicator Remote control sensor On Off button On Off indicator Fan indicator Removing frost indicator Filter Sign indicator Air inlet Air filter under the grille Air flow bla...

Page 91: ...1 2 11 1 2 Outdoor Unit Operating Instructions UH140GAMC Air Inlet Rear Connection Valve Air Outlet UH105GAMC UH094EAM1C Air Inlet Rear Connection Valve Air Outlet UH052 070EAMC Air Inlet Rear Connect...

Page 92: ...temperature press the buttons one or more times until the required temperature is displayed Possible temperatures are between 18 C and 30 C inclusive Cooling Your Room 1 If necessary press On Off but...

Page 93: ...ode press the button until is displayed at the top of the wireless remote controller 3 To adjust the temperature press the buttons one or more times until the required temperature is displayed Possibl...

Page 94: ...press the buttons one or more times until the required temperature is displayed Possible temperatures are between 18 C and 30 C inclusive Airing Room 1 If necessary press On Off button 2 To select th...

Page 95: ...he buttons one or more times until the required temperature is displayed Possible temperatures are between 18 C and 30 C inclusive Cooling Your Room 1 If necessary press ON OFF button 2 To select the...

Page 96: ...he HEAT mode press the button until is displayed at the top of the wireless remote controller 3 To adjust the temperature press the buttons one or more times until the required temperature is displaye...

Page 97: ...To adjust the temperature press the buttons one or more times until the required temperature is displayed Possible temperatures are between 18 C and 30 C inclusive Airing Your Room 1 If necessary pres...

Page 98: ...button On Off Timer Set Cancel button Fan speed adjustment button Temperature adjustment buttons Temperature setting Fan speed Air flow direction On Timer setting Off Timer setting Battery discharge...

Page 99: ...icator Temperature setting Fan speed Air flow direction Filter Sign indicator On Off button Fan speed adjustment button Swing button Except Duct type On Off indicator Operating mode Centralized contro...

Page 100: ...on right Right side mark is marked by when left side is If SW02 MAIN that set indoor unit address is controlled to indoor unit number marked on outdoor unit is marked by 12 1 2 Option set part for Ou...

Page 101: ...se the K1 only for heat pump models K1 Displayed on SEG 3 4 Adding refrigerant at heating mode Test operation at heating mode End K2 Displayed on SEG 3 4 Adding refrigerant at cooling mode Test operat...

Page 102: ...otection control Reverse phase error Protection control In removing frost Error of the outdoor temperature sensor Open Short Error of condenser temperature sensor Open Short Error of discharge tempera...

Page 103: ...n numbers and installed numbers after completion of tracking Communication error for more than 2 minutes Communication error between indoor units 1 Error of electronic expansion valve close 2 Error of...

Page 104: ...SHORT error of room sensor in indoor unit OPEN SHORT error of eva in sensor in indoor unit EEPROM option error Error of fan starting Open error of electronic expansion valve in outdoor unit Detected o...

Page 105: ...outdoor temp sensor Disconnection or leak of applied sensor Yes No Yes Check the out temp sensor is normal or not by use of out data display part Check the temp data is normal or not after pressing K4...

Page 106: ...data display part Check the temp data is normal or not after pressing K4 2 times At this time is occurred the difference between the out temp and data Reoperation after PCB replacement Does the out h...

Page 107: ...time Is largely deviate the resistance value from side table value Measure the resistance value between two terminals after separating the outdoor discharge temp sensor connector from PCB Temp C 130 1...

Page 108: ...then replace the indoor unit PCB after line check Check the display after pressing the reset key on outdoor PCB When tracking is there any indoor answer from display part At this time is the voltage b...

Page 109: ...CB and actual indoor unit installation numbers To measure the 2 lines of outdoor unit side by use of scope after removing the communication line connecting from outdoor unit to indoor unit Is equal in...

Page 110: ...minal after taking out the floating switch connector connected to indoor unit PCB Open status Is much the water of drain pan Does the drain pump operate Does the water level decrease Is the same error...

Page 111: ...y the resistance value in accordance with temperature 4 Is the resistance value of sensor connection pull_up correct 2 Troubleshooting procedure Isn t the Fan locked Is the color of Fan wire matched c...

Page 112: ...procedure Restart after power off Is the restart error occurred again Is the interphase resistance value of com pressor U V V W W U normal Is the connection cable for thecompressor and power terminal...

Page 113: ...procedure Restart after power off Is the lock error occurred again Is the interphase resistance value of com pressor U V V W W U normal Is the connection cable for the compres sor and power terminal...

Page 114: ...eck the voltage of No 15 and No 16 of the main PCB CN91 while operating the remote control When the voltage descends below 3V the assembly module PCB is normal and the main PCB is poor Then replace th...

Page 115: ...COM Room Temperature Pipe Temperature Sensor Control part Option Saving Part EEPROM Ventilator Control Indoor Fan BLDC Outdoor Fan Control TAP No of Indoor Setting S W MICOM 3 Phase Check part Room Te...

Page 116: ...pply Normal N H 115V 60Hz A 220V 60Hz B TB 208 230V 60Hz C 200 220V 50Hz D 220 240V 50Hz E TE 220V 60Hz 3 F TF 380 415V 50Hz 3 G TG 127V 50Hz H 220 240V 50 60Hz 1 M 380V 60Hz 3 H Inverter 1 V Inverter...

Page 117: ...Cooling Low Pressure 2 4 0 6 8 10 5 21 35 43 7 5m 50m Outdoor Air Temp C CH052 070EAMC UH052 070EAMC m c g k e r u s s e r P g Cooling Low Pressure 2 4 0 6 8 10 5 21 35 43 7 5m 50m Outdoor Air Temp C...

Page 118: ...floods the floor A Place the drain hose properly When it is not placed properly the drain water would flow back flooding the floor So straighten out the drain hose for the water to be drained well Q...

Page 119: ...rs generally when there are pet animals in the house Their smells stay at the same place But when the air conditioner is turned on the air gets circulated resulting in the circulation of the smells So...

Page 120: ...e with the outdoor unit in it outside the apartment Also it is illegal obstructing passers by with the outdoor unit installed outside Q What can be done to install the outdoor unit facing the road bec...

Page 121: ...l dust on air filter with a vacuum cleaner or a brush In case of serious dust accumulation put the air filter in warm detergent water and shake it vertically 4 Dry the air filter 5 When you have finis...

Page 122: ...torque wrench to tighten pipes or flare nuts Leak Test Put an inert gas like nitrogen in the outdoor unit pipe and put soap bubbles or other test liquids on the pipe surface for the leak test Drain Ho...

Page 123: ...e valve of the low pressure side of manifold gauge clockwise Remove the hose of the low pressure side of manifold gauge 7 Check for gas leakage At this time especially check for gas leakage from the 3...

Page 124: ...lve 2 way Valve Relocation of the air conditioner Refer to this procedure when the unit is relocated Carry out the pump down procedure refer to the details of pump down Remove the power cord Disconnec...

Page 125: ...Samsung Electronics 14 10 MEMO...

Page 126: ...nics Co Ltd July 2007 Printed in China Code No DB98 26327A 4 Area Web Site North America http service samsungportal com Latin America http latin samsungportal com CIS http cis samsungportal com Europe...

Reviews: