background image

33

EN

Cleaning and Care (Continued)

Assembling the door


1.

  Clean the glass and interior parts with warm  

soapy water.  

   

Do not use abrasive cleaners or pan  

scourers. Use a sponge with liquid  

detergent or warm soapy water.


2.

  Attach the two spring brackets at the top of  

glass #2 and place glass #2 into position. 

3.

  Attach glass #1, the door bracket and the  

supports to the door. 

4.

  Secure the two screws at both sides of the  

door.

Side Runners

To clean the interior of the oven, the both side runners can be removed.

Detaching the Side Runners

1.  Turn the screw at the back 2-3 times  

anti-clockwise only.

BF64CCST_SLI-00142H_EN.indd   33

2007-12-10   ソタネト 1:40:54

Summary of Contents for BF64CCB

Page 1: ...BF64CCST BF64CCBST BF64CCB BF64CCBB Owner s Manual Installation and Operating Instructions Built In Oven ...

Page 2: ......

Page 3: ...cessories 10 Safety shutoff 10 Cooling fan 10 Before You Begin 11 Setting the clock 11 Initial cleaning 12 Oven functions 13 Test dishes 19 Oven Use 20 Setting the Cooking Function mode 20 Setting the oven temperature 21 Switching the oven off 22 End time 22 Cook time 23 Delayed start 24 Kitchen timer 26 Oven lamp on off 27 Child safety function 27 Switching the beeper off 27 Cleaning and Care 28 ...

Page 4: ...ent of a fault or damage to the appliance do not attempt to operate it Repairs should be performed by a licensed technician only Improper repair may result in considerable danger to you and others If your oven needs repair contact a SAMSUNG Service Centre or your dealer If the supply cord is defective it must be replaced by a special cord or assembly available from the manufacturer or an authorise...

Page 5: ... the oven bottom with aluminium foil and do not place any baking trays or tins on it The aluminium foil blocks the heat which may result in damage to the enamel surfaces and cause poor cooking results Fruit juices will leave stains which can become indelible on the enamel surfaces of the oven When cooking very moist cakes use the deep pan Do not rest bakeware on the open oven door This appliance i...

Page 6: ...tion Safety instructions for the installer Installation must guarantee protection against exposure to electrically live parts The unit in which the appliance is fitted must satisfy the requirements of DIN 68930 in respect of stability Installing into a low cabinet Observe minimum clearance requirements Secure oven into place with screws on either side of the oven 1 560 572 595 21 595 545 2 min 550 ...

Page 7: ...the connection to meet safety requirements When power is connected the electronics of the oven are initialised this neutral izes the lighting for a few seconds The electric cable H05 RR F or H05 VV F Min 1 5m 1 5 2 5mm must be long enough for it to be connected to the built in oven standing on the floor in front of its unit Open the back cover of the oven at the bottom using a flat bladed screwdrive...

Page 8: ...Observe minimum clearance requirements The oven should be slid into place at the proper angle of alignment 1 560 572 595 21 595 545 2 min 550 min 590 max 600 min 560 50 3 4 Live Earth Neutral 5 Connecting the oven to the power supply H05VV F H05RR F Min 1 5m 1 5 2 5mm ...

Page 9: ...inly for the grill function Please refer to the cooking guides provided throughout this manual to determine appropriate shelf levels for your dishes Glass door Top heating elements Oven light Catalytic enameled cover casing Door handle Control panel Side Runner Level Level Level Level Level 5 4 3 2 1 ...

Page 10: ... Continued Oven controls 1 2 4 5 6 7 8 9 3 1 Cooking Function Select Knob 2 Window Display 3 Time Temp Control Knob 4 Lamp Button 5 Child Lock Button 6 Clock Button 7 Kitchen Timer Button 8 Cook Time Button 9 End Time Button ...

Page 11: ...ssories The following accessories are provided with your oven Front 1 Wire grill for dishes cake tins roast ing and grilling trays 2 Baking tray for cakes and biscuits Front 3 Deep pan for roasting or collecting meat juices or fat drippings ...

Page 12: ...ep pan Positioning the wire grill Insert the wire grill at any desired level Positioning the baking tray or deep pan Insert the baking tray and or the deep pan at any desired level Safety shutoff If a cooking time is not entered the oven will shut itself off after the lengths of time indicated below Shutoff times for various temperature settings Under 105 C 16 hours From 105 C to 240 C 8 hours Fro...

Page 13: ...and 12 00 will blink in the display when power is first supplied to the appliance Press the Clock Button The and 12 will blink 2 Turn the Time Temp Control Knob to set the hour of the day Example To set 1 30 3 Press the Clock Button The and 00 will blink 4 Turn the Time Temp Control Knob to set the minute of the time will blink 5 Press the Clock Button to finish setting the clock or wait for about 1...

Page 14: ... oven light comes on 2 Clean all oven trays accessories and side runners with warm water or washing up liquid and polish dry with a soft clean cloth 3 Wash the oven interior in the same way 4 Wipe the front of the appliance with a damp cloth Check that the clock is set correctly Remove accessories and operate the oven at the convec tion setting at 200 C for 1 hour before using There will be a dist...

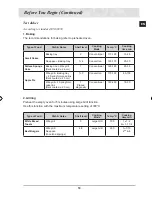
Page 15: ...Deep Pan 240 15 20 Fish filets 500 1000g 3 4 cut on each side DROP OIL 3 Baking Tray 200 13 20 Frozen cutlets 350 1000g minced meat with ham cheese or mushroom filing DROP OIL 3 Baking Tray 200 25 35 Frozen cutlets from minced carrot beetroot or potato 350 1000g DROP OIL 3 Baking Tray 200 20 30 Pork on bone cutlets 500 1000g DROP OIL ADD SALT PEPPER 3 2 Wire Grill Deep Pan 200 40 50 Baked potato cut...

Page 16: ...00g MARINATE 2 Baking Tray 180 230 80 120 Whole chicken 800 1300g BRUSH WITH OIL SPICES 2 1 Wire Grill Deep Pan 190 200 40 65 Meat or fish steaks 400 800g DROP OIL ADD SALT PEPPER 3 Wire Grill Deep Pan 180 200 15 35 Chicken Pieces 500 1000g BRUSH WITH OIL SPICES 4 3 Wire Grill Deep Pan 200 220 25 35 Roast Fish 500g 1000g use ovenproof dish BRUSH WITH OIL 2 Wire Grill 180 200 30 40 Roast Beef 800 12...

Page 17: ...5 10g nuts into cuts drop sugar water wrap in aluminium foil 3 Wire Grill 220 240 15 25 Baked apples 5 8pcs each 150 200g Take out the hearts add raisins and jam Use ovenproof dish 3 Wire Grill 200 220 15 25 Cutlets from minced meat 300 600g DROP OIL 3 Baking Tray 190 200 18 25 Minced Meat roll with filling Russian style 500g 1000g BRUSH WITH OIL 3 Baking Tray 180 200 50 65 Frozen Croquettes 500 10...

Page 18: ...Large Grill mode Food Item Shelf Level Accessory Temperature C Time min Sausages thick 5 10pcs 4 3 Wire Grill Deep Pan 220 5 8 turnover 5 8 Sausages thin 8 12pcs 4 3 Wire Grill Deep Pan 220 4 6 turnover 4 6 Toasts 5 10pcs 5 Wire Grill 240 1 2 turnover 1 2 Cheese Toasts 4 6 pcs 4 3 Wire Grill Baking Tray 200 4 8 Frozen Pancakes with filling Russian Style 200 500g 3 Baking Tray 200 20 30 Beef Steaks ...

Page 19: ...Accessory Temperature C Time min Frozen Oven Camembert 2 4 each 75g PUT IN COLD OVEN before preheat 3 Wire Grill 200 10 12 Frozen Baguettes with topping Tomato Mozzarella or Ham Cheese 3 2 Wire Grill Baking Tray 200 15 20 Frozen Fish fingers 300 700g PUT IN COLD OVEN before preheat DROP OIL 3 2 Wire Grill Baking Tray 200 15 25 Frozen Fish burger 300 600g PUT IN COLD OVEN DROP OIL 3 Baking Tray 180 ...

Page 20: ... zen 350 700g 3 Wire Grill 180 200 15 20 Puff pastry small pies with filling frozen 300 600g BRUSH EGG YOLK PUT IN COLD OVEN before preheat 3 Baking Tray 180 200 20 25 Meat balls in sauce 250 500g use ovenproof dish 3 Wire Grill 180 200 25 35 Puff pastry fans 500 1000g BRUSH EGG YOLK 3 Baking Tray 180 15 23 Cannelloni in sauce 250 500g use ovenproof dish 3 Wire Grill 180 22 30 Yeast dough pies with...

Page 21: ... Wire grill Baking tray 2 Springform cake tins Dark coated ø 20 cm 1 3 Convection 170 190 80 100 Wire grill 2 Springform cake tins Dark coated ø 20 cm 1 Placed diagonally Conventional 180 200 75 90 2 Grilling Preheat the empty oven for 5 minutes using Large Grill function Use this function with the maximum temperature setting of 300 C Type of Food Dish Notes Shelf level Cooking Mode Temp C Cooking...

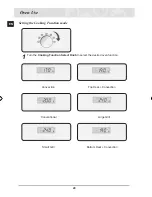
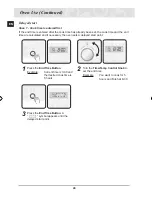
Page 22: ...ven Use Setting the Cooking Function mode 1 Turn the Cooking Function Select Knob to select the desired oven function Convection Top Heat Convection Conventional Large Grill Small Grill Bottom Heat Convection ...

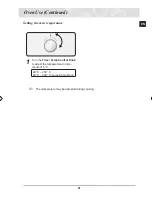
Page 23: ... Use Continued Setting the oven temperature 1 Turn the Time Temp Control Knob to adjust the temperature in incre ments of 5 C 40 C 250 C 40 C 300 C Large Small Grill The temperature may be adjusted during cooking ...

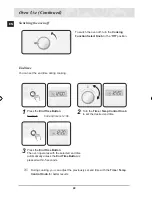
Page 24: ...king 1 Press the End Time Button Example Current time is 12 00 2 Turn the Time Temp Control Knob to set the desired end time 3 Press the End Time Button The oven operates with the selected end time automatically unless the End Time Button is pressed within 5 seconds During cooking you can adjust the previously set end time with the Time Temp Control Knob for better results ...

Page 25: ... 2 Turn the Time Temp Control Knob to set the desired cook time 3 Press the Cook Time Button The oven operates with the selected cook time unless the Cook Time But ton is pressed within 5 seconds During cooking you can adjust the previously set cook time with the Time Temp Control Knob for better results ...

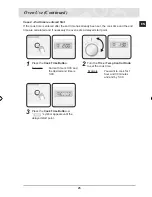
Page 26: ... the end time are calculated and if necessary the oven sets a delayed start point 1 Press the End Time Button Example Current time is 3 00 and the desired cook time is 5 hours 2 Turn the Time Temp Control Knob to set the end time Example You want to cook for 5 hours and finish at 8 30 3 Press the End Time Button A symbol appears until the delayed start point ...

Page 27: ... are calculated and if necessary the oven sets a delayed start point 1 Press the Cook Time Button Example Current time is 3 00 and the desired end time is 5 00 2 Turn the Time Temp Control Knob to set the cook time Example You want to cook for 1 hour and 30 minutes and end by 5 00 3 Press the Cook Time Button A symbol appears until the delayed start point ...

Page 28: ... flashes 2 Turn the Time Temp Control Knob to set the desired time Example 5 minutes 3 Press the Kitchen Timer Button to start the kitchen timer When the set time has elapsed an audible signal sounds Press and hold the Kitchen Timer Button for 2 seconds each to cancel the timer ...

Page 29: ...s L will appear in the display field 2 Turn Cook Function Select Knob to Off position Press the Child Lock Buttons hold for 3 seconds again to unlock If locked buttons and dials except unlock function button fail to operate Switching the beeper off 1 To turn the beeper off press the Clock and End Time Buttons at the same time and hold for 3 seconds 2 To turn the beeper back on press the Clock and E...

Page 30: ...uminium oven fronts Wipe the plate gently with a soft cloth or microfiber cloth and a mild window cleaning deter gent WARNING Make sure the oven is cool before cleaning Oven interior Do not hand clean the door seal Do not use coarse scouring pads or cleaning sponges To avoid damaging the enameled oven surfaces use commercially available oven clean ers To remove stubborn soil use a special oven clea...

Page 31: ...and render it ineffective If using oven sprays on the interior oven surfaces the catalytic cover casing must first be removed from the oven Cleaning with high temperatures Before cleaning the catalytic cover casing with high temperatures make sure that all interior oven surfaces have been cleaned as described above Otherwise the high temperatures can bake deposits onto the interior oven surfaces an...

Page 32: ...al is necessary for ex ample for cleaning follow these instructions The oven door is heavy Removing the door 1 Flip open the clips at both hinges 2 With both hands grasp the sides of the oven door at its middle 3 Rotate the door by approximately 70 until the hinges can be taken out completely from the hinge holes 70 2 1 ...

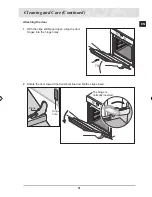
Page 33: ...ontinued Attaching the door 1 With the clips still flipped open align the door hinges into the hinge holes 2 Rotate the door toward the horizontal line and flip the clips closed 70 The hinge is normally inserted Hinge Hinge hole ...

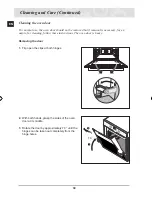
Page 34: ... or some other part from the door may result in injury Attention The glass may break if you use excessive force especially at the edges of the front sheet Disassembling the door 1 Remove the two screws on the left and right sides of the door 2 Remove the two supports and the door bracket and remove the two screws attaching the handle 3 Detach the inner sheet glass 1 from the door 4 Lift glass 2 an...

Page 35: ...nt or warm soapy water 2 Attach the two spring brackets at the top of glass 2 and place glass 2 into position 3 Attach glass 1 the door bracket and the supports to the door 4 Secure the two screws at both sides of the door Side Runners To clean the interior of the oven the both side runners can be removed Detaching the Side Runners 1 Turn the screw at the back 2 3 times anti clockwise only ...

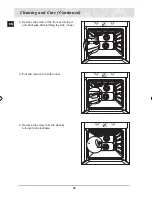
Page 36: ...ning and Care Continued 2 Remove the screw at the front by turning it anti clockwise after latching the side runner 3 Pull and remove the side runner 4 Remove the screw from the back by turning it anti clockwise ...

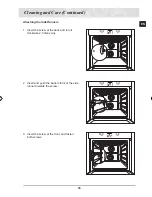
Page 37: ...ntinued Attaching the Side Runners 1 Insert the screw at the back and turn it clockwise 2 3 times only 2 Insert and push the back U form of the side runner towards the screw 3 Insert the screw at the front and fasten both screws ...

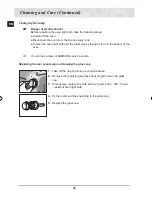
Page 38: ...the glass cap by laying a cloth on the bottom of the oven You can buy a lamp at SAMSUNG service centre Replacing the rear oven lamp and cleaning the glass cap 1 Take off the cap by turning counterclockwise 2 Remove the metal ring and the sheet ring and clean the glass cap 3 If necessary replace the bulb with a 25 watt 230 V 300 C heat resistant oven light bulb 4 Fit the metal and the sheet ring to...

Page 39: ...een set the oven does not heat up There may be problems with the internal electrical connections Call your local service centre What should I do if an error code appears and the oven does not heat up There is a fault in the internal electrical circuit connection Call your local service centre What should I do if the time display is blinking There was a power failure Set the clock see section Setti...

Page 40: ...OR Call local SAMSUNG service centre SAFETY SHUTOFF Oven has continued operating at set temperature for prolonged time Turn oven off and remove food Allow oven to cool before using again An error of the oven may cause low per formance and problems in safety Stop using the oven immediately Call local Samsung service centre ...

Page 41: ...nical data Power Source 230V 50Hz Volume usable capacity 65 L Output Power MAX 3 400 W Weight Net Shipping 40 kg approx 44 kg approx Dimensions W x H x D Outside Oven Cavity 595 x 595 x 566 mm 440 x 365 x 405 mm ...

Page 42: ...40 EN Note ...

Page 43: ...41 EN Note ...

Page 44: ...Code No DG68 00142H ...

Reviews: