W TABLES
designed by David Lopez Quincoces
Via Aurelia 395/E, 55047, Querceta (LU), Italy salvatori.it [email protected] +39 0584 769 200
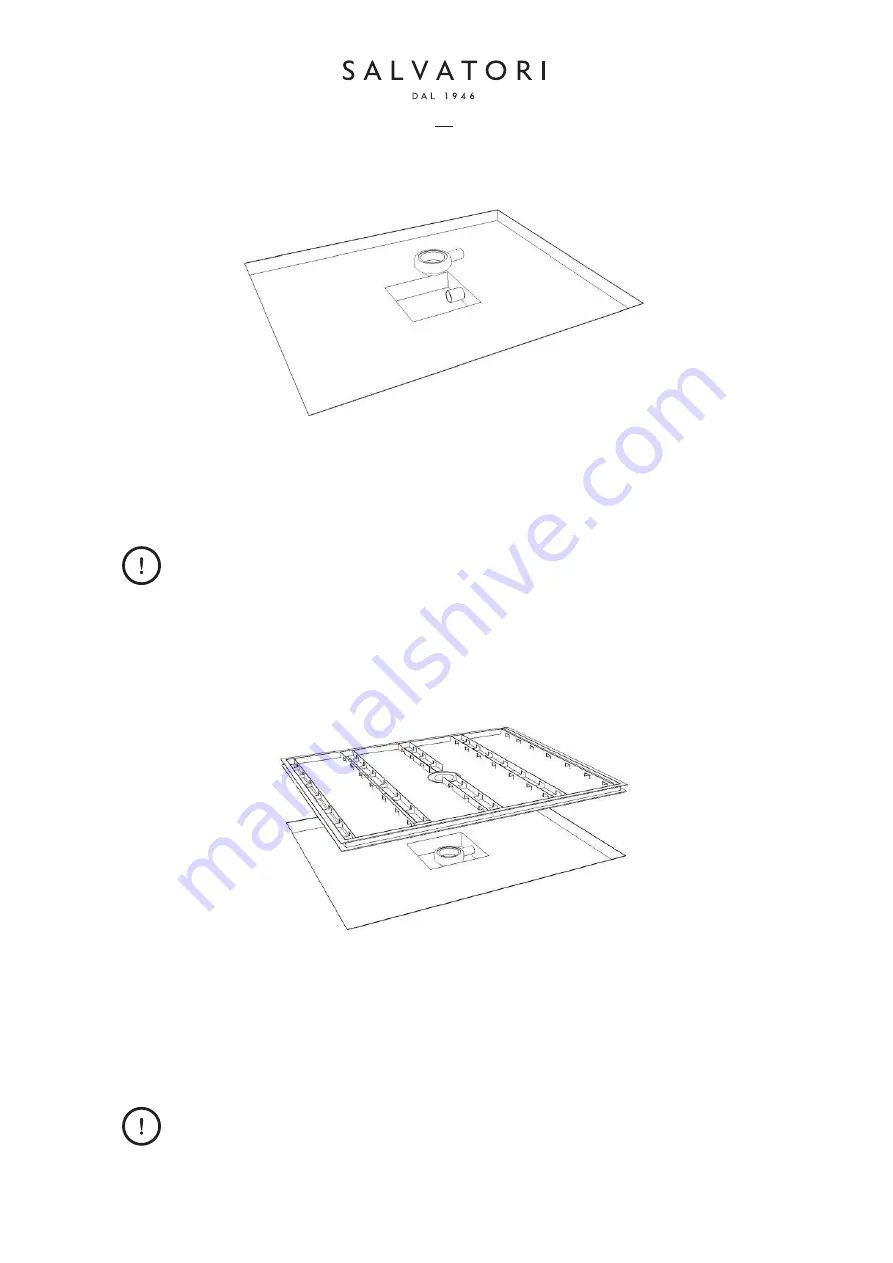
Posizionare la piletta e collegarla al tubo di scarico. È importante che il foro
creato per l’alloggio della piletta venga anch’esso riempito con il cemento
durante la Fase 5.
Position the waste and connect it to the waste pipe. It is important that the hole
created to accommodate the wast
e is fill
ed with cement (see Step 5).
4.
Installazione della piletta /
Install waste
Creare dei punti di livello in modo che una volta posizionato il piatto doccia sia
perfettamente livellato. Dopo questa operazione effettuare il riempimento con
malta magra ed affondare la vasca inox in modo da creare un supporto rigido per
evitare eventuali flessioni.
Lay a mortar bed and place the stainless steel tray on it, taking care that it reaches
the precise height needed to ensure that the slats, once installed, are perfectl
y flu
sh
with the fl
oor. The tray must sit absolutel
y flu
sh on the mortar bed.
5.
Riempimento del vano per il piatto doccia /
Lay the mortar bed
IMPORTANTE! /
IMPORTANT!
Installata la piletta, prima di procedere con le successive fasi di montaggio,
verific
are che scarichi correttamente.
Once the waste is installed, check that it drains correctly before proceeding to
the next step.
Installazione /
Installation
1. Regolare i piedini di appoggio della base
in modo che, una volta appoggiato il
piano in pietra, questo risulti in bolla.
/
Regulate the adjustable supports at
the base of the legs to ensure that the
structure is perfectly level.
Nota! /
Note!
Attenzione, durante la movimentazione del prodotto, onde evitare di danneggiare la
pietra, si consiglia di appoggiare sempre i diversi elementi su una super
ficie
protettiva.
Take care when handling this product to avoid damaging the stone, particularly the
edges. We recommend placing it on a protective surface such as cardboard or a
sheet. Ideally installation should be carried out by two people.
2. Appoggiare il piano del tavolo sulle
gambe in metallo. /
Place the top on the
metal legs.
LxPxH - 240x120x72 cm
LxDxh - 94.5x47.2x28.4 in
LxPxH - 300x150x72 cm
LxDxh - 118.1x59.1x28.4 in
Nota! /
Note!
Si consiglia di far eseguire l’installazione a personale qua
lific
ato.
Installation should only be carried out by
qualifie
d tradespeople.
Nota! /
Note!
Fare attenzione al peso del piano in pietra.
Remember that the stone top weighs a
signific
ant amount.
Nota!
/
Note!
La non corretta esecuzione di questa fase potrebbe causare la rottura delle
doghe.
This step is crucial as if not carried out precisely, it may lead to an unstable
surface being created which could lead to the stone slats breaking over time.
Installazione /
Installation
1. Regolare i piedini di appoggio della base
in modo che, una volta appoggiato il
piano in pietra, questo risulti in bolla.
/
Regulate the adjustable supports at
the base of the legs to ensure that the
structure is perfectly level.
Nota! /
Note!
Attenzione, durante la movimentazione del prodotto, onde evitare di danneggiare la
pietra, si consiglia di appoggiare sempre i diversi elementi su una super
ficie
protettiva.
Take care when handling this product to avoid damaging the stone, particularly the
edges. We recommend placing it on a protective surface such as cardboard or a
sheet. Ideally installation should be carried out by two people.
2. Appoggiare il piano del tavolo sulle
gambe in metallo. /
Place the top on the
metal legs.
LxPxH - 240x120x72 cm
LxDxh - 94.5x47.2x28.4 in
LxPxH - 300x150x72 cm
LxDxh - 118.1x59.1x28.4 in
Nota! /
Note!
Si consiglia di far eseguire l’installazione a personale qua
lific
ato.
Installation should only be carried out by
qualifie
d tradespeople.
Nota! /
Note!
Fare attenzione al peso del piano in pietra.
Remember that the stone top weighs a
signific
ant amount.


