Saltillo Chat Fusion 8 User Manual Download Page 258

ChatFusion User’s Guide 


258 

Connecting Your ChatFusion Device to Your Phone 

1.


On your device, choose 

Menu

 > 

Settings

 > 

System

 > 

Bluetooth 

settings

2.


Make sure that 

Use with Phone

 is turned on. 

Note:

 When you select 

Use with Phone

, the following message will 

appear: 

Text messages on your mobile access device may incur a charge from your mobile 

access service provider. Wireless carrier fees may apply. 

Tap 

OK

 to proceed. 

3.


Choose 

Connect to Phone

. The device will scan for available phones 

and list them on the screen. 

4.


Select your phone. “Connecting to device” will be displayed. When 

the device connects to the phone, “-Connected” will be displayed 

after the phone name at the top of the screen and a “Connected” 

message will appear briefly at the bottom of the display. 

5.


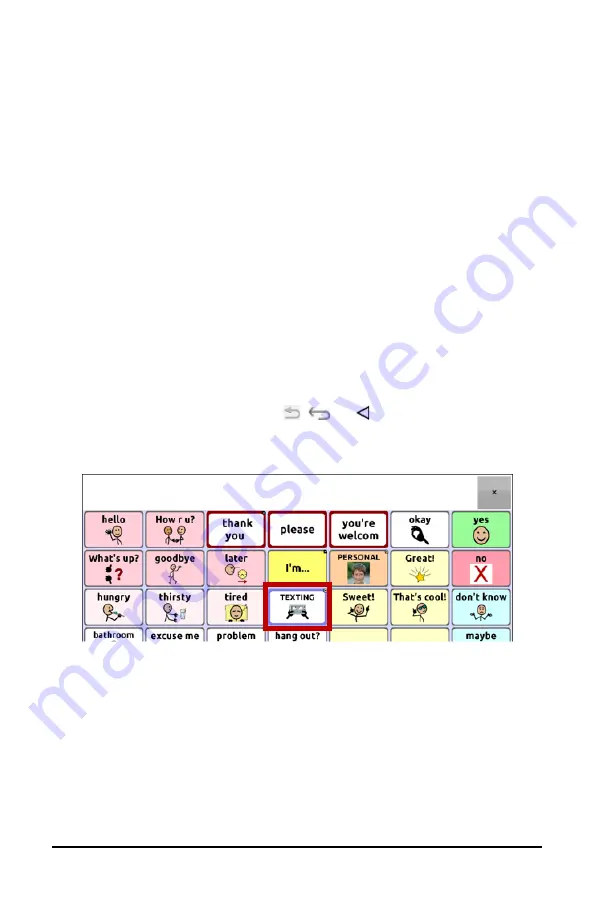
Use the device’s Back button ( ,  , or   ) to go to the 

vocabulary’s home page and then navigate to the page that includes 

the Texting button. For example: 


Note:

 The appearance and location of the Texting button depend on 

the vocabulary file you are using and where you choose to locate 

the button. See “

Using Texting in a Default Vocabulary File

 or 

Adding Texting to a Customized Vocabulary File


Summary of Contents for Chat Fusion 8

Page 1: ...User s Guide Open System and Dedicated Devices ChatFusion 8 1st Generation ChatFusion 10 1st Generation 10127 Version 2 14...

Page 2: ...with Permission Wi Fi is a registered trademark of Wi Fi Alliance WordPower is a trademark of Inman Innovations Inc 2001 2020 All rights reserved Used with permission My QuickChat 12 Adult is copyrig...

Page 3: ...g the Device Battery using the Charge Pad 27 ChatFusion 10 Charging the Device Battery using the Charge Pad 30 Charging the Device Battery using the Standard Charger 33 Checking Battery Status Using a...

Page 4: ...3 Changing SDB Style Settings 64 Engaging in Two Conversations at a Time 65 Choosing a Vocabulary File 66 Evaluating an Individual s Ability to Select Buttons 66 Considering the User s Access Capabili...

Page 5: ...Setting up and Using ChatEditor 82 Installing ChatEditor 82 Configuring ChatEditor 83 Enabling Speech and Symbols in ChatEditor 84 Opening ChatEditor 84 Using Vocabulary Files with ChatEditor 85 Devi...

Page 6: ...tton Color Saturation 101 Changing the Skin Tone of People on Buttons 102 Overriding a Vocabulary Button Style 103 Overriding a Page Button Style 104 Overriding a Specific Button s Style 104 Modifying...

Page 7: ...native Create the Scene and then the Linking Button 133 Create a Visual Scene with Buttons Surrounding the Image 134 Using Keyboards 135 Choosing a Different Keyboard 135 Linking a Button to a Keyboar...

Page 8: ...155 Optimizing Block and Flow Scans 156 Configuring Speech Display Bar SDB Scans 157 Configuring Notification Scans 158 Configuring Empty Area Scans 158 Setting Scan Timing 158 Configuring Re scans 1...

Page 9: ...Tracking Settings 186 Setting Smoothing 187 Setting the Dwell Method 188 Dwell Method Normal 189 Dwell Method Clicker Picker 190 Dwell Method Sir Dragalot 192 Dwell Method Tick Talk 193 Setting Second...

Page 10: ...s and System Settings 213 Open System Devices Restricting Access ChatFusion 10 214 Blocking Access to ChatFusion 10 Application Settings 214 Blocking Access to the Operating System and Apps 215 Blocki...

Page 11: ...239 Deleting Photos 240 Updating the Chat Software using Wi Fi 241 Updating the Chat Software from the Saltillo website 243 Backing Up Your Vocabulary Files 244 Backing Up Customized Vocabulary Files...

Page 12: ...272 Deleting Conversations and Messages 273 Using the Back icon with Texting 273 Viewing Notifications 274 Advanced Texting Setup 275 Adding a Webhook Event to a Button 278 Terms Used in This Section...

Page 13: ...ltillo com support Training opportunities can be found on the Saltillo website http saltillo com webinars Saltillo Operational or Technical support If you need assistance in setting up using or mainta...

Page 14: ...Check for updates The version number appears above the update progress bar User s Guide and Application Help To view or download the user s guide go to https saltillo com support downloads To view th...

Page 15: ...elf Accessories Do not use accessories detachable parts or materials not described in this manual Do not use accessories detachable parts or materials in any other way than described in this manual Mo...

Page 16: ...d Store it in a safe location when not in use The stylus is a potential hazard for poking an eye Screen Do not use the device if the screen is cracked or broken Do not remove the touchscreen overlay f...

Page 17: ...ors Keep the charger away from water and do not allow water or any other liquid to be spilled on it Minimize contact with the back of the device while charging The battery charger country plug adapter...

Page 18: ...e such devices Should ALWAYS keep the mobile device a minimum of six 6 inches from their implantable medical device Should not carry the mobile device in a breast pocket Should move the mobile device...

Page 19: ...on package Your ChatFusion Device Battery Charger Standard Charge Pad or Charge Pad Additional Items Extra device frame Rings to attach a strap USB cable USB flash drive ChatFusion User s Guide Magnet...

Page 20: ...e 20 ChatFusion 8 Device Features This section identifies some basic features of the device and indicates where to find additional information ChatFusion 8 Front View 1 Handle 2 Charging LEDs 3 Camera...

Page 21: ...port HDMI port and power button 1 USB port for charging the device or transferring vocabulary 2 Alternative charging port 3 The HDMI port is for future use 4 Power button ChatFusion 8 Right Side Feat...

Page 22: ...ChatFusion User s Guide 22 ChatFusion 8 Back View 1 USB port for a ChatPoint unit 2 Wheelchair mounting plate 3 Latch for the stand 4 Stand...

Page 23: ...tFusion 10 Device Features This section identifies some basic features of the device and indicates where to find additional information ChatFusion 10 Front View 1 Handle 2 Camera 3 Charging LEDs 4 Tou...

Page 24: ...m the front contains the volume button power button and charging port 1 Charging port 2 Power button 3 Volume button ChatFusion 10 Right Side Features The right side of the device when viewed from the...

Page 25: ...augmentative options are enabled how and when to speak messages and how a wide variety of other options are configured For information on using the menus see Choosing How to Access Menus on page 57 a...

Page 26: ...either to charge your device Using the charge pad is recommended For detailed information on charging your device battery see ChatFusion 8 Charging the Device Battery using the Charge Pad below ChatF...

Page 27: ...Use only the battery charger or charge pad provided with your device Cords and cables are potential entanglement or strangulation hazards Please consider this prior to placing these items with device...

Page 28: ...is recommended 3 Plug the other end of the power cable into the power jack on the edge of the charger 4 Position the ChatFusion device s stand against the back of the device Note If a wheelchair mount...

Page 29: ...charging LED is illuminated When the battery is fully charged the blue charging LED is illuminated When the battery is fully charged 1 Remove the device from the charger Recommendation Keep the charg...

Page 30: ...se only the battery charger or charge pad provided with your device Cords and cables are potential entanglement or strangulation hazards Please consider this prior to placing these items with device u...

Page 31: ...tton to turn off the display 2 Plug the charge pad s power cable into an electrical outlet a surge protector is recommended 3 Plug the other end of the power cable into the power jack on the top edge...

Page 32: ...in the charger until the LED glows blue The device s amber charging LED is illuminated When the battery is fully charged the blue charging LED is illuminated When the battery is fully charged 1 Remove...

Page 33: ...charger or charge pad provided with your device Cords and cables are potential entanglement or strangulation hazards Please consider this prior to placing these items with device users On a regular ba...

Page 34: ...se the power cable that came with the charge pad to charge the device directly ChatFusion 8 While the battery is charging During charging the ChatFusion device s amber charging LED is illuminated When...

Page 35: ...ate a button on a vocabulary page that contains the action Battery Status 1 Press and hold on the button you want to modify Right click the button if you are using ChatEditor 2 Choose Edit Button to d...

Page 36: ...the Speech Display Bar SDB When you connect a charger the icon will disappear Note To view battery status icons the notifications bar must be turned on Choose Menu Settings Input Turn Enable Notificat...

Page 37: ...The ChatFusion 10 power button is located on the side of the device between the volume button and charging port To turn your device on from a complete power down Press and hold the power button To tu...

Page 38: ...anywhere on the touchscreen Press a switch plugged into the device To use the touchscreen to wake the screen you must first enable Touch Wake up Choose Menu Settings System Display Settings Then tap T...

Page 39: ...lane mode off Option 1 Go the Android home page and swipe down from the top of the screen On some devices you may need to swipe down twice The Airplane mode icon shows that Airplane mode is turned on...

Page 40: ...the setting to change it to Off Option 3 Press and hold the device s power button Tap Airplane mode This puts the device into Airplane mode and turns Bluetooth off To turn Bluetooth on Option 1 Go th...

Page 41: ...device next to the handle Press the ends of the button to increase or decrease volume ChatFusion 10 The volume button is located on the side of the device next to the power button Press the ends of t...

Page 42: ...f the screen 1 Place the device face down on a flat surface 2 While holding your thumb on the edge of the device below the stand s bottom support press on the inside of the support with the tip of you...

Page 43: ...moving the screws that hold it in place ChatFusion 8 Remove these screws ChatFusion 10 Remove these screws When removed the screws are a potential choking hazard If you are replacing the handle align...

Page 44: ...nsert the tip of the screwdriver into the slot of a corner tab that attaches the frame to the device 2 Carefully pull the tab away from the device until you can slide the corner of the frame off the d...

Page 45: ...sponding corner of the device frame Then push a corner on the same side of the device into the frame 2 Push a corner on the opposite side of the device into the corresponding corner of the frame 3 Wit...

Page 46: ...ions 1 Place the device face down on a flat surface Be careful not to scratch the display 2 Remove the three screws from the old mounting plate and remove the plate from the back of the device 3 Orien...

Page 47: ...ChatFusion User s Guide 47 5 Insert and tighten the screws Store or dispose of the old mounting plate and screws safely Loose screws can be a choking hazard...

Page 48: ...n the handle or mounting bracket Use the same procedure if you prefer to attach the rings or loops to the holders on the bottom of the device case if available on your device The metal rings or loops...

Page 49: ...s Please consider this prior to placing these items with device users Attach the strap with the rings as shown Step 1 Open the ring as you would open a key ring Suggestions Use your fingernail a screw...

Page 50: ...r strangulation hazards Please consider this prior to placing these items with device users Attach the strap with the loops as shown Step 1 Feed the end of the loop through the hole in the case Step 2...

Page 51: ...ach the rings or loops to the holders on the ChatPoint mounting bracket The metal rings or loops are potential choking hazards Use them with caution Straps are potential entanglement or strangulation...

Page 52: ...nd void the warranty Note To clean the touchscreen see Routine Cleaning and Disinfecting on page 53 If your device will be used by more than one client see Disinfecting a Device for Use by Multiple Cl...

Page 53: ...e vinegar and water on the display Disinfecting a Device for Use by Multiple Clients Note This section applies only when multiple clients will be using the same device In that situation it s vital to...

Page 54: ...ies to dry Final Step Wipe the touchscreen 1 When the device and accessories are dry wipe down the viewing area touchscreen keyguard etc with glass cleaner so the screen doesn t discolor 2 Allow the e...

Page 55: ...isplays icons to show notifications battery power and connection details Pulling down on the status bar displays options for viewing notifications and quickly turning on or off some commonly used oper...

Page 56: ...ChatFusion User s Guide 56 Using the Application Screen A small arrow in the upper corner of a button indicates that the button links to another page...

Page 57: ...u Access The Menu Access window will display three options Select an option to set the location of the Menu button or hide it Hidden The Menu button will not be displayed Speech Display Bar The Menu b...

Page 58: ...button the menu will appear along the left side of the screen Select an option to open the feature When you select Edit Mode the menu options change Select an option to open the feature To exit Edit...

Page 59: ...ess window The Menu Bar with a single button will appear across the top of the screen Select the button on the Menu Bar to open the menu below the Menu Bar along the left side of the screen Select an...

Page 60: ...ChatFusion User s Guide 60 When you select Edit Mode the menu options change Select an option to open the feature Use the Menu Bar arrow to close the menu...

Page 61: ...current page appear in red across the bottom of the screen Note ChatEditor displays the menus at the top of the screen Option Description Edit Mode Turn editing on or off Settings Customize Chat softw...

Page 62: ...SDB Settings To access the options for changing Speech Display bar settings choose Menu Settings Input Option Description Tap to Speak This option toggles the option for the SDB to speak when chosen...

Page 63: ...ech Output Auto Clear The Auto Clear options are displayed Off Spoken text remains in the Speech Display Bar until you clear it Immediate Text is cleared automatically from the Speech Display Bar as s...

Page 64: ...o display icons in addition to text or to appear at the bottom instead of the top of the screen To configure the SDB to display icons in addition to text 1 Choose Menu Settings Style 2 Tap SDB Icons t...

Page 65: ...ak to another person while keeping your place in the current conversation select A new SDB showing an icon with the number 2 opens Now you can start a conversation with the second person You can toggl...

Page 66: ...The vocabulary s ability to be customized Evaluating an Individual s Ability to Select Buttons Explore Access is a tool that allows individuals who use AAC devices and their team to try different acce...

Page 67: ...and Intermediate Scan are files from the Chat Software Library that are provided to individuals in order to practice using a vocabulary with scanning Early Intermediate and Advanced Concepts Early Con...

Page 68: ...re are three different activities to choose find a requested animal find a requested form of transportation and find a specific color of bubbles In the Early Concept Beginner button all the activities...

Page 69: ...button is for someone who has little or no experience using a device Advanced Concepts Intermediate green button is for someone who has some experience on devices and Advanced Concept Advanced blue bu...

Page 70: ...PC Developed for those with developmental delays WordPower Word based vocabularies for those who are literate as well as those who are preliterate Basic versions are available for beginning communicat...

Page 71: ...ulary file that cannot be modified or deleted To customize a vocabulary file make a copy of it and customize the copy See Creating a Customized Vocabulary File on page 89 Important A vocabulary file t...

Page 72: ...rier phrases with core words for quick and easy language generation It can be used as a phrase based system or as a word based system For example you could use the carrier phrases I want I like and I...

Page 73: ...er of high frequency words available on the main page resulting in fast communication with reduced keystrokes Word completion and logical next words are used and the grammar function provides morpholo...

Page 74: ...nicator moves seamlessly between words and spelling thus minimizing keystrokes and the need for navigation Some core words are embedded within the category pages in order to assist in bridging the gap...

Page 75: ...comprehensive vocabulary Specific items within each category can and should be modified to meet the unique needs of individuals Communication Journey Aphasia Communication Journey Aphasia is a vocabu...

Page 76: ...is primarily a phrase based vocabulary for communicators who access communication through auditory and or visual scanning It was designed to be a next step after using the Basic Scan vocabulary file w...

Page 77: ...frequency phrase based communication system in an easy to use yet very engaging format The progressive system offers a variety of topics for everyday needs and conversation and provides AAC users imm...

Page 78: ...enu Settings Language 2 Choose the appropriate language Selecting a Speech Synthesizer and Voice After you choose a language choose a speech synthesizer and voice for the language you selected 1 To ac...

Page 79: ...along with the language For additional options see Creating and Loading Profiles on page 218 If you are using ChatEditor If you are using ChatEditor you will not have access to the synthesizer voices...

Page 80: ...Each synthesizer speaks words in its own way You can add pronunciation exceptions to a dictionary for each synthesizer The voice synthesizer on the Editor is not the same as the one on the device and...

Page 81: ...acter The voice speaks after every character Character is the default setting Word The voice speaks after every word Sentence The voice speaks after every sentence To generate messages quietly If you...

Page 82: ...ls ChatEditor on your computer and creates desktop shortcuts to the ChatEditor application and the ChatEditor Import folder 1 Download ChatEditor from the Saltillo website Go to https saltillo com sup...

Page 83: ...ge window and click OK 3 Select one or more symbol sets from the Choose Symbol Sets window Important This symbol set must match what is on the device you are supporting 4 Click OK 5 Type a descriptive...

Page 84: ...tEditor simply connect a USB cable between your computer and your device Test the Editor to verify that speech is working or symbols are displaying Then disconnect the cable Speech and symbols will no...

Page 85: ...lore files using ChatEditor choose Library My Resources stores all custom files All default Saltillo supplied files are stored in the folder specifying the symbol set and language used Device and Edit...

Page 86: ...e window will open 2 With Capture Selections selected start selecting the buttons you want to appear in your document Each button you select will be captured in the Button Capture window 3 When you fi...

Page 87: ...quences to find the one you want turn off Capture Selections Once you decide what you want to capture turn Capture Selections back on If you make a mistake select Clear and start capturing the sequenc...

Page 88: ...mes appear in red across the bottom row of keys Editor Choose Edit Mode from the menu bar All the buttons are outlined and Edit Mode is selected Important Before you start editing a vocabulary file Co...

Page 89: ...s a starting point 2 Make a copy of the original file 3 Customize the copy as needed Creating a Copy using the Device in Edit Mode 1 Open the vocabulary file 2 Choose Menu Edit Mode 3 Choose Yes 4 Typ...

Page 90: ...e text for any button Or you can remove the text and fill the button with an image Displaying the Button Text to Edit Choose Menu Edit Mode Then press and hold on the button Right click if you are usi...

Page 91: ...new text If you tapped in the Label box choose Next to move to the Message box Choose Done and then choose Save to apply your changes to the button Using Images with No Text Don t enter a label in th...

Page 92: ...s and hold on the button Right click if you are using the Editor A menu will open Choose Edit Button to display the Button Properties Choose the image you want to use To locate the image you can choos...

Page 93: ...The image will be displayed in the Button Properties Choose Save Searching for an Image in the Device Library From the Button Properties in the Editor choose Search to search for images with the labe...

Page 94: ...User s Guide 94 Creating Your Own Image 1 Choose Menu Edit Mode 2 Press and hold on the button A menu will open 3 Choose Edit Button to display the Button Properties 4 From the Button Properties choo...

Page 95: ...mage and import that image directly into the button Note If you are using the Editor the image must be on the same computer If you are importing directly from the device the image must already be stor...

Page 96: ...Please consider this prior to placing these items with device users 2 Give the device a moment to connect to the computer The device screen will display Transfer Mode and the computer will display a...

Page 97: ...ciated information The information can be viewed again when appropriate You can hide a single button or multiple buttons Hiding a Button To hide a single button on your device 1 Choose Menu Edit Mode...

Page 98: ...display them 3 Choose Menu Hide Mode Edit Mode to exit Hiding or Showing All Buttons To hide all buttons on the current page choose Menu Edit Mode Hide Mode Hide All To show all buttons that had previ...

Page 99: ...some vocabularies buttons that have images only such as the Home and the Next and Back arrows will retain their images For example Vocabulary page with labels no images except Home and Next arrow In o...

Page 100: ...p for pages and vocabulary files for a single button Modifying a Button Style You can only modify a button s style in Edit Mode 1 Choose Menu Edit Mode 2 Press and hold a button Right click if you are...

Page 101: ...reate a visual scene in which the location speaks but the button itself does not appear choose Transparent 9 When you finish making changes choose Save Modifying Button Color Saturation Saturation gra...

Page 102: ...to change the skin tone of people displayed on buttons 1 Choose Menu Settings Style 2 In the Images section the skin tone currently selected will appear in a circle after Skin Tone 3 Select Skin Tone...

Page 103: ...page Right click if you are using the Editor A list of button options appears 4 Choose Button Style Override The Button Properties screen opens to the Button tab 5 Choose the Vocabulary tab 6 Select t...

Page 104: ...elect an option you want to modify select the Edit button for that option modify the setting and select Done Do the same for any other options you want to modify When you finish making changes choose...

Page 105: ...hoose Size The Select a Size menu opens 3 Choose Smallest Small Normal Large or Largest If you are using the Editor select Settings Style Button Style The Button Style menu window opens Under Navigati...

Page 106: ...sing the Editor A list of button options opens 3 Choose Edit Button The Button Properties are displayed 4 Choose the Actions tab 5 Tap or click the arrow to open a list of actions 6 Choose the action...

Page 107: ...r Features on page 293 Apply Modifier A modifier key is a special key on a keyboard that modifies the normal action of another key Caps Lock Ctrl Functions Num Lock Shift Backspace key Deletes the las...

Page 108: ...add s Help Signal Triggers a loud attention getting sound Jump to Page see also Using Navigate Visit and Jump to Page Jump to Page takes you to a new page for a single hit and then takes you back to...

Page 109: ...Copy Text Copies all text in the SDB and places a copy in the Clipboard Dedicated devices This action is not available on dedicated devices SDB Paste Text Adds text from the Clipboard to the SDB Dedic...

Page 110: ...in the SDB to the next chosen button Take Photo Activates the camera so you can take pictures that will appear on a button and will also be saved with other images on the device Texting Add Number as...

Page 111: ...Displays the text date and time for the selected text message Note This action displays the date only if the message is older than one day Texting Navigate to Contacts Navigates to your list of contac...

Page 112: ...ing a long message selecting this button will not stop the speech but will stop the speech from being spoken aloud Selecting the button again lets the text be heard Visit see also Using Navigate Visit...

Page 113: ...ng keyboard from the Describer page the system will remember the unused visit and go back after you type a single letter on the keyboard page Jump to Page Jump to Page takes you to a new page for a si...

Page 114: ...the button will also be modified automatically everywhere else it appears You may want to use this technique on buttons that contain tools used on each page 1 Press and hold on the button you want to...

Page 115: ...ons will be swapped immediately Resizing a Button A button can be emphasized by making it larger than the others on a page If you are increasing the size of the button the button will expand to the ri...

Page 116: ...the same key locations as or on top of lowercase letter keys This is basically how a button set works For a detailed example the Word Finder keyboard first displays the lowercase letter keys If you c...

Page 117: ...t Paste ButtonSet Paste ButtonSet pastes the copied button Use Same ButtonSet When a button is used in multiple locations Use Same ButtonSet pastes the copied button set to all locations of the button...

Page 118: ...for an image stored in the device library 7 Select an alignment option To center the image select Center To stretch the image to fill the page select Fit If you stretch the image the aspect ratio will...

Page 119: ...e Animate All to remove the checkmark Adding a Grid to Pages To add a wire frame grid to pages choose Menu Settings Style Show Grid to insert a checkmark To remove the grid choose Show Grid to remove...

Page 120: ...ing special page as your home page Use any vocabulary page as a template Changing Your Home Page 1 Choose Menu Edit Mode Pages to open a list of available pages 2 Scroll to the page you want to use as...

Page 121: ...f Special Page options appears 5 Select the applicable special page designation For example if the page name is Texting Conversations select Text Conversations 6 Choose Save The texting special page i...

Page 122: ...s An icon precedes the name of each special page in the list For example your home page and texting pages Note The checkmark indicates that this page is currently open in the application 2 Scroll thro...

Page 123: ...e 7 Choose Back to exit the list of pages 8 Choose Menu Edit Mode to exit Edit Mode Using a Special Page as a Template You can use a copy of an existing vocabulary page as a template to create new pag...

Page 124: ...name 7 Select Back to exit the list of pages To use the special page as a template 1 Select Menu Edit Mode Pages Menu New from template 2 Select the template special page you created A keyboard opens...

Page 125: ...d hotspots and other buttons You can create the visual scene on your device or use ChatEditor to create the scene and transfer it to your device Before you get started Make sure the image you want to...

Page 126: ...ed on the device or choose Find to search for an image stored in the Chat library Note This image could be the same one you plan to use for the visual scene page This will make it obvious to the user...

Page 127: ...select the page to navigate to 3 Because you haven t created the new page yet choose New from the bottom of the screen 4 Enter a name for the new page In this example the page is named My Farm 5 Adju...

Page 128: ...the page If you stretch the image the aspect ratio will not change so it might not totally fill the page 8 Choose Save choose No Animation and Save and choose Save again 9 Now you re ready to add you...

Page 129: ...ouched For this example create a button that will display and speak cow play a moo sound and navigate to a page about dairy food 1 Press and hold the button cell located above and to the left of the c...

Page 130: ...sound for the cow choose the Actions tab and select Play Audio A list of options will be displayed Select either Import from file or Choose existing recording 7 To add navigation for example to a pag...

Page 131: ...mes to cover the area you want Each time simply press and hold on the button choose Change Button Size and adjust the vertical and horizontal cells 11 Create resize and save additional transparent but...

Page 132: ...Select Navigate Dairy No Animation to open a menu 3 Choose Remove 4 Choose Save To add an action and change the order of actions When you add an action it appears last in the list of actions set up fo...

Page 133: ...maximum number of rows and columns 19 each 5 Choose Import or Find and add an image to the page 6 Select Center or Fit Fit will stretch the image to fill the page or most of the page 7 Choose Save 8 A...

Page 134: ...k buttons To copy and paste a button 1 Choose Menu Edit Mode 2 Navigate to a page that includes the button you want to copy 3 Press and hold the button and choose Copy Button 4 Navigate to your visual...

Page 135: ...a keyboard from the Template options If the keyboard you want is not included in your page listing or the template options see Copying a Page from a Different Vocabulary File on page 119 If you want...

Page 136: ...for all pages Turning Gestures On or Off Because gestures might not benefit a particular individual the Settings menu provides an On Off option Important Timing is not active when gestures are turned...

Page 137: ...ons Adding a Sound Sounds are produced by the speaker s voice for laughing breathing sneezing coughing or whatever sounds our voices can produce to mimic sounds we make in our daily lives Sounds are a...

Page 138: ...s Keyboards and add the Emoji keyboard so that you can type emoticon symbols Once the button is set up with the emoticon and speech message go to Pronunciations and add a pronunciation for the smiley...

Page 139: ...stylus around until you are on the button you want Releasing the button will select it Activate on Release toggles between activating the screen immediately upon touch or upon release To set buttons t...

Page 140: ...ose Enable 4 Choose Time and set the time value Setting up a Beep when a Button is Pressed Some people may benefit from an auditory cue when a button is selected The Input menu provides an option to t...

Page 141: ...nt Fill 4 Select Saturation adjust the color saturation gradient fill and select OK Note Saturation adds the appearance of depth to a button Visual Effect If you select Visual Effect you can select fr...

Page 142: ...p Spoken Text When Pop Up Spoken Text is turned on a pop up will display the spoken text when a button that speaks is selected Full Screen When Full Screen is turned on a pop up fills the entire scree...

Page 143: ...epending on the button layout one orientation may be more helpful than another For example WordPower42 seems to work better in a landscape layout but WordPower24 works better in a portrait layout To A...

Page 144: ...eak When the device is tilted the text in the speech display bar will fill the screen and be spoken Expand Only When the device is tilted the text in the speech display bar will fill the screen and no...

Page 145: ...ting Description Enable Scanning Turns scanning on or off You must turn scanning on to access the other settings Switch Access Choose Switch Configuration or Auto Scan Switch Configuration defines the...

Page 146: ...ivation delay and auto restart on or off See Setting Scan Timing on page 158 For information on setting up switches see Setting up Wired Switches on page 146 or Setting up Bluetooth Wireless Switches...

Page 147: ...e When Left or Right appears in a Switch 1 or Switch 2 setting it does not affect how you should set up the switch It only refers to the internal technical configuration of the switch which you can di...

Page 148: ...Then select the name of the switch Note Pairing is a timed process When the name of your switch appears select it quickly usually within 10 seconds If you do not select it quickly enough you may need...

Page 149: ...s the switch intended to start and stop the scan 6 To set up Switch 2 tap Switch 2 The prompt Press any switch will appear Press the switch intended to make your choice or activation 7 Adjust addition...

Page 150: ...g Patterns Mode The Mode window will be displayed 2 Tap the arrow to the right of the currently selected mode A menu of mode options will be displayed 3 Choose Linear Row Column Block or Flow 4 If you...

Page 151: ...ess on page 197 Using Linear Step Scan Mode with a Single Switch 1 Connect your switch to port A 2 Verify that Enable Scanning is selected Choose Menu Settings Input Scanning A checkmark should appear...

Page 152: ...ng is selected Choose Menu Settings Input Scanning A checkmark should appear in the Enable Scanning checkbox 3 Turn Auto Scan off Choose Switch Access and verify that Auto Scan is not selected With Au...

Page 153: ...screen When the row that contains the button you want is highlighted activate your switch The scan will then step through the buttons from left to right across the row When the button you want is high...

Page 154: ...ton you want is highlighted activate your switch To select block scan mode choose Menu Settings Input Scanning Patterns Mode Select Block from the Mode window A new Mode window will open To increase t...

Page 155: ...ighted activate your switch Flow scanning is provided as a scanning option for individuals who do not require consistency within a scan pattern To select flow scan mode choose Menu Settings Input Scan...

Page 156: ...on Flow finds the lowest average of scanning steps for every button on a page Visualize the page layout in one straight line For example if you break the buttons on a page into 6 equal groups it takes...

Page 157: ...Scan Clear Button is turned on the SDB is scanned as follows 1 When the scan reaches the SDB the entire SDB is highlighted 2 With the SDB highlighted If the user presses the switch the text is highlig...

Page 158: ...reas When selected scanning will skip over an area without a button or a button that only has a speech message action but no text Setting Scan Timing Scan speed is the amount of time it takes for your...

Page 159: ...number of re scans whether Auto Scan is turned on or turned off Setting Activation Delay This option gives you a chance to change your mind when you have selected a button The option is set to your s...

Page 160: ...cue but also an auditory cue to indicate where the scan is currently To enable auditory prompts choose Menu Settings Input Scanning Auditory Prompts Enable Auditory Prompts If you are scanning simply...

Page 161: ...n using earphones or headphones can cause hearing loss over extended periods of time Scanning Beep If you prefer to hear a beep instead of an auditory prompt when you scan a key choose Menu Settings I...

Page 162: ...elected as the synthesizer Tap the arrow to the right of the currently selected voice to open a list of voices Choose the voice you want If necessary adjust the voice s pitch or talking speed 1 Slide...

Page 163: ...d pages Note If you also want to set up visual effects for the user see Configuring Visual Effects for Scanning Head Tracking or Touch Access on page 197 Opening the Scan Editor To access the Scan Edi...

Page 164: ...ubgroups The Scan Editor allows you to set up groups and subgroups of buttons for scan patterns on a page For example a group could be a collection of three rows of buttons eight columns wide Within t...

Page 165: ...A list of groups will appear under Top Level From the list of groups select the group you want to include in the scan When you select a group its name will appear in bold and the corresponding group o...

Page 166: ...mode you want Default Linear Row Column Block or Flow Note The scan mode that is selected by default is set in Menu Settings Input Scanning Patterns Mode 4 Choose Save Move Up Move Down Rearrange you...

Page 167: ...selected group or subgroup automatically This option creates one level of subgroups The number of subgroups is controlled by the scan mode setting Menu Settings Input Scanning Patterns Mode 1 Tap the...

Page 168: ...e selected group and all its subgroups or delete the selected subgroup and all its subgroups 1 Tap the group you want to delete 2 Select Delete Group and Subgroups 3 The group and its subgroups or the...

Page 169: ...will appear under Top Level Note The number of groups listed is controlled by the scan mode setting Menu Settings Input Scanning Patterns Mode 8 From the list of groups select the group you want to i...

Page 170: ...the scan pattern 11 Choose Menu Two menu options are displayed Set as Default and Delete Scan Pattern Quit Choose Set As Default The following prompt will be displayed Setting this scan pattern as the...

Page 171: ...page follow these steps to delete it 1 Choose Menu Edit Mode Pages 2 Choose the page that has the custom scan pattern The following menu will open 3 Choose Scan Editor The custom scan pattern will be...

Page 172: ...1 Choose Menu Edit Mode Pages 2 Choose any page in the vocabulary that has the custom scan pattern The following menu will open 3 Choose Scan Editor The following prompt will be displayed 4 Choose Al...

Page 173: ...nts into pointer movements and activations selections on the screen Mounting the ChatPoint Unit Follow these instructions to attach the ChatPoint unit to your device 1 Remove the device handle by remo...

Page 174: ...ChatFusion User s Guide 174 4 Plug the unit s USB cable into the USB port on the back of the device ChatFusion 8 ChatFusion 10 5 ChatPoint is ready to set up for use...

Page 175: ...ludes strap holders attach the rings or loops that came with your strap to the holders For details see Attaching a Strap on page 48 Viewing Tracking Status The LED on the front of the ChatPoint unit i...

Page 176: ...You may need to refine your settings several times We suggest changing one setting at a time To access the head tracking settings choose Menu Settings Input Head Tracking The Head Tracking Settings sc...

Page 177: ...u allows you to pause or reactivate head tracking and toggle the pointer between pointing and dragging The navigation bottom menu provides quick access to Menu Home on open system devices and Back For...

Page 178: ...dot onto the user s forehead or eyeglass frame ChatPoint calculates how light reflects off the dot to detect the user s head movement The on screen pointer moves with the user s head movements Setting...

Page 179: ...se the keyboard to enter the exact setting you want Choose OK Note The higher you set the horizontal adjustment number the faster the pointer will appear to move across the screen Setting Vertical Adj...

Page 180: ...vertical adjustment value If a slight head movement to the left or right moves the user off the edges of the screen decrease the horizontal adjustment value If a slight head movement up or down moves...

Page 181: ...Description Pointer Opacity The pointer s degree of transparency determining how clearly underlying images show through For details see Setting the Pointer s Opacity on page 182 Pointer Color The colo...

Page 182: ...the Pointer Visual Effects screen The Pointer Opacity window opens To allow less of the underlying image to show through tap To allow more of the underlying image to show through tap Or use the keybo...

Page 183: ...tap To decrease the size tap Or use the keyboard to enter the exact setting you want Choose OK Setting the Pointer s Shape Pointer Shape allows you to set the pointer as either a shrinking dot or an a...

Page 184: ...the center This menu allows you to pause or reactivate head tracking and toggle the pointer between selecting and dragging Green indicates that head tracking is active When the user selects Pause the...

Page 185: ...Use Button as Rest Area is turned on the Rest Area Size setting will not adjust the size of the rest area within the Chat software vocabulary pages It will only adjust the size of the rest area withi...

Page 186: ...activations For details see Setting Smoothing on page 187 Dwell Method One of four dwell types useful for normal operations frequent click operations frequent drag swipe operations or click only opera...

Page 187: ...come highlighted In effect smoothing creates a box that surrounds the average horizontal and vertical values defined by where the individual is pointing The lower the value the smaller the box requiri...

Page 188: ...will be displayed Then choose Advanced Dwell Method The Dwell Method menu opens The available dwell methods are Normal Clicker Picker Sir Dragalot and Tick Talk Most users will use the Normal dwell me...

Page 189: ...n and after the specified dwell time selects that button The button on which the pointer is focused is highlighted to help the user verify that the correct button will be selected In this example the...

Page 190: ...button and move the pointer over the top green section to make a selection Long click Focus on a button and move the pointer over the lower right yellow section to activate additional functionality Dr...

Page 191: ...e 191 In this example the pointer is focused on the Food button and in sync with the specified dwell time has shrunk to the size at which the three section cursor is displayed Note that the Food butto...

Page 192: ...um size and it shrinks according to the specified secondary dwell time As the pointer remains over the target it begins to grow until it reaches full size and makes an activation When the pointer move...

Page 193: ...o a timer and the secondary dwell time controls the pointer If the user moves the pointer off the button while the timer is displayed a click is performed and the button is activated When the secondar...

Page 194: ...dwell methods Clicker Picker Sir Dragalot and Tick Talk To access the Secondary Dwell Time setting 1 Choose Menu Settings Input Head Tracking The Head Tracking Settings screen will be displayed 2 To s...

Page 195: ...ns 1 Set up the switch you want to use If you are using a wired switch Connect the switch to either port A or port B If you are using a wireless Bluetooth switch Pair the wireless switch with your dev...

Page 196: ...eed for this setting Positioning the User and the ChatPoint Unit After setting up ChatPoint familiarize yourself with how to position the user position the unit and clean the unit Positioning the User...

Page 197: ...ociated actions To access the visual effects settings choose Menu Settings Input Visual Effects Effect Description Outline When Outline is turned on an outline appears around the active area Outline C...

Page 198: ...are reversed red becomes green yellow becomes blue etc Magnify When Magnify is turned on the active area is magnified Magnify Multiplier When Magnify is turned on Magnify Multiplier allows you to set...

Page 199: ...choose Menu and select Word Finder Removing Word Finder as a Menu Item If you prefer not to have Word Finder appear on the menu an option is available in Settings to turn the Word Finder menu item off...

Page 200: ...5 Tap or click the list arrow to open a list of actions 6 Choose the action Find Word 7 Choose Save Note After tapping the button and searching for a word tap the button again to stop Word Finder Sett...

Page 201: ...will open 2 Type the word in the colored box Uses of the word will appear above the colored box and one or more paths to the word will appear below the colored box 3 Tap Done to close the keyboard an...

Page 202: ...the number of letters you need to enter When you enter the first letter on the keyboard the Chat software displays a list of words beginning with that letter As you enter more letters the list is upd...

Page 203: ...tic Word prediction uses the large word prediction dictionary The settings that apply to learning are not available Learning Word prediction includes the ability to learn starting with an empty librar...

Page 204: ...ritish English Adding Words using the Add Learned Words Screen Use the Add Learned Words screen to add words directly to the learning word prediction dictionary This screen accumulates an alphabetical...

Page 205: ...r letters in the text field to jump to specific locations in the list Adding Words by Entering them in the Vocabulary In your vocabulary choose the keyboard button to display the keyboard Then enter a...

Page 206: ...rd prediction dictionary Only words entered from the keyboard in a vocabulary will be reviewed Words added from the Add Learned Words screen or an imported text file will not be reviewed Choose Menu S...

Page 207: ...o add to the list Note As you enter characters the display will be limited to words that begin with those characters This may save you from trying to add a word that is already on the list 4 Choose Ad...

Page 208: ...e file application to save the document as a text file Then remove the text you don t want to add to learning prediction For example if you use Microsoft Word select Save As and select Plain Text txt...

Page 209: ...Settings Text Prediction Add Words The words in the file should be listed on the Add Learned Words screen Deleting Prediction Words You can delete individual learned words or all learned words from t...

Page 210: ...by frequency of use select Order by count For any word you want to delete from the word prediction dictionary choose the X icon To move a word to the list of banned words choose the icon To delete all...

Page 211: ...p Next 4 Enter the text to be displayed and spoken 5 Choose Save To use the abbreviation open the keyboard page and enter the abbreviation followed by a period The abbreviation should expand automatic...

Page 212: ...revent the user from changing them To lock application settings 1 Choose Menu Settings Menu Lock 2 Enable Menu Lock 3 Enter a password and choose Save 4 Choose Menu Lock To unlock application settings...

Page 213: ...ation settings 1 Choose Menu Settings Menu Lock 2 Enable Menu Lock 3 Enter a password and choose Save 4 Choose Menu Lock To restore access to application settings and system settings Important If the...

Page 214: ...wing Block access to application settings block access to the operating system and apps block access to application settings AND the operating system and apps Blocking Access to ChatFusion 10 Applicat...

Page 215: ...o the operating system and apps Important If the Kiosk Mode option is greyed out on your ChatFusion you may have a dedicated device If you purchased your ChatFusion as a dedicated device you must purc...

Page 216: ...em and apps Important If the Kiosk Mode option is greyed out you may have a dedicated device If you purchased a dedicated ChatFusion device you must purchase a key to unlock the system Contact Saltill...

Page 217: ...is greyed out you may have a dedicated device If you purchased a dedicated ChatFusion device you must purchase a key to unlock the system Contact Saltillo for details Blocking Access to Application Se...

Page 218: ...the vocabulary file settings language etc 4 Choose Menu Settings Profiles Save 5 Your new profile has been created with all current settings To create a second profile for example afternoon settings r...

Page 219: ...Settings Profiles Delete 2 Choose the profile to delete from the list 3 Choose Yes at the confirmation prompt Restoring Default Profile Settings At any time you can restore the default settings 1 Choo...

Page 220: ...Touch Wake Up When Touch Wake Up is turned on You can wake the device by touching the screen or pressing a switch plugged into the device Note Touching the screen or pressing a switch will wake the d...

Page 221: ...mats Creating a Date Time Button You can create a button that speaks and shows the date time or both in the Speech Display Bar SDB 1 Go to the page on which you want to create the button 2 Select Menu...

Page 222: ...button that you do not want to include 12 Select Save When you select the button it should speak and show the date time or both in the Speech Display Bar SDB Adding Audible Feedback The application pr...

Page 223: ...the results in easy to understand graphic formats that provides valuable insights into each person s language development With this service you can 1 Track the person s communication development over...

Page 224: ...ion 2 Choose Continue to close the message and open a keyboard for creating a privacy password 3 Enter a password and choose Next 4 Enter the password again to confirm it and choose Save The Data Logg...

Page 225: ...collecting usage data Your next step is to upload that data to the Realize Language website for analysis You can initiate uploads manually any time or choose to allow data to upload automatically ever...

Page 226: ...dress and Realize Language account password 3 Enter your Realize Language account email address and choose Next The highlight moves to the Realize Language Password field 4 Enter your Realize Language...

Page 227: ...t to associate data The following message will appear Logged data exists that is not associated with a person Do you want it associated with person 3 Choose Yes The name you select will appear under P...

Page 228: ...Now at any time Note If you want to initiate all data uploads yourself leave this option unselected and use Upload Now each time you want to upload data Initiating an Immediate Data Upload Any time y...

Page 229: ...al communication Do you want to save personal communication 6 Select Yes File Saved will appear near the bottom of the screen 7 You can then view the file on your device or computer To view the file o...

Page 230: ...to Clear window will be displayed 2 Choose the person whose usage data you want to clear Note A green dot will appear to the right of the person who is selected currently You can choose that person a...

Page 231: ...ord from the Data Logging menu 2 Enter your old privacy password and choose Next 3 Enter your new privacy password in the New Password field and choose Next 4 Enter your new privacy password again in...

Page 232: ...that provides valuable insights into each person s language development With this service you can 1 Track the person s communication development over time 2 Compare different aspects of communication...

Page 233: ...p a privacy password to protect your communications from being shared without your permission 2 Choose Continue to close the message and open a keyboard for creating a privacy password 3 Enter a passw...

Page 234: ...s to personal communication requires authorization Please enter your privacy password 2 Choose OK The keyboard will be displayed with the cursor in the Password field 3 Enter your privacy password and...

Page 235: ...ter The device screen will display Transfer Mode and the computer will display a window with several options 2 Click Open device to view files 3 Locate the file by navigating to the ChatPC folder and...

Page 236: ...ovided USB flash drive has a micro USB connector on one end that plugs into your device and a USB 3 0 connector on the other end that plugs into a computer The drive rotates in its holder so you can p...

Page 237: ...le for a different person select the list box arrow and select a different person 3 Select an option Since last save on From to or All 4 Choose Save to File Select the USB drive in the left pane of th...

Page 238: ...the focus tap another area of the display The circle will move to that area 4 When the image looks the way you want it tap the Camera button To use additional features Tap the icon above the Camera bu...

Page 239: ...4 Choose Edit Button to display the Button Properties 5 Add a label and message 6 Scroll down to Button Actions and tap Add to open the list of actions 7 Scroll down the list and select Take Photo 8 T...

Page 240: ...m device do either of the following Choose Gallery or the Pictures folder select the photo and tap the Delete icon Turn off your device and turn it back on Then connect the device to your computer go...

Page 241: ...ions are selected 1 Choose Menu Help Check for Updates Menu 2 If either option is not selected select the box to insert a green checkmark To check for download and install updates 1 Choose Menu Help T...

Page 242: ...ll To do this choose Menu Help Check for Updates Menu Update files will download automatically but will not be installed The next time you restart the device Check Now will be displayed on the screen...

Page 243: ...splayed 3 Select I agree to the End User License Agreement 4 Scroll through the list of updates and select the applicable file The file will start downloading Depending on your internet connection thi...

Page 244: ...guard against losing changes you made If a problem occurs you can then restore the backed up files to your device How you back up your vocabulary files depends on the backup media you have access to...

Page 245: ...sion 8 devices The Import Export feature can back up vocabulary files to a USB drive or to a folder on the device ChatFusion 10 devices The Import Export feature can only back up vocabulary files to a...

Page 246: ...icro USB connector Note If the device s file manager opens use the device s Back arrow to close it 2 On the device select Menu Library Menu Import Export Note A different file management screen may op...

Page 247: ...247 3 A window will list the customized files under Device on the left Any files already on the USB drive are listed under Backup Folder on the right 4 Select each file on the device that you want to...

Page 248: ...ed to restore a backed up file to your device do the following 1 Connect your USB drive to the USB port on your device Note If the device s file manager opens use the device s Back arrow to close it 2...

Page 249: ...ame as a file on your device you will be asked if you want to overwrite the file on the device If you select Yes the file will be overwritten as the file is copied to the device If you select No the b...

Page 250: ...the Editor Cords and cables are potential entanglement or strangulation hazards Please consider this prior to placing these items with device users Note If a message prompts you to allow access you m...

Page 251: ...ile should be listed in the ChatEditor section of the Transfer screen Click Done If you are finished transferring files disconnect the USB cable from the device and the computer Copying Vocabulary Fil...

Page 252: ...Backup 3 Choose Yes to proceed 4 When the backup is complete choose OK Restoring a Library to the Device 1 Choose Menu Library 2 Choose Menu Restore 3 Choose Yes at the overwrite prompt 4 Choose Yes...

Page 253: ...want to delete one or more custom vocabularies use this procedure 1 Choose Menu Library Menu Delete 2 Check each file in the list the list contains only custom files 3 Choose Delete 4 Choose Yes to c...

Page 254: ...will delete all custom vocabularies and restore all Chat software settings to their defaults 1 Choose Menu Settings System Reset Data The following prompt will be displayed 2 Choose Yes to confirm 3...

Page 255: ...e for details on removing these items Images can be removed manually by choosing the Gallery App and choosing to delete the images and image albums Photos taken with the device s camera can be removed...

Page 256: ...incur a charge from your mobile access service provider Wireless carrier fees may apply Note Images in this section are examples only Texting pages vary by vocabulary You can also modify texting page...

Page 257: ...f 15 Tap the home button 16 Tap Apps AeroText 17 If you see the message An app wants to turn Bluetooth ON for this device tap Allow Or if you see the message This app was built for an older version of...

Page 258: ...ble phones and list them on the screen 4 Select your phone Connecting to device will be displayed When the device connects to the phone Connected will be displayed after the phone name at the top of t...

Page 259: ...4 Conversations list Each conversation shows the first few words of the most recent message To view the entire conversation select the conversation to open the texting messages page 5 Done Functions...

Page 260: ...easier for the user to access than the Send or Create Contact buttons You may want to copy the button to your keyboard or another convenient page so you don t need to return to the Social or More Thin...

Page 261: ...mbols For this example assume your customized vocabulary file includes 60 buttons and the SymbolStix symbol set Choose Menu Edit Mode Pages Menu Import 2 Choose a default vocabulary file from which to...

Page 262: ...or example see Using a Different Texting Keyboard Page 14 Choose Menu Edit Mode to exit Edit Mode Then navigate to the page that includes your Texting button When you select the button you ll see that...

Page 263: ...th Phone To reactivate texting choose Menu Settings System Bluetooth settings Turn on Use with Phone Increasing the Size of the Speech Display Bar SDB If you aren t using a keyguard you may want to in...

Page 264: ...device when you choose New Message When you want to delete a contact use your phone to delete it To learn how to add a contact from a message see Adding a Contact from a Received Message Adding a Con...

Page 265: ...Create Contact button 3 Enter the contact s name in the SDB 4 Choose the Create Contact button The list of messages for the contact will be displayed with the new name in place of the phone number The...

Page 266: ...ary The texting conversations page opens 2 Choose New Message Your contacts list is displayed 3 Select the contact you want you want to send the message to The vocabulary home page or the page you spe...

Page 267: ...uard you may want to increase the size of the SDB This will increase the size of the Send button making it easier to access To increase the size of the SDB choose Menu Settings Style Number of Lines 5...

Page 268: ...at the bottom of the list Reply Reply to the most recent message at the bottom of the list Click Reply to open the vocabulary home page or the page you specified as your texting keyboard page with a S...

Page 269: ...You can speak any text message in a conversation 1 From the list of messages for a contact select the message you want to speak 2 When you select the message the text message details page is displayed...

Page 270: ...essage and paste it into a text message you want to send to someone else 1 From the list of messages for a contact select the message you want to copy 2 When you select the message the text message de...

Page 271: ...old on the SDB A menu will open 6 Choose Paste The copied message will be copied to the SDB 7 Tap Send Display Creating a Draft Message to finish later If you start a text message and are interrupted...

Page 272: ...nversations when Creating a Message You can be in a conversation before creating a text message For example if you have text in the SDB that you decide you want to text to someone you can go to Textin...

Page 273: ...ge you want to delete 3 Select Delete Text Message 4 Repeat steps 2 and 3 for each message you want to delete Note To delete a contact use your phone Using the Back icon with Texting The Back icon or...

Page 274: ...t connected to the device If you tap the icon you ll see a small popup note The phone is not connected When you connect the phone the icon will disappear The version of AeroText installed on the conne...

Page 275: ...essage Creates a message to text to one of your contacts This action is used on the Reply button When you choose Reply the action takes you to Home with the Enter the text to send prompt and Send butt...

Page 276: ...Details Navigates to the text message details page which displays the text date and time of the selected message Note This action displays the date only if the message is older than one day Texting N...

Page 277: ...ChatFusion User s Guide 277 Action Description Texting Speak Text Message Speaks the currently selected text message...

Page 278: ...r retrieving and storing data from a certain event webhook event A webhook event is a web request via a URL that can contain additional information needed by the webhook service provider There are two...

Page 279: ...8a606107fac15 submitted_at 2018 01 18T18 17 02Z JSON Webhooks must deliver responses payloads in JSON format a language used by programmers The Chat software provides an interface for these responses...

Page 280: ...smart home device Note You can simplify programming webhooks by using ChatEditor especially copying and pasting URLs and entering data in JSON format 1 Choose Menu Edit Mode 2 Press and hold the butt...

Page 281: ...placeholders must appear as follows SDB and MESSAGE 10 Choose Save 11 Make sure you have an active Wi Fi connection and choose the button you created Viewing Webhook Examples For examples of how to u...

Page 282: ...is turned on tap the icon to turn Airplane mode off Option 2 Open the Android Settings and select Airplane mode in the left pane If the setting in the right pane shows On tap the setting to change it...

Page 283: ...reset by cycling power with the device s power button A hard reset is not recommended No Speech Check the volume control on the edge of device If that is not the problem choose Menu Settings Speech Ou...

Page 284: ...is in the charge pad but the battery is not charging Verify that the charge pad is plugged into an electrical outlet or surge protector If you are using a surge protector make sure it is turned on Ver...

Page 285: ...on It only appears on trial devices Choose the icon to open a message Read the message and select OK This message will reappear every seven days until you complete and submit your funding trial device...

Page 286: ...e updated or The version of Chat software installed on your device is incompatible with the version of AeroText installed on the connected phone and should be updated AeroText is not set as the defaul...

Page 287: ...Saltillo customer support The installed software is erroneous Please contact customer support The software did not install properly Contact Saltillo customer support The repository configuration has e...

Page 288: ...ion and that it has a strong signal Go to Home Settings Wi Fi and ensure a good connection is made to your network If you still don t have a connection contact Saltillo customer support Unable to down...

Page 289: ...go to Menu Help About and note the Device ID Then call Saltillo customer support and provide the device ID Customer support will help you register the software again If you already have your registrat...

Page 290: ...ld replaceable and the system will need to be returned to PRC Saltillo USA for servicing Replacement and repair of any electronic components of your device should only be done by qualified service per...

Page 291: ...sending a system back Please call the company at 1 800 382 8622 option 1 or email at service saltillo com to obtain a Return Authorization number prior to sending the system to PRC Saltillo If replac...

Page 292: ...ior to sending a system back Please call the company at 1 800 382 8622 option 1 or email at service saltillo com to obtain a Return Authorization number prior to sending the system to PRC Saltillo If...

Page 293: ...mple an est button for adjectives Setting up grammar actions involves identifying words as a part of speech and setting up a button to apply a grammar rule applicable to that part of speech In this ap...

Page 294: ...portant The grammar property must appear first in the list of actions You ll need to move it to the top of the list 9 Tap Apply Grammar Property noun A menu will open 10 Choose Move Up In this example...

Page 295: ...Grammar Rule window will open 4 Tap the Grammar Rule list box arrow A list of options will be displayed These options perform as follows Option Application add ed verb simple past tense add en verb pa...

Page 296: ...n button labels the changes that will be made to words when grammar rules are applied Important If you are working with a person learning language it is best not to turn on Dynamic Labels The grammar...

Page 297: ...en video game and computer game remain unchanged even though either word will be pluralized when selected Example Dynamic Grammar Labels turned on When the s grammar rule key is chosen video game and...

Page 298: ...ou will need to tap the pluralize button again before pluralizing another thing 1 In the Speech Display Bar SDB enter the words you want to speak up to the game you want to pluralize In this example I...

Page 299: ...ed If however you tap the pluralize button and decide you don t want to pluralize any word the software will pluralize the next noun you select unless you clear the pluralize state In this case after...

Page 300: ...nymously it does not include any personally identifiable information When you install or update the Chat software to version 2 28 a window titled You Are Helping Us to Improve Your Experience will app...

Page 301: ...quipment into an outlet on a circuit different from that to which the receiver is connected Consult the dealer or an experienced radio TV technician for help Industry Canada IC Warning This device com...

Page 302: ...d used with a table stand or mounted to a wheelchair It is accessed by using the touchscreen a head tracking system or a variety of available switch accessories The device does not incorporate in any...

Page 303: ...n storage for a long period of time turn the device and amplifier off Devices in storage must be charged every six months Explanation of Symbols This section explains the symbols that appear on ChatFu...

Page 304: ...tware operating system Chat software Android Standard components Amplifier handle stand frame battery charger charge pad with power supply USB cable USB flash drive stylus Accessories Keyguards TouchG...

Page 305: ...op up speech to develop literacy skills 142 Options 139 Preventing double selection of button 140 Setting button activation time 139 Setting up a button beep 140 Setting up a button visual indication...

Page 306: ...160 Automatic capitalization 211 Automatic updates Updating the Chat software using Wi Fi 241 Automatic uploads 228 Averaging Head tracking 196 Averaging Details Head tracking 196 B Back icon 25 Usin...

Page 307: ...98 List of available actions 107 Modifiers 105 Modifying color saturation 101 Modifying styles 100 Moving images to and from device 96 Overriding a page button style 104 Overriding a specific button...

Page 308: ...ctivation 195 Mounting 173 Normal dwell method 189 Pointer visual effects 181 Popup menus 184 Positioning the unit 196 Positioning the user 196 Rest area 185 Secondary dwell time 194 Settings 176 Sir...

Page 309: ...21 Creating a button to show and speak the date and or time 221 Deleting a custom scan pattern from all pages 172 Deleting a custom scan pattern from one page 171 Device Changing orientation 143 Charg...

Page 310: ...o select buttons 66 Exporting Backing up and restoring specified vocabulary files to a USB flash drive 245 F Feedback Adding audible feedback 222 Files Removing downloads 255 Flash drive Backing up an...

Page 311: ...ng auditory prompts volume 161 Hiding Hiding or showing all buttons 98 Hiding or showing multiple buttons 98 Home icon 25 Home page Changing your home page 120 Setting a special page as your home page...

Page 312: ...system ChatFusion 8 213 Locking ChatFusion 8 application settings 212 Unlocking access application and system settings on an open system ChatFusion 8 213 Unlocking access to all settings on an open sy...

Page 313: ...ing from template 118 Overriding a page button style 104 Overriding a page style 119 Overriding a specific button s style 104 Setting a special page as your home page 122 Setting an imported texting p...

Page 314: ...g vocabulary files 244 Restricting access Restricting access on a dedicated device 217 Restricting access on an open system ChatFusion 10 214 Restricting access on an open system ChatFusion 8 212 S Sa...

Page 315: ...n 8 212 Configuring head tracking settings 176 Creating profiles 218 Head tracking advanced settings 186 Restoring access to all settings on an open system ChatFusion 10 216 Restoring access to applic...

Page 316: ...tions 65 Overview 80 Selecting a synthesizer 78 Selecting a voice 78 Simultaneous conversations 65 Speaking after every character word or sentence 81 Toggling on or off 81 Troubleshooting 283 Speech D...

Page 317: ...tivating 263 Adding a contact from a received message 264 Adding texting to a customized vocabulary file 261 Advanced setup 275 Bluetooth connection 258 Composing and sending a message 266 Connecting...

Page 318: ...8 Immediate 228 URL Adding a webhook event to a button 278 USB flash drive Backing up and restoring specified vocabulary files to a USB flash drive 245 Saving usage data to a USB flash drive 236 V Ver...

Page 319: ...r108 74 WordPower108 with Keyboard 74 WordPower140 Scan Touch 74 WordPower20 Simply 72 WordPower25 Touch Scan 72 WordPower42 73 WordPower42 Basic 73 WordPower48 73 WordPower60 73 WordPower60 Basic 73...

Page 320: ...sing 202 WordPower 72 WordPower108 74 WordPower108 with Keyboard 74 WordPower140 Scan Touch 74 WordPower20 Simply 72 WordPower25 Touch Scan 72 WordPower42 73 WordPower42 Basic 73 WordPower48 73 WordPo...

Reviews: