Nutritional Information
The Saladmaster® Machine can play an integral role in your healthy lifestyle
allowing you to quickly and easily create healthful salads, side dishes, and main
meals using the freshest ingredients. With the following ingredients, there is
no skimping on nutrition
…or f lavor!
•
According to the American Cancer Association, cruciferous vegetables
help the body resist cancer.
Cabbage
and
Radishes
are in the
cruciferous category.
•
Squash & Zucchini:
Vitamin C, B6 and A, Magnesium, Potassium,
and Fiber.
•
Carrots:
Carotenoids. High carotenoid intake has been linked to a
decrease in cancer.
•
Celery:
Vitamin C (immune system vitamin), Phthalides Compounds
(relaxes muscles of the arteries and reduces stress hormones).
•
Cheese:
Calcium, Protein, Vitamins B, B2, B12, Zinc.
•
Cantaloupe:
Good source of Beta-Carotene, and also a good source
of Potassium and Vitamin C.
•
Honey Dew:
Calcium and Vitamin C. One cup provides 10 milligrams
of Calcium, about 10 percent of an adult's daily requirement with just
60 calories.
•
Bananas:
Vitamin C, Potassium, Phosphorus, and Vitamin A.
•
Pears:
Calcium, Potassium, Phosphorus, and Vitamin A.
•
Apples:
Calcium, Potassium, and Vitamin A.
10
Using the Saladmaster® Machine
This precision engineered, superbly constructed kitchen utensil is a handy,
simple-to-use machine allowing you to slice and grate all types of foods
including vegetables, fruits, nuts, crackers, cheese, hard sausage, shrimp and
various meats.
Easy to turn, this manually operated food cutter allows you to have complete
control over the speed of the device and the size of the processed pieces of
food. It features a heavily chrome plated base and hopper…guaranteed not
to chip, peel or pit. The five cutting cones are constructed of stainless steel
for everlasting beauty and protection. Under normal use, your Saladmaster®
Machine should provide a lifetime of superb service.
Get started by following these simple steps:
•
Before first use, thoroughly wash unit.
See “Cleaning” on page 5.
•
Attach suction cups to feet, pushing cups up on feet as far as possible.
•
Position base onto work surface and press down to establish suction cups
firmly. Surface being used must be a non-porous type such as formica. To
loosen suction cups from work surface, simply lift edges of suction cups
with your finger. Do not forcibly pull suction cups loose.
•
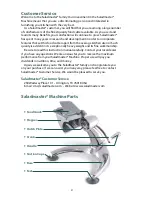
Place hopper onto the base. Slide food guide onto top of hopper. The food
guide helps to position foods properly against the cone to ensure the best
cutting results.
CAUTION:
As with any precision cutting instrument, the edges of the
cutting cones are very sharp. Use extreme care when handling.
•
To attach cutting cones, place center hole in cone on center pin of clutch
plate. Turn handle clockwise to engage disk lugs into six holes of cone.
Check to make sure handle turns easily and cone is secure. To remove cone,
reverse procedure.
•
Place a bowl directly under the slicing cone to catch food.
•
Feed foods with fingertips, anchoring thumb and little finger on the sides of
the hopper. Do not feed with thumbs, palm of hand, or “baseball bat” grip.
Push food through cone using constant pressure while turning the handle
to activate the cutting mechanism. Always use fresh, crisp foods.
•
Thoroughly clean after each use.
See "Cleaning" on page 5.
3


