background image


Revised 10/02/2012 

7.3 

Overflow Bottle Cleaning 

The overflow bottles associated with Retort #3 and #4 

serve as overflow receptacles in the event excess reagent 
(paraffin) is pumped into the associated retort. The 
overflow bottles should be cleaned as needed to remove 
any accumulated paraffin. 
WARNING: THE OVERFLOW BOTTLES MAY CONTAIN 

BIOHAZARDOUS WASTE. DISPOSE OF CONTENTS IN 

ACCORDANCE WITH LOCAL REGULATIONS. 
To clean the overflow bottles: 
1.


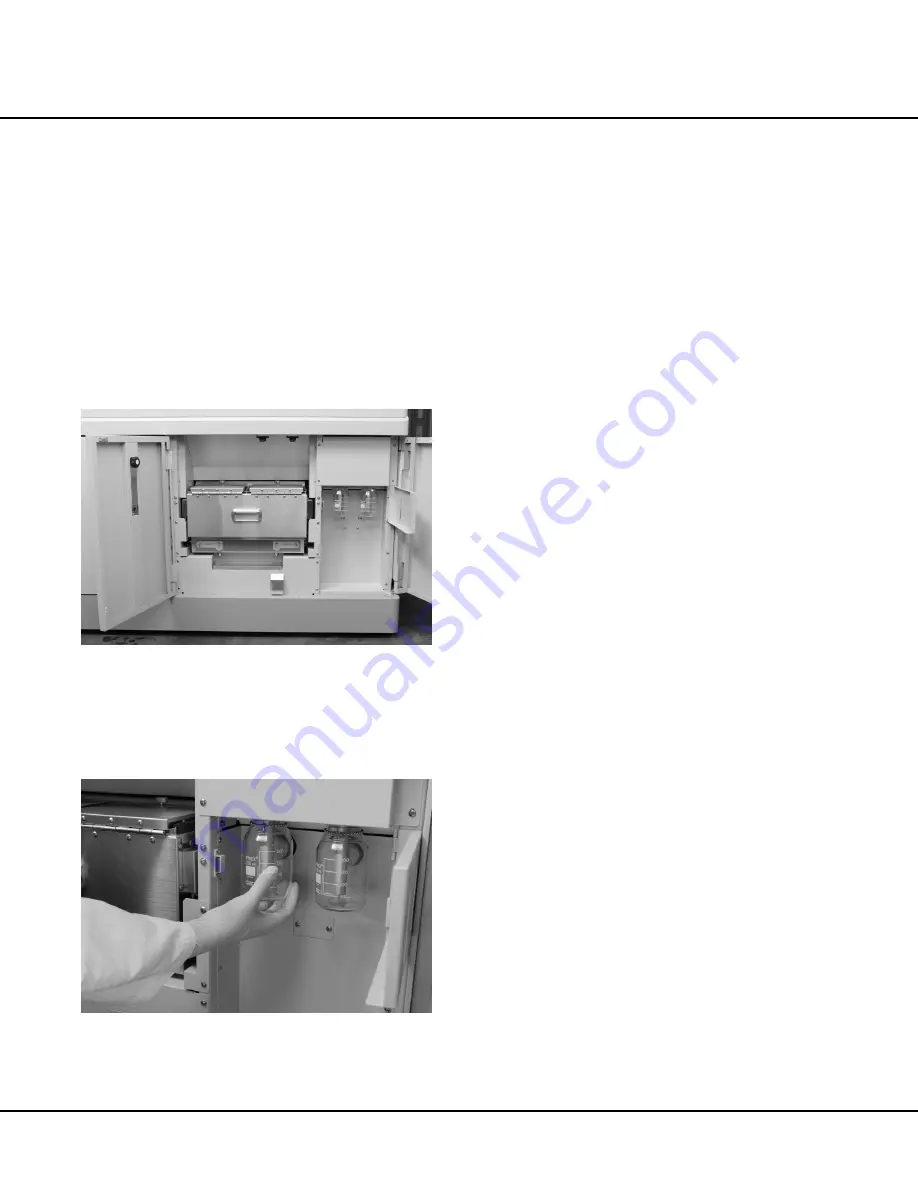
Open the Overflow Bottles Access Door (Figure 7-A). 


Figure 7-A 

 
2.


Loosen each overflow bottle by turning to the left, and 
remove the overflow bottles from the overflow bottle 
cabinet (Figure 7-B). 


Figure 7-B 

3.


Discard accumulated paraffin in the overflow bottles 
in accordance with local regulations for biohazardous 
waste. 

4.


Clean any paraffin residue in overflow bottles using 
hot, soapy water, then rinse and wipe dry. 

NOTE: The overflow bottles are labeled “#3” and “#4” to 
ensure reinstallation in the correct locations in the 
overflow bottle cabinet. 
5.


Reinstall the overflow bottles in the overflow bottle 
cabinet. Be sure to match the labels on the overflow 
bottles with the labels on the overflow bottle cabinet 
to ensure installation in the proper locations. 

6.


Tighten each overflow bottle by turning to the right. 

7.


Close the Overflow Bottle Access Door. 

Pre-Processing Solution                

Replacement 

Onboard Pre-Processing Solution must be replaced on 

condition  (after a specified number of hours) to ensure 

proper preprocessing.  The instrument con be configured 

to count the number of hours the solution has been in the 

instrument to aid in determining when to replace the Pre-

Processing Solution (See “System Operation”, page 4.5). 
NOTE:  Depending on the types of tissues processed the 

Pre-Processing Solution should be replaced every 3 

hours. 

To replace the Pre-Processing Solution: 
WARNING:  THE PREPROCESSING CONTAINER MAY 

CONTAIN BIOHAZARDOUS WASTE.  DISPOSE OF 

THE CONTENTS IN ACCORDENCE WITH LOCAL 

REGULATIONS. 
1.


Open the Loading Station Door. 

2.


Remove the Loading Station Container. 

3.


Discard the Pre-Processing Solution per local 

regulations. 

4.


Wipe the inside of the loading station container with 

gauze. 

5.


Fill the Loading Station Container with 1.2L of Pre-

Processing Solution. 

6.


Place the Loading Station Container inside the 

instrument. 

7.


Close the Loading Station Door. 

Summary of Contents for Tissue-Tek Xpress x120

Page 1: ...Operating Operating Manual Manual Rapid Tissue Processor Tissue Tek Xpress x120 ...

Page 2: ...O p e r a t i n g O p e r a t i n g M a n u a l M a n u a l Rapid Tissue Processor Tissue Tek Xpress x 120 ...

Page 3: ......

Page 4: ... 2012 Sakura Finetek USA Inc All Rights Reserved Printed in U S A 0004389 03 Rev C Manufactured for Sakura Finetek U S A Inc Torrance CA 90501 U S A ...

Page 5: ...al Information 3 1 Accessing the UTILITIES Menu 3 1 Configuring System Settings 3 2 4 OPERATING INSTRUCTIONS Initial Setup 4 1 Understanding the Control Panel Display 4 1 Preparation for Processing 4 2 System Start Up 4 3 System Operation 4 5 Special Conditions and Considerations 4 12 Viewing Reports and Statistics 4 13 5 RECOVERY PROCESS Overview 5 1 Detecting an Error Condition 5 1 Starting a Pr...

Page 6: ...ory Items 9 2 APPENDIX Tissue Tek Xpress x120 Rapid Tissue Processor Applications Manual Overview A 1 Preparation for Processing A 1 Use of Tissue Tek Xpress x120 Pre Processing Solution or Pre Processing Fixative A 1 Use of Tissue Tek Molecular Fixative A 2 Embedding of Tissue Tek Xpress x120 Processed Tissue A 4 Microtomy A 4 Staining A 4 Microscopic Evaluation A 5 Reprocessing of Tissue A 5 Tis...

Page 7: ...et The instrument employs scheduling software to efficiently process and transfer sample baskets The Tissue Tek Xpress x120 instrument has the follow ing features Instrument can be configured for either Manual or Automatic start up Compatible specimen types include Formalin fixed tissue tissue fixed in Tissue Tek Xpress Molecular Fixative Supports use of standard cassettes and Tissue Tek Paraform ...

Page 8: ...ty of infections depending on the type of specimens processed Pre vent infections by using Personal Pro tective Equipment PPE as required by OSHA and any applicable state or local regulations CAUTION Do not use cassettes that contain metal or use metal lids Do not place any metal items in Retorts 1 and 2 CAUTION When placing cassettes into the basket do not allow cassettes to extend above the uppe...

Page 9: ...e opened The Loading Indicator is off whenever there is a basket in the Loading Station or when the Transferring Arm is in motion Light On indicates access permitted to the Loading Station access door the door can be opened The Loading Indicator is on when there is no basket in the Loading Station and the Transferring Arm is stationary The Loading Indicator is operational only when a user is logge...

Page 10: ...lume selection high mid low are user selectable see Configuring System Settings on page 3 2 for details Retort Access Door 5 provides access to the Microwave and Vacuum Stations for purposes of cleaning and or maintenance Access to all four retorts is permit ted denied under software control when the instrument is processing specimens Retort 1 2 Reagent Cabinet Access Door 6 provides access to ret...

Page 11: ...ight must be manually turned off Shutting down the instru ment will not turn the light off USB Interface 16 USB communication port for connection to a memory stick for transfer of data to an external PC Figure 1 D Figure 1 D External Alarm Output Port allows for connection of an external audible alarm to a switched no voltage contact within the Tissue Tek Xpress x120 contact is switched when an al...

Page 12: ...ponents Figure 1 E Control Panel 8 Loading Station 17 Retort 1 18 Retort 2 19 Retort 3 20 Retort 4 21 Unloading Station 22 Transfer System 23 Fume Control System 24 Reagent Cabinet 25 Paraffin Oven 26 Overflow Bottles 27 Accessory Compartment 28 Major systems and components of the Tissue Tek Xpress x120 instrument are described in the following paragraphs Figure 1 E ...

Page 13: ...wave retort has a designated reagent supply level of approximately 1 44 liters with a maximum capacity of approximately 1 74 liters Filing and draining of the retorts is accomplished by a reagent flow circuit operating under software control The flow control circuit incorporates an interlock that prevents reagent from draining out of the retort if a reagent container is not in place in the reagent...

Page 14: ...ber The upper sensor is used to prevent reagent overflow The sensor is actuated at approximately 2 5 liters When the upper sensor is actuated an audible alarm sounds and the line pump is stopped A software controlled temperature regulation unit main tains temperature in the preheating chamber Reagent Cabinet Figure 1 H Figure 1 H The reagent cabinet 25 is accessed through a door in the cabinet fro...

Page 15: ...during pro cessing The lid is opened automatically during transfer operations and may be opened manually when no power is applied to the motor to allow for cleaning and mainte nance of the retort Vacuum pumps are used to pump reagent melted paraffin into the Vacuum Station retorts The vacuum pump for Vacuum Retorts applies vacuum for 80 seconds and then is off for 10 seconds no vacuum applied This...

Page 16: ...ovides for storage of baskets or magazine sets after completing tissue processing Access to the Unloading Station is facilitated by an access door in the Cabinet Front see Cabinet Front Figure 1 A on page 1 3 for details The Unloading Station is comprised essentially of a dual retort heater and transport tray Figure 1 L The dual retort 22 allows for temporary storage of two processed baskets or fo...

Page 17: ...tion beneath the basket while traveling horizontally between stations Fume Control System Figure 1 N Figure 1 N The Fume Control System 24 is comprised essential ly of a hood activated carbon absorption filter and exhaust fan The Fume Control System is accessed through a door in the cabinet front see Cabinet Front Figure 1 A on page 1 3 for details The Fume Control System hood serves to prevent ha...

Page 18: ... data entry and display screens to manage instrument users configure system settings and view statistical data see Section 3 Customization of Settings and Section 4 Operating Instructions for details Specifications Models Covered By This Manual Product Code Name Description 7720 Tissue Tek Xpress x120 Continuous Rapid Tissue Processor 200 VAC USA 7721 Tissue Tek Xpress x120 Continuous Rapid Tissue...

Page 19: ...on No 864 3875 For Model 7721 Japanese Pharmaceutical Law Complies with Quality Management System ISO 13485 2003 Electrical Safety JIS C 1010 1 2005 IEC61010 2001 ed2 IEC61010 2 010 2003 IEC61010 2 081 2001 IEC61010 2 101 2002 EMC JIS C1806 1 2001 Risk Management JIS T 14971 2003 For Model 7722 Complies with LVD IVD EN61010 1 2001 ed2 EN61010 2 010 2003 ed2 EN61010 2 081 2001 EN61010 2 101 2002 EM...

Page 20: ...INTRODUCTION 1 14 Revised 10 02 2012 ...

Page 21: ...s carefully CAUTION The Tissue Tek Xpress x120 is a precision instrument and must be handled accordingly Rough handling or dropping will disturb or damage internal components Always handle the instrument with care Environmental Factors As with all sensitive electronic equipment avoid pro longed exposure to excessive temperature and humidity Temperature and humidity should be held relatively consta...

Page 22: ...olding a basket or magazine set and that there are no or magazines baskets in the Loading Station Unloading Station or in any retort Verify that all retort lids are closed If any lids are open close them manually Verify both reagent containers are full Ensure both reagent containers are in their proper posi tions in the cabinet and that locking levers for both containers are in the locked position...

Page 23: ...ct Code 7106 1 pack of 20 Loading Station Container w Lid Product Code 7108 1 Description Quantity Basket Transportation Tray Product Code 7109 1 Drip Tray Product Code O71 169 01 1 Reagent Bottle Tray Product Code O71 355 00 1 Retort Cleaning Pipette Product Code D9 01 0102 1 Retort Mesh Filter Removal Tool Product Code O71 692 00 1 Sight Tube Cleaning Brush Product Code O71 697 00 1 Spill Tray P...

Page 24: ...INSTALLATION 2 4 Revised 10 02 2012 ...

Page 25: ...rom the WARMING UP SYSTEM screen MANUAL START screen or AUTO START screen touch the LOG ON button The INPUT PASSWORD dialog displays Use the keypad to enter the password then touch the ENTER key NOTE The password is displayed on the screen as entered as a series of asterisks If the login is unsuccessful When password is incorrectly entered the message INCORRECT PASSWORD ENTERED displays Reenter th...

Page 26: ...YSTEM SETUP option allows changes to user selectable and user specified system settings and parameters To change system settings 1 From the UTILITIES screen touch the SYSTEM SETUP button SYSTEM SETUP screen page 1 displays Figure 3 B showing the currently selected parameters for the instrument selected parameters are indi cated by a gray background Figure 3 B NOTE The SYSTEM SETUP screen is a mult...

Page 27: ...ed option field either HIGH au dible within 100 feet of instrument MIDDLE au dible within 50 feet of instrument or LOW audi ble within 10 feet of instrument The factory default setting for SOUND VOLUME is MIDDLE NOTE Touch the TEST CLICK TEST ALARM or TEST END OF PROCESS button to test the selected SOUND VOLUME SOUND SELECTION allows for selection of the desired end of process and alarm sounds fro...

Page 28: ...und 2 Touch the RESET DEFAULTS key to return system settings to the factory default values 3 The system returns to the UTILITIES screen To print system settings NOTE The PRINT option allows users to export a file to a USB memory stick FILE OUTPUT exports a CSV file to a USB memory stick PRINT exports a PDF file to a USB memory stick 1 From the UTILITIES screen touch the SYSTEM SETUP button SYSTEM ...

Page 29: ... the keyboard to enter the desired password The password displays as a series of asterisks when entered NOTE The password must be a six digit numeric password DO NOT use alphabetic characters in the password 5 When the desired password has been entered in the PASSWORD field press the ENTER key 6 Touch the REENTER field then use the keyboard to reenter the password as entered in step 4 7 When the p...

Page 30: ... can be entered NOTE The USER DEFINED FILE is unsorted Items are listed in the order in which they were entered To edit an item in the file 1 Touch the name of the item chosen for edit in the USER DEFINED FILE list then touch the EDIT button The EDIT USER DEFINED ITEM screen displays Figure 3 G Figure 3 G NOTE Use the backspace key to edit a currently entered name 2 Touch the NAME field then use t...

Page 31: ... to enter the desired on time the time at which the instrument should be ready to begin processing or off time the time at which the instru ment should normally shutdown 3 When the desired time has been entered in the active field press the ENTER key 4 Repeat steps 1 through 3 to set the ON TIME and OFF TIME for the remaining days of the week 5 When all desired on off times have been entered or ed...

Page 32: ... 3 I showing the days off calendar for the current month Currently specified days off are indicat ed by a red circle around the date The DAYS OFF LIST lists all currently specified days off in chronological order Days off can be selected by using the calendar Days off can be deselected by using either the calendar or the DAYS OFF LIST To use the days off calendar 1 Use the PREVIOUS and NEXT button...

Page 33: ...TART or AUTO START is shown in the upper left hand corner of the window The currently selected pro cessing program STANDARD PROGRAM or EXTENDED PROGRAM is shown in the upper right hand corner of the window The process monitor window also provides status indicators for the Loading Station and Unloading Station access doors The indicators show when the associated access door can be opened to load or...

Page 34: ...settes that contain any metal or use metal lids When placing cassettes into the basket do not allow any cassettes to extend above the maximum limit rim Cassettes placed above the maximum limit rim will not be fully immersed in the reagents and will not be processed properly The Standard Basket incorporates a removable handle and lid to allow for easy loading and positioning of cassettes in the bas...

Page 35: ...igured to automatically start up and be ready for processing by a specified ready time When auto start is enabled the instrument is started prior to the desired ready time in order to allow the WARMING UP SYSTEM cycle to be completed by the desired time When the Auto Start Shutdown feature is enabled the Auto Start Shutdown indicator on the User Interface is illuminated at all times that power is ...

Page 36: ...strument at any time It is possible to log on to the instrument during the WARMING UP SYSTEM cycle or when the instrument is in the MANUAL or AUTO START process monitor mode To log on to the instrument NOTE If another user is current logged on to the instrument the LOG OFF button is shown in the lower right hand corner of the screen and the name of the user is shown at the top of the screen The sy...

Page 37: ...er the con trol of the scheduling software and based on the selected preprocessing time The Control Panel displays a process monitor screen that allows tracking the status of a basket or magazine set through the preprocessing cycle NOTE Do not transport or leave specimens in PPS overnight as this is a timed solution and over exposure will compromise the tissue samples Process Monitoring Once a pro...

Page 38: ...itiating a Processing Cycle After the WARMING UP SYSTEM cycle has completed the Control Panel displays the PROCESS MONITOR screen see Process Monitor Screen on page 4 1 for details The instrument is now ready to process specimens To load a basket or magazine set and initiate a processing cycle 1 Verify the instrument is ready to accept a basket or magazine set by observing the following conditions...

Page 39: ...ES text box If no value is entered in the INPUT NUMBER OF CASSETTES box the system will default to 40 cassettes If REAGENT CONTROL is set to RUN or DAY the system counts each basket or magazine set as a run and a day is automatically accounted for no user entry is required Select the appropriate user defined item loca tion department or doctor s name for which the cassettes are being processed fro...

Page 40: ...ow Figure 4 M Touch REPLACE after replacing the Pre Processing Solution the loading station icon changes back to blue and the SOLUTION EXPIRATION TIME is reset Touch LATER to continue without replacing the Pre Processing Solution the loading station icon remains yellow and the above message is displayed every 10 minutes until the solution is replaced NOTE Overuse of Pre Processing Solution could l...

Page 41: ...g Station completing pro cessing STATUS identifies the current state of the as sociated retort as follows LOADING STATION STATUS EMPTY The Loading Station is currently empty and is ready to accept a basket or magazine set WAIT A basket or magazine set is currently in the loading station and is undergoing prepro cessing or awaiting transfer to Retort 1 under control of the instrument s scheduling p...

Page 42: ...to the instrument to unload a basket or magazine set 1 Press the Unloading Indicator to open the lid of the unloading station 2 Open the Unloading Station Access Door Figure 4 O Figure 4 O 3 Remove the basket or magazine set from the Unloading Station and place the basket or magazine set on the transport tray for transportation to the par affin embedding system Figure 4 P Figure 4 P 4 Close the Un...

Page 43: ... at all times that power is applied to the instrument see Control Panel Figure 1 O on page 1 12 for details NOTE If it is necessary to shutdown the instrument prior to its programmed shutdown time use the Manual Shutdown procedure to manually shutdown the instru ment Shutting down the instrument manually will not affect the auto start cycle for the next day and auto start will occur at its next sc...

Page 44: ...GE occurs proceed as follows 1 Allow all baskets or magazine sets currently being processed to complete their processing 2 Remove the baskets or magazine sets from the Unloading Station when processing is completed 3 Perform a manual shutdown of the instrument see Manual Shutdown on page 4 11 for details 4 After the shutdown process has completed replace all reagents see Pre Processing Solution Re...

Page 45: ...rmation dialog A shutdown dialog displays the message REMOVE ALL BASKETS FROM RETORTS THEN SELECT GO TO STANDBY OR SHUTDOWN 4 Touch the SHUTDOWN button to shut down the instrument NOTE If baskets were in Retort s 3 or 4 they may be reprocessed using the recovery process see Section 5 Recovery Process for details Viewing Reports and Statistics The UTILITIES menu provides access to historical and st...

Page 46: ... been defined as Location Figure 4 U To view run history The RUN HISTORY screen is comprised of a series of data lines There is one for each run basket or magazine set processed by the in strument The RUN HISTORY screen provides the follow ing information DATE The date on which the run was processed RUN The system assigned number for the run Each basket or magazine set is assigned a unique number ...

Page 47: ...N HISTORY button The RUN HISTORY screen displays Figure 4 U 2 Touch the PRINT button 3 Select the print period from the list Viewing Statistics The system records and stores statistical data related to the number of runs and cassettes processed This information is retrieved and viewed using the STATISTICS function The system stores statistical information for the prior one year period Statistical ...

Page 48: ... STATISTICS Figure 4 X or MONTHLY STATISTICS Figure 4 Y screen Figure 4 W Figure 4 X Figure 4 Y To view statistics The STATISTICS screen is comprised of a series of data lines one for each instrument operator ADMIN 1 THRU 4 OPERATOR 1 thru 20 when viewing by OPERATOR or for each user defined item currently defined in the USER DEFINED FILE see Configuring System Settings on page 3 2 for details whe...

Page 49: ...ted location when viewing by LOCATION for the currently selected period X X AVERAGE RUNS DAY The average number of runs per day processed by the associated operator when viewing by OPERATOR or for the associated location when viewing by LOCATION for the currently selected period X X The STATISTICS screen initially displays statis tics for the current period day week or month as appropriate by oper...

Page 50: ...subsystem or process The ERROR LOG provides the following infor mation DATE TIME The date and time at which the associated error was logged RUN The identification number for the run that was in process when the associated error occurred If the associated error occurred while the instrument was idle this field is blank OPERATOR The name of the operator ADMIN 1 THRU 4 OPERATOR 1 THRU 20 logged into ...

Page 51: ...rest authorized Sakura instrument distributor or representative Detecting an Error Condition When the instrument has detected an error during processing a message window displays automatically Write this message down Then note the time left for the basket s in Retorts 3 and or 4 for reference during recovery process setup The window presents two options from which to choose RESUME or ABORT Figure ...

Page 52: ...ens beginning in Retort 3 or 4 due to an error condition that suspended processing or because of a technical processing issue NOTE There are no special recovery methods for those specimens that may have been suspended in Retorts 1 or 2 These specimens can be reprocessed by placing them back into Retort 1 without compromising specimen integrity NOTE If the Tissue Tek Xpress x120 will be down for lo...

Page 53: ... black and the Retorts are filled touch the 3 Retort 3 or 4 Retort 4 button as appropriate The lid for the selected Retort opens and the PROCESS TIME dialog displays Figure 5 E The Retort for which process time is being set is shown in the upper left corner of the dialog Figure 5 E 3 Place the basket to be processed in the Retort 4 Use the keypad on the PROCESS TIME dialog to set the amount of tim...

Page 54: ...RECOVERY PROCESS 5 4 Revised 10 02 2012 ...

Page 55: ...Wells Instruction Sheet Tampers 2 pcs Gauge Set 4 pcs 4848 Grossing Wells Left Handed Grossing Wells Instruction Sheet Tampers 2 pcs Gauge Set 4 pcs 7730 Reagent Set set of 4 7115 Pre Processing Solution 4 x 3 8L 7117 Pre Processing Fixative 4 x 3 8L 7120 Molecular Fixative 4 x 3 8L Standard Accessory Items Product Code Description 1550 Paraffin Scraper 4803 Grossing Fork 1 5mm 4804 Grossing Fork ...

Page 56: ...sue Tek AutoTEC Embedding System Product Code Description 7006 20 Cassette Tissue Tek AutoTEC Magazines 4 case Includes 4 adapters and 4 lids 7007 Tissue Tek AutoTEC Magazine Handles 6 case 7139 Uninterruptible Power Supply UPS 7145 Uninterruptible Power Supply Extended Use UPS AI8 IF 001 Service Manual Where to Call to Order Consumables and Accessories If located within the United States contact ...

Page 57: ...ekly Clean Preheating Chamber Sight Tubes Weekly Replace Fume Control System Activated Carbon Cartridge Monthly On Condition Maintenance Basket Magazine Cleaning CAUTION Using baskets or magazines with paraffin residue will cause clogging of the reagent transfer line and will result in instrument malfunction and improper processing of specimens A clean basket or magazine set MUST be used for each ...

Page 58: ...k each basket magazine for residual paraffin If the baskets are clean they are ready for use 7 Discard the soapy hot water solution down the drain Rinse the container with a second hot water rinse Discard soapy water down the drain Cleaning Method 3 for Tissue Tek Xpress x120 Processing Baskets and Magazines If an automatic dishwasher is not available for use in the laboratory Tissue Tek Xpress x1...

Page 59: ... Be sure to match the labels on the overflow bottles with the labels on the overflow bottle cabinet to ensure installation in the proper locations 6 Tighten each overflow bottle by turning to the right 7 Close the Overflow Bottle Access Door Pre Processing Solution Replacement Onboard Pre Processing Solution must be replaced on condition after a specified number of hours to ensure proper preproces...

Page 60: ...ls CAUTION To ensure proper processing of tissue specimens reagent for Retorts 1 and 2 and paraffin for Retorts 3 and 4 MUST be replaced at the same time NOTE Refer to Section 9 Service and Replacement Parts for information on obtaining replacement reagents Retorts 1 and 2 Reagent Replacement NOTE Each reagent container is equipped with a two piece cap connector The upper cap is used during shipme...

Page 61: ...ling the reagent containers with the reagent supply system Figure 7 E Figure 7 E 10 Close Retort 1 2 Reagent Cabinet Access Door Retort 3 and 4 Paraffin Replacement NOTE Retain the shipping materials to drain used paraffin WARNING DISPOSE OF USED PARAFFIN IN ACCORDANCE WITH LOCAL REGULATIONS FOR BIOHAZARDOUS WASTE To replace paraffin 1 Perform a system shutdown 2 Open the Paraffin Oven Access Door...

Page 62: ...ol knob 9 Seal the plastic bags securely Allow the used paraffin to harden then seal the containers Discard the used paraffin in accordance with local regulations for biohazardous waste 10 Turn the locking knob on the lid of the Retort 3 paraffin oven clockwise then lift the lid to open Figure 7 J Figure 7 J 11 Open the plastic shipping bag and dispense the entire contents into the paraffin oven F...

Page 63: ...ent is replaced the reagent counter must be cleared to maintain an accurate count for the next reagent replacement cycle To clear the reagent counter NOTE The user must be logged on to the system as an Administrator in order to clear the reagent counter see NOTE The user must be logged on to the system as an Administrator in order to clear the reagent counter see Logging On on page 4 4 for details...

Page 64: ...loth moistened with a xylene substitute then wipe dry After cleaning manually close the retort lids Use the paraffin scraper see Section 6 Consumables and Accessories for details from the retort shelf inside the instrument Clean excess paraffin residue from the retort shelf inside the instrument with a lint free cloth moistened with a xylene substitute then wipe dry Retort Mesh Filter Cleaning WAR...

Page 65: ...s accumulates the filling and draining processes for Retorts 3 and 4 may be affected To ensure proper filling and draining of the retorts clean the paraffin oven mesh filters weekly To clean the paraffin oven mesh filters 1 Open the Paraffin Oven Access Door Figure 7 P Figure 7 P 2 Press in on the paraffin oven to unlatch then slowly slide the oven out of the cabinet 3 Turn the locking knob on the...

Page 66: ...brush see Section 6 Consumables and Accessories for details into the sight tube and scrub up and down several times to remove debris from the wall of the sight tube Figure 7 T Figure 7 T NOTE Debris removed from the sight tube walls during cleaning will accumulate in the bottom of the sight tube Be sure to use the retort cleaning pipette to extract and expel any accumulated debris 4 Insert the ret...

Page 67: ...ating chamber counterclockwise to open the valve Figure 7 U Figure 7 U 3 Insert the sight tube cleaning brush see Section 6 Consumables and Accessories for details into the sight tube and scrub up and down several times to re move debris from the wall of the sight tube Figure 7 V 4 After cleaning turn the sight tube access valve for Retort 1 preheating chamber clockwise to close the valve 5 Repeat...

Page 68: ...r Figure 7 X 3 Unlock the latch securing the fume filter cover Figure 7 Y and lift the cover up Figure 7 Y 4 Slide the fume filter out of the instrument Figure 7 Z Figure 7 Z 5 Install a new fume filter in the instrument Lower the fume filter cover and secure the cover latch 6 Close the fume filter access door and secure the door latch Figure 7 AA Figure 7 AA 7 Close the Fume Control System Access...

Page 69: ...i Sat Replace MF in load station Lot Lot Lot Lot Lot Lot Lot Perform Exterior Cleaning Perform Interior Cleaning Replace Drip Tray Liner Check Reagent Bottle Check Overflow Bottle Clean Cassette Baskets Daily Care Week 3 Beginning Date___________ Sun Mon Tues Wed Thurs Fri Sat Replace MF in load station Lot Lot Lot Lot Lot Lot Lot Perform Exterior Cleaning Perform Interior Cleaning Replace Drip Tr...

Page 70: ...eginning Date___________ Sun Mon Tues Wed Thurs Fri Sat Replace On Board Reagent Set Lot Lot Lot Lot Lot Lot Lot Cassette Count Clean Microwave Retort Mesh Filter Clean Microwave Chamber Sight Tube Clean Paraffin Retort Clean Paraffin Retort Mesh Filter Clean Paraffin Oven Reagent Change Week 4 Beginning Date___________ Sun Mon Tues Wed Thurs Fri Sat Replace On Board Reagent Set Lot Lot Lot Lot Lo...

Page 71: ...ted to the electrical power source 2 Turn the main power switch ON 3 Turn the UPS power switch ON 4 Contact Sakura Technical Support Retorts 3 and 4 are not heated 1 Line cord is not plugged Power failure 2 Main power switch circuit breaker is off 3 UPS power switch is off 4 UPS outputs power failure signal 1 Make sure power is available at the power source Make sure the line cord is properly conn...

Page 72: ... One or more baskets are currently being processed 2 One or more baskets are unloading station 3 Instrument was started manually following an automatic shutdown automatic shutdown will not begin until next OFF TIME occurs when the instrument has been started manually following automatic shutdown 4 OFF TIME setting is not correct 1 Continue processing remove basket s from unloading station when com...

Page 73: ...tomer Support Department of Sakura Finetek U S A Inc by calling toll free 1 800 725 8723 In countries other than the United States contact the nearest authorized Sakura instrument distributor or representative for service information and assistance Consumable Materials Product Number Description 4295 Neutra Pads 100 pk 7115 Pre Processing Solution 4 x 3 8L 7117 Pre Processing Fixative 4 x 3 8L 712...

Page 74: ...PS AI8 IF 001 Service Manual Where to Order In the United States the above Replacement Acces sory Items may be ordered directly from Order Management Sakura Finetek U S A Inc 1750 W 214th Street Torrance CA 90501 1 800 725 8723 Or contact the nearest authorized Tissue Tek distribu tor or representative Outside of the United States contact the nearest authorized Sakura instrument distributor ...

Page 75: ...ing The Tissue Tek Xpress x120 can be configured for operation using one of two immersion time settings for tissue processing based on the thickness of the grossed tissues either 2 mm maximum or 3 mm maximum Use ofTissue Tek Xpress x120 Pre Processing Solution or Pre Processing Fixative Pre Processing Solution is used to firm and pre condition the tissue specimens prior to Tissue Tek Xpress x120 p...

Page 76: ...f 15 minutes prior to being processed by the Tissue Tek Xpress x120 CAUTION Tissue specimens are to be held in 10 NBF until they are ready to start the preprocessing step Processing Tissue Specimens CAUTION The Loading Station retort should be filled with Preprocessing Solution to accelerate the dehydration process Additional processing baskets with tissue samples can be loaded into the Loading St...

Page 77: ...yield intact RNA comparable to fresh tissue If the Tissue Tek Xpress x120 has been used for processing Formalin fixed tissue the Tissue Tek Xpress x120 must be cleaned prior to use for RNA study see Cleaning Instructions for RNA Tissue Processing on page A 3 for details DNA Tissue treated with Molecular Fixative yields similar results to enzyme digested DNA extracted from fresh tissue frozen Cross...

Page 78: ...nd or may show areas that appear sunken the day after microtomy Microtomy Paraffin embedded Tissue Tek Xpress x120 tissue can be sectioned on a Microtome The tissue blocks usually do not require soaking The blocks can be faced and allowed to cool face up on ice water for not more than 5 minutes prior to sectioning CAUTION Avoid soaking of Tissue Tek Xpress x120 processed paraffin blocks Soaking ma...

Page 79: ...cassettes from the alcohol 6 Retrim tissue to the correct thickness as necessary 7 Place tissue in processing basket then place the basket in Pre Processing container filled with Pre Processing Solution for 15 minutes 8 Place processing basket in the Loading Station with the preprocessing step enabled and set for 30 minutes 9 Depending on the thickness of the residual tissue select the appropriate...

Page 80: ...issue Tek Xpress x120 DO NOT process tissue thicker than 2 mm in thickness on the Standard program DO process tissue that is more than 3 mm in thickness using the Extended program DO NOT allow the faced tissue blocks to soak too long in water DO face the block and allow the block to soak or cool only for a short period of time DO NOT use metal cassette lids DO use plastic lids and remove metal sta...

Page 81: ... Alternative step to address specific Pathologists preferences Immersion in PPF for 30 minutes Alternative step for Formalin Free Tissue Processing Collect and fix tissues in Molecular Fixative then gross to final thickness and immerse in Molecular Fixative for 1 hour Place in Loading Station filled with PPS with immersion time set for 15 minutes and reagent usage limit set at 3 hours Tissues in c...

Page 82: ...A 8 Revised 10 02 2012 ...

Reviews: