2.
When the Introduction Screen appears, click Install Software to continue. If the CD does not
run automatically, select Start from the Windows® Taskbar, then Run and type D:\Setup.exe
and click OK - where D:\ is letter of your CD-ROM drive. For Vista users, the screen will ask
Do you want to run this file? Press Run. A screen will now appear saying A program needs
your permission to continue. Press Continue.
3.
When the Welcome screen appears, click Next to continue.
4.
After reading the Disclaimer, select the I accept the terms of the Disclaimer option and click
Next to continue.
5.
Plug the USB cable into one of your computer's USB ports and click on Next.
6.
At the Registration screen, select Check this box to register now and follow the on-screen
instructions, or you can choose to select this option later.
7.
Click on Finish to complete the installation.
B) Drivers and Programming Software
Follow points 1 - 7 of the install procedure in A), then at the Software Setup screen, select Install
the SST Programming Software and click Next. For Vista users, the screen will once again ask Do
you want to run this file? Press Run. A screen will now appear saying A program needs your
permission to continue. Press Continue.
In the following Software Setup screen, click Next and follow the on-screen instructions. At this
point Vista users will be asked to install the Saitek Magic Bus and XP users asked to install the
Saitek Magic Mouse, HID-compliant mouse, Saitek Magic Keyboard and HID Keyboard Device
(these are what Windows calls the Programming elements of your Saitek controller). Continue to
click on Next and Finish to accept the installation until the Registration screen appears.
At the Registration screen, select Check this box to register now and follow the on-screen
instructions, or do not select this option and register later.
Upon completion of the installation, you have the option to Run Profile Editor, which will give you a
view of the programming environment. If you do not wish to see the Profile Editor at this point, just
uncheck the box and click on Finish to complete the installation.
Important Information
Driver updates
From time to time there may be updates to the driver and programming software for this product.
You can check for the latest software updates by visiting the Saitek website (www.saitek.com) and
clicking on Downloads. A drop down menu will appear. Select Drivers and Software.
SAITEK R660 GT FORCE FEEDBACK WHEEL
Congratulations on purchasing the Saitek R660 GT Force Feedback wheel. The R660 GT features
perfectly positioned controls, a semi-automatic gearstick which can be mounted on either side of
the wheel, powerful Force Feedback for increased realism, stable pedal unit and highly secure
clamping mechanism
Setting up your controller
1
Before connecting the R660 GT Force Feedback
Wheel to your PC, you need to connect it to your
mains supply using the AC/DC adapter
(supplied). This connects via the rear of the unit
next to the USB cable.
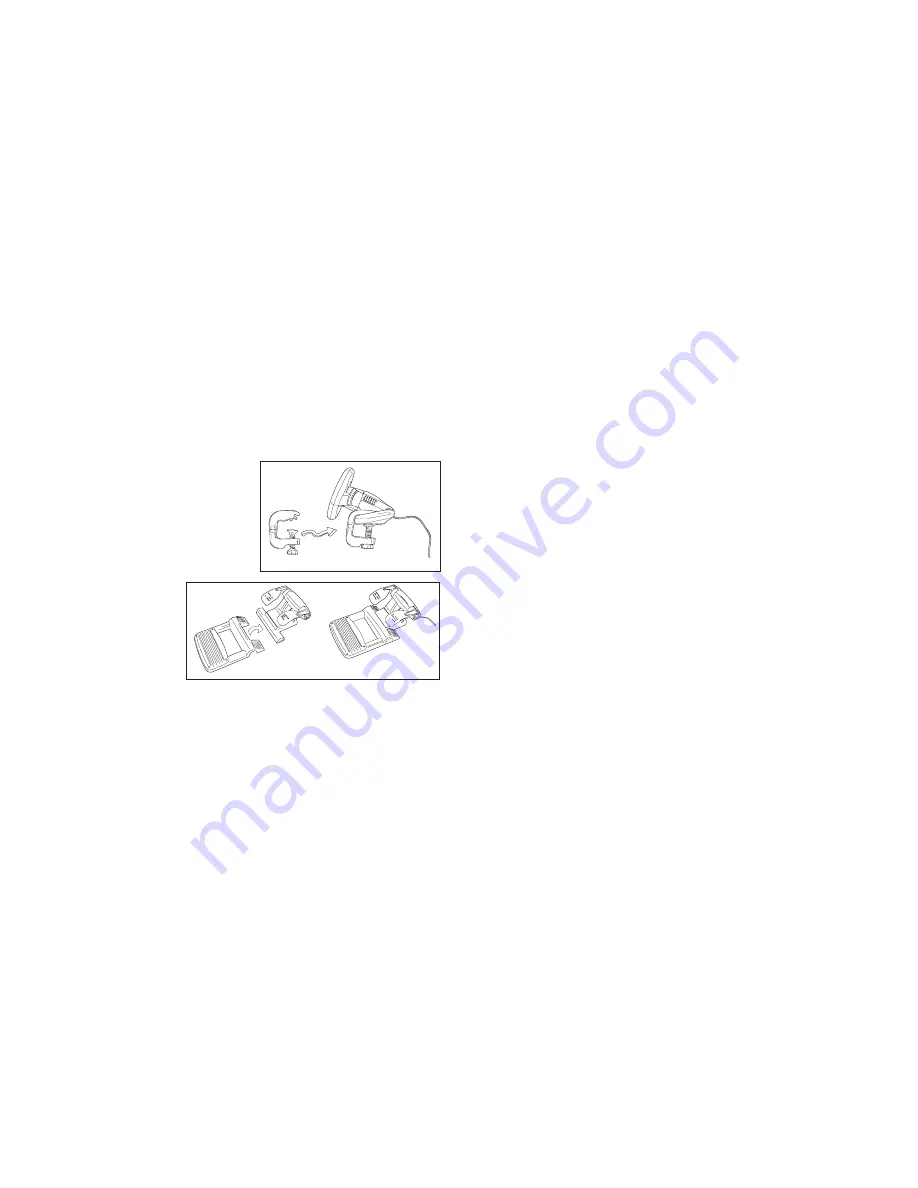
2
Attach the main wheel unit and the desk clamp
as shown in the diagram.
3
Position the steering wheel unit on the edge of
your desktop, and turn the clamp grip clockwise
until the unit is securely attached to the desk. Do
not overtighten!
4
Plug the cable from the pedal
unit into the socket in the
steering wheel unit, making
sure the connector clicks firmly
into place.
5
Attach the main pedal unit to
the pedal unit base, making
sure it clicks firmly into place.
Next, place the complete pedal
unit floor for your optimum
driving position.
6
To switch gearstick sides, pull the stick out of the socket and clip into place on the other side
of the wheel.
System Compatibility
PC running Windows XP/XP64/Vista (all versions)
Software installation for users of Windows® XP, XP64 and Vista (all versions)
A) Drivers Only
1.
With your computer switched on, close down any programs that are currently running and
insert the Installation CD into your CD-ROM drive.


