background image

2

FOR 440-I / 445-I MODELS

3. CONNECTIONS

1

2

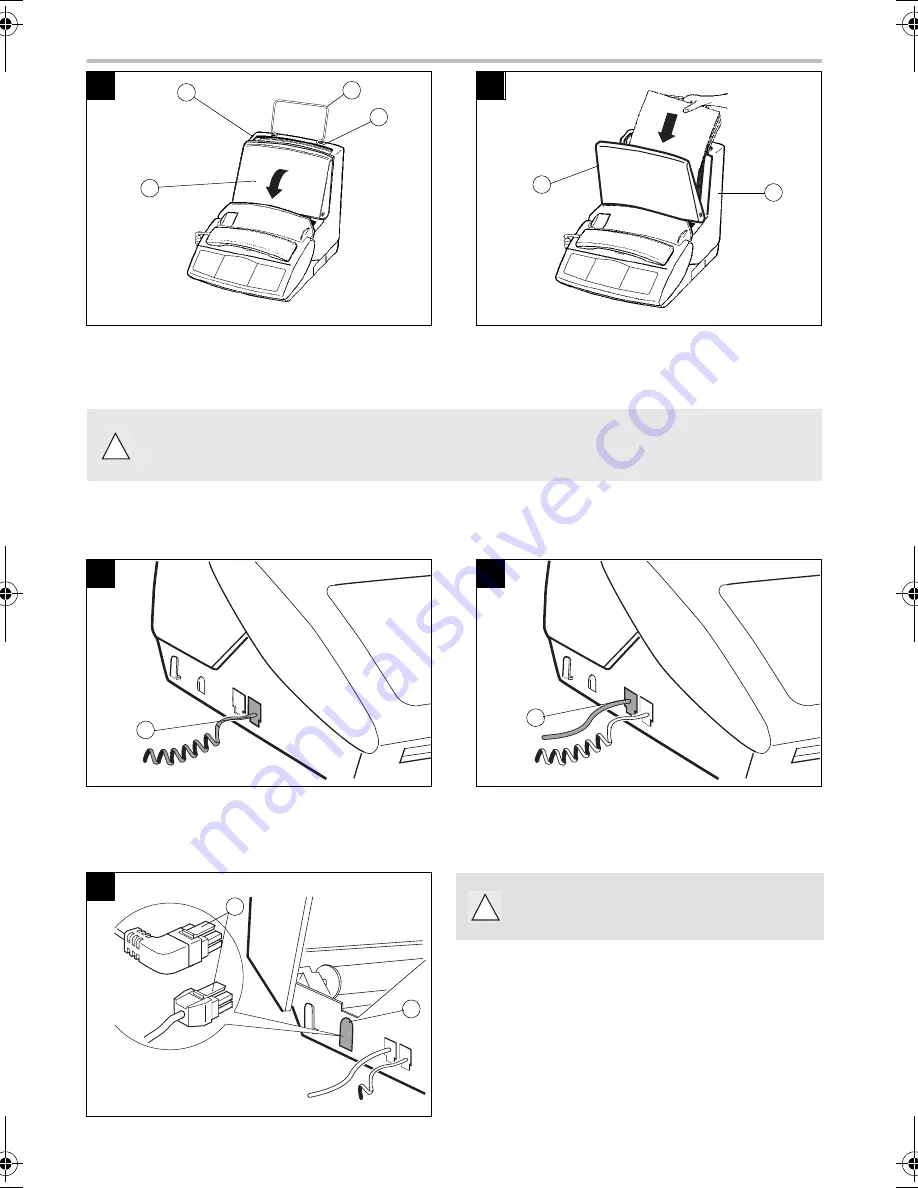
Snap the paper holder (1), in the two slots (2)at the top
of the sheet feeder.
Open the feeder cover (3).

Prepare a stack of plain paper (100 sheets maximum).
Place the paper stack into the feeder (4).
Close the feeder cover (3).

Use only new paper that is not torn, crumpled or curled.
Never reload the feeder during printing.
Remove any remaining sheets of paper from the feeder before reloading paper.

1

2

Connect the telephone handset cord to the appropriate
connector (1) on the main unit.

Connect the small plug of the telephone cable to the
appropriate connector (2) on the main unit, and
connect the other end to your wall telephone socket

3

Connect the small plug of the power adaptor to
the connector (4) on the main unit. Ensure the
strip (3) is facing upwards.

Make sure the wall socket to which you are connecting
your machine complies with the specifications on the
label under the power adaptor.
Connect the mains cable plug of the power adaptor to the
wall socket.

3

2

1

2

4

3

!

1

2

3

4

or

!

Liasse 23228000-2 A (T).book  Page 2  Jeudi, 5. août 1999  9:26 09

Summary of Contents for PHONEF@X INTERNET 390-i

Page 1: ...ES PHONEF X INTERNET 390 i 395 i 440 i 445 i User manual This product is not designed for making emergency telephone calls when the power fails Alternative arrangements should be made for access to em...

Page 2: ...42 12 13 14 15 16 17 18 41 43 40 44 35 19 20 21 22 34 33 27 29 28 26 23 36 37 38 39 45 46 32 24 25 30 31 4 5 6 9 10 11 1 3 7 8 2 5 6 4 OR OR 390 i 395 i 440 i 445 i 440 i 445 i 390 i 395 i OPERATION P...

Page 3: ...with any letter on the keypad to access the symbols shown above the alphabetic characters 26 Internet key for faxing via the Internet 27 Stop key stop current operation or confidential telephone mode...

Page 4: ...9 6 Mute mode 9 7 Using recall and 9 8 Transferring a call 9 9 Timing your calls 9 10 Using a cordless handset 10 11 Using a mobile phone depending on model 10 CHAPTER 4 FAX 11 1 Fax transmission 11...

Page 5: ...your voice and fax messages 29 5 Alarm 30 6 Economising printing paper 30 7 PC interface 30 8 Special ringing for Australia only 31 CHAPTER 10 APPENDICES 32 1 Replacing consumables 32 2 Technical par...

Page 6: ...NOTE POUR L IMPRIMEUR VOIR BAT...

Page 7: ......

Page 8: ...wever for optimal print quality results we suggest you use the type of paper recommended by the manufacturer 1 2 To open the fax access door 1 use notch on the side 2 Lift the paper support bracket 3...

Page 9: ...fore reloading paper 1 2 Connect the telephone handset cord to the appropriate connector 1 on the main unit Connect the small plug of the telephone cable to the appropriate connector 2 on the main uni...

Page 10: ...number of your fax machine Press the OK key to confirm your choice Enter you name using the alphabetic keyboard Press the OK key to confirm your choice ACCESSING THE MAIN MENU Press the MENU key MOVIN...

Page 11: ...K key to confirm Then press the STOP key Note choosing the prefix enables you to change from a private network WITH prefix to a public network WITHOUT prefix In this case all the number in the directo...

Page 12: ...the alphabetic keyboard The character is inserted in the number displayed ENTERING THE CONTACT S INTERNET ADDRESS If your contact has an Internet address enter it in the directory Use the alphabetic...

Page 13: ...ifying the name with the alphabetic keyboard as for adding a record Press the OK key to confirm You can correct the fax number by using the key and changing the number with the numeric keypad as for a...

Page 14: ...OK key Select the MAILBOX NUMBER you want to assign to faxes received from your contact Press the OK key Select the number of the cordless handset you want to assign to calls from your contact only i...

Page 15: ...through the speaker Dial your party s number Note at any time you can pick up the receiver and use it to continue the call in this case the SPEAKER and the microphone are automatically disabled You c...

Page 16: ...ling mode you can witch to tone dialling during a call by pressing the key to send a multi frequency tone sequence to a server or access a machine externally for example an answering machine RECALL KE...

Page 17: ...6 1 and START Press OK then 6 on the cordless handset DELETING THE REGISTRATION OF A CORDLESS HANDSET Press MENU 6 2 and START Type the number of the handset to be deleted CHANGING THE BASE STATION AS...

Page 18: ...you to transmit a document in several ways BY NAME Example call the record YATES in the directory Enter the letters Y A and T Press the START key BY 2 DIGIT SPEED DIAL Example call the YATES record i...

Page 19: ...ncel a request from the waiting queue see the ADVANCED COMMUNICATION FUNCTIONS chapter Cancelling a transmission request To transmit immediately press START TRANSMISSION OF A SHORT MESSAGE ENTERED ON...

Page 20: ...FAXES RECEIVED Put paper in the paper tray Press the FAX MESSAGES key Note you can protect access to your messages with a code see the OTHER FUNCTIONS chapter Protecting your voice and fax messages I...

Page 21: ...wish you can talk to the person on the other end of the line during a fax transmission TO CALL THE PERSON ON THE OTHER END OF THE LINE During transmission of the document sending or receiving Press t...

Page 22: ...ider in the list or OTHER Press OK to confirm You will have to define the settings not already defined which you can be obtained from your access provider access number login identifier login password...

Page 23: ...ll be received as an E mail attachment SENDING TO AN E MAIL ADDRESS Sending faxes to an E Mail address Put the document in the feeder Press the key Enter the recipient s E mail address or use the dire...

Page 24: ...ly whenever you connect to the Internet Note your fax cannot process files other than faxes e g word processing files CAD files etc You can keep these documents in your Internet mailbox for use by you...

Page 25: ...er a PC sharing the same Internet subscription as your fax Press MENU 9 6 and OK and choose an option using the or keys F X ONLY all messages are sent to your fax unit PC ONLY all messages are kept in...

Page 26: ...nnouncement Pick up the receiver Record the announcement Hang up Choose FREE or SECURED RELAY and press OK to confirm If you choose SECURED RELAY when receiving relayed documents on the recipient tele...

Page 27: ...announcement simple answering machine SELECTING THE ANSWERING MACHINE RECORDER Press MENU 4 5 1 and OK SELECTING THE SIMPLE ANSWERING MACHINE Press MENU 4 5 2 and OK 3 ANNOUNCEMENTS The machine has tw...

Page 28: ...e of reception Whilst listening to the VOICE messages you can Press the key to return to the beginning of the message Press the key twice to go to the previous message Press the key to start listening...

Page 29: ...ctivate the CALL FILTERING mode Press MENU 4 6 1 and OK To disable the CALL FILTERING mode Press MENU 4 6 2 and OK 7 REMOTE RETRIEVAL OF MESSAGES ON THE ANSWERING MACHINE To activate remote retrieval...

Page 30: ...ss the key then enter the 4 digit privileged access code Notes If you do not answer the call the caller will be prompted to leave a message on your TAD The remote message retrieval and privileged acce...

Page 31: ...ception mode if it is a voice call your caller can leave a message Note you can set the number of rings before your machine takes the line If you pick up the receiver you can either have a conversatio...

Page 32: ...ress MENU 3 3 and OK Choose SINGLE POLLING or MULTI POLLING using the or navigator keys and press OK Note if you choose MULTI POLLING the document will be recorded in memory and can be retrieved by se...

Page 33: ...retrieved TX Scheduled transmission NET Internet transmission fax or E mail If you want to modify one of the operations in the waiting queue You can select the operation with the or navigator keys or...

Page 34: ...NU 7 1 and OK Enter a number between 1 and 5 on the keypad and press OK twice Enter a 4 digit code of your choice other than 0000 on the keypad and press OK Note the 4 digit code lets allows remote re...

Page 35: ...Note after creating a mailbox to hear all messages received or print all faxes use mailbox number 0 REMOTE RETRIEVAL OF MESSAGES IN YOUR MAILBOX On the remote telephone or fax machine dial your number...

Page 36: ...functions and their corresponding numbers Press the MENU key then the 5 1 and OK keys successively The machine prints the guide LOGS The last 30 calls are recorded in transmission and reception logs...

Page 37: ...the or navigator keys and press OK to confirm your choice START activation of the alarm STOP deactivation of the alarm SETTING THE TIME FOR THE ALARM Select the START option with the or navigator keys...

Page 38: ...the normal ringing tone and fax transmissions with a special ringing tone In the case of a fax transmission your fax machine will automatically answer the call after 2 rings and receive the fax IMPOR...

Page 39: ...an ink ribbon that matches the manufacturer s specifications The use of other types of ink ribbons could result in damage to the main unit and invalidate the warranty Documents printed by your unit ca...

Page 40: ...on the right end of the main roller onto the retractable axis position the left end of the main roller onto the left axis 4 4 OR Pull off the adhesive strip 2 from the ink ribbon 5 5 OR Insert the sma...

Page 41: ...de the flap back then lift the front part of the flap to remove it from the main unit Remove the worn gauge from its housing 7 Remove the pre cut gauge 9 from the ribbon gauge card 8 8 Insert the gaug...

Page 42: ...the rear cover press down on both sides of the cover 11 simultaneously until the two latches 1 click into place If the gauge is not installed or not properly installed the unit displays 1 11 11 1 11 1...

Page 43: ...ceived and local copies 40 RECALL LENGTH Time during which the line is cut long or short during the Flash signal of the Recall key 50 SORTED PRINT Print documents in the reverse order they were receiv...

Page 44: ...ment Code 0B Difference between the number of pages defined for transmission and the number of pages sent Check the number of pages Code 13 Memory full Fax reception impossible Code 17 Your machine is...

Page 45: ...al rings The FAX icon may be off check the reception mode manual automatic Check the number of rings see the INSTALLATION chapter Setting up the unit Configure the machine on private network see the I...

Page 46: ...grey Modem Fax up to 14400 bps The last documents printed have a lot of black smears the temperature of the printer is too high Wait a few moments for it to cool You probably forgot to replace the gau...

Page 47: ...result in the apparatus being connected being incompatible Failure of the apparatus to work under these circumstances is not the responsibility of the network operator In the unlikely event of such p...

Page 48: ...ecessary to fit an alternative main plug the following instructions must be adhered to For apparatus connected by mains plug the wall socket must be installed near the apparatus and must be easely acc...

Page 49: ...42...

Page 50: ...vious message press twice Delete received messages by pressing and To record your announcement press and to stop the recording of your announcement press any key To listen to your announcement press T...

Page 51: ...44 LIASSE 23228000 2 A...

Page 52: ...d pages Use the following references to order new ribbons TTR 815 RIBBON Reference 23327983 7 TTR 816 RIBBON models 440i 445i Reference 23330760 2 PAPER Print quality will vary according to the kind o...

Reviews: