background image

I

NTRODUCTION

W

ELCOME

Dear customer,
Thank you for purchasing a SAGEM Web Tuner; we appreciate your trust in us.
This product was manufactured with the utmost care, should you encounter any difficulties during its use, we
recommend that you refer to this installation guide. You can also find information on the following site:

http://www.sagem-communications.com/support

The new material is guaranteed (parts and labour) by 

Sagem Communications

 under the conditions and

according to procedures' defined on the site 

www.sagem-communications.com

 heading 

support

.

In the event of a technical problem, please refer to the table at the end of this user guide for a list of incidents and
the way to solve them. The SAGEM site (

www.sagem-communications.com

 assistance section) also provides

information on how your Web Tuner SAGEM works and how to solve any problems you may encounter. You can
also contact our assistance service by E-mail. If the problem persists, you should contact our call centre (see the
table below). They will offer an expert appraisal of your material remotely to determine the cause as well as the
type of repair required.

For your comfort and safety, please carefully read the paragraph below on safety recommendations and

instructions.

Country

Phone numbers

Tariff/Minute

Sagem France

0892 230425

0,34 €

Sagem Austria

0820 550540

0,145 €

Sagem Germany

0180 5308930

0,14 €

Sagem Belgium

070 350 016 

0,17 €

Sagem Netherlands

0900 0400478

0,18 €

Sagem UK

0871 07 50 712

0,10 £

Sagem Italy

899 484 810

0,28 €

Sagem Spain 

807 088 303

0,41 €

Sagem Sweden

08 501 11 805

local call

Sagem Norway

23 680115

local call

Summary of Contents for MY WEB TUNER 500

Page 1: ...My Web Tuner 500 User Guide English...

Page 2: ...SAGEM site www sagem communications com assistance section also provides information on how your Web Tuner SAGEM works and how to solve any problems you may encounter You can also contact our assista...

Page 3: ...private use inside a building CPE customer premises equipment in the European Free Trade association EFTA It has been tested in accordance with the technical provisions for radio equipment EN 300328 T...

Page 4: ...Listening to Internet Radio 28 Handle your VTuner web interface 32 Create a VTuner account 32 Create and edit your own radio station folders 35 Add internet radio stations 37 Listening to the music in...

Page 5: ...oice 60 Equalizer Settings 61 Reset to Factory Default Settings 61 Clear Favorites 61 Check Firmware Version 62 Software Updation 62 6 Appendix 64 Care and Maintenance 64 Problems 64 7 Specifications...

Page 6: ...MusicMatch Jukebox Users benefit from the network audio streams delivered from UPnP based audio servers 4 Direct access playback of music from external USB storage devices including Flash MP3 player...

Page 7: ...6 YOUR WEB TUNER 1 3 FRONT PANEL 1 4 REAR PANEL Display screen IrDA receiver Power switch DC power jack RJ45 port RCA jacks for line out USB port...

Page 8: ...back to the main menu Stop the alarm Increase the volume Reduce the volume Mute Next Direct access to alamr menu Direct access to MP3 Player menu Direct access to Internet Radio menu Direct access to...

Page 9: ...Insert the batteries one after the other in compliance with the battery polarity as shown on the battery slot Refit the battery compartment cover first by the bottom then lowering the top until full...

Page 10: ...and white 2 3 On your Hi Fi system select the Auxiliary mode to hear the sound from the Web Tuner 4 If you want to use Ethernet for wired network connection plug your Ethernet cable into the RJ45 port...

Page 11: ...Go back to main menu Identical POWER Put the device in Standby mode Identical OK Select the function Goes to option screen UP Move to previous item 1 Volume up 2 After 2s goes back to playback screen...

Page 12: ...back to standby screen No reactivation of alarm Alarm menu displayed POWER Put the device in Standby mode Identical Identical OK Displays playback screen Identical Main menu displayed UP Volume up aft...

Page 13: ...y screen Music Playing Standby Screen Alarm Music StandbyScreen No Music RIGHT Radio IP Goes back to Station radio screen Identical Main menu displayed Media Server First press Goes back to song playi...

Page 14: ...Time Display Format Main Language V Tuner Language Backlight Equalizer Advanced Setup Network Setting Configure Network Reset to Default Clear Favorites Device MAC Address Firmware Version F W Upgrad...

Page 15: ...re operating your Web Tuner device The minimum streams to receive Radio IP are 192 kB s for a normal quality 640 kB s for an upper quality How does your computer or Notebook PC access the Internet The...

Page 16: ...uration as a Wireless Client There are three network configuration modes available for the Web Tuner device simple wireless client wired client or wireless access point AP The factory default mode is...

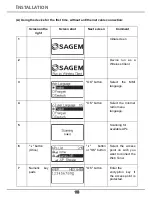
Page 17: ...ial screen 2 Device run as a Wireless Client 3 OK button Select the MMI language 4 OK button Select the Internet radio menu language 5 Scanning for available APs 6 button Once button or OK button Sele...

Page 18: ...re connected directly to the internet select No Otherwise activate this option and enter the IP address and the port of your proxy server 9 OK button Confirm the settings above 10 Apply new settings I...

Page 19: ...INSTALLATION Using the device for the first time without an Ethernet cable connection continued Screen on the right Screen shot Next screen Comment 13 14 The device is already connected to your netwo...

Page 20: ...button 4 times button or OK button 3 button Once button or OK button 4 button or OK button Manually select the wireless client mode 5 Scanning for available APs 6 button Once button or OK button Sele...

Page 21: ...ectly to the internet select No Otherwise activate this option and enter the IP address and the port of your proxy server 9 OK button Confirm the settings above 10 Apply new settings If the connection...

Page 22: ...21 INSTALLATION Manually set to the Wireless Client Mode continued Screen on the right Screen shot Next screen Comment 13 14 The device is already connected to your network...

Page 23: ...wired client mode when it detects a link status via the Ethernet connection A Using the device for the first time with an Ethernet cable connection If the Web Tuner is switched on after a reset wirel...

Page 24: ...nce button or OK button Manually select the wired client mode 5 button Once button or OK button Select the DHCP for auto configured IP address 6 OK button You could have the option to connect to the i...

Page 25: ...Manually set to the Wired Client Mode continued Screen on the right Screen shot Next screen Comment 8 Apply new settings 9 The device is now in wired client mode 10 11 The device is already connected...

Page 26: ...without having to purchase another AP To configure the Web Tuner device as an AP you need to setup the device manually via the MMI menu Setup Advanced Setup Configure Network AP mode You then need to...

Page 27: ...Numeric key pad OK button Select the wireless channel to be allocated to this AP 8 button Once OK button Select one of the security functions 9 Numeric key pad OK button Enter the encryption key if t...

Page 28: ...P Mode continued Screen on the right Screen shot Next screen Comment 11 OK button Confirm the settings above 12 Apply new settings 13 The device is in wireless AP mode now 14 15 The device is already...

Page 29: ...o stations select the Internet Radio function in the main menu and then press the OK button to activate the Internet Radio function The first screen of the Internet Radio function displays a choice of...

Page 30: ...y connected to the Internet server and has retrieved information from the server If the following screen appears it means that the device could not connect to the radio server Please refer to the trou...

Page 31: ...creen Comment 3 button 4 times button or OK button 4 button 15 times button or OK button 5 button or OK button 6 button button or OK button Press the button to add the current station to the list of f...

Page 32: ...ote control You can also use the alphanumerical keypad on your remote control in order to do an alphabetical search by entering the first letters of the searched station Access sequence to the French...

Page 33: ...t your own list of Vtuner radio stations but also add a radio station that would not be in the VTuner list 3 2 1 Create a VTuner account 1 Enter the address http sagem vtuner com in your web browser 2...

Page 34: ...cation and language From the field Browse by Format Location or Language click on the desired link to choose a grouping type 5 A list of folders sorted out following your choice is displayed The numbe...

Page 35: ...the radio station file Click on Download Once the download is over open the downloaded file with Windows Media Player 11 The radio station is played 8 To add a station to the list of favorites click...

Page 36: ...efined 1 Choose a folder the list of radio station appears Click on A window opens If you have already created folders choose the folder where you want to add the selected sttion then click on the cor...

Page 37: ...ISTENING TO MUSIC 2 A message confirms that your station has been added 3 You can access the various folders that you have created from the main menu of your web interface in the field My favorite gro...

Page 38: ...ons that do not appear on the initial list by doing the following 1 From the main page click on from the menu My added Stations 2 Enter the informations related to the station you want to add Click on...

Page 39: ...nd install it on its computer Once you have installed and activated the media server you can enjoy listening to the music via the Web Tuner device 3 3 1 Windows Media Player 11 Installation and connec...

Page 40: ...the content and share your media The following screen will be displayed Step 4 Add your Media content to the WMP11 media library Click on the Library tab again to access the pull down menu To add you...

Page 41: ...TO MUSIC Click on the Add button select the media folder in your computer and then click on the OK button You can put all of the music files in the D Music directory to be able to add the folder to th...

Page 42: ...dded to the WMP11 monitor folder list Click on the OK button A pop up window will be displayed showing you that the WMP11 is searching for the media files Once completed click on the Close button You...

Page 43: ...ss the pull down menu Click on Media Sharing to activate the media sharing function The following dialog windows will be displayed Select the Share my media box and click on the OK button The WMP11 wi...

Page 44: ...rk a screen similar to the following may be displayed showing you that the WMP11has detected a network device named My Web Tuner 500 Step 6 Manage the media sharing settings Click on the Settings butt...

Page 45: ...e simple When the WMP11 detects a new network device as shown on the final screen in Step 5 you need to decide whether you want to allow or deny the requests from that device Select the device icon an...

Page 46: ...devices Double click on it to manage the access for the devices Click on the Allow button Step 8 Establish the connection between the Web Tuner device and the WMP11 server On the Web Tuner device sele...

Page 47: ...tails please refer to paragraph Listening to the music in your computer page 38 3 3 2 Command from the remote control Select the Media Server function in the main menu and then press the OK button to...

Page 48: ...media server on your computer If after that there are still no media servers on the list please refer to the troubleshooting chapter to identify the problem and solve it step by step The following scr...

Page 49: ...Screen on the right Screen shot Next screen Comment 1 button or OK button Initial screen 2 3 button Once button or OK button 4 button or OK button 5 button 6 times button or OK button 6 button 4 time...

Page 50: ...ess sequence to connect to the multimedia server SNNECCI Windows Media continued Screen on the right Screen shot Next screen Comment 7 button or OK button Press the button to add the current station t...

Page 51: ...folder content of the attached USB drive If the following NO DEVICE screen is displayed there may be a problem in accessing the USB device Unplug the USB device and then plug it in again To play back...

Page 52: ...ds Love Song in the attached USB drive Screen on the right Screen shot Next screen Comment 1 button or OK button Initial screen 2 3 button 2 times button or OK button Select the music folder to browse...

Page 53: ...er go to the setup menu and choose Remove MP3 player Select Yes to confirm 3 5 THE PLAYBACK SCREEN When the music starts the screen will display playback information This includes the title of the son...

Page 54: ...vice First select the Setup function in the Main Menu In the setup menu the first item Clock is used to set the date and time Press the OK or button to set the clock There are 3 items in the clock men...

Page 55: ...k manually press the OK or the button to access the date and time screen You can use the four directional buttons and the OK button to set the time a Use the and buttons to switch between the items to...

Page 56: ...can also choose to activate the automatic handling of daylight saving time The device then changes the date and time automatically when the clocks change The following screen shows an exemple of time...

Page 57: ...on 4U Classical Rock as the source of alarm music Caution The alarm sounds through the loudspeakers of your Hi Fi system For your alarm to be audible your Hi Fi system must be turned on in Auxiliary m...

Page 58: ...he alarm and play back the specified music The music volume will then increase progressively up to the selected alarm volume level 5 button or OK button Set Internet radio as alarm source 6 OK button...

Page 59: ...used to stop the radio after a preprogrammed time This function is available from the following menus Radio Internet media server and MP3 reader You are listening to a radio station IP radio or a fil...

Page 60: ...o a radio station IP radio or a file on PC MP3 reader You can also use the remote control by pressing the snooze key up to the choosen time Once the sleep function is activated the following icon is d...

Page 61: ...g is always ON You can set the backlight to be turned OFF when the device is idle no keys pressed after a specified amount of time You can activate deactivate or modify the intensity of the screen bac...

Page 62: ...tion from Radio media server and MP3 menus Once on the selected station screen or file key OK 5 4 RESET TO FACTORY DEFAULT SETTINGS When you reset the device to its factory default settings your Inter...

Page 63: ...press the new F W file e g the file 20080919_MAA303SG_Sagem_R1 11 zip and copy the uncompressed file ShrekW BIN on the root folder of the USB key or USB MP3 player Note DO NOT rename it Otherwise the...

Page 64: ...ng the F W version in the menu Setup Advanced Setup Firmware Version In this case the firmware version must be the same as the new firmware file downloaded If a different version number is shown there...

Page 65: ...s not blocked Make sure that the remote control is well pointed towards the sensor when manipulating the Web Tuner The screen is switched off Make sure that the power adapter is properly connected to...

Page 66: ...e ping the IP address of the DNS to check if it is the case DNS doesn t have the record of the vTuner server or radio station that you are trying to connect The connection between the Web Tuner and vT...

Page 67: ...re enter via the remote controller 3 The network interface has trouble 1 The network interface of the Web Tuner is good 2 The connection between Web Tuner and router was OK 3 The Web Tuner already got...

Page 68: ...ion is unavailable or heavy loaded 2 The Web Tuner doesn t support the service type of the radio station The connection between Web Tuner and the radio station was OK BUT ONLY FOUR BARS IN THE RADIO S...

Page 69: ...1 x RJ45 10 100 Mbps with Auto MDI MDIX 1 x USB Jack type A USB 2 0 Compliant DC 5V 2A CPU Memory Front Panel Display Remote Control Audio Port Ether Port USB Port Input Power Operating Temperature S...

Page 70: ...Album Artist Genre and Playlist Folder depends on the server connected Volume USB extension Alarm Clock Supported Network Configuration 24 hours Dual alarm snooze Music source USB WiFi Internet radio...

Page 71: ...pect the sorting rules set up locally for this kind of waste 8 2 Batteries If your product contains batteries they must be disposed of at appropriate collection points 8 3 The product The crossed out...

Page 72: ...t to change without notice Sagem Communications SAS Soci t par actions simplifi e au capital de 158 291 895 440 294 510 RCS PARIS Le Ponant de Paris 27 rue Leblanc 75015 PARIS France www sagem communi...

Reviews: