


For more help and resources, call 1-800-544-1108 or visit www.safety1st.com
11
10
Using Your Monitor
Using Your Monitor
VOLUME CONTROL
Volume Control Button is on the right side of Parent Unit. To adjust volume,
press up (+) or down (-). Volume bars will display on screen. Yellow dashlight
icon: Volume levels 1 – 3, Green dashlight icon: Volume levels 4 – 9, Red
dashlight icon and no bars means Parent Unit is on mute.
TALK TO BABY
Talk to Baby Button is on the right side of Parent Unit. Press and hold
Talk to Baby Button to transmit speech to baby. The Talk icon appears on
screen until button is released.
QUICK VIEW -
VIEDO ON/OFF
Quick View Button is on the right side of Parent Unit. Press the Quick View
Button to shut-off the video screen. The Parent Unit will go into Powersaver
Mode.Press again to bring back full video.
BELT CLIP & STAND
The Belt Clip is convenient for portability. You can clip the Parent Unit
to your belt or waistband. The Belt Clip also easily converts to a
tabletop stand.
TOOLBOX
Touch the Toolbox Icon on the Primary Menu, Secondary Menu
screen appears.
SECONDARY
TOUCHSCREEN MENU
• Touch-activated Icons:
- Clock Button/Set Time
- Camera Button
Program/Add Camera(s)
- Temp Button/(˚F/˚C) Setting
-
Help
Button
- Confirm/return to previous
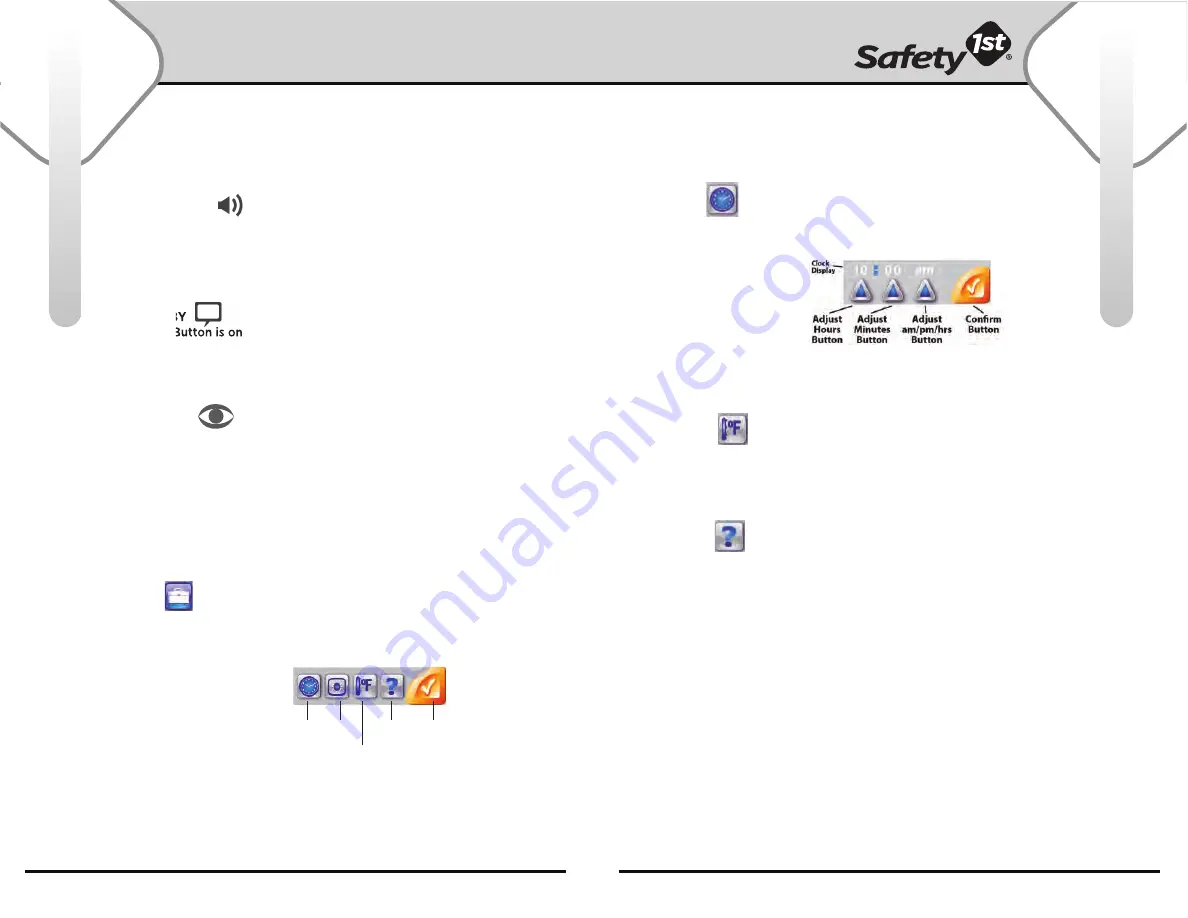
CLOCK MENU
Touch the Clock Icon, clock
overlay screen appears. To set
clock, press and hold the hour
button to set current hour.
Press and hold the minute
button to set current minutes.
Press and hold the am/pm/hrs
button to continuously scroll
through the am/pm/hours and
minutes to set time. Press “Check”
button to confirm and return to prior
screen. Time set appears in status bar.
TEMPERATURE
Touch the Temperature Icon to change current
(˚F) Farenheit temperature reading to (˚C) Celsius
temperature reading. Temperature appears in
status bar.
HELP BUTTON
Touch the Help Icon to get our Customer Service
contact information.
Clock Camera
Temperature
Help
Confirm
Parent Unit (Video/Receiver):
(continued)
Parent Unit (Video/Receiver):
(continued)


