


www.safescan.com
15
7. SYNCHRONIZE USERS FROM TA SOFTWARE TO TIME
CLOCK TERMINAL
The process of “synchronization” transfers user data between the time clock terminal (device) and the TA software
(DB -or- database). Any time that you add a new user or make any change to a user’s data, you’ll need to synchronize
the user information. After synchronization is complete, clocking data for the users will be transferred automatically
between the TA software and the time clock terminal.
The
DIRECTION
of the synchronization is important. Please note the following:
TA>PC: copies user information from the TA (time clock terminal) to the PC (computer).
PC>TA: copies user information from the PC (computer) to the TA (time clock terminal).
When adding a user or making changes to user data on the PC, use “PC>TA” when synchronizing. When making
changes to user data on the TA (time clock terminal), use “TA>PC”.
To synchronize the user data, please follow these steps:
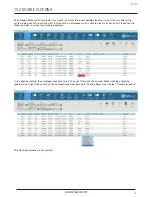
1. Go to the “Device” page of the TA software. Select the device to be synchronized by clicking on its name. The row
in which the device is listed will become light blue in color.
2. After you select the device in step 1 above, the icons at the lower left of the screen will be unlocked.
Click on the “Synchronize” icon
3. The pop-up window “Synchronization” will then open.
In this example, the new user was created on the PC and this information now needs to be transferred to the TA (time
clock terminal). In the synchronization window, click on PC>TA and then click on “COMMit”. The user information from
the PC will now be copied over to the TA (time clock terminal).
WARNING:
be sure to note where you have made the changes to the user data. If you are changing user
information on the PC, you’ll need to choose “PC>TA” when synchronizing. If you are changing user information on
the TA (time clock), you’ll need to select “TA>PC” when synchronizing. If you choose the wrong direction, you may
overwrite existing user data.
ENGLISH


