


EN
DIGISTEEL
III
320C
/
DIGIPULS
III
320C
15
5 - MAINTENANCE
5.1. GENERAL
Twice a year, depending on the use of the device, inspect the following:
cleanliness of the pwer source
electrical and gas connections
WARNING :
Never carry out cleaning or repair work inside the device before making sure that the unit has been completely disconnected from
the mains.
Dismantle the generator panels and use suction to remove dust and metal particles accumulated between the magnetic circuits
and the windings of the transformer.
Work must be performed using a plastic tip to avoid damage to the insultation of the windings.
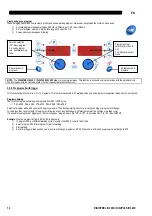
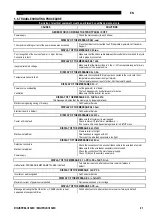
At each start-up of the welding unit and prior to calling customer cupport for technical servicing, please check that:
Power terminals are not improperly tightened.
The selected mains voltage is correct.
There is proper gas flow.
Type and diameter of the wire.Torch condition.
TWICE PER YEAR
Perform calibration of the current and voltage settings.
Check electrical connections of the power, control and power supply circuits.
Check the condition of insulation, cables, connections and pipes.
Perform a compressed air cleaning
5.2. ROLLERS AND WIRE GUIDE
Under normal conditions of use, these accessories have a long serviceable life before their replacement becomes necessary.
Sometimes, however, after being used over a period of time, excessive wear or clogging due to adhering deposits may be noted.
To minimise such harmful effects, make sure the wire feeder plate remains clean.
The motor reduction unit requires no maintenance.
5.3. TORCH
Regularly check the proper tightness of the connections of the welding current supply. Mechanical stresses related to thermal shocks tend to loosen
some parts of the torch, particularly:
The contact tube
The coaxial cable
The welding nozzle
The quick connector
Check that the gasket of the gas inlet spigot is in good condition.
Remove the spatter between the contact tube and the nozzle and between the nozzle and the skirt.
Spatter is easier to remove if the procedure is repeated at short intervals.
Do not use hard tools that may scratch the surface of these parts and cause spatter to become attached to it.
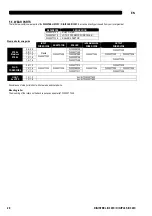
SPRAYMIG SIB, W000011093
SPRAYMIG H20, W000010001
Blow out the liner after each change of a spool of wire. Carry out this procedure from the side of the quick fitting connector plug of the torch.
If necessary, replace the wire inlet guide of the torch.
Severe wear of the wire guide may cause gas leaks towards the rear of the torch.
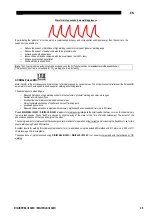
The contact tubes are designed for long use. Nevertheless, the passage of wire causes them to wear off, widening the bore more than the
permissible tolerances for good contact between the tube and the wire.
The need to replace them becomes clear when the metal transfer process becomes unstable, all the settings of the work parameters remaining
otherwise normal.
Summary of Contents for DIGISTEEL III 320C
Page 17: ...EN DIGISTEEL III 320C DIGIPULS III 320C 17...
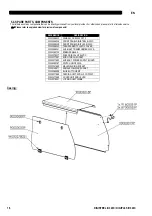
Page 18: ...EN 18 DIGISTEEL III 320C DIGIPULS III 320C Internal and inverter...
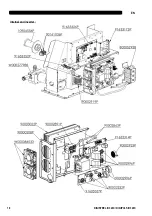
Page 19: ...EN DIGISTEEL III 320C DIGIPULS III 320C 19 Front and rear...
Page 23: ...EN DIGISTEEL III 320C DIGIPULS III 320C 23 5 7 ELECTRICAL DIAGRAM...
Page 46: ...FR DIGISTEEL III 320C DIGIPULS III 320C 17 Capots...
Page 47: ...FR 18 DIGISTEEL III 320C DIGIPULS III 320C Composants interne et onduleur...
Page 48: ...FR DIGISTEEL III 320C DIGIPULS III 320C 19 Sous ensemble face avant arri re...
Page 52: ...FR DIGISTEEL III 320C DIGIPULS III 320C 23 5 7 SCHEMA ELECTRIQUE...
Page 75: ...ES DIGISTEEL III 320C DIGIPULS III 320C 17...
Page 76: ...ES 18 DIGISTEEL III 320C DIGIPULS III 320C Vista interna e inversor...
Page 77: ...ES DIGISTEEL III 320C DIGIPULS III 320C 19 Vista delantera y trasera...
Page 81: ...ES DIGISTEEL III 320C DIGIPULS III 320C 23 5 7 DIAGRAMA EL CTRICO...
Page 104: ...IT DIGISTEEL III 320C DIGIPULS III 320C 17...
Page 105: ...IT 18 DIGISTEEL III 320C DIGIPULS III 320C Interno ed inverter...
Page 106: ...IT DIGISTEEL III 320C DIGIPULS III 320C 19 Lato anteriore e posteriore...
Page 110: ...IT DIGISTEEL III 320C DIGIPULS III 320C 23 5 7 SCHEMA ELETTRICO...
Page 133: ...PT DIGISTEEL III 320C DIGIPULS III 320C 17...
Page 134: ...PT 18 DIGISTEEL III 320C DIGIPULS III 320C Interna e inversor...
Page 135: ...PT DIGISTEEL III 320C DIGIPULS III 320C 19 Frente e traseira...
Page 139: ...PT DIGISTEEL III 320C DIGIPULS III 320C 23 5 7 ESQUEMA EL TRICO...
Page 162: ...NL DIGISTEEL III 320C DIGIPULS III 320C 17...
Page 163: ...NL 18 DIGISTEEL III 320C DIGIPULS III 320C Intern en omvormer...
Page 164: ...NL DIGISTEEL III 320C DIGIPULS III 320C 19 Voor en achterkant...
Page 168: ...NL DIGISTEEL III 320C DIGIPULS III 320C 23 5 7 BEDRADINGSSCHEMA...
Page 191: ...RO DIGISTEEL III 320C DIGIPULS III 320C 17...
Page 192: ...RO 18 DIGISTEEL III 320C DIGIPULS III 320C Intern i invertor...
Page 193: ...RO DIGISTEEL III 320C DIGIPULS III 320C 19 Fa i spate...
Page 197: ...RO DIGISTEEL III 320C DIGIPULS III 320C 23 5 7 SCHEM ELECTRIC...
Page 205: ...EL...
Page 209: ...EL 6 DIGISTEEL III 320C DIGIPULS III 320C...
Page 216: ...EL DIGISTEEL III 320C DIGIPULS III 320C 13...
Page 217: ...EL 14 DIGISTEEL III 320C DIGIPULS III 320C 4 1 2 RC SIMPLE W000275904 3 II W000383000...
Page 221: ...EL 18 DIGISTEEL III 320C DIGIPULS III 320C...
Page 222: ...EL DIGISTEEL III 320C DIGIPULS III 320C 19...
Page 223: ...EL 20 DIGISTEEL III 320C DIGIPULS III 320C...
Page 227: ...EL 24 DIGISTEEL III 320C DIGIPULS III 320C 5 7...
Page 235: ...RU...
Page 239: ...RU 6 DIGISTEEL III 320C DIGIPULS III 320C...
Page 246: ...RU DIGISTEEL III 320C DIGIPULS III 320C 13 4 1 2 W000275904 3 II W000383000...
Page 250: ...RU DIGISTEEL III 320C DIGIPULS III 320C 17...
Page 251: ...RU 18 DIGISTEEL III 320C DIGIPULS III 320C...
Page 252: ...RU DIGISTEEL III 320C DIGIPULS III 320C 19...
Page 256: ...RU DIGISTEEL III 320C DIGIPULS III 320C 23 5 7...
Page 263: ...1 DVU W500 INDICE DATE MOTIF F GB 30 31 32 23 B A 10 1 1 2 11 21 22 24 25...