SachsenRad SachsenRad E-Racing R6 User Manual Download Page 26

26

9. 

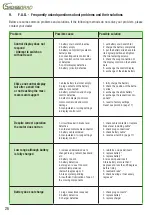
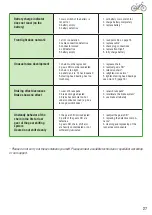
F.A.Q. -  Frequently asked questions about problems and their solutions

Below are some common problems and solutions. If the following methods do not solve your prob-lem, please 

contact your dealer.

Problem

Possible cause

Possible solution

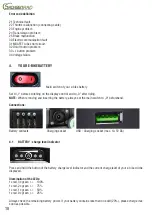
Control display does not 

respond 

- Attempt to switch on 

without result

1. battery main switch inactive

2. battery empty

3. battery not correctly seated in 

battery slide

4. connecting cable control dis-

play / control unit not connected 

or defective

5. control display defective

6. battery (circuit) defective

1. set battery main switch to I

2. charge the battery completely

3. put the battery slide back into 

its original position and tighten 

the two fastening screws.

4. check the plug connection of 

the display control on the handle-

bars

5. exchange the control display

6. exchange of the ebike battery

EBike and control display 

fail after a short ride

or not reaching the maxi-

mum motor support


1. ebike battery is almost empty

2. plug contacts of the battery 

slide not connected

3. battery protection and charge 

control defective

4. defect in display control or 

motor control unit and motor 

damage

5. manipulated or wrong settings 

in display control unit

1. fully charge the battery

2. check the position of the batte-

ry slide*.

3. exchange the ebike battery*

4. exchange the respective com-

ponent*

5. reset to factory settings

Reset see point 3.3 (page 17)

Despite correct operation 

the motor does not run

1. circuit breaker in brake lever 

defective

2. soldered motor cable connector

3. battery cable soldered

4. manipulated or wrong settings 

in display control

1. check cable contacts or replace 

brake lever including cable*.

2. check plug connections*

3. check battery cable*

4. reset see item 3.3 (page 17)

Low range although battery 

is fully charged

1. increased demands due to 

changed load, gradient, headwind, 

etc.

2. battery too old

3. battery defective

4. storage or use at too cold 

ambient temperatures 

(below 5(degree sign) C

5. brake system grinding

6. insufficient lubrication of one of 

the moving components

1. reinforce own pedal insert

2. replace battery*

3. replace battery*

4.raise own pedal insert

Store battery at more than 7 

degrees and less than 25 degrees 

before riding

5. readjust brake*

6. check bearings, if necessary 

regrease*

Battery does not charge

1. plug connections loosened

2. battery defective

3. charger defective

1. check plug contacts*.

2. replace battery*

3. replace charger

Summary of Contents for SachsenRad E-Racing R6

Page 1: ...User Manual with E Bike pass and maintenance log SachsenRad E Racing Bike R6 Productnummer BB12062 BB12083...

Page 2: ...nd bell 12 2 11 Inserting the battery 13 3 OPERATION AND FUNCTIONS 13 3 2 Breaking with the E Bike 14 3 3 The control display 14 4 YOUR E BIKE BATTERY 18 4 2 Battery use safe storage and handling 19 4...

Page 3: ...following warnings and precautions before using the pro duct for the first time If you lend your e bike to another person ask them to read this manual to minimise the chance of accidents WARNING Wear...

Page 4: ...that it is dismantled properly We also have a short video online for you https www youtube com watch v zJ2FOVUJSYw Under the following link you will find a video tutorial on how to adjust the brake sy...

Page 5: ...IKE BATTERY SERIAL NO MOTOR SERIAL NO IF AVAILABLE FRAME FORK RIM DERAILLEUR TYPE NUMBER OF GEARS SUSPENSION FORK BASKET FRONT CARRIER OTHERS FRAME NO MODEL TYPE ENGINE REAR CENTER SIZE IN INCHES COLO...

Page 6: ...2 hours first Please read sections 5 2 and 5 3 Tip The battery must be charged for at least 12 hours before first use Please read section 5 2 and section 5 3 Remarks Upgrading with accessories attachm...

Page 7: ...e lever front brake control 2 ASSEMBLY 2 1 Before assembly WARNING Incorrect assembly of your e bike can cause significant damage to the bike and even personal injury If you are not sure whether your...

Page 8: ...wheel Remove the black plastic covers on the left and right of the front wheel that were used to secure it for transport Carefully loosen the cable tie on the spoke with which your quick release axle...

Page 9: ...the steering head bearing First loosen the four bolts of the stem Fig 1 NOTE The stem is designed differently on some versions Now place the handlebars in the stem shell please note the direction and...

Page 10: ...t the cables and Bowden cables to see if they are pointing to the left or right The arrows 1 and 2 describe the directions of the stem and the suspension fork On the left pic ture you see the delivery...

Page 11: ...re A 2 Insert the seat post into the seat post bracket of the frame picture B 3 Press the quick release lever onto the frame and close it Please make sure that the lever is locked picture C Otherwise...

Page 12: ...rtain period of use the chain may be worn out due to transmission strength and can be properly adjusted by using a tensioning screw to hold the chain in place The chain should be set on the smallest t...

Page 13: ...osition Place the battery on top of the battery slide and let the battery slide down as far aspossible If the battery is in the correct posi tion you can lock the battery with the key Before each ride...

Page 14: ...on the brake handle when you want the motor to work Try the brakes at low speed The brake hand le of the left hand corresponds to the brake of the rear wheel The brake handle of the right hand corres...

Page 15: ...le for a good screen view Switch off the battery beforehand General operation control display Switching the e bike control display on and off Press and hold the ON OFF button for 2 seconds to switch t...

Page 16: ...ressed Caution The e bike accelerates in this mode Switching the lighting on off Press and hold the button for 2 seconds to switch on the front light The front light is switched off in the same way Mo...

Page 17: ...ease contact the manufacturer or a bicycle dealer in your vicinity Quality assurance and warranty The warranty is valid for 24 months from the date of purchase of the e bike and only if used properly...

Page 18: ...and to 0 after riding NOTE When removing and inserting the battery always set the main switch to 0 beforehand Connections Battery contacts Charging socket USB Charging socket max 1A 5V DC 4 1 BATTERY...

Page 19: ...equences such as fire serious injury or death If you have any questions about using the battery please contact your dealer WARNING Never short circuit a battery intentionally Doing so may cause an exp...

Page 20: ...ill gradually lose its performance and life With proper use and maintenance your battery can maintain more than 80 capacity after more than 500 charging cycles but the decrease in total capacity is in...

Page 21: ...rear brake and the right brake corresponds to the front brake Your e bike is equipped with normal speci fications of brake pads Please check the brake pads every time and ask your dealer about the br...

Page 22: ...pecifications usually include if necessary cleaning greasing and adjustment of the certain compo nent and if necessary replacement of wear caused by fatigue or damage General infor mation and brief in...

Page 23: ...rive slowly and keep clear of other vehicles and brake early Failure to do so may result in accidents sig nificant property damage serious bodily injury or death If you are unsure about the performanc...

Page 24: ...se the door suddenly opens or the car blocks the line of sight so that you cannot see suddenly appearing people or things in time Please be especially careful in bad weather In wet weather your electr...

Page 25: ...3 Inspection 4 Inspection Carried out on Carried out on Carried out on Carried out on Signature Stamp Specialist workshop Signature Stamp Specialist workshop Signature Stamp Specialist workshop Signat...

Page 26: ...ontrol unit and motor damage 5 manipulated or wrong settings in display control unit 1 fully charge the battery 2 check the position of the batte ry slide 3 exchange the ebike battery 4 exchange the r...

Page 27: ...gear shift 3 retension chain 4 retighten crank arms 5 tighten steering head bearings see point 2 5 page 10 Braking effect decreases Brake shows no effect 1 wear of brake pads 2 brake wrongly adjusted...

Page 28: ...Output voltage 42V DC Output current 2A 11 DECLARATION OF CONFORMITY The manufacturer declares that the above mentioned products are in conformity with all relevant declarations of the Machinery Direc...

Page 29: ...ontains more than 0 0005 mass percent mercury Please observe the above instructions 13 IMPRINT Every effort has been made to ensure that the information in this manual is correct however product opera...

Page 30: ...applies in particular to the intended use as well as the care and maintenance instructions 6 Not included in the warranty are a Components subject to wear consumption or deterioration except for clear...

Page 31: ...above are only valid if confirmed in writing by LEICKE GmbH SachsenRad 10 Should a technical problem occur with the e bike you have purchased please contact the sup port hotline of LEICKE GmbH Sachsen...

Page 32: ...32 notes...

Page 33: ...as unable to solve your problem 1 Please contact our customer service before you return the product 2 Pack well Take your time and pack the item carefully Remove old labels and barcodes from the shipp...

Page 34: ...Battery Charger Display error code Brakes Motor Handlebar Suspension fork Wheel Light Bottom bracket Other If you send this receipt by mail please include pictures or videos of the defect as attachme...

Page 35: ...35 notes...

Page 36: ...36 We wish you a good trip with your SachsenRad E Racing Bike R6...

Reviews: