background image

20

20

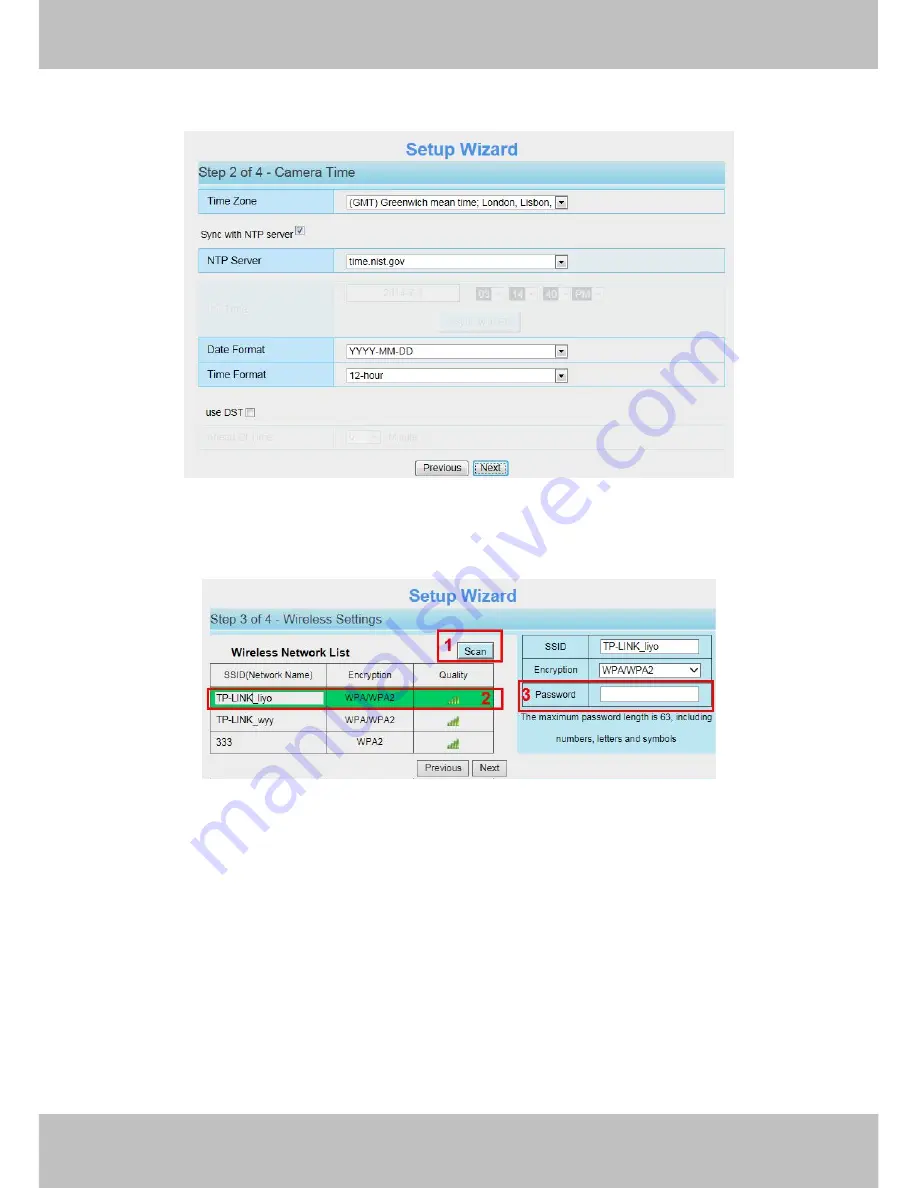
System Time:

Select the time zone you need to set the date, time,format, etc.

Figure 3.4

Wireless networks:

Click Scan, find the SSID of your wireless router, select and enter the password.

Figure 3.5

IP:

Set the IP address of the camera. You could choose to obtain an IP automatically (DHCP) or set the IP

address manually according to your needs.

Summary of Contents for SABIP1600

Page 1: ...User User Manual Manual For Windows Mac OS Indoor HD Wireless IP Camera V1 0 Model SABIP1600...

Page 2: ...14 2 5 IP Camera Connection to the Server 17 3 Surveillance Software GUI 17 3 1 Login Window 18 3 2 Modify the Username and Password 18 3 3 Setup Wizard 19 3 4 Surveillance Window 21 4 Advanced Camer...

Page 3: ...4 9 3 Patch Installation 67 4 9 4 Factory Reset 67 4 9 5 Reboot 67 5 Playback 68 6 Appendix 69 6 1 Frequently Asked Questions 69 6 1 1 Install the add on of Firefox browser Google Chrome and IE Chrome...

Page 4: ...network to access the website of your camera The camera is designed for indoor surveillance applications such as home retail store and office Controlling the camera and managing images are simplified...

Page 5: ...nts received are complete according to the Package Contents listed below Before the IP Camera is installed please carefully read and follow the instructions in the Quick Installation Guide to avoid da...

Page 6: ...when the available size of SD card is less than 256M the old record files will be deleted automatically 1 6 Hardware Installation 1 Rotate the base of the camera until points a and bare aligned this a...

Page 7: ...twork Router or Switch via network cable 2 Connect the power adapter to the camera 3 Insert the CD into the CD drive of your computer 4 Go to the folder Equipment Search Tool and find the folder For W...

Page 8: ...er will open to the camera login page 2 https LAN IP HTTPS Port NO The default Https port no is 443 You can use the url to access the camera https LAN IP HTTPS port Go to Settings Network Port panel y...

Page 9: ...et Explorer if it is not already opened Click on Tools then click Internet Options Next click the Security tab then click the Trusted sites button Figure 2 3 For Firefox you can add the trusted as the...

Page 10: ...9 9 Tools Options Advanced View Certificates Servers Figure 2 4 Click View Certificates and go to Servers option Figure 2 5 Go to Add Exception panel...

Page 11: ...address and port forwarding you can access the camera directly from the Internet using the WAN IP address and port number How to Obtain the WAN IP address from a public website To obtain your WAN IP a...

Page 12: ...P reads UPnP Successful on the Device Status page 2 Do port HTTP port and Media port forwarding manually If your router has a Virtual Server it can do port forwarding Add the camera s LAN IP and port...

Page 13: ...al cameras on the same network you will need to change the HTTPS port for each camera IP Address Set this in the same subnet as your computer or keep it as default Subnet Mask Keep it as default Gatew...

Page 14: ...ter For these steps we will be using the TP LINK brand wireless router as an example If there is a UPnP function in your router Choose Forwarding UPnP make sure that the Current UPnP Status is Enabled...

Page 15: ...This part can be omitted IP WAN or LAN IP address port number If there is the RSTP port number on the Port page you must only use RTSP port number otherwise you must only use HTTP port number Videost...

Page 16: ...s in the VLC 1 rtsp admin 123 192 168 1 11 88 videoMain 2 rtsp 192 168 1 11 88 videoMain 3 rtsp 123 192 168 1 11 88 videoMain 4 rtsp admin 192 168 1 11 88 videoMain Open the VLC and go to Media Open N...

Page 17: ...16 16 Figure 2 10 Sometimes you may need to enter the user name and password again Click OK and you can see the real time preview Figure 2 11...

Page 18: ...camera or else the new username and password cannot take effect when you enter the authentication in the VLC 2 5 IP Camera Connection to the Server Device supports ONVIF2 2 1 protocol You can easily a...

Page 19: ...in stream If you want to access the camera from Internet here we recommend sub stream Note When the network bandwidth is badly you d better select Sub Stream and the video will be more fluency Section...

Page 20: ...login page again 3 3 Setup Wizard After logging in for the first time you will be directed to the Setup Wizard automatically Here you can set the basic parameters of camera such as camera name camera...

Page 21: ...rmat etc Figure 3 4 Wireless networks Click Scan find the SSID of your wireless router select and enter the password Figure 3 5 IP Set the IP address of the camera You could choose to obtain an IP aut...

Page 22: ...your router 3 4 Surveillance Window Figure 3 7 Section1 LiveVideo Settings Playback buttons Path to surveillance window Click this button and back to the surveillance window Path to Administrator Cont...

Page 23: ...identify the stream type 2 720P VGA The bigger the resolution the better of the image quality is If you are accessing the camera via internet and want to get more fluent video streaming please select...

Page 24: ...ill adjust the infra led on or off automatically Manual Select it and you can turn on or turn off the infrared led manually Schedule Select it and the IR led light will be off at the schedule period I...

Page 25: ...re your voice Click the icon again and stop talking 4 Audio Click this icon the icon will become to you can hear the sound around the camera by the earphone or speakers that connected with PC 5 Snapsh...

Page 26: ...lick it to make full screen press ESC and exit full screen Zoom up First Method Here is a convenient and fast solution to Zoom up down screen by Clicking Video Screen and adjusting Mouse pulley or by...

Page 27: ...ess Esc button or double click right mouse and cancel the function NOTE For Mac OS the plugin cannot support Onscreen Mouse Control so you cannot allow to use it 4 Advanced Camera Settings Click the b...

Page 28: ...For example Device ID is 000C5D00008 the same MAC ID sticker is found at the bottom of the camera Camera Time The system time of the device Click Basic Settings and go to Camera time panel and adjust...

Page 29: ...gure 4 2 4 1 3 Session Status Session status will display who and which IP is visiting the camera now Figure 4 3 4 1 4 Log The log record shows who and which IP address accessed or logout the camera a...

Page 30: ...nymous You can define a name for your camera here such as apple Click Save to save your changes The alias name cannot contain special characters Figure 4 5 4 2 2 Camera Time This section allows you to...

Page 31: ...the Network Camera with your computer Manually The administrator can enter the date and time manually Note select the date and time format use DST Select the use DST then select the daylight saving ti...

Page 32: ...tor then select Change password enter the old password and the new password lastly click modify to take effect Figure 4 8 How to add account Select one blank column then enter the new user name passwo...

Page 33: ...Figure 4 9 Figure 4 10 Delete Select the account which you want to delete then click Delete button to take effect NOTE The default admin account cannot be deleted but you can add other administrator...

Page 34: ...ras in LAN In Multi Device Settings page you can see all devices searched in LAN The 1st Device is the default one You can add more cameras in the list in LAN for monitoring The camera s software supp...

Page 35: ...34 34 Figure 4 12 Back to Surveillance Windows and click Four Windows option you will see four cameras you added Figure 4 13...

Page 36: ...m using DDNS domain name Firstly make sure all of the cameras you added can be accessed through the internet Read How to configure DDNS settings Login to the first camera using a DDNS domain name and...

Page 37: ...igure 4 19 Figure 4 16 1 The camera model MJ or H264 2 The 2nd camera s name 3 Fill in the 2nd camera s DDNS host not LAN IP NOTE The MJ series have the same HTTP Port no and Media Port no 4 Enter the...

Page 38: ...e and port to view all the cameras via internet 4 2 5 Status Light You can enable or disable status light 4 3 Network This section will allow you to configure your camera s IP DDNS Wireless Settings U...

Page 39: ...that you use the subnet mask gateway and DNS server from your locally attached PC If you don t know the subnet mask gateway and DNS server you can check your computer s local area connection as follo...

Page 40: ...a interface and go to the Network panel on the left side of the screen then click Wireless Settings Click the Scan button and the camera will detect all wireless networks around the area It should als...

Page 41: ...are exactly the same for your router Figure 4 22 Step 3 Please click on the Save button after all settings have been entered and disconnect the network cable Never shut down the power of the camera un...

Page 42: ...or two seconds Step 02 Press the WPS button on your router within 60 seconds The WPS button is usually on the back or side of your router On some routers you may need to log in to the web interface an...

Page 43: ...Restore DDNS to factory If you have configured Third Party DDNS successfully but you want to use Manufacturer s DDNS again here click this button and start Manufacturer s DDNS Service Third Party Doma...

Page 44: ...43 43 Figure 4 24 Figure 4 25 Click here to register...

Page 45: ...com After registration please login your email which used to register You will receive an email from website please click the link to activate your ACCOUNT as indicated in email Secondly Login the li...

Page 46: ...rator panel and check if the DDNS status is successful If failed please double check if you have input the correct hostname user name and password and try to redo the settings NOTE If you have set Thi...

Page 47: ...Back to the Device Status panel you can see the UPnP status Figure 4 30 The camera s software will be configured for port forwarding There may be issues with your routers security settings and someti...

Page 48: ...ike to change the port of right click on the IP address and click on Network Configuration this brings up the network configuration box as shown in Figure 4 35 and 4 36 Figure 4 32 Figure 4 33 Modify...

Page 49: ...is set or you may have problems later with remote access and seeing the camera remotely if the camera loses power and reconnects on a different LAN IP address Make sure you set a static LAN IP address...

Page 50: ...and SMTP Port must be set to 465 or 25 or 587 which port you choose should be decided by which Transport Layer Security you select 2 SMTP Username password ID account and password of the sender email...

Page 51: ...ter 3 Server Error 4 Incorrect user or password 5 The sender is denied by the server Maybe the server need to authenticate the user please check it and try again 6 The receiver is denied by the server...

Page 52: ...can access on the internet Port Default is port 21 If changed external FTP client program must change the server connection port accordingly FTP Mode Here supports two modes PORT and PASV Username pas...

Page 53: ...the cloud server information to store the recording files Figure 4 40 Enable cloud server you can check it to enable the cloud server Click the Get Authorization Code button then you will enter the dr...

Page 54: ...Mode the clearer video will become and it will take up more bandwidth If select the Smooth Mode the bandwidth is very narrow and bit rate is large that will lead to video can not play well The Equili...

Page 55: ...ikely you will get a better video quality but at the cost of higher network bandwidth consumption Variable bitrate Select the Bit rate type to constant or variable If select Yes the camera will change...

Page 56: ...time Capture anytime Click the black button up the MON you will see all time range turn red When something moving in the detection area at anytime the camera will capture Specify an capture schedule...

Page 57: ...or 4 5 1 Motion Detection IP Camera supports Motion Detection Alarm when the motion has been detected the IP Camera will make a alarm Figure 4 45 To enable action detection follow the steps below Step...

Page 58: ...ill snap the live view window as a still picture and load it to the FTP Make sure you have set FTP and set FTP as the storage path in Video Snapshot settings panel D Recording If you select this check...

Page 59: ...ving in the detection area at anytime the camera will alarm Figure 4 47 Specify an alarm schedule Click the week day words the corresponding column will be selected For example click TUE the all colum...

Page 60: ...en the motion has been detected during the detection time in the detection area the camera will alarm and adopt the corresponding alarm indicators NOTE You must set the detection area and detection sc...

Page 61: ...75db If the Sensitivity is set to Lower the camera will detect the sound whose more than 85db If the Sensitivity is set to Lowest the camera will detect the sound whose more than 95db About the other...

Page 62: ...ording path is c IPCamRecord you can change another one For MAC OS the manual recording path is IPCamRecord Enter the local folder Click here You can enter the local storage folder 4 6 2 Alarm Recordi...

Page 63: ...ecord When the parameter Recording Location is set SD Card on the Storage Location page you can configure parameters as shown in follow figure Figure 4 53 When the parameter Recording Location is set...

Page 64: ...Click Save button to take effect 4 6 5 SD Card Management This camera supports SD Card and the max size of SD card must be under 32G Go to the Settings Device Status Device Status page you can see th...

Page 65: ...lient PC s IP addresses It is composed of the following columns Block access from these IP addresses and Only allow access from these IP addresses Figure 4 56 Enable firewall If you select Only allow...

Page 66: ...These parameters will be stored in a bin file for future use Click Browse and select the parameters file you have stored then click Submit to restore the restore the parameters Figure 4 57 4 9 2 Syst...

Page 67: ...ipment Search Tool Double click the Equipment Search Tool shot icon select the Camera IP that you want to upgrade the firmware Then select Upgrade Firmware and enter the username and password choose t...

Page 68: ...ame Your camera will not function correctly if a corrupt bin file is used 4 Normally only Device WEB UI need to be upgrade please do not try to upgrade the Device System Firmware 5 Never shut down the...

Page 69: ...red in the SD card NOTE The FC1403P does not support the function Section 1 Define the Record files time and Type The storage path of record files Here supports three types current day current month a...

Page 70: ...et Section 3 Play Stop Audio Full screen buttons Please select one record file before use these buttons Click this button to play the record files Click this button to stop the record files Open or st...

Page 71: ...70 70 6 1 1 Install the add on of Firefox browser Google Chrome and IE Chrome Figure 6 1 Figure 6 2...

Page 72: ...71 71 Figure 6 3 Figure 6 4...

Page 73: ...72 72 Figure 6 5 Figure 6 6...

Page 74: ...73 73 6 1 2 Uninstall the add on of Firefox browser Google Chrome and IE Chrome Figure 6 7...

Page 75: ...or username and password Please power on the camera before reset Default administrator username admin Default administrator password No password 6 1 4 Camera can not record Camera can not record when...

Page 76: ...transmitted by the ActiveX controller If ActiveX controller isn t installed correctly you will see no video image You can resolve this problem by this way Download ActiveX controller and set the safet...

Page 77: ...t also has much relation with router s security settings So we recommend you do port forwarding manually You can view your camera in internet successfully after you do port forwarding manually in your...

Page 78: ...le of View horizontal Horizontal 108 Diagonal 116 Video Image Compression H 264 Image Frame Rate 25fps VGA 23fps 720P Resolution 720P 1280 x 720 VGA 640 x 480 640 x 360 QVGA 320 x 240 320 x 180 Stream...

Page 79: ...adapter should be used between 0 40 and 5 90 relative humidity 6 4 CE FCC Electromagnetic Compatibility EMC FCC Statement This device compiles with FCC Rules Part 15 Operation is subject to the follo...

Page 80: ...roved by the party responsible for compliance could void the user s authority to operate this equipment CE Mark Warning This is a Class B product In a domestic environment this product may cause radio...

Reviews: