background image

6 32 025 682

Saab 9-3 5D M06-

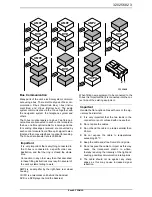
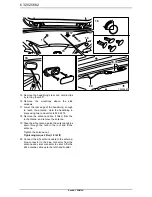
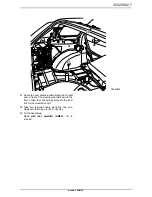
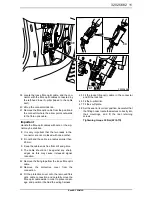
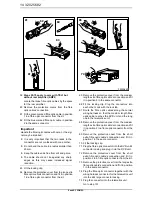
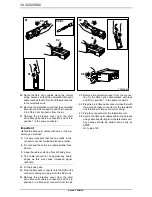
15 Remove the headlining's rear and centre clips

by turning them 90°.

16 Remove the mountings above the side

windows.

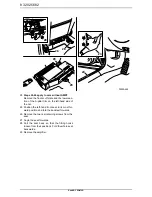
17 Lower the rear edge of the headlining, enough

to reach the antenna. Hold the headlining in
place using two removal tools 82 93 474.

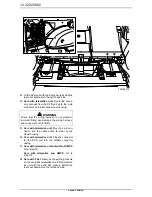
18 Remove the antenna cable, if fitted, from the

roof antenna, and remove the antenna.

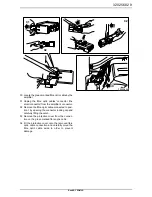
19 Take the kit's antenna, guide the antenna cables

down through the hole in the roof and fit the
antenna.
Tighten the antenna nut.

Tightening torque 2 Nm (1.5 lbf ft)

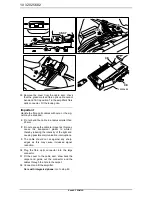
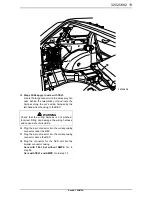
20 Connect the kit's antenna cable to the antenna,

blue connector to the blue connector from the
antenna and violet connector to violet. Affix the
kit's antenna cable up to the left-hand D-pillar.

F930A451

15

15

16

15

15

16

17

20

18,19

Summary of Contents for 32 025 681

Page 1: ...Cdefault MONTERINGSANVISNING INSTALLATION INSTRUCTIONS MONTAGEANLEITUNG INSTRUCTIONS DE MONTAGE SITdefault Saab 9 3 5D M06 Navigation system Accessories Part No Group Date Instruction Part No Replaces...

Page 2: ...8 Nut 9 Cable tie x20 10 Fibre optic connector x2 11 Fibre optic connector 12 Connector casing x2 13 Fibre optic cable x3 Depending on the equipment level of the car the kit may need to be supplemente...

Page 3: ...it is connected into the cor rect side of the existing equipment Important It is very important that everything connected to the O bus is connected in a specific order see illustration and that the r...

Page 4: ...ing the internal compo nents in the control module a replacement must be made with care in the following way Never touch the pins on a control module with hands or clothes Ground yourself by touching...

Page 5: ...d 10 Remove the scuff plate and luggage compart ment floor 11 Steps 11 14 must be carried out on both sides Remove the C pillar trim 12 Remove the side bolsters 13 Remove the rear side trim and the co...

Page 6: ...Remove the antenna cable if fitted from the roof antenna and remove the antenna 19 Take the kit s antenna guide the antenna cables down through the hole in the roof and fit the antenna Tighten the an...

Page 7: ...t of the electrical centre down to the floor Follow the car s wiring harness to the loca tion for the telematics unit 22 Tape any removed cable along the new one Apply anti rattle tape to the connecto...

Page 8: ...d side of the car 25 Position the left hand front seat in its most for ward position and fold the backrest forwards 26 Remove the two rear retaining screws from the seat 27 Angle the seat forwards 28...

Page 9: ...2 Remove the fibre optic cable connected to posi tion 1 by opening the connector locking clip and carefully lifting the catch 33 Remove the protective cover from the connec tion on the green marked fi...

Page 10: ...nd the cables through the hole in the carpet 38 Connect and fit the amplifier Cars with integrated phone Go to step 49 Important Handle the fibre optic cables with care or the sig nal may be distorted...

Page 11: ...in order to prevent dam age and position it behind the wiring harness 45 Fit the loose fibre optic cable in the connector and fit the lock tab 46 Fit the A pillar trim 47 Fit the scuff plate 48 Set th...

Page 12: ...housing 52 Cars with telematics unit Plug the connector for the DVD unit into the smaller connector casing 53 Cars with telematics unit but without AMP2 Go to step 99 Cars with telematics and AMP2 Go...

Page 13: ...the 2 pin connector into the corresponding connector under the REC 57 Plug the 3 pin connector into the corresponding connector above the REC 58 Plug the connector for the DVD unit into the smaller c...

Page 14: ...xtra fibre optic cable s connection and fit it in position 2 in a fibre optic connector from the kit 69 Remove the protective cover from the short extra fibre optic cable s connection and fit it in po...

Page 15: ...e other end with tape 83 Fit the locking clip 84 Plug the connectors into each other Lock with the lock tab 85 Remove the protective cover from the connec tion on the medium length extra fibre optic c...

Page 16: ...nnector from the kit 95 Remove the protective cover from the connec tion for the fibre optic cable marked with tape and fit it in position 1 in the same connector 96 Plug the 2 pin fibre optic connect...

Page 17: ...t one end in position 1 in the same fibre optic connector 108Fit the locking clip 109Plug the fibre optic connector into the DVD unit s connector casing and plug it into the DVD unit 110Unplug the fib...

Page 18: ...t on the removed fibre optic cable 118Fit the fibre optic cable in position 1 in the fibre optic connector for AMP2 119Fit the locking clip 120Plug the fibre optic connector into the large con nector...

Page 19: ...ic cable connected to posi tion 2 by opening the connector locking clip and carefully lifting the hook 128Remove the protective cover on the fibre optic cable from the DVD unit and fit it in position...

Page 20: ...f the car was equipped with one 137Fit the luggage compartment floor and scuff plate 138Connect the diagnostic tool select car and model year select All select Add Remove select the current replaced n...

Reviews: