background image

Page 6

ADJUSTMENTS

SETTING THE TABLE FOR HORIZONTAL OR

BEVEL CUTTING

See Figure 6.

A bevel scale is located under the saw table as a convenient
guide for setting the approximate saw table angle for bevel
cutting. When greater precision is required, make practice
cuts on scrap material and adjust the saw table as necessary
for your requirements.

Note:

When cutting at angles, the drop foot should be tilted

so it is parallel to the saw table and rests flat against the
workpiece. To tilt the drop foot, loosen philips screw, tilt drop
foot to the proper angle, then retighten screw.

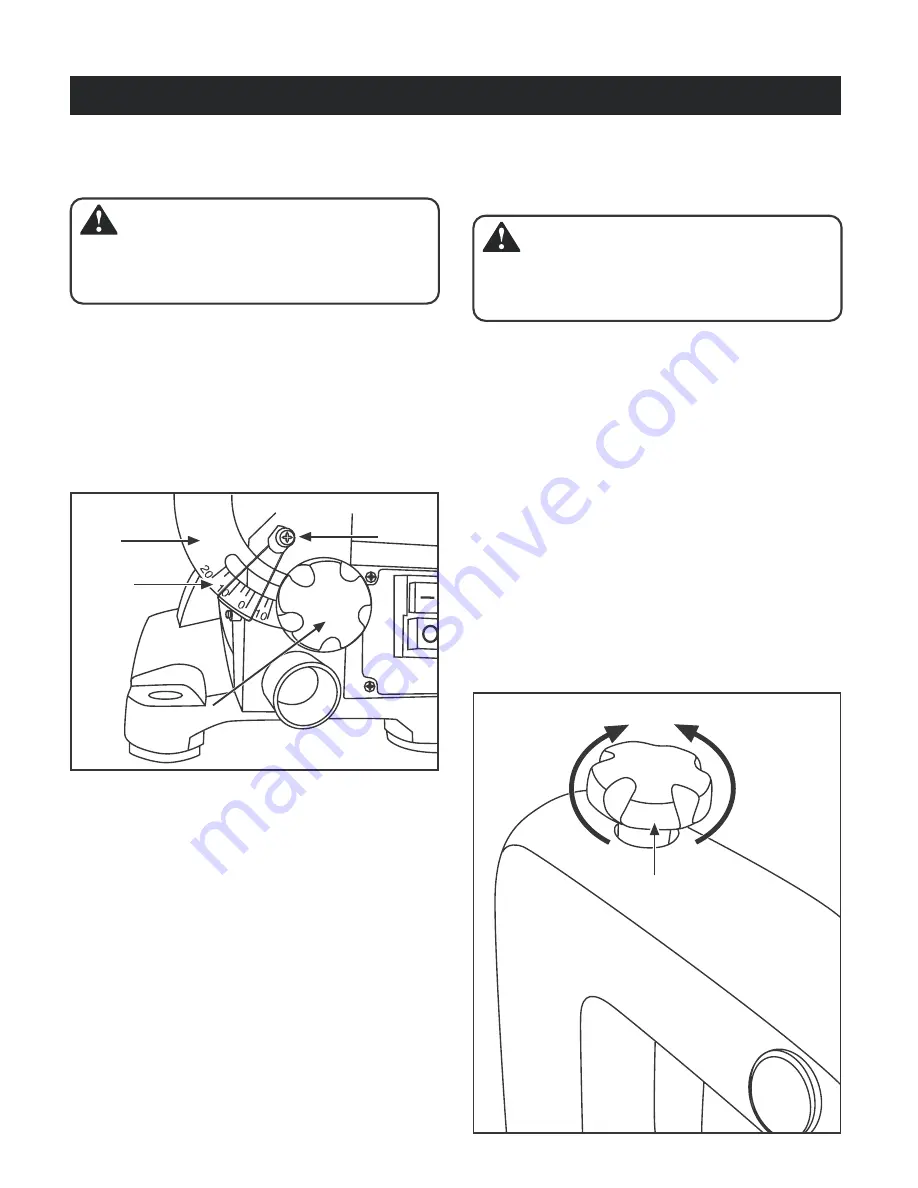
ADJUSTING BLADE TENSION

See Figure 7.

Turn off and unplug the saw from the power source.

Turning the blade tension knob counter-clockwise decreases

(or loosens) blade tension.

Turning the blade tension knob clockwise increases (or

tightens) blade tension.

Note:

Adjustments to blade tension can be made at any time.

Check tension by the sound the blade makes when plucked
like a guitar string. This method of adding tension to the blade
can be developed with practice and requires knowing your
scroll saw.

Pluck the back straight edge of blade while turning tension

adjustment knob. Sound should be a musical note. Sound
becomes less flat as tension increases. Sound decreases
with too much tension.

Note:

Be careful not to adjust blade too tight. Too much tension

may cause the blade to break as soon as you start cutting.
Too little tension may cause the blade to bend or break before
the teeth wear out.

WARNING:

Failure to turn the saw off and unplug the saw from the
power source could result in accidental starting causing
possible serious injury.

Bevel
scale

Blade tension knob

Table lock knob

Fig. 6

Fig. 7

WARNING:

Failure to turn the saw off and unplug the saw from the
power source could result in accidental starting causing
possible serious injury.

Scale
indicator

To tighten

To  release

Screw

Summary of Contents for ESW1846

Page 1: ...HIS MANUAL FOR FUTURE REFERENCE Pay close attention to the Rules for Safe Operation Warnings and Cautions If you use your Scroll Saw properly and only for what it is intended you will enjoy years of s...

Page 2: ...afety symbols and the explanations with them require your careful attention and understanding The safety warnings do not by themselves eliminate any danger The instruction or warnings they give are no...

Page 3: ...el scale and indicator show you the degree the saw table is tilted 6 Sawdust Exhaust This feature will allow you to attach any 1 1 4 in 32mm vacuum hose for easy sawdust collection 7 LED light Illumin...

Page 4: ...m the box with the list below Assemble according to the instructions on the following pages 2 5 mm Hex Key 4 mm Hex Key Blade s 4 pcs Combined Blade guard Blade adaptor 2 pcs 4 mm Hex key Blade Combin...

Page 5: ...sorb the noise and vibration The size of the padding material should be approximatedly 30 in x 15 in x 1 2 in 780mm x 390mm x 13mm CLAMPING SCROLL SAW TO WORKBENCH See Figure 2 If the scroll saw is to...

Page 6: ...hten drop foot lock knob Loosen the table lock knob to tilt the saw table until it is approximately perpendicular or at right angle to the blade Place a small square on the saw table next to the blade...

Page 7: ...Adjustments to blade tension can be made at any time Check tension by the sound the blade makes when plucked like a guitar string This method of adding tension to the blade can be developed with pract...

Page 8: ...lease the blade tension Remove throat plate by applying force from the bottom of the throat plate upward Press down the upper blade holder and lift up the blade with blade adaptor to enable the remova...

Page 9: ...fine narrow blades should be used to scroll cut in thin material 1 4 in 6mm thick or less Most blade packages state the size or thickness and type of material which that blade is intended to cut The...

Page 10: ...d workpieces plan your work so it will not pinch the blade Workpieces must not twist rock or slip while being cut REMOVING JAMMED MATERIAL When backing out the workpiece the blade may bind in the kerf...

Page 11: ...and remove the workpiece from the saw table STACK CUTTING See Figure 13 After becoming well acquainted with your saw through practice and experience you may wish to try stack cutting Stack cutting may...

Page 12: ...rings Carefully place the saw on its side as shown in Figure 14 Remove the rubber cap from the upper and the lower arm of the saw Squirt a few drops of SAE20 oil around the shaft end and arm bearings...

Page 13: ...blem with ON OFF switch power cord or outlet 2 Motor defective 1 Too much tension 2 Feeding too quickly 3 Wrong blade 4 Blade twisting in wood 1 Improper mounting of saw 2 Mounting surface 3 Loose tab...

Page 14: ...under normal use and reasonable care in the opinion of the Company and such guarantee does not cover damage malfunction or failure resulting from misuse neglect abuse or used for a purpose for which...

Reviews: