background image

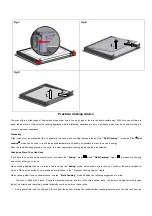
When the door is mounted, removing some of the parts (the door glass or some other part) from the door may result in injury.

Attention 

The glass may break if you use excessive force especially at the edges of the front sheet.


Accessories 

Wash all bakeware and accessories after each use and dry with a kitchen towel.To clean easily, soak in warm soapy water for about 30 
minutes. 

Catalytic enamel surface 

The removable cover casing is coated with a dark gray catalytic enamel that can become coated with oil and fat distributed by circulating 
air during convection heating. These deposits will burn off at oven temperatures of 200 °C and higher, for example, when baking or 
roasting.  
Higher temperatures will result in faster burning.The oven and accessories should be cleaned after each use. Otherwise further baking and 
roasting will cause the deposits to bake on even harder and cleaning may become difficult and in extreme cases impossible. 

Cleaning by hand

Make sure the oven is cool before cleaning. 

The catalytic enameled cover casing should be cleaned using a solution of hot water and washing-up liquid applied with a soft nylon


brush. 

Do not use abrasive cleaning agents, hard brushes, scouring pads or cloths, steel wool, knives or other abrasive materials.Do not use 
oven spray on catalytic enamel as the chemicals used in oven sprays will damage catalytic enamel and render it ineffective. 
If using oven sprays on the interior oven surfaces, the catalytic cover casing must first be removed from the oven. 

Cleaning with high temperatures   

Before cleaning the catalytic cover casing with high temperatures, make sure that all interior oven surfaces have been cleaned as 
described above. Otherwise, the high temperatures can bake deposits onto the interior oven surfaces and make them impossible to 
remove. 
If, after manual cleaning, the oven is still heavily soiled, heating it to a high temperature will help remove soiling caused by oil and grease 
splashes.


Note that deposits of spices, syrups and similar substances are not removed by this process. These should be removed by hand with a 
mild solution of hot water and washing-up liquid applied with a soft brush. 

Remove all accessories from the oven.

Set the oven to conventional function.

Set the heat to 250 °C.

Run the oven for approximately 1 hour. The length of time will depend on the degree of soiling.

It is a good idea to set the finish time for the process using the end time setting, in case you forget to switch the oven off at the end. 
Any remaining soil will gradually disappear with each subsequent use of the oven at high temperatures. 

Disposal  Instructions 


Disposing of the packaging material 

The material used to package this appliance is recyclable.

Dispose of the packaging materials in the appropriate container at your local waste disposal facility Disposing

Summary of Contents for RBO-IA8X-70SS

Page 1: ...RBO IA8X 70SS BUILT IN OVEN...

Page 2: ...the mains The omnipolar circuit breaker should be sized according to the load and should comply with current regulations the earth wire should not be interrupted by the circuit breaker The rating plat...

Page 3: ...ce CAUTION Some parts of this product can become very hot and cause burns Particular attention has to be given where children and vulnerable people are present This appliance can be used by children a...

Page 4: ...e backsplash Children climbing on an appliance to reach items could be seriously injured Do not clean the appliance while it is still hot Some cleaners produce noxious fumes when applied to a hot surf...

Page 5: ...icals used in oven sprays will damage catalytic enamel and render it ineffective If using oven sprays on the interior oven surfaces the catalytic cover casing must first be removed from the oven Clean...

Page 6: ...blic refuse disposal sites from your local refuse department or council Meaning of crossed out wheeled dustbin Do not dispose of electrical appliances as unsorted municipal waste use separate collecti...

Page 7: ...80 120 100 60 60 100 120 180 220 MAX 80 10 20 30 40 50 60 70 90 100 110 120 160 160 MAX 220 180 120 100 60 60 100 120 180 220 MAX 160 E C B B D C E 5 FUNCTION MODEL 7 FUNCTION MODEL A U T O A U T O D...

Page 8: ...this initial use is due to the evaporation of substances used to protect the oven during storage and until it is installed Notice Place the dripping pan provided on the bottom shelf of the oven to pre...

Page 9: ...use lower temperatures when cooking roasts This results in less loss of juices meat which is more tender and a decrease in the loss of weight for the roast The Multi cooking mode is especially suited...

Page 10: ...and for the preparation of certain tartlets on 3 shelves at the same time Here are a few examples cream puffs sweet and savory biscuits savoury puffs Swiss rolls and small portions of vegetables au gr...

Page 11: ...automatic setting set the time of automatic starting and ending A Set the time limit of roast 10 hours maximum Press the button to set the time of roast The oven starts immediately and AUTO will flash...

Page 12: ...tes the setting of baking procedure has been remembered automatically When the clock shows at 13 15 between 14 15min the oven will switch on automatically During the baking time frame the square symbo...

Page 13: ...d get stained If these stains are difficult to remove use special products available on the market After cleaning it is advisable to rinse thoroughly and dry the inside of the oven should preferably b...

Page 14: ...of glass fig 4 Clean the glass and other components with an appropriate cleaner Dry thoroughly and place on a soft surface Reassemble the door by following the above procedures backwards Fig 1 Fig 2...

Page 15: ...lected Cooking on More Than One Rack If you have to cook food using several racks use either the baking mode or the Multi Cooking mode as these are the only modes that allow you to do so When cooking...

Page 16: ...for grilling foods rapidly as the distribution of heat makes it possible not only to brown the surface but also to cook the bottom part Moreover it can also be used for browning foods at the end of t...

Page 17: ...inutes Cooking Fish and Meat When cooking white meat fowl and fish use temperature setting from 180 to 200 For red meat that should be well done on the outside while tender and juicy in the inside it...

Page 18: ...mburgers Mackerels Toasted sandwiches 1 1 1 1 1 1 1 1 4 4 4 3 4 4 4 4 4 4 5 5 5 5 5 5 5 5 5 Max Max Max Max Max Max Max Max Max 8 10 6 8 10 10 15 15 20 15 20 7 10 15 20 2 3 With rotisserie where preve...

Page 19: ...5 18 45 10 12 9 Pizza Pizza Roast veal or beef Chicken 0 5 1 1 3 2 2 3 15 10 10 220 220 180 15 20 25 30 60 70 NB cooking times are approximate and may vary according to personal taste When cooking usi...

Page 20: ...an withstand temperatures of up to 100 In compliance with current safety standards contact with the electrical parts of the oven must not be possible once it has been installed All parts which ensure...

Page 21: ...e specifications indicated on the date plate on the appliance and or packaging correspond to those of the electrical mains system of your home Check that the electrical capacity of the system and sock...

Page 22: ...i clockwise to release it and then pull it downwards to take it out Replace it with a new halogen lamp Refit the lamp cover and turn it clockwise to secure it Reconnect the appliance to the mains elec...

Page 23: ......

Reviews: