background image

25

English

NOTE:

 If you want to change the password

at step 8, do it before pressing ENTER.

To Change the Settings

You can change the parental lock settings at
any time.

1

Bring up the OTHERS menu.

2

Press 

/

 to move 

 to select PAREN-

TAL LOCK and press ENTER 

34

. The pa-

rental lock on-screen display appears on the
TV screen.

3

While 

 is pointing to PASSWORD, press

the numeric buttons 

4

 to enter your cur-

rent 4- digit password then press ENTER 

34

.

 moves to COUNTRY CODE if you enter

the correct password. If you enter a wrong
password, “WRONG! RETRY...” appears on
the TV screen, and you cannot go to the next
step. If you forget your password, enter
“8888.” The current password is deleted and
you can set a new password.

4

To change the COUNTRY CODE or SET
LEVEL, press ENTER 

34

 to bring up the

associated pull-down menu when 

 is

pointing to the desired item.

5

Press 

/

 to select the desired option then

press ENTER 

34

. If you change the coun-

try code, you must reselect the parental lock
level.

6

While 

 is pointing to PASSWORD, press

the numeric buttons to enter a 4-digit pass-
word. The password entered in this step be-
comes the new password. If you want to keep
the same password as before, enter the same
password.

7

Press ENTER 

34

 moves to EXIT. Press-

ing ENTER again returns to the OTHERS
menu of the preference display.

NOTE:

 If you enter the wrong password

more than 3 times in step 3 above, 
moves to EXIT automatically and 

/

 do

not work.

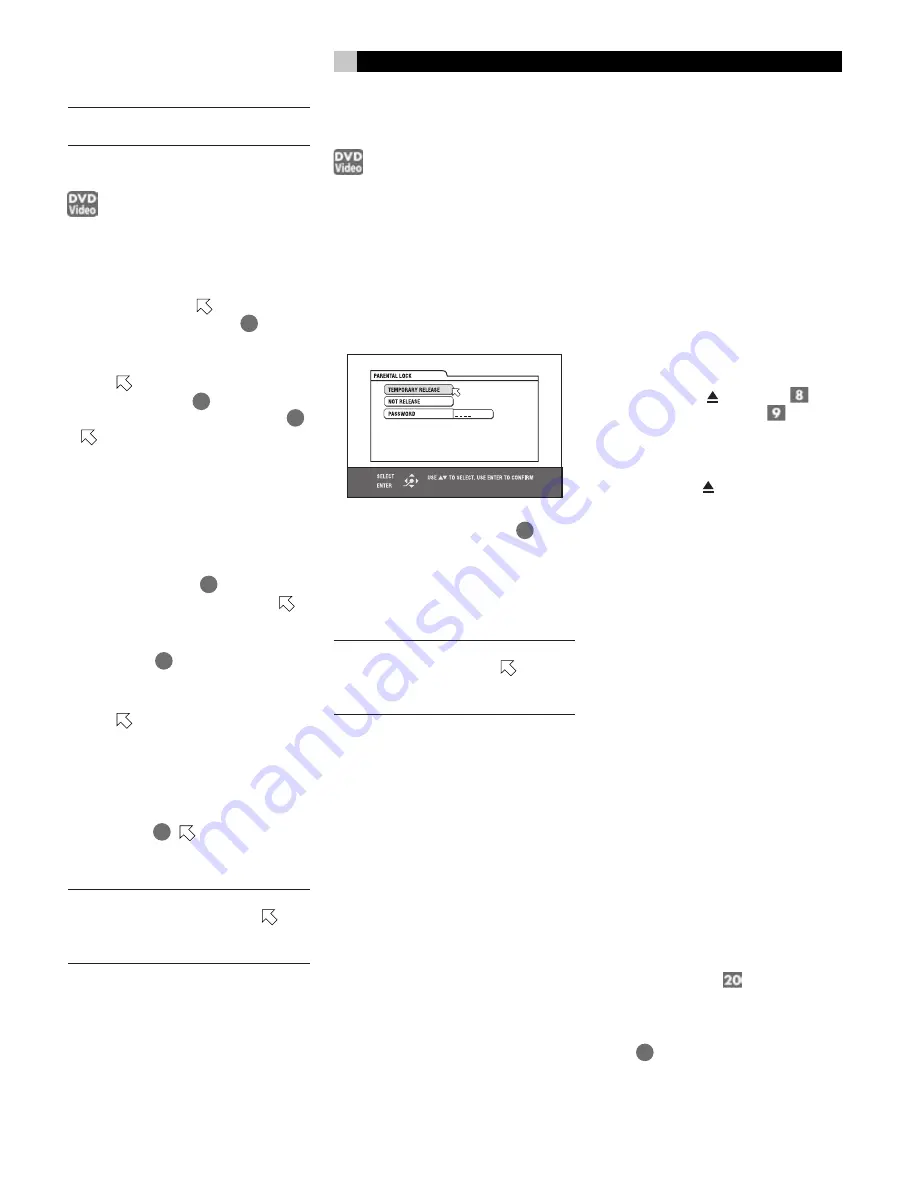
To Temporarily Release the
Parental Lock

If the parental level is set to a strict value, some
discs may not play at all. When you insert such
a disc and try to play it, the following paren-
tal lock on-screen display appears on the TV
screen, asking you whether you want the pa-
rental lock to be temporarily released or not.

1

Press 

/

 to move to TEMPORARY RE-

LEASE, then press ENTER.

2

Press the numeric buttons (0 to 9) 

4

 to enter

your 4-digit password. The parental lock is
released, and the RDV-1040 starts playback.
If you enter a wrong password, “WRONG!
RETRY...” appears on the TV screen. Enter
the correct password.

NOTE:

 When you enter the wrong pass-

word 3 times at step 2 above, 

 moves to

NOT RELEASE automatically and 

/

 do

not work.

Troubleshooting

Power

Power does not come on.

• Power plug is not inserted securely. Plug in

securely.

Operation

“REGION CODE ERROR!” is shown
on the TV screen.

• Region code of the inserted disc does not

match the RDV-1040. Check the region code
of the disc printed on the disc jacket.

The RDV-1040 does not work.

• Microcomputer malfunction due to lightning

or static electricity. Turn off the power and
unplug the power cord, then connect the
power cord again.

• Moisture condensation caused by a sudden

change of temperature or humidity. Turn off
the power, then turn it on a few hours later.

• The disc does not allow the operation, or

an unplayable disc is inserted. Check and
replace the disc. See the Playable Discs
section.

LOCK appears in the display window
and the disc tray does not open.

• When you press   (OPN/CLS) 

 while

pressing down  

 (STOP)  

 when the

RDV-1040 in standby mode, the tray lock
function is activated. The disc tray cannot
be opened or closed in this state. To release
the LOCK, press   while pressing down 

when the RDV-1040 is in standby mode.

Picture

Picture is noisy.

• The RDV-1040 is connected to a VCR di-

rectly and the copyguard function is acti-
vated. Connect the RDV-1040 directly to the
TV.

• With some discs, the picture may be blurred

when PICTURE SOURCE is set to FILM or
AUTO. Set PICTURE SOURCE to VIDEO
(NORMAL) or VIDEO (ACTIVE).

Picture is distorted when using
COMPONENT VIDEO OUT or S-
VIDEO output jack(s).

• There are connections to both the compo-

nent and S-video outputs. Disconnect the un-
used one.

No picture is displayed on the TV
screen or the screen is blurred or
divided into two parts.

• The RDV-1040 is in the progressive scan-

ning mode but  is connected to a TV via the
VIDEO or S-VIDEO jack. Set the VIDEO
SIGNAL SELECTOR 

 on the rear panel

to “480i,” or set it to “REMOTE” and make
the Progressive scanning mode inactive by
using the VFP - PROGRESSIVE SCAN but-
ton 

25

.

— continued

Summary of Contents for RDV-1040

Page 1: ...Owner s Manual RDV 1040 DVD Player COVER GRAPHIC PLACEHOLDER...

Page 2: ...nsion cords Do not route the power cord where it will be crushed pinched bent at severe angles exposed to heat or damaged in any way Pay particular attention to the power cord at the plug and where it...

Page 3: ...n screen display or to change the setting of an item in the on screen display 14 CHOICE button Displays the DVD set up menu Is also used when selecting parental lock settings 15 Infrared signal output...

Page 4: ...hts in RED for Video source and GREEN for Film source Disc tray Used to load discs Display Window Shows various indicators and information about the operation of the RDV 1040 Remote sensor Receives th...

Page 5: ...d the world in order to make that product the best they can You are likely to find capaci tors from the United Kingdom and Germany semi conductors from Japan or the United States while toroidal power...

Page 6: ...only when the RDV 1040 is turned off The Progressive mode can be used only when the Output Signal switch is set to NTSC and the Component Output connec tions are used Some progressive scan TV sets and...

Page 7: ...u will get better video performance by using the COMPONENT VIDEO output jacks of the RDV 1040 The required cable is not provided Be sure to connect the Y out put to the Y input PB output to the PB inp...

Page 8: ...ignal connection If this preference set ting is not done correctly loud noise may be generated which can damage the speakers Before using the RDV 1040 with a digital signal connection be sure the prop...

Page 9: ...teries and dispose of them properly Never leave dead batteries lying around Do not take them apart mix them with other refuse or throw them into an incinerator Never touch liquid that has leaked out o...

Page 10: ...V 1040 Digital Audio Formats The RDV 1040 supports the following digital audio formats see the Glossary for descrip tions of each audio format Linear PCM MPEG Multichannel Dolby Digital DTS Digital Th...

Page 11: ...n EXECUTE DVD PLAYER SETUP BASIC PICTURE AUDIO SETTING YES PRESS ENTER NO CANCEL You can set the display language TV monitor type and digital output before using the RDV 1040 by using the following pr...

Page 12: ...r Press STOP 9 to stop playback then press PLAY 28 To Check Playback Status Press ON SCREEN 33 to see the current se lection number the title chapter number for DVD VIDEO or track number for SVCD Vide...

Page 13: ...upted Various Speed Playback To Rapidly Advance or Reverse Playback During playback press 29 or 10 on the remote control unit You can select from 1 5 times 5 times 20 times and 60 times nor mal speed...

Page 14: ...m The MENU button does not work while stopped NOTES Some DVD VIDEO discs may also have a different menu which appears when MENU is pressed See the instructions of each DVD VIDEO disc for its particula...

Page 15: ...0 10 then 3 To select 40 press 10 10 10 then 10 To correct the program press to move to the track to be corrected then press TV VIDEO CANCEL 22 The track is erased and the subsequent programmed tracks...

Page 16: ...ull down menu for repeat mode selection appears 3 Press to select A B 4 Press ENTER at the beginning of the part you want to repeat point A The pull down menu disappears The repeat icon A shows 5 Pres...

Page 17: ...ation is doubled 1 8 4 8 16 32 and 64 times When a picture of a DVD VIDEO disc is viewed on a normal TV screen 4 3 Letter Box black bars may appear at the top and bottom of the screen In this case if...

Page 18: ...OUT jack When the VSS function is active the ANALOG DOWN MIX setting in the AUDIO setting display is not available Menu Bar Functions To Display a Menu Bar 1 With a disc is loaded press ON SCREEN 33 A...

Page 19: ...Open the pull down window 2 Press to select a desired subtitle 3 Press ENTER 34 to begin playback with the selected subtitle Basic MP3 Operations Make sure that the TV DVD switch 1 on the remote contr...

Page 20: ...MA file name in cludes any 2 byte character the RDV 1040 cannot show the file name correctly Only MP3 WMA files are shown on the MP3 WMA CONTROL display The order of groups tracks shown in the MP3 WMA...

Page 21: ...ack The RDV 1040 only can play back files with the following file extensions jpg jpeg JPG JPEG and any other combination of upper case and lower case letters such as Jpg If a JPEG file name includes a...

Page 22: ...ars on the TV screen 3 Press to select the item you want to edit The color of the selected item changes 4 Press ENTER 34 A pull down menu ap pears over the selected item 5 Press to select from the opt...

Page 23: ...selecting an appropriate option Setting options AUTO FILM VIDEO NOR MAL VIDEO ACTIVE AUTO select when playing back a disc con taining both video and film source materials The RDV 1040 recognizes the...

Page 24: ...f the last 30 discs played The RDV 1040 retains a memory of the inter rupted positions of the last 30 discs played even though they have been removed from the disc tray ON SCREEN GUIDE The RDV 1040 ca...

Page 25: ...040 starts playback If you enter a wrong password WRONG RETRY appears on the TV screen Enter the correct password NOTE When you enter the wrong pass word 3 times at step 2 above moves to NOT RELEASE a...

Page 26: ...Digital discs contain six 5 1 channels of information Dolby Surround Dolby Pro Logic Dolby Surround records four channels of front and rear audio in two channels in a way that allows a decoder to rec...

Page 27: ...CD DA MP3 WMA format JPEG CD R RW CD DA SVCD Video CD MP3 WMA format JPEG Video Format NTSC 480i Interlaced scan 480p Progressive scan selectable PAL 576i only Other Power Requirements AC 120 V 240 V...

Page 28: ...and Nevis KP Korea Democratic People s Republic of KR Korea Republic of KW Kuwait KY Cayman Islands KZ Kazakhstan LA Lao People s Democratic Republic LB Lebanon LC Saint Lucia LI Liechtenstein LK Sri...

Page 29: ...n HU Hungarian HY Armenian IA Interlingua IE Interlingue IK Inupiak IN Indonesian IS Icelandic IW Hebrew JI Yiddish JW Javanese KA Georgian KK Kazakh KL Greenlandic KM Cambodian KN Kannada KO Korean K...

Page 30: ...America 54 Concord Street North Reading MA 01864 2699 USA Phone 1 978 664 3820 Fax 1 978 664 4109 Rotel Europe Dale Road Worthing West Sussex BN11 2BH England Phone 44 0 1903 221 600 Fax 44 0 1903 221...

Page 31: ......

Reviews: