Strawberry Server
User and Hardware Manual
23
Chapter 5
Connections and Configurations
S
S
i
i
n
n
g
g
l
l
e
e
S
S
t
t
r
r
a
a
w
w
b
b
e
e
r
r
r
r
y
y
P
P
r
r
e
e
p
p
a
a
r
r
a
a
t
t
i
i
o
o
n
n
Making Connections and Power up
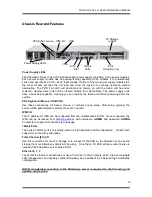
The
Strawberry server
OS has been preloaded and Raid storage preconfigured to be ready for
you to power up and start configuring it for use. Before powering up, make the connections to
power, keyboard, mouse, monitor, and LAN connections to Eth 0 and Eth 1.
Press the front panel Power button. The system will go into a power on boot process that takes
up to 45 seconds to come to a stable configuration status.
The booting of the
Strawberry server
will bring you to a standard Linux GUI login screen. See
the following sections for setup, management, and usage of the Strawberry software.
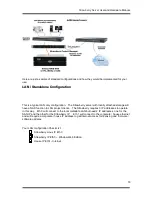
Configuring a standard single Strawberry
The Strawberry server has a Linux boot disk, with a Windows 2008 R2 Web Virtual Machine.
Therefore, both the Linux portion and the Windows portion need an IP Address set - see below.
1. Connect ETH0 of the Strawberry server to the Metadata segmented LAN network that
has the SAN metadata server on it.
2. Connect ETH1 of the Strawberry server to the house, corporate, or management only
LAN and boot the server.
NOTE: Best practice says to keep your video network separate from your
corporate internet and email network using VLAN or separate ethernet
switches.
3. Log in to the Linux OS of the server username:
root
password:
rdserdse
4. Open Administration / Network menu. Setup ETH 0 for your SAN Metadata / Video


