G A L A X Y N A S L X C O N F I G U R A T I O N A N D S Y S T E M I N T E G R A T I O N G U I D E
24
Section 2 Basic Setup
power, keyboard, and monitor. Press and hold the front panel Power button for 3 seconds.
See figure 2.2
2.2 Pre-configuration Setup
2.2.1 First time operation of GalaxyNASLX2 Figure 2.3
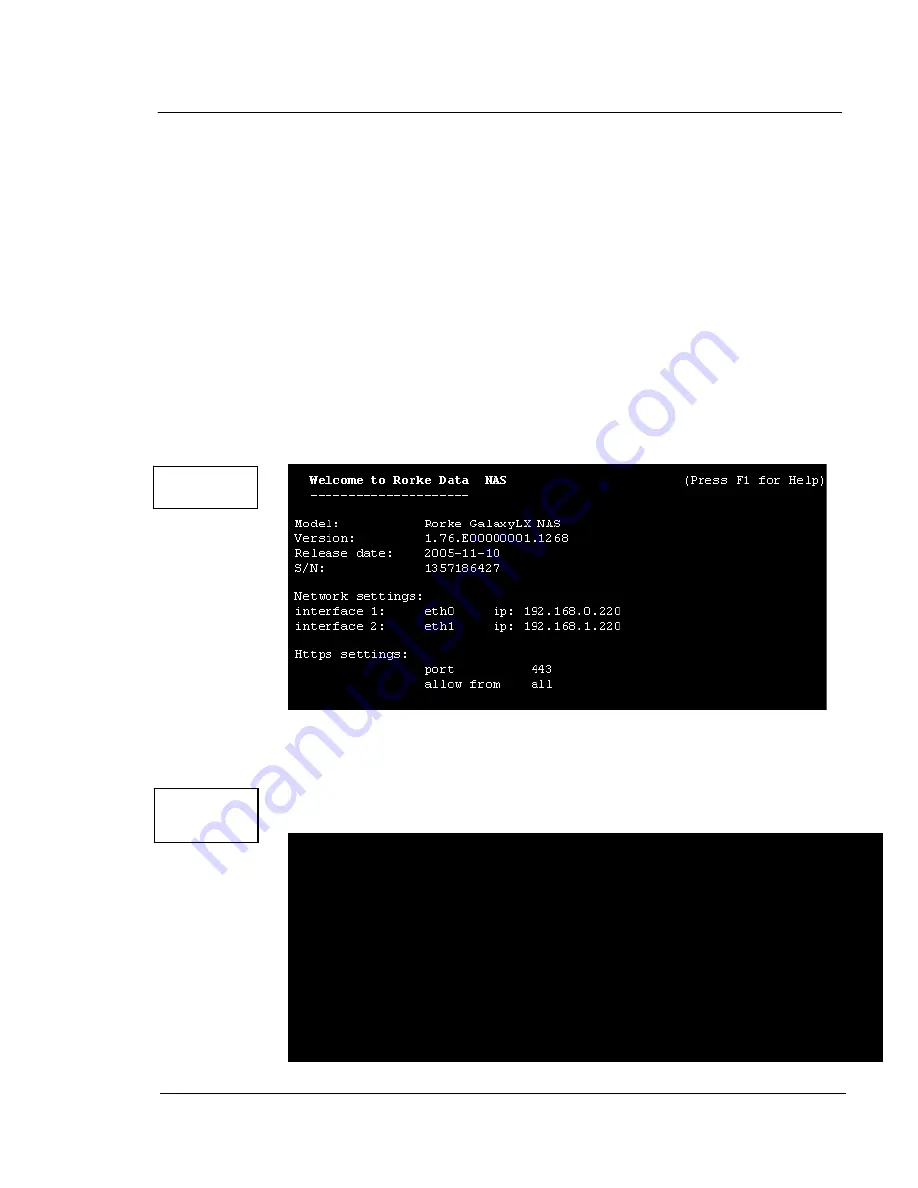
The booting of the GalaxyNASLX2 will bring you to a text menu screen [see figure 2.3]showing
you information on its network IP settings. If your network has a DHCP server then the
GalaxyNASLX2 should retrieve and assign network IP settings to the ethernet cards
automatically. If your network does not contain a DHCP server, the GalaxyNASLX2 will start
with the default settings: IP address 192.168.0.220 and 192.168.1.220 with a netmask of
255.255.255.0. These values can be changed manually at the server terminal by using the
following key sequence: left "CTRL" + left "ALT" + "N" and then hitting the "ENTER" key. You
will then be prompted for the correct IP address and subnet mask.
All other available functions on of the console will appear after pressing F1
key
[see figure 2.4]. .
Figure 2.3
Figure 2.4
−−−−−−−−−−−−−−−−−−−−−−−−−−−−−−−−−−−−− Η
elp
−−−−−−−−−−−−−−−−−−−−−−−−−−−−−−−−−−
You can use below key sequences (C-means ‘Left Ctrl’,A-‘Left Alt’)
C-A-N
– to edit static IP addresses
C-A-P
– to restore default factory administrator settings
C-A-I
– to restore default factory IP configuration
C-A-T
– to run Console Tools
C-A-X
– to run Extended Tools
C-A-W
– to run Hardware Configuration
C-A-H
– to display hardware and drivers info
F2
- to display all network interface
F5
– to refresh console info
C-A-S
– to shutdown the system


