NEXUS CALL SYSTEM
by Rondish
P46
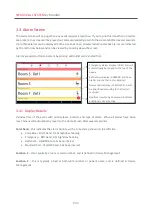
The device ID will show on the grey color
band at the top. This will typically match
the serial label on the back of a call point.
The device type icon will display on the
right
Device ID
–
usually matches the serial
label on back of call point.
Device Type icon
Location 1
–
to be configured by user
(must be defined)
Location 2
–
to be configured by user
(optional)
3.4.1 Add New Device
From this screen, triggering a device can have two effects:
If Nexus does not already have this device in memory it will create a new entry with the 6-digit device ID,
device type and notification that new hardware has been detected.
If Nexus already recognizes a device that is triggered while in Device Management, it will exit to the Alarm
Screen as if a patient has normally triggered an alarm. This ensures the call system continues to function
if a patient needs help.
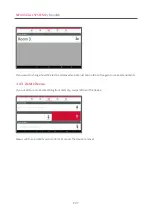
3.4.2 Device Location
Tapping on the Device you have just added will bring up the screen below, prompting you to enter a
Primary and Secondary location. The text you enter here will display when this device is in alarm state.
Click OK to confirm the location details, and these will now display on the Device Management screen.


