background image

35

Troubleshooting

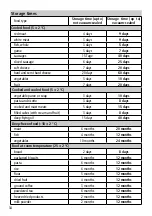
These are indicative values which depend on the quality of the packaging and the original quality 

of the food. They solely refer to the use of original accessories (foil bags and rolls). For the use of 

accessories of other brands, we can neither make a statement regarding their general suitability 

nor regarding the storage life of food vacuum-sealed with them. Also no liability will be assumed 

in this case.

Note: 

Store perishable foods in the freezer or fridge. Vacuum-sealing extends the storage time 

of food, but does not make them a ‘preserve’, i. e. a product which is stable at room temperature.

Note: 

Food which has been vacuum-sealed, then has been heated up and left at room tempera-

ture is susceptible to pathogenic micro-organisms which are multiplying within just a few hours 

and can be harmful to health when consumed.

The appliance does not work

•  Check whether power cord or plug show any damage. If yes – do not operate the appliance.

•  Check if the power plug is correctly inserted in the socket. Check the socket by plugging in 

another appliance to test.

•  In case of overheating, the appliance switches off automatically. In this case let it cool down 

for 20 minutes with open lid and then try again.

•  Check if the lid has correctly engaged at both sides.

Appliance does not create a sufficient vacuum inside the bag

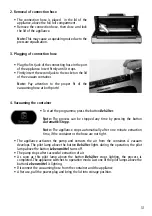
•  For a correct sealing process, the open end of the bag must completely extend into the 

vacuum chamber.

•  Check the sealing bar, the silicone lip as well as the gaskets for dirt. Clean them and put them 

back into the correct position. 

•  Check if the lid has correctly engaged at both sides.

•  Check the bag for holes.

Appliance does not seal the bag correctlyt

•  Check if the lid has correctly engaged at both sides.

•  If the sealing bar gets too hot and the bag is melting, fold the lid upwards and let the sealing 

bar cool down for a few minutes.

•  This appliance is produced in compliance with current safety standards. In case of overheating, 

the appliance switches off automatically. Let cool down for 20 minutes and try again.

Bag loses the vacuum after sealing

•  Wrinkles, crumbs, grease or humidity can cause leaky spots at the sealing seam. Re-open the 

bag, clean the inside of the upper part of the bag as well as the sealing bar and seal again.

•  Check the bag for damage (crack, holes). Padding out sharp edges of the contents using 

kitchen paper is recommended.

Storage times

Summary of Contents for VAC 385

Page 1: ...VAC 385 VAC 385 Vakuumierer Vakuumierer Vacuum sealer Vacuum sealer D Bedienungsanleitung GB Instruction manual...

Page 2: ...uelles Vakuumieren und Versiegeln 11 1 Ger t zur Verarbeitung vorbereiten 11 2 Betriebsmodus w hlen 11 3 Manuelles Vakuumieren starten 11 4 Manuelles Versiegeln starten 12 C Erstellen von Beuteln aus...

Page 3: ...tomatic programme 27 B Manual vacuuming and sealing 28 1 Preparing the appliance for operation 28 2 Selecting operating mode 28 3 Starting manual vacuuming 28 4 Starting manual sealing 29 C Making bag...

Page 4: ...r Vakuumierschlauch zur Beh lter Vakuumierung Silikonlippe herausnehmbar Obere Vakuumkammer Dichtung herausnehmbar Untere Vakuumkammer Dichtung herausnehmbar Integriertes Rollenfach Verriegelungshake...

Page 5: ...en eines Vakuums E Taste Beh lter Zum Vakuumieren von speziellen Vakuumierbeh ltern F Schlauchanschluss Zum Anschlie en des Vakuumierschlauches Schlauch befindet sich im Geh use Deckel ber dem Rollenf...

Page 6: ...e nicht mit dem Ger t spielen Verpackungsmaterialien wie z B Folienbeutel geh ren nicht in Kinderh nde Dieses Ger t keinesfalls ber eine externe Zeitschaltuhr oder ein separates Fernwirksystem z B sog...

Page 7: ...en Herd Gasflamme etc sowie in explosionsgef hrdeter Umgebung in der sich brennbare Fl ssigkeiten oder Gase befinden Ger t nicht am Handgriff tragen Vermeiden Sie das Ansaugen von Fl ssigkeiten in die...

Page 8: ...f dem Typenschild angegebenen Spannung entsprechen Nur an Wechselstrom anschlie en Nennspannung 220 240 V 50 Hz Nennaufnahme 120 W Ansaugleistung ca 12 l min Unterdruck bis 0 8 bar Ma e Ger t BxHxT ca...

Page 9: ...ungsnaht gesetzt werden soll muss innen und au en sauber trocken und frei von Lebensmittelresten sein F r das Vakuumieren von druckempfindlichen Lebensmitteln empfehlen wir die Benutzung der Funktion...

Page 10: ...abgebrochen werden Hinweis Das Ger t stoppt automatisch nach einer Minute Absaugzeit sollte der Beutel nicht dicht sein Das Ger t startet die Pumpe und entzieht dem Beutel Luft so dass einVakuum ents...

Page 11: ...ten dr cken bis er einrastet Hinweis HierbeikannesdurchdenDruckausgleich zu einem Quietsch Ger usch kommen Das Ger t ist nun betriebsbereit 2 Betriebsmodus w hlen Durch Dr cken der Taste Lebensmittel...

Page 12: ...n aus einer Folienrolle 1 Ger t zur Verarbeitung vorbereiten Netzkabel komplett abwickeln Netzstecker in eine Steckdose stecken F r kurze Zeit leuchten alle Kontrolllampen auf Das Ger t befindet sich...

Page 13: ...des Folienendes startet Jetzt leuchtet zus tzlich die Kontrolllampe oberhalb der Taste Versiegeln auf Sobald beide Kontrolllampen erl schen ist der Vorgang abgeschlossen Das Ger t wechselt in den Betr...

Page 14: ...Start dr cken Sie die Taste Beh lter Hinweis Durch Dr cken der Taste Automatik Stopp kann der Vorgang jederzeit abgebrochen werden Hinweis Das Ger t stoppt automatisch nach einer Minute Absaugzeit so...

Page 15: ...efahr Vor der Reinigung Ger t vollst ndig abk hlen lassen Vor der Reinigung des Ger tes oder des Zubeh rs sorgf ltig H nde waschen Ger t und Vakuumkammer vor und nach dem Gebrauch mit einem feuchten T...

Page 16: ...ebensmittel sind nach dem Erhitzen oder Auftauen zu konsumieren Essen Sie verderbliche Lebensmittel nicht wenn sie in der Raumtemperatur f r mehr als ein paar Stunden zur ckgelassen wurden Dies ist da...

Page 17: ...m sep ree und suppen 3 Tage 10 Tage Teigwaren und Risotto 3 Tage 8 Tage Siedefleisch und Braten 5 Tage 15 Tage Gef llte Torten mit Creme und Fr chten 3 Tage 8 Tage l zum Frittieren 15 Tage 40 Tage Tie...

Page 18: ...beiden Seiten eingerastet ist Das Ger t stellt bei Beuteln kein ausreichendes Vakuum her F r ein korrektes Versiegeln muss das offene Ende des Beutels ganz in die Vakuumkammer hineinreichen Pr fen Si...

Page 19: ...ubeh r www rommelsbacher de FOLIENROLLEN 20x600 cm VRS 2060 FOLIENROLLEN 30x600 cm VRS 3060 FOLIENBEUTEL 20x30 cm VBS 203 FOLIENROLLEN 15x600 cm VRS 1560 FOLIENBEUTEL 30x40 cm VBS 304 FLASCHENVERSCHLU...

Page 20: ...cher de VAKUUMIERBEH LTER VCC 100 1 Liter VCC 150 1 5 Liter VAKUUMIERBEH LTER SET VCK 525 VAKUUMIERBEH LTER 1 5 l VCR 150 VAKUUMIERBEH LTER 2 5 l VCR 250 VAKUUMIERBEH LTER SET VCR 600 UNIVERSALVAKUUMD...

Page 21: ...nel Port for connection hose for vacuuming containers Silicone lip detachable Upper gasket for vacuum chamber detachable Locking hook Removable connection hose Foldable cutting device with integrated...

Page 22: ...ll For manually producing a vacuum E Button Beh lter For vacuuming special vacuuming containers F Port for connection hose For connecting the connection hose A1 Pilot lamp dry Indicates the setting of...

Page 23: ...out of the reach of children Do not operate this unit with an external timer or a separate telecontrol system e g so called smart or remote plug sockets Prior to each use check the appliance and the a...

Page 24: ...explosive environments where inflammable liquids or gases are located Do not use the handle to carry the appliance Prevent suction of liquids into the vacuum chamber Should liquids get into the vacuum...

Page 25: ...0W Suction power approx 12 l min Negative pressure up to 0 8 bar Dimensions WxHxD approx 40 x 10 x 17 5 cm Scope of supply Check the scope of supply for completeness as well as for perfect condition o...

Page 26: ...d residues at the inside and outside For the vacuum sealing of pressure sensitive food we recommend to use the function manual vacuuming and sealing see point B page 28 Storage position 1 Preparing th...

Page 27: ...matically stops after one minute of extraction time if the bag is not tight The appliance activates the pump and extracts air from the bag thus creating a vacuum The pilot lamp above the button Automa...

Page 28: ...appliance For locking the lid fold the handle down until it snaps in Note This may cause a squeaking noise due to the pressure equalisation The appliance is ready for operation now 2 Selecting operat...

Page 29: ...ing bags from a foil roll 1 Preparing the appliance for operation Completely unwind the power cord from the cord storage Connect the power plug to a socket All pilot lamps light up for a short time Th...

Page 30: ...a squeaking noise due to the pressure equalisation 5 Starting the automatic programme To start the programme press the button Automatik Stopp Note The operation can be stopped at any time by pressing...

Page 31: ...n Beh lter Note The process can be stopped any time by pressing the button Automatik Stopp Note The appliance stops automatically after one minute extraction time if the container or the hose are not...

Page 32: ...cleaning Prior to cleaning the appliance or equipment please wash your hands thoroughly Clean the appliance and the vacuum chamber with a moist cloth and a mild dishwashing detergent before and after...

Page 33: ...cuum sealing extends the storage period of dried food Food which has a high fat content quickly becomes rancid due to oxygen and heat Vacuum sealing also extends the storage period of food like nuts c...

Page 34: ...e puree or soup 3 days 10 days pasta and risotto 3 days 8 days cooked and roast meats 5 days 15 days filled cakes with cream and fruit 3 days 8 days deep frying oil 15 days 40 days Deep frozen food 18...

Page 35: ...ing the appliance switches off automatically In this case let it cool down for 20 minutes with open lid and then try again Check if the lid has correctly engaged at both sides Appliance does not creat...

Page 36: ...ichtig erfolgen Bei Einsendung des Ger tes bitte f r eine transportsichere Verpackung und eine ausreichende Frankierung sorgen da wir f r unversicherte oder transportgesch digte Ger te keine Verantwor...

Reviews: