


4
Rollerdor RD77 Installation Guide, Edition 2022/01
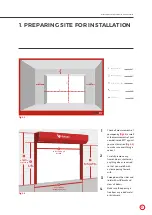
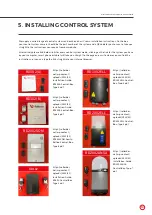
1. PREPARING SITE FOR INSTALLATION
1
Check all measurements of
your opening
(fig.1.1)
as well
as the measurements of your
new delivered RD77 against
your confirmation
(fig.1.2)
to make sure everything is
correct.
2
Carefully remove any,
frames, doors, shutters or
anything else as required,
so that you are left with
a clear opening to work
with.
3
Sweep down the sides and
lintel with a stiff brush and
clear all debris.
4
Make sure the opening is
free from any raised metal
or brick work.
Plan Of here To Take The Measurements
R
L
Aerial View Of Garage
Notes
Which Side Is The
Power Supply On?
Right
4L
Power viewed from inside look
at back of garage door
4R
Opening Width
Opening Height
Headroom Height
mm
4
Side Room
R
4
Side Room
L
mm
mm
mm
mm
Requirements For The Opening & Taking Measurements
>
All measurements should be taken from
multiple places and the smallest size used.
>
Please make us aware of any heating pipes, water pipes, ducts, electrical
cables or anything else that may impede the installation of your new door.
View From Inside Garage
Name:
Address:
Tel:
Standard Back Fixing
In-between Fixing
Limited Fixing
Back & Between Fixing
Roll Under Lintel
Half & Half
Roll Above Lintel
PLAN OF WHERE TO TAKE MEASUREMENTS
Name
Tel
Address
REQUIREMENTS FOR THE OPENING & TAKING MEASUREMENTS
Company Registration Number. 10676267
fig.1.1
fig.1.2
Drive Through
Width
Estimate Drive
Through Height
Total Door
Height to
Top of Box
Guide
Height
Total Door Width
Including Guides
Total Width
Including Guides
Drive Through
Width
Guide
Height
Total
Height to
Top of Box
Estimate Drive
Through Height


