background image

Configuring Repetition 

(MUSIC / VOICE)


30


Viewing File Information


(VIDEO / MUSIC / VOICE / PHOTO / FILES)


31


You can only configure this in the MUSIC menu.

You can only configure this in the VIDEO/MUSIC/PHOTO/FILES menu.

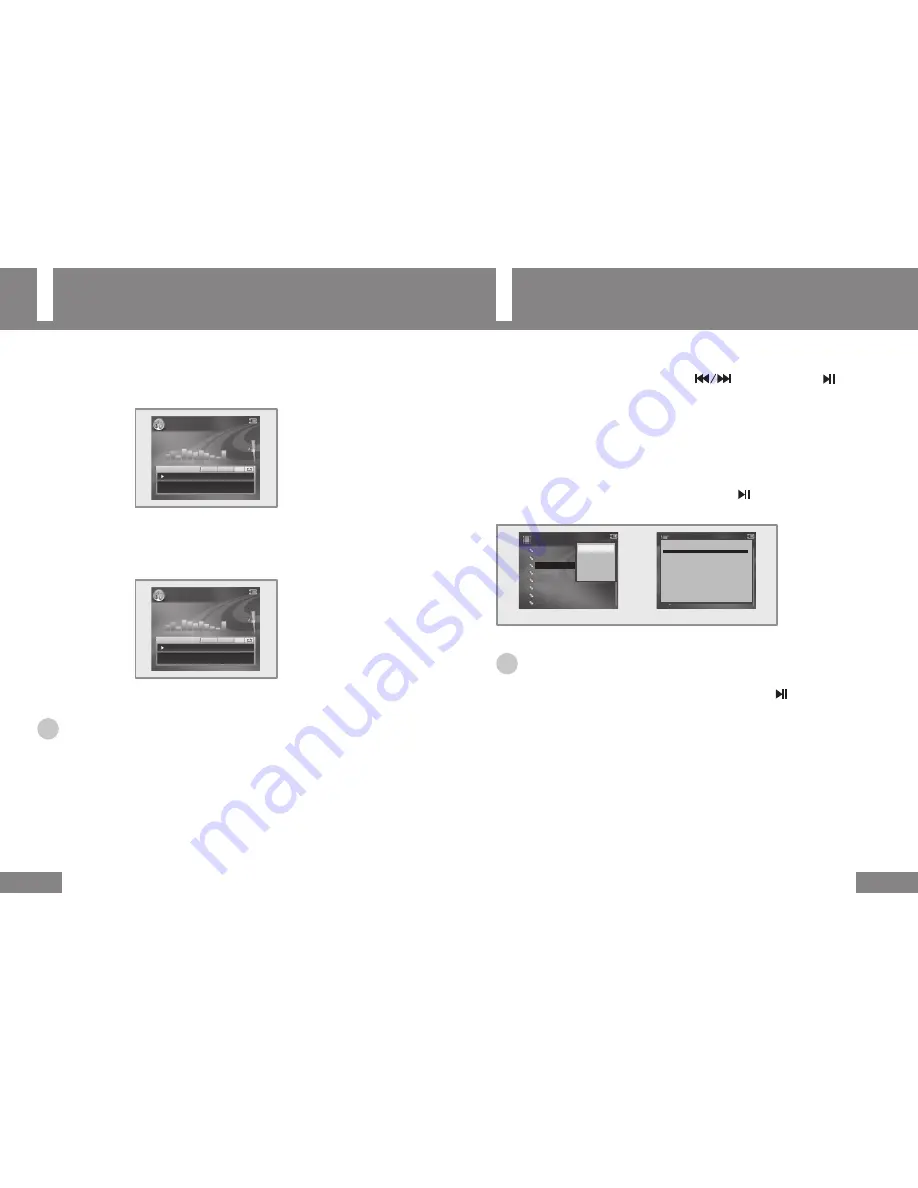
1


From the point where repetition is started, press the 

A ► B

 button while playing the file.


● 

A

  is displayed on the Operating Display.

2


At the point where repetition is stopped, press the 

A ► B

 button again.


● 

A – B

 is displayed on the Operating Display.


● The configured section is repeated continuously.

Note

●  To cancel the configured repetition, press the A ► B button on the unit once again briefly.
●  You cannot configure repetition for the last 10 second section of a music / voice file.

1


Select a menu from the main menu using the  

  buttons and press the   button.


● The file list of the selected menu will be displayed.

2


Select a file to view information for using the 

+

 / 

 buttons.

3


Press the 

MENU

 button.


● The sub-menu will be displayed.

4


Select 

Information

 using the 

+

 / 

 buttons and press the   button.


● The information will be displayed for about 3 seconds.

Note

● 

You can file information during a video / music / voice / photo file playback, by pressing 

  the MENU button, selecting Information and then pressing the 


button.

● 

You can view the information of the saved files by selecting HDD from the FILES menu.

●  You can view information such as the Playing Time, File Size, Video Size, Video Bit Rate, Audio Format and 

  Audio Bit Rate in the video information.

●  You can view information such as the Playing Time, File Size, Title, Artist, Album and Year in the music information.

●  You can view information such as the Photo Dimensions and the File Size for a photo file.

●  You can also view the recorded (music / voice / video) file information.

001. Lovesong.mp3 - Park.HB

    0:00:15                                            

3:20:30

128Kbps           44.1KHz  Rock       Shuffle    A

MUSIC ►

001. Lovesong.mp3 - Park.HB

    0:00:30                                            

3:20:15

128Kbps           44.1KHz  Rock       Shuffle    A-B

MUSIC ►

MOVIE ►

1. [KBS] Sesatv-1.avi
2. [KBS] Sesatv-2.avi
3. [KBS] Sesatv-3.avi
4. [MBC] Lovemovie-1.avi
5. [MBC] Lovemovie-2.avi
6. [MBC] Documentery1.avi
7. [MBC] Documentery2.avi
8. [MBC] Documentery3.avi

Information
Sort             ►
Repeat
Delete

MOVIE ►

1. [KBS] Sesatv-1.avi
2. [KBS] Sesatv-2.avi
3. [KBS] Sesatv-3.avi
4. [MBC] Lovemovie-1.avi
5. [MBC] Lovemovie-2.avi
6. [MBC] Documentery1.avi
7. [MBC] Documentery2.avi
8. [MBC] Documentery3.avi


Sesatv-3.avi ► Information

Play time ► 0:03:32
File size ► 37.36 MB
Video size ► [DIVX] 720X400
Video bitrate ►1.2Mbps
Audio format ►MP3 48.0KHz
Audio bitrate ► 160Kbps

Video Mode

Summary of Contents for ea2020G

Page 1: ...English www rollei asia com ea2020G User s Manual ...

Page 2: ... the product This may cause problems with or damage to the product Do not place the product in a moist dusty or sooty place This may cause problems with the product Do not press two buttons at the same time This may cause problems with or damage to the product Do not leave the unit in direct sunlight or near a heater This may cause problems with the product Do not drop the product and avoid strong...

Page 3: ... a damaged internal rechargeable battery or charger Do not charge the rechargeable battery for longer than the specified time Charge the battery fully when using the battery for the first time or when using the battery after a few months of non use Charge the battery fully use it until it is completely discharged and recharge it again to ensure a long lifetime Charging the battery after a short use ...

Page 4: ...etition VIDEO MUSIC VOICE 30 Additional Usage Viewing File Information VIDEO MUSIC VOICE PHOTO FILES 31 Sorting Files VIDEO MUSIC VOICE PHOTO 32 Configuring the Playlist MUSIC 33 Using the Playlist MUSIC VOICE 34 Configuring Play Mode 36 Configuring Repeat in the MUSIC Menu 36 Configuring Repeat in the VIDEO Menu 37 Shuffle Play 38 Configuring EQ 39 Configuring the Bookmarks While Playing a File 40 Manag...

Page 5: ... will not properly be done Main Body HOLD HOLD Earphone Remote Control Jack Hold Switch Microphone Charger Jack Power On Off Menu Button Repeat Button Record Button Reset Hole USB 1 1 Host Port USB 2 0 Port Line In Jack Audio In Jack Audio Out Jack Display Play Pause Button Volume Move File Move Menu High Speed Search Changing the Directory Stop Move To Previous Menu Remote Control Play Pause Butt...

Page 6: ...el when using the product and connect the DC adapter if necessary Check the battery charge status and charge the battery before it is completely discharged When the battery is completely discharged connect the power adapter for longer than one minute and then turn it on Radio Mode Channel Selection Channel Display On Off Radio Channel Information 001 Title song mp3 Park HB 0 00 15 3 20 30 128Kbps ...

Page 7: ...vice Manager Disk Drive USB 2 0 Storage Devic USB 2 0 Storage Device USB Device Windows 2000 Professional Control Panel System Hardware Device Manager Disk Drive USB 2 0 Storage Device USB Device Windows XP Professional Control Panel System Hardware Device Manager Disk Drive USB 2 0 Storage Device USB Device Note If your PC monitor has a Composite Input jack you can view video or pictures through ...

Page 8: ...el System Device Manager Windows 2000 Professional Control Panel System Hardware Device Manager Windows XP Professional Control Panel System Hardware Device Manager 2 Check if there is a device marked by an exclamation mark or question mark represented as an Unknown Device or USB Device 3 Double click a device marked by an exclamation mark or question mark Note When the USB driver is not recognize...

Page 9: ...he corresponding playback folder it will not be played For example if Love avi a video file is copied to the MUSIC menu folder the files will not be played 1 Double click the green arrow in the notification area 2 Select the USB device and press the Stop button When the Stop Hardware Device screen appears click the OK button and remove the USB cable Notice Separating the cable while downloading or up...

Page 10: ... conversion software converts various video files to the Divx AVI type video format In addition you can change the screen resolution and the image quality during the conversion process Required Programs The Transcoder will only work properly when the following programs have been properly installed MS DirectX 9 0b or later Required MS Windows Media Player 9 DivX 5 1 1 codec or later Notice When the ...

Page 11: ... home comcast net MP3 codec http lame sourceforge net The version and installation procedures of the software may change without prior notice on the sites Check the versions and installation procedures on the corresponding sites prior to installation 1 Double click dxsetup exe to launch it 2 Follow the instructions in the windows to complete the installation When you complete the installation rest...

Page 12: ...ides a higher screen quality with a larger file size Normal is recommended for general use Video Size Determines the screen quality of the converted file Example Converting a 320X240 video file low resolution to a 640X480 file high resolution degrades the screen quality when playing the file 4 3 Ratio This option keeps the horizontal and vertical ratio of the screen at 4 3 Transcod Audio Only This opti...

Page 13: ...rol during playback You can select a volume level between 00 and 99 Pressing once briefly adjusts a single volume level Press and hold the button to accelerate the volume adjustment speed Hold Function If you set the Hold function pressing buttons during playback will not work To set the function slide the HOLD switch on the unit or the remote control in the direction of the arrow Even if the Hold ...

Page 14: ...UDIO Recording using the buttons and press the button to start music recording Press the button to pause recording Press the button once again to resume recording 4 To stop recording press the button while recording voice This returns to the previous menu and saves the recorded voice as a file Note After recording the recorded files are automatically saved in the AUDIO folder within the RECORD folde...

Page 15: ...g voice This returns to the previous menu and saves the recorded voice as a file Note After recording the recorded files are automatically saved in the VIDEO folder within the RECORD folder of the MOVIE menu If the VIDEO folder does not exist the VIDEO folder is automatically created The recorded video is saved as an AVI file in the sequence of VIDEO000 VIDEO001 and so on You can create up to 1000 fil...

Page 16: ...layback by pressing the MENU button selecting Information and then pressing the button You can view the information of the saved files by selecting HDD from the FILES menu You can view information such as the Playing Time File Size Video Size Video Bit Rate Audio Format and Audio Bit Rate in the video information You can view information such as the Playing Time File Size Title Artist Album and Yea...

Page 17: ...ion is complete the Added in playlist message will be displayed The file is added to the Playlist Note You can add the current music file to the playlist while playing the file by pressing the MENU button selecting Add to Playlist using the buttons and then pressing the button Since the file added to the Playlist is a copy of the original file the original file remains in its original location You can a...

Page 18: ...d files in the MUSIC menu the Playlist is displayed You can play the Playlist immediately To Delete All Files in the Playlist Select the files from the Playlist and then press the MENU button The sub menu will be displayed Select Clear Playlist using the buttons and then press the button All saved Playlists are deleted To View File Information from the Playlist Select the files from the Playlist and ...

Page 19: ...laylist RECORD 1 Loving Day mp3 2 Title song mp3 3 My heart mp3 4 Spring mp3 5 Trumpet mp3 6 Goodbye mp3 Repeat Off All 1 Repeat Off All 1 Configuring Repeat in the VIDEO Menu 2 Select a file using the buttons and then press the MENU button The sub menu will be displayed 3 Select Repeat using the buttons and then press the button The Repeat ON message will be displayed To cancel select Repeat again ...

Page 20: ...files included in the folder If you select Shuffle On for the files saved in the MUSIC menu only the files within the MUSIC menu will be played in random order Configuring EQ 2 Select a file using the buttons and then press the MENU button The sub menu will be displayed 3 Select Equalizer using the buttons and then press the button 1 Select MUSIC from the main menu using the buttons and then press the b...

Page 21: ... 4 Select a file or folder using the buttons and press the MENU button 5 Select Copy to HDD using the buttons and press the button The selected file or folder is copied to the HDD The file copying progress is displayed on the screen and the file or folder is copied onto the HDD A backup folder is automatically created on the HDD and the selected file or folder is copied to the BACKUP folder Note To pla...

Page 22: ...0 ROOT PHOTO MOVIE MUSIC 1 UNICODEF FON 2 Title song mp3 Information Move Copy to UMS Delete Copying a File to an External USB Device 1 Connect the USB 1 1 cable to the port at the bottom of the unit and connect the external USB item with the USB 2 0 cable For procedures to connect refer to page 41 2 Select FILES from the main menu using the buttons and press the button 3 Select a HDD using the bu...

Page 23: ... The selected files are displayed through SlideShow To cancel the SlideShow press the button Note Even during photo file playback you can activate SlideShow by pressing the MENU button If you press the A B repetition button during file playback the Slide show ON message appears and SlideShow is activated If you press the A B repetition button once again the Slide show OFF message appears and SlideSh...

Page 24: ...ver you press the button the zoom in level is configured to X4 X2 and X1 respectively You can view a part of the zoomed in photo file sing the buttons To exit Zoom mode press the button 2 Select files using the buttons and press the MENU button The sub menu will be displayed 3 Select Show Interval using the buttons and press the button 1 Select PHOTO from the main menu using the buttons and press the...

Page 25: ... a preset number you can overwrite another channel for that preset number Saving a Channel Automatically 1 Press the MENU button The menu screen will be displayed 2 Select Auto Scan using the buttons and press the button 3 This automatically searches the band between 87 5MHz and 108 0MHz line and saves the found channels If you use the Auto Scan function the found channels are saved from the prese...

Page 26: ...ng Select Voice recording using the buttons select Quality and configure it using the button You can select High Medium or Low to determine the sound quality for Voice recording Audio recording Select Audio recording using the buttons select Quality and configure it using the button You can select High Medium or Low to determine the sound quality for Audio recording Video recording Select Video reco...

Page 27: ...ou can select Europe US or Japan depending on your location Europe US You can search for a channel in 100 KHz increments from the frequency range 87 5MHz to 108 0MHz Japan You can search for a channel in 100 KHz increments from the frequency range 76 0MHz to 108 0MHz English French German Italian Spanish Dutch Simplified Chinese Traditional Chinese Korean HDD capacity Language TV signal Band of Rad...

Page 28: ...ar sound or you can view the movie file without sound Alternatively you may experience discontinuous screen or sound play In this case check your product specifications The product only supports the MP3 audio format for video files It does not support AC3 and DTS A video file whose screen resolution is higher than the resolution specified by the product specifi cations may not be played Firmware update ...

Page 29: ...lay Time Power Supply General Supported Operating Systems Frequency Range Earphone Output Signal to Noise Ratio Frequency Property Number of Channels LCD 2 22 TFT Composite Output Frequency Range Signal to Noise Ratio Receiver Form Antenna Video Audio AC Adapter Internal Battery Product Size Product Weight Operation Temperature Range IBM PC Interfaces File System 20Hz 20KHz Left 20mW Right 20mW 16...

Page 30: ... product will not play unless they are converted using the Transcoder You may experience unstable video playback even when playing files of a supported format In this case it is recommended converting the file using the supplied Transcoder Rollei Fototechnic GmbH Rollei Procurement Ltd bears no responsibility in case of damages arising from fires not liable to Rollei affiliates operation by the third ...

Page 31: ...RI2020 100EC Rollei Fototechnic GmbH P O Box 3245 D 38022 Braunschweig Germany ...

Reviews: