background image

4

1.Introduction

To Ensure Safe Use

Improper handling or operation of this machine may result in injury or damage to property. Points that must be 
observed to prevent such injury or damage are described as follows.

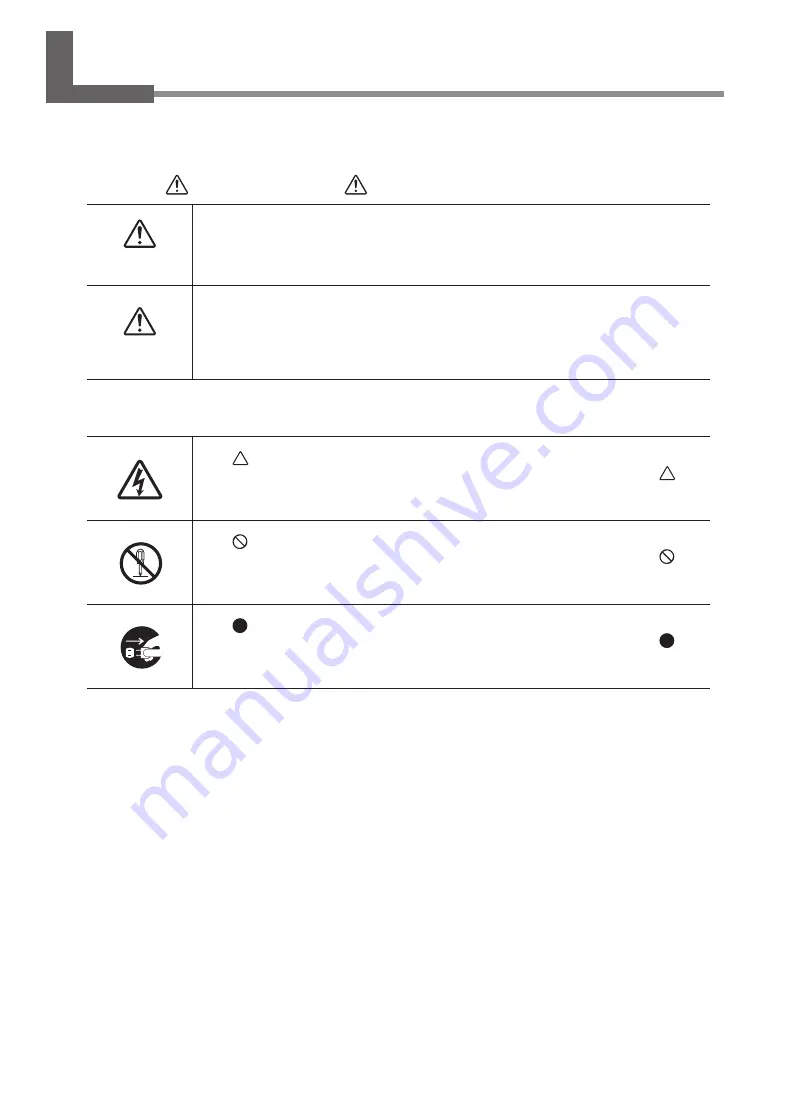
About   WARNING and   CAUTION Notices


WARNING

Used for instructions intended to alert the user to the risk of death or severe injury should 

the unit be used improperly.


CAUTION

Used for instructions intended to alert the user to the risk of injury or material damage 

should the unit be used improperly.

* Material damage refers to damage or other adverse effects caused with respect to the 

home and all its furnishings as well as to domestic animals or pets.

About the Symbols

The 

 symbol alerts the user to important instructions or warnings.

The specific meaning of the symbol is determined by the design contained within the 


symbol.

The symbol at left means "danger of electrical shock."

The   symbol alerts the user to items that must never be carried out (are forbidden).

The specific meaning of the symbol is determined by the design contained within the 


symbol.

The symbol at left means the unit must never be disassembled.

The   symbol alerts the user to things that must be carried out.

The specific meaning of the symbol is determined by the design contained within the 


symbol.

The symbol at left means the power-cord plug must be unplugged from the outlet.

Summary of Contents for SF-200

Page 1: ...tion manual are subject to change without notice This manual and the product have been prepared and tested as much as possible If you find any misprints or errors please inform Roland DG Corporation Roland DG Corporation assumes no responsibility for any direct or indirect loss or damage that may occur through use of this product regardless of any failure to perform on the part of this product Rol...

Page 2: ...OLAND DG CORPORATION 1 6 4 Shinmiyakoda Kita ku Hamamatsu shi Shizuoka ken 431 2103 JAPAN The importer in the EU Roland DG Europe Holdings B V Prof J H Bavincklaan 2 1183 AT Amstelveen The Netherlands For UK Manufacturer ROLAND DG CORPORATION 1 6 4 Shinmiyakoda Kita ku Hamamatsu shi Shizuoka ken 431 2103 JAPAN The importer in the UK Roland DG U K Ltd Griffin House Windmill Road Clevedon Business P...

Page 3: ...s 22 Setting Up the Machine 23 Step 1 Removing the Retainers 23 Step 2 Attaching the Pad Tray 27 Step 3 Connecting the Cables 29 Step 4 Initial Settings 30 Step 5 Ink Filling 31 Connecting to the Computer 38 Step 1 Make the Network Settings for the Computer 39 Step 2 Make the Network Settings on the Printer 41 Step 3 Make the Port Settings for the Software RIP 43 3 Appendix 45 Locations of the Pow...

Page 4: ...gli appositi contenitori per la raccolta differenziata non buttare nel cestino dei rifiuti casalinghi Este producto debe devolverse al centro de reciclaje más cercano a su domicilio para su correcta eliminación No lo tire a la basura Deite fora separadamente este produto no seu centro de reciclagem local Não o deite fora no seu caixote do lixo Lever dit product in bij een lokaal afvalverzamelpunt ...

Page 5: ...3 1 Introduction 1 Introduction To Ensure Safe Use 4 Pour utiliser en toute sécurité 11 Machine Highlights 18 Features of This Machine 18 About the User s Manuals for This Machine 18 ...

Page 6: ...ith respect to the home and all its furnishings as well as to domestic animals or pets About the Symbols The symbol alerts the user to important instructions or warnings The specific meaning of the symbol is determined by the design contained within the symbol The symbol at left means danger of electrical shock The symbol alerts the user to items that must never be carried out are forbidden The sp...

Page 7: ...cident WARNING Conduct operations in a clean brightly lit location Working in a location that is dark or cluttered may lead to an accident such as becoming caught in the machine as the result of an inadvertent stumble Never climb or lean on the machine The machine is not made to support a person Climbing or leaning on the machine may dislodge components and cause a slip or fall resulting in injury...

Page 8: ... the power cord plug and electrical outlet correctly and with care Never use any article that is damaged Using a damaged article may result in fire or electrical shock When using an extension cord or power strip use one that adequately satisfies the machine s ratings for voltage frequency and current Use of multiple electrical loads on a single electrical outlet or of a lengthy extension cord may ...

Page 9: ...ing agent or explosive material Any location within the reach of children Fire may be a danger Accidental ingestion by children may pose a health hazard Never place an ink container such as a cartridge or pouch in fire Ink may flow out catch fire and spread fire to other nearby objects WARNING Never drink or sniff ink cleaning liquid or discharged fluid or allow them to come in contact with the ey...

Page 10: ...irritation or inflammation occurs seek treatment by a physician In the event of ingestion do not induce vomiting and immediately seek treatment by a physician Forcibly inducing vomiting may lead to danger of choking If odor leads to physical distress move to a well ventilated location and rest quietly If dizziness or nausea persists seek treatment by a physician Refer to the appropriate safety dat...

Page 11: ...heir warnings Also never remove the labels or allow them to become dirty Caution Pinching Hazard Be careful not to allow the fingers to become pinched when closing covers Caution Moving Print Heads The print heads inside the cover move at high speed and pose a hazard Never insert your hands or fingers into the gap Caution High Voltage Removing the cover may result in high voltage electric shock ...

Page 12: ...h the eyes or skin it may be hazardous to the health When performing maintenance work for example when disposing of discharged fluid wear protective eyewear and protective gloves refer to the safety data sheet SDS 2 Caution Pinching Hazard Hands or fingers may be pinched or become caught in certain areas Use care when performing operations ...

Page 13: ...mage ou tout autre effet indésirable sur la maison tous les meubles et même les animaux domestiques À propos des symboles Le symbole attire l attention de l utilisateur sur les instructions importantes ou les avertissements Le sens précis du symbole est déterminé par le dessin à l intérieur du symbole Le symbole à gauche signifie danger d électrocution Le symbole avertit l utilisateur de ce qu il ...

Page 14: ...ourrait entraîner un accident ATTENTION Utiliser l appareil dans un endroit propre et bien éclairé Travailler dans un endroit sombre ou encombré peut causer un accident l utilisateur risque par exemple de trébucher malencontreusement et d être coincé par une partie de l appareil Ne jamais grimper ni s appuyer sur la machine La machine n est pas conçue pour supporter le poids d une personne Grimper...

Page 15: ...dans un endroit où des gaz peuvent s accumuler Une combustion ou une explosion pourraient se produire Manipuler le câble d alimentation la fiche et la prise électrique correctement et avec soin Ne jamais utiliser un article endommagé car cela pourrait causer un incendie ou un choc électrique ATTENTION Si une rallonge ou une bande d alimentation électrique sont utilisées s assurer qu elles correspo...

Page 16: ... matériel explosif tout endroit à la portée d enfants Il y a risque d incendie L ingestion accidentelle par un enfant peut présenter un risque pour la santé Ne placez jamais un récipient d encre tel qu une cartouche ou une poche dans le feu De l encre pourrait couler s enflammer et le feu se répandre à des objets proches ATTENTION Ne jamais boire l encre le liquide de nettoyage ni les liquides usé...

Page 17: ...irritation ou d inflammation de la peau consulter un médecin En cas d ingestion ne pas provoquer le vomissement et demander immédiatement l aide d un médecin Provoquer le vomissement peut créer un risque de suffocation Si l odeur cause un trouble physique amener la personne dans un endroit bien aéré et la faire se reposer Si l étourdissement ou la nausée persistent consulter un médecin Se reporter...

Page 18: ...mais retirer les vignettes et ne pas les laisser s encrasser Prudence Risque de pincement Veillez à ce que les doigts ne se pincent pas lors de la fermeture des couvercles Prudence Têtes d impression mobiles Les têtes d impression à l intérieur du couvercle se déplacent à grande vitesse et constituent un danger N insérez jamais vos mains ou vos doigts dans l espace Prudence Haute tension Le retrai...

Page 19: ...peau ils peuvent être dangereux pour la santé Lors des travaux d entretien par exemple lors de l élimination des liquides évacués porter des lunettes de protection et des gants de protection voir la fiche de sécurité FS 2 Prudence Risque de pincement Les mains ou les doigts peuvent être écrasés ou se coincer dans certaines zones Faire preuve de prudence pendant l utilisation de l appareil ...

Page 20: ... can also verify the printing area before you carry out printing which can help prevent failures when performing actual printing preview feature About the User s Manuals for This Machine The following documentation is included with the machine Paper Manuals Setup Guide This manual contains details on how to install the machine and how to configure its initial settings Regular Maintenance Guide Thi...

Page 21: ...cking the Included Items 22 Setting Up the Machine 23 Step 1 Removing the Retainers 23 Step 2 Attaching the Pad Tray 27 Step 3 Connecting the Cables 29 Step 4 Initial Settings 30 Step 5 Ink Filling 31 Connecting to the Computer 38 Step 1 Make the Network Settings for the Computer 39 Step 2 Make the Network Settings on the Printer 41 Step 3 Make the Port Settings for the Software RIP 43 2 Installat...

Page 22: ...t or in a gas filled location Combustion or explosion could occur WARNING Position so that the power plug is within immediate reach at all times This is to enable quick disconnection of the power plug in the event of an emergency Install the machine next to an electrical outlet Also provide enough empty space to allow immediate access to the electrical outlet CAUTION Ensure adequate ventilation fo...

Page 23: ... type Install the machine in a location that allows easy access to areas such as the power switch and other controls during operation Air Ventilation This machine emits a small amount of volatile compounds during printing and for some time after printing which may cause irritation of your eyes nose and throat To use this machine make sure to install ventilating equipment to ensure adequate ventila...

Page 24: ...d accounted for Power cord 1 SOL INK cleaning cartridges 2 Mist filters 4 Positioning jigs 4 Retaining screws 8 Cleaning sticks Cleaning liquid 2 Tweezers 1 Wipers 6 Hexagonal wrench 5 mm 0 2 in 1 Drain bottle 1 Pad trays 2 Software RIP 1 Setup Guide this document 1 Regular Maintenance Guide 1 22 2 Installation ...

Page 25: ... switched on Store the retainers carefully because they are needed again when transporting the machine For transportation of this machine contact your authorized Roland DG Corporation dealer Procedure A Open the front cover IMPORTANT Be sure to hold the handle of the front cover and keep holding it until the cover is completely opened or closed If you do not open and close the front cover gently i...

Page 26: ...Retainer B Retainer A Screw You can store the retainers in the locations indicated in the illustration Use the screws previously attached to the retainers to attach them to the machine Inside Retainer B Screw Retainer A Setting Up the Machine 24 2 Installation ...

Page 27: ...that specified may deform and damage the cover 1 Position to push with your hand 3 Move the print head carriage to the position indicated in the picture Move the print head carriage by hand CAUTION When moving the print head carriage by hand be sure to hold the specified position Moving it by holding positions other than that specified may deform and damage the cover 1 Position to hold with your h...

Page 28: ...4 Remove retainer C D Close the panel cover E Close the front cover Setting Up the Machine 26 2 Installation ...

Page 29: ...om the drain bottle Point When the pad tray gets dirty replace it with a spare pad tray included as needed Procedure A Open the panel cover Remove the screw on the top of the panel cover and then pull out the panel cover in the direction indicated by the arrow B Detach the drain bottle Setting Up the Machine 27 2 Installation ...

Page 30: ...lace the pad tray so that it is not creased or loose If the pad tray is creased or loose it will be difficult to install the drain bottle D Place the drain bottle on the pad tray and then install the drain bottle E Close the panel cover Setting Up the Machine 28 2 Installation ...

Page 31: ... voltage or insufficient current may cause fire or electrical shock WARNING Connect the machine to ground This can prevent fire or electrical shock due to current leakage in the event of malfunction Electrical outlet Power cord Ethernet 100Base TX recommended Ethernet cable Category 5 or higher Never insert a telephone cable AC adapter port Do not connect any cable other than the AC adapter cable ...

Page 32: ...over B Turn on the main power switch C Hold down MENU and press the sub power switch D Press or to select the language you want MENU LANGUAGE ENGLISH E Press ENTER to confirm your entry F Press or to select the unit of measurement you want for length LENGTH UNIT mm INCH G Press ENTER to confirm your entry Setting Up the Machine 30 2 Installation ...

Page 33: ...sages indicate which ink cartridges to insert and remove and when to insert and remove them Follow the instructions given in P 33 2 Clean the print heads using the SOL INK cleaning cartridges and P 36 3 Insert the ink cartridge for each color Items Used in this Procedure Two SOL INK cleaning cartridges The ink cartridges to be used IMPORTANT Be sure to use new SOL INK cleaning cartridges and ink c...

Page 34: ...ong cartridges If you insert an incorrect cartridge by mistake contact your authorized Roland DG Corporation dealer Be sure to insert cartridges horizontally Otherwise cleaning and filling may not be performed properly Insert the cartridge so that the side with the arrow faces up Insert and remove cartridges slowly one at a time Arrow SET CL LIQUID 12 Slot number Setting Up the Machine 32 2 Instal...

Page 35: ...he SOL INK cleaning cartridges A When the following screen is displayed remove the cartridges whose slot numbers are flashing REMOVE CL LIQUID 12 B When the following screen is displayed insert SOL INK cleaning cartridges into the slots whose numbers are flashing The SOL INK cleaning cartridges are not differentiated by color SET CL LIQUID 12 The screen shown below appears FILLING INK C When the f...

Page 36: ...elow appears FILLING INK E When the following screen is displayed remove the SOL INK cleaning cartridges whose slot numbers are flashing REMOVE CL LIQUID 34 F Repeat steps B to E until the screen shown below appears EMPTY DRAIN BOTTLE G Open the panel cover Remove the screw on the top of the panel cover and then pull out the panel cover in the direction indicated by the arrow Setting Up the Machin...

Page 37: ...scharged fluid may come out of the machine Exercise caution to prevent this fluid from soiling your hands I Quickly attach the emptied drain bottle to the machine once more J Close the panel cover K Make sure the drain bottle is installed and then press ENTER Cleaning is finished Setting Up the Machine 35 2 Installation ...

Page 38: ... end of the ink cartridge B When the following screen is displayed insert an ink cartridge for each color SET CARTRIDGE 123456 Insert the ink cartridge for each color When ink cartridges are inserted in all the slots the following screen appears FILLING INK C When the following screen is displayed open the panel cover EMPTY DRAIN BOTTLE D Remove the drain bottle and discard the discharged fluid IM...

Page 39: ... machine once more F Close the panel cover G Make sure the drain bottle is installed and then press ENTER When the following screen is displayed filling with ink is finished SETUP MEDIA H Close the front cover Setting Up the Machine 37 2 Installation ...

Page 40: ...RIP This machine has a built in print server as a network interface When you use the print server you can send print data to the machine from anywhere on the network TCP IP is used as the protocol IMPORTANT The examples used in the procedures for making the settings described in this section assume you are using one computer and one machine The procedures and setting values described here may not ...

Page 41: ...gs and then click Network Internet 2 Click Network and Sharing Center 3 Click Ethernet or Wi Fi Windows 8 1 users 1 From the Start menu click PC settings and then click Control Panel 2 Click Network and Internet and then click Network and Sharing Center 3 Click Ethernet or Wi Fi C Click Properties The Ethernet Properties dialog box appears If the User Account Control dialog box appears click Conti...

Page 42: ...ess to enter IP address 192 168 0 XXX Subnet mask 255 255 255 0 Here XXX can be any number from 001 to 254 However be sure to specify a number that is different from the numbers used for other computers and devices Here as an example enter 192 168 0 101 for the IP address and 255 255 255 0 for the subnet mask G Click Close in Ethernet Properties and then click Close in Ethernet Status Connecting t...

Page 43: ...ow IP ADDRESS 192 000 000 000 E Press or to select the address number F Press G Repeat steps E and F to set the IP ADDRESS 192 168 000 XXX Here XXX can be any number from 001 to 254 However be sure to specify a number that is different from the numbers used for other computers and devices For the part corresponding to 192 168 000 apply the same value as the setting of your computer Here 192 168 00...

Page 44: ...e computer Here 255 255 255 000 is entered by way of example SUBNET MASK 255 255 255 000 F When you have finished making the setting press ENTER G Press The screen shown below appears again NETWORK SUBNET MASK If you connect the computer and the machine on a one to one basis this completes the settings to make on the printer Proceed to P 43 Step 3 Make the Port Settings for the Software RIP If you...

Page 45: ... F When you have finished making the setting press ENTER G Press The screen shown below appears again NETWORK GATEWAY ADDR Step 3 Make the Port Settings for the Software RIP Install the software RIP and set it up For the print destination use the IP address set on the printer For information about how to make the settings refer to the documentation for the software RIP You can check whether the co...

Page 46: ...Connecting to the Computer 44 2 Installation ...

Page 47: ...45 3 Appendix 3Appendix Locations of the Power Rating and Serial Number Labels 46 Specifications 47 ...

Page 48: ...and Serial Number Labels Serial Number This number is required when you seek maintenance servicing or support Never peel off the label Power Rating Use an electrical outlet that meets the requirements for voltage frequency and amperage given here ...

Page 49: ... is greater Connectivity Ethernet 10BASE T 100BASE TX automatic switching Power saving function Automatic sleep feature Power requirements 100 to 240 VAC 10 1 1 A 50 60 Hz Power consump tion During operation Approx 81 W Sleep mode Approx 13 W Acoustic noise level During operation 60 dB A or less During standby 49 dB A or less Outer dimensions 1 202 W 962 D 549 H mm 47 3 W 37 9 D 21 6 H in Weight 1...

Page 50: ...48 ...

Reviews: