background image

19

Before You Play

Before You 

Play

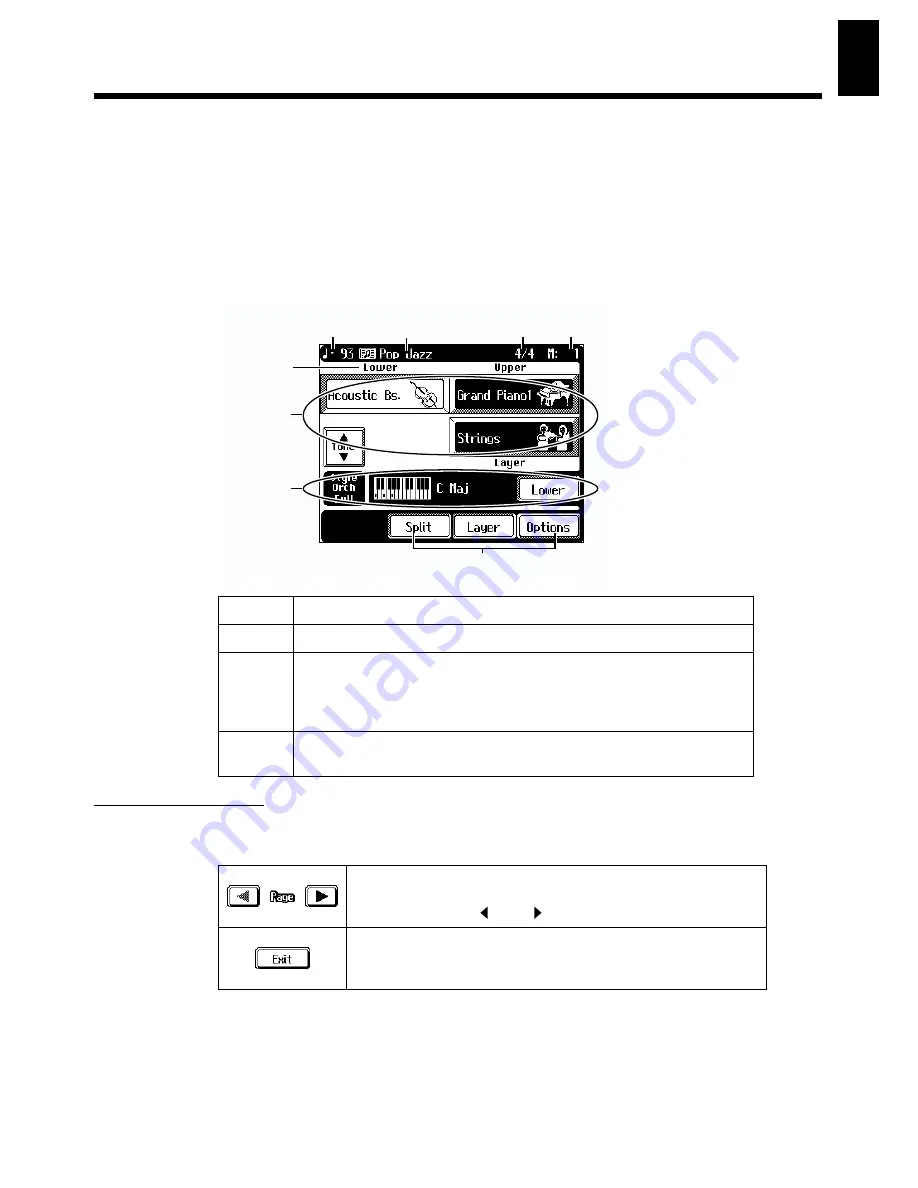
Basic Screen

The following screen is called “Basic Screen.”
You can usually display this screen by touching <Exit> in the display several times.
If touching <Exit> doesn’t display this screen, follow either of the procedures described 
below to display it.
• Press the One Touch Program [Arranger] button.

The basic screen appears and displays the settings for Automatic Accompaniment.

• Hold down the One Touch Program [Piano] button and press any one of the Tone 

Select buttons, then touch <Exit>.

fig.00-11

Using the Main Icons

With the KF-90, you can many other screens besides the basic screen to do things. The 
main icons you can use on these screens are as follows.

* You can adjust the contrast of the screen. Check out “Adjusting the Contrast of the Screen” (p. 

153).

* The explanations in this manual include illustrations that depict what should typically be shown 

by the display. Note, however, that your unit may incorporate a newer, enhanced version of the 
system (e.g., includes newer sounds), so what you actually see in the display may not always 
match what appears in the manual.

1

Such as the name of the song and Music Style appears.

2

The Tone names are selected appear.

3

Information about the Automatic Accompaniment, such as the form of 
each of the chords as they are played and icons are shown in the dis-
play. Information about the manner in which the chords are played is 
not displayed when Automatic Accompaniment is not being used.

4

The on-screen graphics that appear three dimensional work like but-
tons. These are called “Icons.”

Some screens consist on two or more pages.
You can display the next page or the previous page of the screen
by touching Page <

> or <

>.

Touch this to exit the screen that is currently displayed.
You can usually display the Basic screen by touching <Exit> sev-
eral times.

2

3

4

Tempo

Tone Part

Name

Beat

Measure

1

Summary of Contents for KF-90

Page 1: ...Additionally in order to feel assured that you have gained a good grasp of every feature provided by your new unit Owner s Manual should be read in its entirety The manual should be saved and kept on...

Page 2: ...rong are provided for your safety When the provided plug does not fit into your outlet consult an electrician for replacement of the obsolete outlet WARNING IMPORTANT As the colours of the wires in th...

Page 3: ...d consult an audiologist 011 Do not allow any objects e g flammable material coins pins or liquids of any kind water soft drinks etc to penetrate the unit 013 In households with small children an adul...

Page 4: ...below At least two persons are required to safely lift and move the unit It should be handled carefully all the while keeping it level Make sure to have a firm grip to protect yourself from injury and...

Page 5: ...sing an equal amount of strength moving the cloth along with the grain of the wood Rubbing too hard in the same area can damage the finish 402 Never use benzine thinners alcohol or solvents of any kin...

Page 6: ...owing when handling floppy disks Never touch the magnetic medium inside the disk Do not use or store floppy disks in dirty or dusty areas Do not subject floppy disks to temperature extremes e g direct...

Page 7: ...just by following the on screen instructions make immediate use of the Automatic Accompaniment feature and access many other convenient functions allowing you to achieve the things you want to do eve...

Page 8: ...you want to learn how the KF 90 s various buttons work see Panel Descriptions Also be sure to make use of the Index at the end of the volume Appendices If the KF 90 does not operate as you expect rea...

Page 9: ...g with Automatic Accompaniment Style Navigator Button 28 Playing with an Automatic Accompaniment One touch Arranger 30 Recording a Performance 34 Recording a Song Composer Navigator Button 34 Recordin...

Page 10: ...Accompaniment Pattern Within a Song Fill In 77 Changing the Arrangement of the Accompaniment 78 Adding Harmony to the Right hand Part Melody Intelligence 79 Adding Automatic Accompaniment to Regular P...

Page 11: ...istening to a Song 123 Adjusting the Tempo at a Particular Measure 123 Chapter 6 Editing Functions 124 Choosing an Editing Function 124 Canceling an Edit 124 Copying a Measure 125 Copying a Rhythm Pat...

Page 12: ...the Bend Range 152 Changing the Screen Settings 153 Hiding the On screen Lyrics 153 Changing the Language 153 Adjusting the Contrast of the Screen 153 Changing the Screen Message When the Power Is Tu...

Page 13: ...tches the connections for the MIDI connectors and the computer port p 161 Also this switch is set to Mac PC 1 or PC 2 according to the type computer that s connected Computer Connector You can connect...

Page 14: ...p 109 10 Composer Navigator Button You can select convenient functions for playing back recording or editing a song p 34 11 Bwd Button Rewinds the song 12 Fwd Button Fast forwards the song 13 Reset Bu...

Page 15: ...optimal settings for playing with automatic accompaniment p 30 p 70 30 Drums SFX Button Changes the keyboard to play percussion and effect sounds p 58 31 Melody Intelligence Button Adds harmony to th...

Page 16: ...s depressed long lingering reverberations continue to be added to the sound after you release from the keys When you depress the damper pedal on an acoustic piano the sound from the strings that were...

Page 17: ...rd the right increases the volume rotating it toward the left decreases the volume 3 Use the Brilliance knob to adjust the overall sound quality Rotating the knob clockwise makes the tone brighter rot...

Page 18: ...d depending on the location of microphones relative to speakers This can be remedied by Changing the orientation of the microphone Relocating microphone at a greater distance from speakers Lowering vo...

Page 19: ...strations that depict what should typically be shown by the display Note however that your unit may incorporate a newer enhanced version of the system e g includes newer sounds so what you actually se...

Page 20: ...20 Before You Play MEMO...

Page 21: ...21 Quick Start Quick Start...

Page 22: ...Touch the screen to select the demo type By touching All you can view these demos in succession Touch Exit to go back to the Demo screen 3 Touch Exit at the bottom left of the screen to end the Demo s...

Page 23: ...g Q1 03 1 Press the One Touch Program Piano button A Piano screen like the one shown below appears fig Q1 04 e 2 When you finger the keyboard the piano sound is produced In this way you can make the s...

Page 24: ...tch screens The screen changes and other tones in the selected tone group are displayed Choose the tone you want to play 3 Touch the screen to choose the tone you want to select You can listen to a ty...

Page 25: ...desired activity Touch Exit to go back to the Tone Navigator screen 3 Touch Exit at the bottom left of the screen to end the Tone Navigator screen Display Description Check It Out You can select tones...

Page 26: ...c Files not just the included disk About Music Files take a look at Music Files That the KF 90 Can Use p 183 fig Q1 12 1 Press the Function button A Function screen like the one below appears fig Q1 1...

Page 27: ...27 Playing the Keyboard Quick Start MEMO...

Page 28: ...he screen to choose the desired activity Touch Exit to go back to the Style Navigator screen 3 Touch Exit at the bottom left of the screen to end the Style Navigator screen Display Description EZ Arra...

Page 29: ...you ve answered all the questions you can start playing with Automatic Accompaniment right away When specifying the chords yourself in a performance specify the chords in the left part of the keyboar...

Page 30: ...is button Let s Try Playing Little Brown Jug Now let s try playing Little Brown Jug you can see the score on page 32 using Automatic Accompaniment In this example we ll play the song with the Big Band...

Page 31: ...keyboard with the timing indicated for C F and G on the next page score for the left hand part as shown in the figure There s no need to hold down the key so you can get ready to finger the next one f...

Page 32: ...ccompaniment fig Q2 09 e Little Brown Jug Play the C Key on the keyboard Right Left Left Intro 8 measures Press the Fill In To Variation to change the Accompaniment Pattern Press the Intro Ending 1 to...

Page 33: ...33 Playing with Accompaniment Quick Start MEMO...

Page 34: ...pears fig Q1 08 e 2 Touch the screen to choose the desired activity Display Description 16 Track Sequencer This allows you to record performance for up to 16 parts to create ensemble songs p 118 Chord...

Page 35: ...t a marker at a point within a song and then go immediately to that measure and have a count in be sounded before the performance starts p 90 Rec Mode Use this mode when making changes in the recordin...

Page 36: ...creen appears fig Q3 02 e 2 Touch 0 to display 0 New Song on the screen If 0 doesn t appear on screen touch Page and to switch screens Touch Exit to go back to the previous screen Get ready to play 3...

Page 37: ...gin playing fig Q3 03 Stop recording 9 Press the Intro Ending 1 button An ending is played then the automatic accompaniment stops and recording is stopped at the same time When the Following Screen is...

Page 38: ...ayed back 3 Press the Stop button Playback stops Any performance that has been recorded is deleted when the power to the KF 90 is turned off If you don t want to lose your recorded performance save it...

Page 39: ...into the disk drive until it clicks into place The disk drive is on the left side of the front panel fig Q5 02 e Never eject a disk while reading or writing is in progress since that can damage the ma...

Page 40: ...4 Touch on screen to play back the song You can also start playback by pressing Play button The on screen changes to 5 To stop playback of the song touch on the screen You can also stop playback by p...

Page 41: ...K The recorded performance or song whose settings have been changed is erased Playing Back All Songs Continuously All Song Play You can continuously repeat playback of all the songs This function is c...

Page 42: ...p 46 fig Q5 06 e 2 Insert the floppy disk that contains music files into the disk drive Please refer to Inserting and Ejecting a Floppy Disk p 39 3 Press the Song Disk button The Song Disk screen appe...

Page 43: ...Exit to go back the previous screen with the Vocal Effect function still in effect 4 To cancel the Vocal Effects press the Vocal Effects button to go out the button s indicator Display Description Ec...

Page 44: ...amount of echo applied 4 Touch Type 1 or 2 to change the type of echo Touch Exit to go back to the Vocal Effects screen Modifying Your Voice With the KF 90 you can modify the way your voice sounds thr...

Page 45: ...ometimes be reset 5 Touch the icon you selected in step 3 again to cancel the Voice Transformer function Touch Exit to go back to the Vocal Effects screen Display Description Makes your voice sound li...

Page 46: ...f two people singing a melody in unison This applies a voice modified by Voice Transformer to your own voice If you don t use the Voice Transformer function this lets you sing with a voice one octave...

Page 47: ...iment by giving the count through the microphone 1 Press Voice Effects button The Vocal Effects screen appears 2 Touch Vocal Count In fig Q5 12 eps 3 Select Song or Arranger 4 Count to four One two th...

Page 48: ...ale The Tone you ve selected is heard when you finger the keyboard 4 Touch OFF to cancel the Keyboard function Adding the Harmony to the Song When you sing along with the playback of a specified part...

Page 49: ...49 Appendices Chapter 2 Chapter 3 Chapter 4 Chapter 5 Chapter 6 Chapter 7 Chapter 8 Chapter 9 Chapter 1 Reference...

Page 50: ...hetic Resonance Changing the Piano Sound 1 Touch next to the illustration of the piano The amount by which the piano s top is opened changes and the sound also changes This simulates the sound reflect...

Page 51: ...creens and touch the screen to choose a Tone The Tone you ve selected is heard when you finger the keyboard Also the next time you press the Tone Select button you chose in step 1 the tone you selecte...

Page 52: ...roup A Tone Selection screen appears 2 Use the Value and buttons or the dial to select a Tone The indicator for the corresponding Tone Select button blinks 3 Finger the keyboard or press the blinking...

Page 53: ...ttom of the screen fig 01 07 e_70 The screen changes as shown below fig 01 08 e_70 This tone displayed in the lower section is called the Layer Tone When the keys are played the tone selected in Step...

Page 54: ...screens and touch the screen to choose a Tone You can also select a Tone using the Value and buttons or the dial 4 Touch Exit The Basic screen appears When you finger the keyboard the selected Tone a...

Page 55: ...ne and the tone in the left portion of the keyboard is called the Lower Tone fig 01 11 e_70 2 To cancel the Split Play touch Split The tone in the upper part then is effective for the entire keyboard...

Page 56: ...tone selection screen appears 3 Touch an icon at the bottom of the screen to switch the Tone part This allow you select a Tone of the Tone part displayed on the icon Touching the icon changes the Tone...

Page 57: ...atch the pitch of the right hand part during Split Play Or you could change the pitch of each tone and play both tones together during Layer Play 1 Make sure the Basic screen is displayed 2 Touch Laye...

Page 58: ...ch as STANDARD are called Drum Sets Each drum set contains a wide variety of percussive instrument sounds and sound effects and each key plays a different sound You can play the Drum sound by touching...

Page 59: ...instrument sound used before the Drums SFX button was pressed Adding Reverberation to Sounds The Reverb Effect The KF 90 can apply a reverb effect to the notes you play on the keyboard Applying reverb...

Page 60: ...hin the accompaniment fig 01 18 1 Press the Advanced 3D button The Advanced 3D screen appears in the display 2 Touch the window icon to switch the effect on or off Three dimensional breadth is added t...

Page 61: ...s at the Advanced 3D screen The following display appears fig 01 19 2 e_60 2 Touch All Parts or Layer Part Touch Exit to go back the Advanced 3D screen Display Description All Parts The effect is appl...

Page 62: ...53 or the Lower tone p 55 than the effect applied to the Upper tone the tone shown in the upper right of the basic screen the effect may not be applied in some cases Select the same effect as for the...

Page 63: ...button s indicator lights up and a Metronome screen like the one below appears fig 01 22 e_70 2 To stop the metronome s sound press the Metronome button The Metronome button s indicator goes dark Tou...

Page 64: ...the KF 90 is powered up You can also use the Value buttons or dial to adjust the tempo Turn the dial clockwise for a faster tempo or counterclockwise for a slower tempo Determining the Tempo with Tem...

Page 65: ...to one side or the other and show other choices for the pattern by touching Display Description The metronome sounds in the ordinary way Counting starts at the beginning of the measure in intervals of...

Page 66: ...any of ten possible levels Metronome volume is set to 5 when the keyboard is turned on 1 At the Metronome screen touch Volume The available choices for the volume level appear at the bottom of the sc...

Page 67: ...different varieties of music around the world and each one has its own unique features What gives jazz its jazziness and classical music its unmistakable classical feel is the unique combination of el...

Page 68: ...ng a chord during automatic accompaniment To play a C Maj chord for example you usually have to finger the three keys C E and G but with Chord Intelligence you only have to press the C key to initiate...

Page 69: ...you can have the notes comprising the chord be shown in the screen 1 Press the Style Navigator button The Style Navigator screen will appear fig 02 02 e_70 2 On the screen touch Chord Finder 3 Touch t...

Page 70: ...u choose any one of Preset A through D the Music Style s tempo the tone of the right hand part the settings of the Style Orchestrator p 78 and the like change By varying the tempo or Tone you can enjo...

Page 71: ...l times to display the Music Styles stored in internal memory Styles with numbers that begin with L are Styles stored in internal memory 4 Press the One Touch Program Arranger button When you specify...

Page 72: ...gh you can play the tone in the left side of the keyboard while simultaneously having the Automatic Accompaniment play 1 Press the One Touch Program Arranger button The Basic screen appears 2 Touch Lo...

Page 73: ...ng for Automatic Accompaniment 2 Use the Tempo and buttons to adjust the tempo The tempo appears at the top left area of the screen Pressing the button makes the tempo faster and pressing makes the te...

Page 74: ...mpaniment When You Play the Left hand Section Sync Start 1 Press the Sync Reset button getting the button indicator to light The Intro Ending 1 button s indicator will flash 2 Specify the chord on the...

Page 75: ...mpaniment without an intro Pressing the Intro Ending 2 button plays a simple intro Stopping Automatic Accompaniment Stopping with an Added Ending 1 Press the Intro Ending 1 or 2 button An ending is pl...

Page 76: ...own button getting the indicator to light 2 Press the Intro Ending 1 or 2 button The intro starts and the count sound plays to the end of the intro If the Sync Reset button s indicator is lit specifyi...

Page 77: ...the variation accompaniment pattern 2 Pressing the Fill In To Original button its indicator should light makes the setting for playing the original accompaniment pattern Pressing these buttons during...

Page 78: ...ic Style fig 02 14 1 Press the Style Orchestrator or button to change the arrangement of the accompaniment Pressing the button provides a simpler arrangement press the button for a more elaborate arra...

Page 79: ...right hand section of the keyboard a harmony is added to the notes you finger A Melody Intelligence screen like the one following appears fig 02 16 e_70 2 Use Page and the Touch Screen the Value butto...

Page 80: ...chords from the entire keyboard and perform without splitting the keyboard This function is called the Piano Style Arranger This makes it possible to add an accompaniment automatically as you play a...

Page 81: ...Performance Part You can adjust the volume balance of each part of the Music Style and of each tone when playing more than one tone with the keyboard fig 02 19 1 Press the Part Balance button The Par...

Page 82: ...ounds with the keyboard 2 Touch to adjust the volume of the respective Parts You can adjust the volume by touching the each slider on screen Touch Exit to go back to the previous screen Drs SFX Volume...

Page 83: ...re the measure number appears in the top right area of the screen 5 Press the Play button to play back the song 6 Press the Bwd and Fwd buttons to move to a bar where you want to listen Pressing the b...

Page 84: ...s displayed Lyrics are displayed on the score Your performance data is displayed The left hand part is displayed The right hand part is displayed The both hands part is displayed on the grand staff NO...

Page 85: ...ult complex musical works that demand accurate notation In addition the display cannot show notes that are briefer than a sixteenth note If you use the icons on screen to change the displayed part whi...

Page 86: ...t specifying the tempo in numerical terms fig 03 02 1 Press the Metronome button The Metronome screen appears 2 Touch Tap Tempo The following screen appears fig 03 03 e_70 3 Either lightly tap the Tap...

Page 87: ...n t change is called Tempo Muting 1 Hold down the Stop button and press either the Tempo or button 2 Press the Play button Now songs are played back at an unchanging tempo When tempo muting is in effe...

Page 88: ...1 Press the Composer Navigator button The Composer Navigator screen appears 2 Touch Marker Count In The Marker screen appears 3 Touch the Count In icon With this setting two measures are counted down...

Page 89: ...screen appears fig 03 07 e_70 3 Touch the Track button for the part you will play yourself The display for the Track button you chose changes to The sound of the Track button you chose is muted out To...

Page 90: ...he top right area of the screen 4 Touch for Marker A Marker A is placed at the beginning of the bar you moved to in the screen will change to the number of the measure where you placed the marker 5 In...

Page 91: ...between Marker A and Marker B forward or back without changing the interval itself 1 Touch or to move to where you want to place the marker fig 03 11 e Touch to move toward the beginning of the song T...

Page 92: ...th bar and marker B in the ninth bar 4 Touch the Repeat icon The setting is made for repeated playback of the passage from marker A to marker B fig 03 13 e 5 Press the Play button The passage from mar...

Page 93: ...Transpose screen like the one below appears fig 03 17 e_70 2 Touch The notes you play with the keyboard are transposed 3 Choose the value for transposition by touching or on the screen Each touch of o...

Page 94: ...can transpose the song within a range of 24 to 24 semitones 4 Touch to return the song transposition to the original key Touch Exit to go back to the previous screen Transposing Both the Keyboard Note...

Page 95: ...song and the lower portion shows what s played on the keyboard The Keyboard Screen fig 03 20_60 When this screen is visible you can check the pitch The key for the note being played is indicated The G...

Page 96: ...16 as necessary When Keyboard is selected in the Lower Screen the keyboard performance appears After recording your performance if you want to compare it with the model performance again all you have...

Page 97: ...ons for which is displayed have no performance data Track button name Performance recorded The Rhythm Part of an Automatic Accompaniment is recorded here When a Tone set such as a drum set or an SFX s...

Page 98: ...the Rec button The Play button indicator will flash and the KF 90 will be ready for recording To cancel recording press the Stop button 6 Press the Play button to start recording A two bar count in so...

Page 99: ...fig 04 04 e_80 If you don t want to erase the song Touch Cancel Save the song on a floppy disk For information on how to save your song see Saving Songs to Floppy Disks p 109 Erasing a song Touch OK...

Page 100: ...s the Rec button The Play button indicator will blink and the KF 90 will be ready for recording To stop recording press the Stop button 8 Specify a chord by playing it in the lower section of the keyb...

Page 101: ...dy for recording 4 Begin recording If you redo a recording with Automatic Accompaniment specify a chord in the left hand section of the keyboard or press the Start Stop button If you don t use automat...

Page 102: ...irmation screen appears 3 Touch OK to delete the song If you touch Cancel the song is not erased Erasing the Sound Recorded at Specific Track Buttons Here s how to erase what s been recorded to a part...

Page 103: ...ndicator to light up The Composer Navigator screen appears 2 Touch Rec Mode fig 01 05 e_60 3 Touch Rec Stop to switch between Arranger Stop and Composer Stop Touch Exit several times to go back to the...

Page 104: ...e screen where the measure number appears in the top right area of the screen 4 Press the Rec button turning on that button s indicator The KF 90 enters standby for recording 5 Press the Bwd button on...

Page 105: ...poser Navigator screen appears 2 Touch Chord Sequencer The screen like the one shown below is called Chord Sequencer screen fig 04 08 e One measure is inserted after the measure indicated by the curso...

Page 106: ...paniment 2 Press the Stop button to stop playback 6 When you have finished inputting all the data touch Execute The accompaniment you ve composed is registered at 0 New Song Press the Play button and...

Page 107: ...the bottom of the Chord Sequencer screen to specify chords on the screen 1 At the Chord Sequencer screen touch Chord The following screen will appear fig 04 10 e_60 2 Touch the to specify a chord Tou...

Page 108: ...ars 4 Touch Audition on screen to hear the rhythm pattern Make sure the rhythm pattern you hear is the one you chose To stop the rhythm pattern touch Stop on the screen 5 Touch Record on the screen to...

Page 109: ...ks that have been used on another device cannot be used with the KF 90 just as they are The operation that readies floppy disks for use with the KF 90 is called Format Caution Formatting a disk destro...

Page 110: ...mat is finished the Song Disk Menu screen returns Touch Exit several times to go back to the previous screen Rear side of the disk Protect prevents writing to disk Write can write new data onto disk W...

Page 111: ...sor sideways and enter the name of the song by using the Value buttons or the dial to choose the letters Assign a name to the song to be saved Touch A a 0 at the bottom of the screen to change the typ...

Page 112: ...ng process is finished the Song Disk Menu screen appears Touch Exit to go back to the previous screen Indication Description KF Saves the data using sounds exclusive to the KF 90 for rich expressive p...

Page 113: ...ing upward insert it into the disk drive until it clicks into position 3 Press the Song Disk button A Song Disk screen appears 4 Touch Disk on the screen A Song Disk Menu screen appears 5 Choose Delet...

Page 114: ...er on the screen appears in reverse video 7 When the measure number display returns to its original appearance press the Stop button 8 Take the floppy disk out of the disk drive 9 Insert a blank flopp...

Page 115: ...d repeatedly with new notes being combined with existing ones This is handy when you re making rhythm parts such as by layering different percussion tones while recording the same passage over and ove...

Page 116: ...rt very simple 1 Place A and B markers at the beginning and end of the passage you want to record Take a look at Placing Erasing a Marker Within a Song p 90 If you haven t recorded anything yet then p...

Page 117: ...ong p 90 use Markers A and B to specify the interval 2 At the Rec Mode screen choose Auto Punch In Out fig 05 02 e_50 This changes the recording mode to Punch In Recording Touch Exit to go back to the...

Page 118: ...k Buttons and more The track buttons correspond to 16 track sequencer parts as shown below Track button Part R Rhythm D 10 S 11 1 Whole 1 2 Accomp 2 5 to 9 12 to 16 3 Left 3 4 Right 4 Since the 16 Tra...

Page 119: ...rd To record a new song select 0 Touch 0 to change the display to 0 New Song If 0 New Song doesn t appear on screen touch Page and to switch screens If you have recorded a song or changed a song s set...

Page 120: ...information see Saving Songs to Floppy Disks p 109 Getting the Most Suitable Part Tones for the Musical Genre Tone Set Tone Set is a function that assigns to each of the sixteen parts the most suitab...

Page 121: ...from to the left or right Touch to shift the sound to the right or touch to shift it to the left What s Panpot Panpot is the control that determines the placement of the sound in the stereo sound fiel...

Page 122: ...ou pressed the Composer Navigator button appears 6 Press the Reset button to return the measure number to 1 7 Start a recording Record the performance following the procedures described in Chapter 4 p...

Page 123: ...Recording mode When you re finished tempo recording go back to the ordinary Replace Recording Take a look at Selecting the Recording Method p 115 Adjusting the Tempo at a Particular Measure You can h...

Page 124: ...pose Transposes a Part p 128 Erase Makes a measure blank p 129 Part Exchange Exchanges swaps the notes in two Parts p 130 Note Edit Used to correct individual notes one at a time p 130 PC Edit Used to...

Page 125: ...place When a recorded performance exists at the copy destination the previous recording is deleted and replaced with the copied passage Mix When a recorded performance exists at the copy destination t...

Page 126: ...ute Copying starts When copying is done you are returned to the Song Edit screen You can also record the rhythm pattern Take a look at Creating a Rhythm Part with Ease p 108 Correcting Timing Discrepa...

Page 127: ...re of portions of a performance is called Deleting fig 06 10 1 Follow the steps in Choosing an Editing Function p 124 to choose Delete The following screen will appear fig 06 11 eps Display Descriptio...

Page 128: ...ou are returned to the Song Edit screen Transposing Individual Parts You can transpose specified parts and tracks individually 1 Follow the steps in Choosing an Editing Function p 124 to choose Transp...

Page 129: ...ce information such as the notes tempo tone changes and volume level changes Tempo Erases tempo information By erasing the tempo information for all bars the song will change with a uniform tempo In t...

Page 130: ...iting You can make the corrections described below by using Note Editing Deleting misplayed notes Changing the scale of a single note Changing the key velocity of a single note 1 Follow the steps in C...

Page 131: ...pear fig 06 19 eps The PC location display uses Measure Beat Tick as the format A tick is a unit of time that s shorter than a beat 2 Touch Part and to choose the Part that contains the note you want...

Page 132: ...working on that the KF 90 automatically extrapolates the other chords and arranges the style The Style Converter has an Auto Mode for creating Music Styles simply from a song with a single chord and a...

Page 133: ...tting the Styles for all Parts touch Execute You create a new Style The User Style is recorded to the Disk User button Try playing with the created Style to play If you turn off the power or record a...

Page 134: ...other chords and arranges the style The Style Converter has an Auto Mode for creating Music Styles simply from a song with a single chord and a Manual Mode for creating a Music Style from a song of t...

Page 135: ...Key The basic key of the recorded performance Src Chord The chord of the recorded performance Major Minor 7th Division Division From The first measure in the passage you want to extract For The number...

Page 136: ...chords all share the same Rhythm Part If you want to use the performance of other part check out Changing an Extracted Part 1 Use the 16 track sequencer to record the song Refer to Recording with the...

Page 137: ...the character under the cursor touch _ 6 After you ve enter the style name use to choose the destination for saving it If you select a location where a User Style has already been saved the previously...

Page 138: ...m button internal memory You can then call up the stored settings by pressing the User Program button This is handy for storing often used combinations of styles tone and other settings Such a set of...

Page 139: ...f the User Program you want to call up If the User Program you want to call up is not displayed touch Page and to switch screens Touching the User Program name changes the panel settings to the stored...

Page 140: ...ve a User Program at a place where another User Program has already been saved the previously saved User Program is erased and the new one is saved Touch Exit to go back to the previous screen 7 Touch...

Page 141: ...creen without deleting the User Program Disabling Everything Except Piano Play Panel Lock Making the setting for the panel lock enables a state where only piano play is possible and all buttons are di...

Page 142: ...rom the strings that were struck resonates with other strings adding rich reverberations and broadness to the sound This resonance is called Sympathetic Resonance Adding Ambience from Different Venues...

Page 143: ...Performances are possible in all keys III Mean Tone This scale makes some compromises in just intonation enabling transposition to other keys Pythagorean This scale devised by the philosopher Pythagor...

Page 144: ...hing Exit changes the setting for resonant notes to Advanced Changing Key Touch Key Touch You can vary the touch of the keyboard when you finger the keys 1 At the Piano Customize screen p 142 touch Ke...

Page 145: ...ong to lengthen the sound s release time select Short to shorten the sound s release Touch Exit to go back to the Piano Customize screen Changing the Settings for Automatic Accompaniment You can chang...

Page 146: ...hord Tones and Bass Tones refer to the section Changing the Chord Tone and Bass Tone which follows Changing the Chord Tone and Bass Tone You can change the sound of the chord tone and bass tone What A...

Page 147: ...vents the tempo and tone from changing even when the Music Style is changed All items are set to ON when you turn on the power 1 Press the One Touch Program Arranger button to display the Basic screen...

Page 148: ...Glide The sound s pitch is temporarily lowered while the Glide pedal is pressed when the pedal is released the pitch gradually returns to normal This can be effective for simulating the performance o...

Page 149: ...wer Track 1 16 Select the part to be displayed as the left hand part The power up default is Lower Track Upper Part Upper Track 1 16 Select the part to be displayed as the right hand part The power up...

Page 150: ...A voice counting 1 2 in Japanese Voice ENG A voice counting 1 2 in English Wood Block Wood Block Triangle Castanet Triangle and castanet sound Handclap Clapping Animal Animal Voice Touch Exit to go ba...

Page 151: ...of Reverb Effect By changing the reverberations of the notes you can enjoy the atmosphere of performance in a wide variety of different locations 1 Press the Function button The Function screen appear...

Page 152: ...ect Short Delay A short echo effect Flanger An effect that sounds like a jet plane s ascent descent Short Delay Feedback A short echo with many repetitions Touch Exit to go back to the Function screen...

Page 153: ...adjust the contrast of the screen You can adjust the contrast level along a ten stage range The higher the value set the brighter it is displayed Changing the Screen Message When the Power Is Turned...

Page 154: ...ge the internal memory making it impossible to use this instrument Restoring the Factory Settings Factory Reset You can restore the settings stored in memory with Memory Backup p 154 to these original...

Page 155: ...n If Touch Screen is not displayed touch Page and to switch screens fig 08 30 eps Touch Exit to go back to the Function screen 4 Touch Execute on the screen 5 Touch the points indicated on the touch s...

Page 156: ...rument or switch Tones on the other instrument What s MIDI MIDI short for Musical Instrument Digital Interface was developed as a standard for the exchange of performance data between electronic instr...

Page 157: ...When the KF 90 is connected to a MIDI sequencer set it to Local OFF Refer to Disconnecting the Keyboard from the Internal Sound Generator Local On Off p 158 Connecting with a MIDI Sound Module fig 09...

Page 158: ...is switched on If you first switch on the KF 90 then the MT series device Local Control is automatically switched off on the KF 90 Sending Recorded Performance Data to a MIDI Device Composer Out When...

Page 159: ...et to either Int or Auto the KF 90 s buttons cannot be used to adjust the KF 90 s tempo Ordinarily you should set this to Int Touch Exit to go back to the Function screen MIDI Ensemble Performing in E...

Page 160: ...es before making any connections Playing Sounds from the KF 90 Through the Speakers on Audio Equipment or Recording Your Performances on a Recording Device fig 09 1 Turn the volume all the way down on...

Page 161: ...al port 3 Set the computer switch on the underside of the keyboard to match the type of computer connected Please refer to the connection examples below Change the setting of the Computer switch only...

Page 162: ...uch Program Arranger button has not been pressed only the rhythm pattern is played p 73 Is the 16 track Sequencer screen displayed p 119 Certain instruments are not heard while playing a song Have son...

Page 163: ...g the Touch Screen p 155 to correct the positioning Depressing a pedal has no effect or the pedal effect doesn t stop Is the pedal connected correctly p 16 Has a different function been assigned to th...

Page 164: ...at the procedure Indication Error 11 Meaning There is not sufficient space left on the floppy disk or internal memory for the data to be saved Save the data onto a different floppy disk Indication Err...

Page 165: ...ange the tempo more slowly to record the performance again Indication Error 43 Meaning The Computer Switch is set to a wrong position or the computer is set wrongly Switch off the KF 90 then set the C...

Page 166: ...up Rock Organ1 Rock Organ2 Jazz Organ 1 Rotary Org S Rotary Org F L Organ Full Organ 1 Full Organ 2 Full Organ 3 Jazz Organ2 Jazz Organ3 Jazz Organ4 Nason flt 8 Diapason 8 Organ Flute Accordion Hard A...

Page 167: ...s2 EX Orchestra Slow Violin Contrabass Choir Str Harp Strings Bell Strings PizzicatoStr Mellow Pizz Timpani Strings 2 Legato Str Warm Strings Syn Strings1 Syn Strings2 Syn Slow Str Orchestra Orchestra...

Page 168: ...th Bass 2 Synth Bass 3 Synth Bass 4 Rubber Bass GS Violin Slow Violin Viola GS Cello Contrabass GS Trem Str PizzicatoStr GS Harp Timpani GS Strings Orchestra GS Sl Str Syn Strings1 Syn Strings2 Syn St...

Page 169: ...Contrabass Tremolo Str Pizzicato Harp Timpani Strings SlowStrings Syn Str 1 Syn Str 2 Choir Aahs Pop Voice SynVox Orche Hit Trumpet Trombone Tuba M Trumpet FrenchHorns Brass 1 SynthBrass1 SynthBrass2...

Page 170: ...gle EXC5 Open Triangle EXC5 Shaker Jingle Bell Bell Tree Castanets Mute Surdo EXC6 Open Surdo EXC6 Cana R B Snare Rock Snare Rock Snare Pop Snare m Pop Snare Ghost Pop Snare m Finger Snap 707 Claps Ha...

Page 171: ...e High Bongo Mute Falamenco HC Falamenco HC Bongo Cowbell Bongo Cowbell Falamenco Hi Timbale Falamenco Lo Timbale Falamenco Tmbl Flam Shekere 1 Shekere 2 Low Bongo Mute High Bongo Mute Falamenco HC Fa...

Page 172: ...Guiro EXC3 Claves High Wood Block Low Wood Block Mute Cuica EXC4 Open Cuica EXC4 Mute Triangle EXC5 Open Triangle EXC5 Shaker Jingle Bell Bell Tree Castanets Mute Surdo EXC6 Open Surdo EXC6 Bar Chime...

Page 173: ...rt Guiro EXC3 Long Guiro EXC3 808 Claves High Wood Block Low Wood Block Mute Cuica EXC4 Open Cuica EXC4 Mute Triangle EXC5 Open Triangle EXC5 Shaker Jingle Bell Bell Tree Castanets Mute Surdo EXC6 Ope...

Page 174: ...go Low Bongo Mute High Conga Open High Conga Low Conga High Timbale Low Timbale High Agogo Low Agogo Cabasa Maracas Short Hi Whistle EXC2 Long Low Whistle EXC2 Short Guiro EXC3 Long Guiro EXC3 Claves...

Page 175: ...gBand Pop 60 s R B 50 s R B Rock 1 Rock 2 16Beat Rock Rock n Roll AcousticRck1 AcousticRck2 Ballad Soulful Sax Swing Ballad Pop Ballad 8BeatBallad1 8BeatBallad2 8BeatBallad3 MediumBallad 70 s Ballad 7...

Page 176: ...altz 2 Musette Parade Tango Last Dance Vienna Waltz ClasiclPolka Polka March Foxtrot Data Disk Style 01 Ocean Side 02 16Beat Pop 03 70 s Disco 04 Pop n Roll 05 16BeatBallad 06 60 s Ballad 07 Swayin 08...

Page 177: ...2 House 1 2 House 2 1 Shuffle1 1 Shuffle2 1 Brush 2 Swing 1 1 Swing 2 4 Waltz 2 March 1 1 March 2 2 BossaNova 2 Samba 1 1 Samba 2 1 Rhumba 2 Mambo 2 Tango 2 Beguine 1 Simple4 4 1 Simple3 4 1 Simple6 8...

Page 178: ...he p 68 Cm7 5 C C D E E F CM7 C M7 DM7 E M7 EM7 FM7 C7 C 7 D7 E 7 E7 F7 Cm C m Dm E m Em Fm Cm7 C m7 Dm7 E m7 Em7 Fm7 Cdim C dim Ddim E dim Edim Fdim Dm7 5 Em7 5 Caug C aug Daug E aug Eaug Faug Csus4...

Page 179: ...F m Gm A m Am B m Bm F m7 Gm7 A m7 Am7 B m7 Bm7 F dim Gdim A dim Adim B dim Bdim Gm7 5 Am7 5 Bm7 5 F aug Gaug A aug Aaug B aug Baug F sus4 Gsus4 A sus4 Asus4 B sus4 Bsus4 F 7sus4 G7sus4 A 7sus4 A7sus...

Page 180: ...es both chorus and delay effects Flanger Delay Applies both flanger and delay effects Overdrive Chorus Applies both overdrive and chorus effects Overdrive Flanger Applies both overdrive and flanger ef...

Page 181: ...k a volume of original piano music encompassing all standards of musical ability which included the piano and orchestral accompaniment data in SMF format was published and printed Scott Wilkie Scott W...

Page 182: ...atie 1997 Roland Corporation 3 Piano Sonata No 15 in C Major 1st Movement W A Mozart 1996 Roland Corporation 4 Fr hlicher Landmann from Album F r Die Jugend Op 68 R Schumann 1996 Roland Corporation 5...

Page 183: ...ing the same logo the lyrics will appear in its display About the KF 90 Sound Generator The KF 90 come equipped with GM 2 GS sound generators General MIDI The General MIDI is a set of recommendations...

Page 184: ...ideally suited to each style when it starts playing the automatic accompaniment p 74 Key Touch This is the sensation of heaviness the touch of the keys when the keyboard is played The KF 90 100 level...

Page 185: ...instruments or effect sounds stored in the internal memory of the KF 90 The display shows TONE Tuning Curves Graphic representations of the changes in pitch of the equally tempered tuning versus thos...

Page 186: ...v 64 15 113 x x O O O O O O O O O O O O O O O O O O O O O O O O O O O O O O Reverb O Chorus O O O 0 127 O x x x O O x x x x O x 1 16 1 16 Mode 3 Mode 3 4 M 1 O x 0 127 0 127 O O O O 0 127 O x x x O O...

Page 187: ...yle Orchestrator Music Style Disk 36 styles Programmable Music Styles Style Converter Style Composer Melody Intelligence 24 types User Programs Internal 36 Disk Max 99 sets Control Start Stop Intro En...

Page 188: ...tor Tone Navigator Composer Navigator Piano Master Score Audition Panel Lock Connectors Output jacks L Mono R Input jacks L Mono R Microphone jack Headphone jack stereo MIDI In connector MIDI Out conn...

Page 189: ...Delete 127 Songs 113 User Program 141 User Style 138 Demo 22 Disk drive 39 Divisions 67 134 Drum Set 58 Drum Sounds 58 Dynamic Range 145 E Echo 44 Edit 124 Effect Sounds SFX 59 Effects 43 62 Ending 67...

Page 190: ...Recording 116 Reset 75 84 Resonance 144 Reverb Effect 59 151 Rhythm Pattern 73 108 Root Note 68 Rotary Slow Fast 148 S Save 111 Save As SMF 112 Songs 109 User Programs 140 User Style 137 Score 84 149...

Page 191: ...191 MEMO...

Page 192: ...192 MEMO...

Page 193: ...lts supplied with KF 90 Important Notes on Combining the KF 90 and FPS 9 If the long knobbed bolts are mistakenly used for the holes at the front it will be impossible to tighten the bolts properly Be...

Page 194: ...17 Diagorou Street Nicosia CYPRUS TEL 02 66 9426 DENMARK Roland Scandinavia A S Nordhavnsvej 7 Postbox 880 DK 2100 Copenhagen DENMARK TEL 039 16 6200 FRANCE Roland France SA 4 Rue Paul Henri SPAAK Pa...

Page 195: ...t off and on the user is encouraged to try to correct the interference by one or more of the following measures Reorient or relocate the receiving antenna Increase the separation between the equipment...

Page 196: ...KF 90 Owner s Manual 02123634 02 7 C2 61N This owner s manual is printed on recycled paper...

Reviews: