background image

Connecting an External MIDI Device

93

In

tr

oduc

tion

Pla

ying S

ounds

Editing S

ounds

O

ther C

on

venien

t  

Func
tions

Connec

ting O

ther 

Equipmen

t

A

ppendix

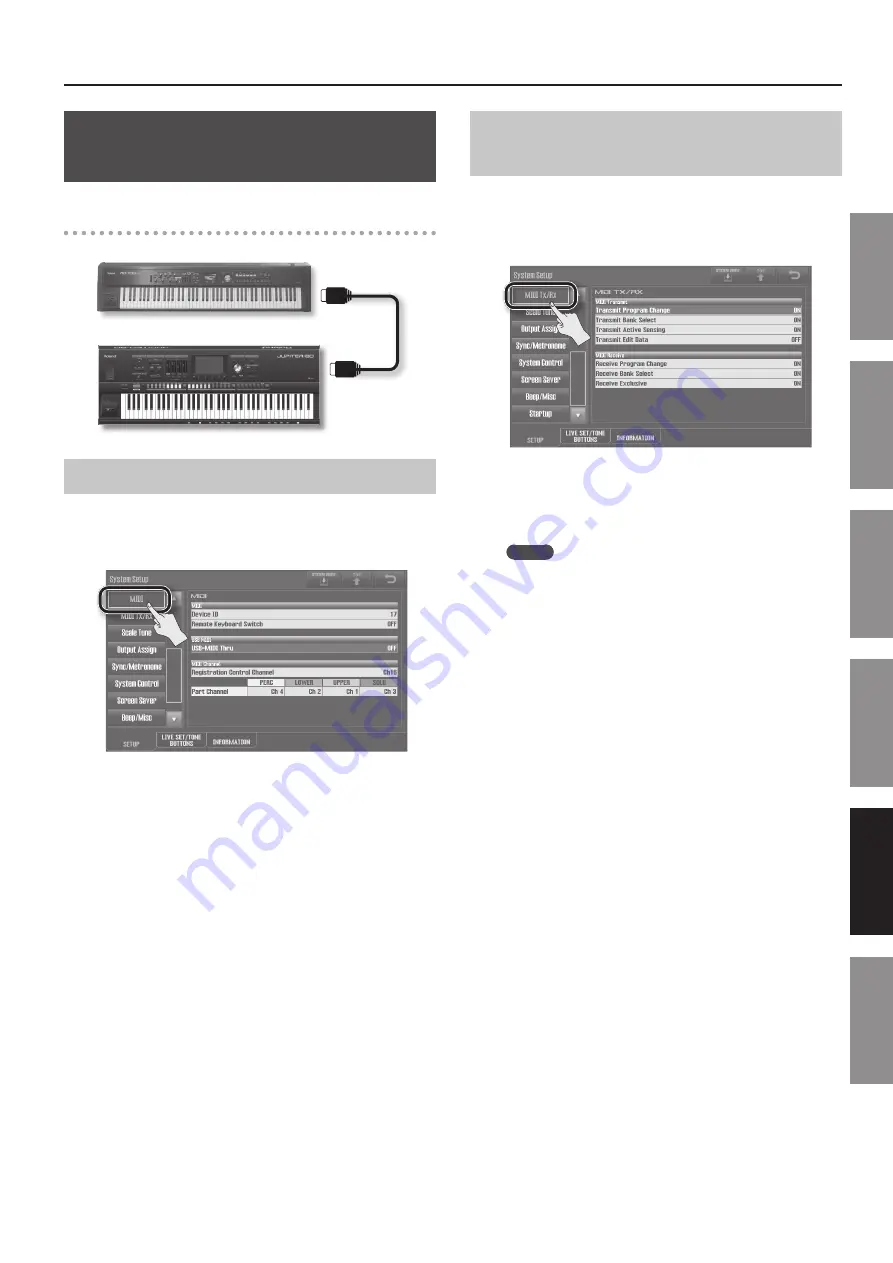
Playing the JUPITER-80 from an 

External MIDI Device

Connection example

MIDI OUT connector

MIDI IN connector

MIDI keyboard

JUPITER-80

Setting the Receive Channel

You’ll need to match your external MIDI device’s transmit channel 

with the JUPITER-80’s receive channel.

1. 

In the System Setup screen, touch <MIDI> (p . 85) .

2. 

In Part Channel, specify the MIDI channel of each Part .

3. 

To save the settings, touch <SYSTEM WRITE> .

Setting the Program Change Receive 

Switch

Here’s how to turn on the receive switch for program change and 

bank select messages. With the factory settings, both are turned 

“ON.”

1. 

In the System Setup screen, touch <MIDI Tx/Rx> (p . 85) .

2. 

Turn on Receive Program Change and Receive Bank 

Select .

3. 

To save the settings, touch <SYSTEM WRITE> .

MEMO

•  For details on these settings, refer to “MIDI Tx/Rx” (p. 85).
•  For details on how to set the transmit channel of your external 

MIDI device, refer to its owner’s manual.

Summary of Contents for Jupiter-80

Page 1: ......

Page 2: ...vided plug does not fit into your outlet consult an electrician for replacement of the obsolete outlet WARNING IMPORTANT As the colours of the wires in the mains lead of this apparatus may not correspond with the coloured markings identifying the terminals in your plug proceed as follows The wire which is coloured GREEN AND YELLOW must be connected to the terminal in the plug which is marked by th...

Page 3: ...ONS Owner s Manual p 2 USING THE UNIT SAFELY Owner s Manual p 4 and IMPORTANT NOTES Owner s Manual p 5 These sections provide important information concerning the proper operation of the unit Additionally in order to feel assured that you have gained a good grasp of every feature provided by your new unit Owner s Manual should be read in its entirety The manual should be saved and kept on hand as ...

Page 4: ...in stable If not using a stand you still need to make sure that any location you choose for placing the unit provides a level surface that will properly support the unit and keep it from wobbling WARNING The unit should be connected to a power supply only of the type described as marked on the rear side of unit Use only the attached power supply cord Also the supplied power cord must not be used w...

Page 5: ...it has been completely disconnected from the source of power If you need to turn off the power completely first turn off the POWER switch then unplug the power cord from the power outlet For this reason the outlet into which you choose to connect the power cord s plug should be one that is within easy reach and readily accessible Placement Using the unit near power amplifiers or other equipment co...

Page 6: ...ty USB flash drives are constructed using precision components handle the cards carefully paying particular note to the following To prevent damage to the cards from static electricity be sure to discharge any static electricity from your own body before handling the cards Do not touch or allow metal to come into contact with the contact portion of the cards Do not bend drop or subject cards to st...

Page 7: ...Sets or the Solo Part s Tone 36 Instantly Switching the Variation Sounds Alternate Button 37 Turning Each Part On Off and Adjusting its Volume 37 Playing Drum Sounds and Sound Effects Percussion 38 Playing Percussion Sounds and Voice Phrases Manual Percussion 38 Playing Drum Sounds on the Entire Keyboard Drums SFX 38 Switching the Sounds Played by Manual Percussion or Drums SFX 38 Split Performanc...

Page 8: ...dio Rec Standby Screen 77 Recording 77 Audio Signal Flow 78 Using the Included USB Memory Protector 78 Settings and Convenient Functions 79 Backing Up All Settings to a USB Flash Drive 79 Restoring Backed up Settings from a USB Flash Drive 80 Backing Up USB Flash Drive Data to a Computer 80 Restoring Backed up Data from a Computer to a USB Flash Drive 80 Initializing a USB Flash Drive Format 81 Di...

Page 9: ...Introduction Playing Sounds Editing Sounds Other Convenient Functions Connecting Other Equipment Appendix Introduction ...

Page 10: ...w the sound of each individual instrument responds to the performer s playing While previous physical modeling sound generators model the structure of an instrument such as the shape of its resonator the length of the tube and the material of the vibrating parts Behavior Modeling Technology additionally models the response and movement of each specific instrument as it reacts to performance techni...

Page 11: ...f four tones in the Live Set you can easily generate powerful sonic transformations that were impossible on previous synthesizers p 61 Controllers Optimized for Live Performance A color coded panel layout and full color TFT touch screen pressure sensitive ensure that the status of the sound is instantly comprehensible Dedicated buttons are provided for instant access to the functions you need guar...

Page 12: ...ucts SuperNATURAL Synth Tones can be combined as elements in a Live Set and can also be edited in detail for each tone and saved Since a single Synth Tone contains three sets of oscillator filter amp and LFO it packs a formidable amount of synthesis power The oscillator contains not only analog waveforms but also PCM waveforms and you can use the graphic screen to edit them intuitively creating a ...

Page 13: ...OSC provides not only the waveforms of a standard analog synthesizer but also PCM waveforms You can save 2 048 tones you ve edited p 68 These tones can be assigned to the Live Set Upper Part Lower Part Solo Part and Percussion Part Manual Percussion These produce the sounds of percussion instruments or sound effects A wide variety of percussion instruments and sound effects will be heard depending...

Page 14: ...t increase or decrease the values of the Tones they do not directly modify the Tones themselves This means that even if the same tone is used in other Live Sets the other Live Sets will not be affected by your editing Parts The JUPITER 80 has four parts Solo Upper Lower and Percussion You can assign a Tone or Live Set to each Part and play it Solo Upper Lower Percussion You can play all Parts from...

Page 15: ...of these settings at once except for the system parameters Solo Part Tone Lower Part Live Set Registration Percussion Part Tone Upper Part Live Set Reverb Comp Comp Equalizer Equalizer Delay Delay Harmony Intelligence Arpeggio Audio data flow Performance data flow How Registrations are Organized Registrations are managed in banks of eight In turn these banks are managed as sets of four banks Since...

Page 16: ...he settings in the temporary area When you edit sounds you re editing the data that s in the temporary area Settings in the temporary area are temporary they will be lost when you turn off the power or select other settings If you want to keep the settings of the temporary area you must save them to rewritable memory MEMO When you import an SMF Standard MIDI File as a user arpeggio style p 45 the ...

Page 17: ...kHz 48 kHz 96 kHz Bit 8 16 24 bit MEMO Use only single byte alphanumeric characters in file names and folder names Audio files that will be saved WAV Sampling Frequency 44 1kHz Bit Rate 16 bit Data Saved in USB Flash Drive A USB flash drive can hold audio files MIDI files that you want to import as user arpeggio styles and the JUPITER 80 s internal memory data that you ve backed up USB Flash Drive...

Page 18: ... off p 46 TRANSPOSE button By holding down the TRANSPOSE button and using the buttons you can transpose the keyboard in semitone steps p 50 OCTAVE DOWN button Lowers the key range in steps of one octave p 50 OCTAVE UP button Raises the key range in steps of one octave 5 PART BALANCE LEVEL slider Adjust the volume of each Part or the volume of each layer in the Live Set For a SuperNATURAL Synth Ton...

Page 19: ...s the audio file while you hold down the button button Stops audio file playback or recording button Plays back the audio file 10 ROTARY SOUND ROTARY SOUND ON OFF button Turns on off the rotary effect assigned to the MFX of the Live Set p 49 ROTARY SOUND SLOW FAST button Switches the speaker rotation speed between Slow and Fast 11 Selecting tones for Parts PERCUSSION Tone button Select the Tone fo...

Page 20: ...pped with a digital input Hold jack Here you can connect a pedal switch such as one from the DP series sold separately and use it as a Hold pedal p 48 CTRL 1 CTRL 2 jacks Here you can connect an expression pedal EV 5 sold separately and use it to control various parameters or functions p 48 Use only the specified expression pedal EV 5 sold separately By connecting any other expression pedals you r...

Page 21: ...udio signals Connect them to your mixer PHONES jack You can connect a set of headphones sold separately here 1 GND 2 HOT 3 COLD 1 GND 2 HOT 3 COLD TIP HOT RING COLD SLEEVE GND 1 GND 2 HOT 3 COLD 1 GND 2 HOT 3 COLD TIP HOT RING COLD SLEEVE GND This instrument is equipped with balanced XLR TRS type jacks Wiring diagrams for these jacks are shown below Make connections after first checking the wiring...

Page 22: ...e front of the stand Adjust so that the height does not exceed 1 meter Adjust the stand to a level no higher than the fourth level from the bottom Adjust the width of the stand so that the rubber feet of the JUPITER 80 straddle the stand Top view KS G8 Align the front of the JUPITER 80 with the front of the stand Top view Place the JUPITER 80 so that it s rubber feet are in the inner side of the s...

Page 23: ...n off p 5 However this is normal and does not indicate a malfunction 1 Minimize the volume of the JUPITER 80 and your speakers 2 On the JUPITER 80 s rear panel turn the POWER switch ON This unit is equipped with a protection circuit A brief interval a few seconds after power up is required before the unit will operate normally 3 Turn on the power of your speakers 4 Use the VOLUME knob to adjust th...

Page 24: ...e value of the selected parameter is highlighted in blue and the knob or slider is indicated by a green frame Touch panel To move the cursor simply touch a parameter value knob or slider Cursor highlighted blue Cursor green frame Cursor buttons You can move the cursor by pressing the cursor buttons If you hold down a cursor button the cursor will continue moving If you hold down the cursor button ...

Page 25: ...e value will increase or decrease continuously To rapidly increase the value hold down the INC button and press the DEC button Conversely to rapidly decrease the value hold down the DEC button and press the INC button If you hold down the SHIFT button and press the INC button or DEC button the value will change in larger steps Touch panel When you touch the field highlighted by the cursor a list o...

Page 26: ...screen p 52 If you turn an E1 E4 knob while touching the selected knob or slider i e the one enclosed by the green frame in the screen the parameter you touched will be assigned to the knob you turned Now you can edit the value by turning the E1 E4 knob The parameters assigned to the E1 E4 knobs are indicated by icons E1 E4 This operation is available in the following screens Registration Part scr...

Page 27: ...e Live Set p 62 Saves the Tone p 68 Saves the system settings p 83 Tempo Accesses the tempo setting screen p 43 Utility Displays a context sensitive menu for each screen Tab Switch between edit screens Scroll bar Scroll buttons Drag this up or down to scroll the list By pressing the scroll buttons located at the top and bottom of the scroll bar you can scroll by one item at a time Cancel Select Ca...

Page 28: ...mmon screen of the Lower Part p 56 SHIFT LOWER WOOD WINDS Accesses the Live Set Layer screen of the Lower Part p 56 SHIFT LOWER OTHER Accesses the Live Set Effects Routing screen of the Lower Part p 56 SHIFT UPPER PIANO Accesses the Synth Tone Edit screen for layer 1 of the Live Set assigned to the Upper Part p 60 SHIFT UPPER E PIANO Accesses the Synth Tone Edit screen for layer 2 of the Live Set ...

Page 29: ... Reset Resets the JUPITER 80 to its factory settings p 87 MEMO You can also use the value dial or cursor buttons to select an icon in the menu screen and press the ENTER button to select it Assigning a Name The JUPITER 80 lets you assign names to the following items Registration Live set SuperNATURAL Synth Tone User arpeggio style Song Regardless of what you re naming the procedure is the same Shi...

Page 30: ...ot always match what appears in the manual Registration screen This is the main screen that appears when you turn on the power It shows the name of the currently selected Registration the sound and volume of each Part and the split status 2 Live Set List screen p 36 3 Tone List screen p 36 Select the Live Sets for the Upper and Lower Parts Select the Tone for the Solo Part 4 Tone List screen p 38 ...

Page 31: ...f each Part 8 Registration PERC Part screen p 52 9 Registration SOLO Part screen p 52 Edit the settings of the Percussion Part Edit the settings of the Solo Part 10 Registration Common Control screen 11 Registration Effects Routing screen Make overall settings for the Registration p 52 Edit the effect settings for the Registration p 52 12 Registration External Part screen p 91 Edit Part settings f...

Page 32: ...9 Select the Tone for each layer Edit the effect settings for the Live Set 15 Live SetTone Modify screen p 56 16 Live Set Layer screen p 56 Edit the sound of each layer Edit the settings of each layer 17 Live Set List screen p 36 18 Live Set Common screen p 56 Select a Live Set Make overall settings for the Live Set p 30 p 34 p 61 p 34 p 61 p 34 p 61 p 34 p 61 p 34 1 24 24 21 24 24 5 ...

Page 33: ...he effect settings for the Live Set 19 Live Set MFX screen p 59 20 Live Set Reverb screen p 59 Edit the reverb parameters of the Live Set 24 p 34 p 61 14 SynthTone Edit OSC FILTER AMP screen Edit the oscillator filter and amp settings of the SuperNATURAL Synth Tone 22 LFO screen p 66 23 Pro Edit screen p 66 Edit the Tone s LFO settings Make detailed settings for the Tone 21 ...

Page 34: ... to access the MENU screen From here you can access the JUPITER 80 s settings and numerous functions p 29 Song screen Press the SONG button to access the Song screen Here you can operate the USB song player recorder p 72 Visual Control screen The Visual Control screen will appear when you press the VISUAL CONTROL button Here you can use the JUPITER 80 to control video equipment that supports Visua...

Page 35: ...Introduction Playing Sounds Editing Sounds Other Convenient Functions Connecting Other Equipment Appendix Playing Sounds ...

Page 36: ...art Upper The sound of the Upper Part will change For example if you press the UPPER PIANO button the Upper Part will switch to a piano sound 2 If you press the same Part sound button once again you ll be able to choose sounds from a list Select a sound category Select a sound Confirm your selection 1 2 3 MEMO You can use the same procedure to select a Tone for the Solo Part REFERENCE For details ...

Page 37: ...ments such as trumpet SAX Sax Sax FLUTE Flute Flute OBOE Wind Woodwinds such as oboe BELL Bell Bell OTHER All Categories All sounds The SuperNATURAL Acoustic Tone 0028 TW Organ cannot be selected MEMO The sound that is selected when you press a sound button is determined by the LIVE SET TONE BUTTONS p 87 Instantly Switching theVariation Sounds Alternate Button By pressing the ALTERNATE button you ...

Page 38: ...he Manual Percussion function will turn off the button will be unlit Playing Drum Sounds on the Entire Keyboard Drums SFX You can use the entire keyboard to play various drum and sound effects SFX This function is called Drums SFX 1 Press the DRUMS SFX button The Drums SFX function will turn on the button will be lit Play the keyboard each key will play a different drum sound or sound effect MEMO ...

Page 39: ...lo Part and keys to the left will play the sound of the Upper Part The Solo Split Point key itself C6 is the lowest key of the Solo Part it is included in the Solo Part MEMO You can change the Lower Split Point and the Solo Split Point p 40 The split settings are saved in the Registration For more about split for the Percussion Part refer to How Split and Parts are Related p 40 Turning Split On 1 ...

Page 40: ...or Solo Split Point at which the keyboard is divided when Split or Solo Split are on The Lower Split Point is the top key of the Lower Part you can specify it in the range of E1 F 7 The Solo Split Point is the bottom key of the Solo Part you can specify it in the range of F1 G7 1 Hold down the SPLIT button or SOLO SPLIT button and press the key that you want to specify as the split point Hold down...

Page 41: ... the cursor to the Registration name and using the value dial or the DEC INC buttons You can use the Registration Lock function p 81 to lock the Registration buttons so that the settings will not be changed inadvertently Switching Banks Each bank contains 8 Registrations There are 4 banks A D meaning that 8 Registrations x 4 banks 32 Registrations are available Here s how to select other Registrat...

Page 42: ...V button switches to the previous Registration Set The display indicates the Registration Set that s selected Registration Set MEMO If Registration Next Prev Button p 86 is set to REGISTRATION you can also switch Registration Sets by holding down the SHIFT button and pressing the PREV button or NEXT button You can use the Registration Exchange function p 82 to swap entire sets of Registrations Swi...

Page 43: ...EMO You can set the tempo by pressing the TEMPO button or touching Tap Tempo at the desired timing Tap Tempo Press or touch three times or more at quarter note intervals of the desired tempo 3 Touch Close Holding the Arpeggio HOLD The Hold function allows you to have the arpeggio continue even after you release your fingers from the keyboard 1 Press the HOLD button Hold will turn on the button wil...

Page 44: ...n downward repeatedly between the lowest and highest notes you played Play two notes the lowest and highest desired notes CHORD All of the notes you play will sound simultaneously AUTO1 The timing at which each note will sound is assigned automatically starting at the lowest note you play AUTO2 The timing at which each note will sound is assigned automatically starting at the highest note you play...

Page 45: ...select U001 U128 as the Style number SMF IMPORT will not be available to touch 4 Select the SMF that you want to import and then touch IMPORT Select the SMF 1 Confirm your selection 2 5 Assign a name to the arpeggio style For details on how to assign a name refer to Assigning a Name p 29 6 Touch OK The screen will ask Are you sure 7 Touch OK The SMF will be imported into the style number you speci...

Page 46: ...rgan sounds will be produced BIG BAND Harmony typical of big band jazz will be produced This is appropriate for brass sounds STRINGS Harmony typical of a string ensemble will be produced This is appropriate for string sounds BLOCK Block chord harmony will be produced This is appropriate for piano or mallet sounds HYMN Harmony appropriate for hymns will be produced This is appropriate for choir sou...

Page 47: ...eam controller No effect will be obtained if you position your hand outside the effective range NOTE The effective range of the D Beam controller will change depending on the lighting conditions If the D Beam controller does not work as you expect readjust the sensitivity For details on readjust the sensitivity refer to D Beam Sens p 84 Changing the Pitch ApplyingVibrato Pitch Bend Modulation Leve...

Page 48: ... connected to the rear panel CTRL 1 or CTRL 2 jack you can use the pedal to vary the volume or control a variety of functions Sustaining the Notes Hold Pedal While playing the keyboard step on the pedal switch You can hold sustain the notes by stepping on the pedal switch Adding Expression toYour Performance Control Pedal While playing the keyboard raise or lower the expression pedal You can make ...

Page 49: ... of the rotary effect will change The rotary effect can be switched between two settings SLOW and FAST ROTARY SOUND SLOW FAST button Explanation Unlit SLOW The effect produced when the rotary speaker is turning slowly Lit FAST The effect produced when the rotary speaker is turning rapidly When you switch the rotary effect from SLOW to FAST the modulation speed will increase when you switch from FA...

Page 50: ...d save the Registration If you want to change the octave setting of each layer in the Live Set edit the Octave setting in Pitch of the Live Set Layer screen p 32 and save the Live Set The octave shift function does not affect the Manual Percussion Transposing Transpose is a function that shifts the keyboard s pitch range in steps of a semitone By using this setting a transposing instrument such as...

Page 51: ...Introduction Playing Sounds Editing Sounds Other Convenient Functions Connecting Other Equipment Appendix Editing Sounds ...

Page 52: ... Beam controller S1 S2 button and E1 E4 knob assignments Arpeggiator Harmony Intelligence Control and other data sent to each Part Octave Shift Transpose etc PERC PART SOLO PART Settings for the Percussion Part or Solo Part Tone pan volume and reverb send level Keyboard range Pitch Vibrato Offset values for filter and envelope Velocity Mono poly switch Legato Voice reserve guaranteed polyphony Con...

Page 53: ...n will light and the Registration buttons will blink MEMO You can also perform a save by touching Registration screen s WRITE 2 Move the cursor to Write Destination and use the value dial or the DEC INC buttons to select the write destination Registration number MEMO You can also use the bank buttons A D and Registration buttons 1 8 to directly specify the write destination 3 Press the blinking Re...

Page 54: ...RAL Synth Tone number proceed to step 4 2 If you want to specify the Live Set number or SuperNATURAL Synth Tone number for saving touch SELECT DEST Live Set Select Destination screen will appear 3 Select the write destination Select the write destina tion for the Live Set Select the write destina tion for the SuperNATURAL Synth Tone Confirm selections and return to the previous screen 1 2 3 4 Touc...

Page 55: ...on will affect the data in the temporary area p 16 When you initialize the Registration the Live Sets and tones in the temporary area will also be initialized If you want to return the parameters of all sounds to their factory set state use Factory Reset p 87 1 In the Registration Part screen p 31 touch UTILITY Registration Utility Menu screen will appear 2 Touch Registration Initialize and then t...

Page 56: ...ettings Send levels from the Tone to reverb and from MFX to reverb etc MODIFY Offset settings for each layer For a SuperNATURAL Synth Tone For a SuperNATURAL Acoustic Tone Pitch Filter Amp LFO Modulation Portamento etc Noise level Variation etc Tips for editing a Live Set Choose which Parts will be heard A Registration consists of up to four Parts Editing will be easier if you re listening only to...

Page 57: ...the Tones in a Live Set 1 In the Live Set screen p 32 touch a tone name to view a list MEMO You can also switch tones by moving the cursor to the tone name in the Live Set screen and using the value dial or the DEC INC buttons to select a Tone The Tone List screen will appear In this example the Tone for layer 1 of the Live Sets assigned to the Upper Part is changed 2 Touch the new tone and then t...

Page 58: ...i effects Each Live Set contains four MFX multi effects processors To switch the MFX access the Live Set Effects Routing screen 1 In the Live Set Effects Routing screen p 33 touch the MFX effect type to access a list Touch an effect type The MFX Type screen will appear In this example the effect type for MFX1 of the Live Set selected for the Upper Part is changed MEMO If you move the cursor to the...

Page 59: ...ent to MFX or reverb Set the level of sound sent from MFX to reverb Set the output destination and output level of the selected layer Set the output level of MFX or reverb Editing the MFX To edit MFX settings access the Live Set Effects Routing screen p 33 1 In the Live Set Effects Routing screen p 33 touch MFX s EDIT In this example we ll edit the Multi Tap Delay effect for MFX1 of the Live Set s...

Page 60: ...een p 32 touch layer s EDIT The Live Set Tone Modify screen will appear In this example layer 1 of the Live Set selected for the Upper Part is edited 2 Edit the Tone Example screen for a SuperNATURAL Acoustic Tone Example screen for a SuperNATURAL Synth Tone For details on the parameters refer to the parameter list in the PDF manual Editing aTone For SuperNATURAL Synth Tones you can go deeper to c...

Page 61: ...usted by the Tone Blender level pan cutoff resonance attack delay release MFX 1 4 send level and reverb send level 1 In the Live Set screen p 32 touch either COMMON LAYER EFFECTS or EDIT In this example the Upper Part s Live Set parameters are adjusted 2 Touch Tone Blender The Tone Blender screen will appear 3 Set the values in the lower half of the screen the destination values Specify the destin...

Page 62: ...the Registration Common Control screen p 31 touch Pedal D Beam 2 Set the D Beam Assign parameter to CC79 Tone Blender Now you can control the Tone Blender by operating the D Beam controller Saving a Live Set Edits you make to the Live Set are temporary they will be lost if you turn off the power or select another Live Set If you want to keep the edited Live Set you must save it to user memory NOTE...

Page 63: ...splay appears when you save If SuperNATURAL Synth Tone parameters have been edited the corresponding Synth Tone s will be highlighted when you save the Live Set The Tone has been edited You have the option of saving the edited SuperNATURAL Synth Tones at the same time that you save the Live Set If you want to do this proceed as follows 1 Select the Write check box for the SuperNATURAL Synth Tones ...

Page 64: ...and then perform this operation the edited SuperNATURAL Synth Tone will also be assigned to the other layers as well Initializing a Live Set Here s how to initialize the currently selected Live Set MEMO Initializing the Live Set affects the data in the temporary area p 16 When you initialize the Live Set the temporary area for the Tones will also be initialized If you want to return the parameters...

Page 65: ...ch UTILITY The Live Set Utility Menu screen will appear 2 Touch Live Set Layer Copy and then touch Select 3 As the Source specify the copy source layer As the Destination specify the copy destination layer NOTE When you copy a layer the sound of the specified Destination layer will be lost and overwritten by the sound of the specified Source layer 4 Touch Execute A message will ask Are you sure 5 ...

Page 66: ...of the Synth Tone itself and it will be easier to discern the results of your editing p 59 1 As described in Changing a Live Set s Tones p 57 select the SuperNATURAL Synth Tone that you want to edit 2 In the Live Set screen p 32 touch EDIT for the layer to which the selected Synth Tone is assigned The Live Set Tone Modify screen will appear In this example the SuperNATURAL Synth Tone that s select...

Page 67: ...Partials by holding down the SHIFT button and touching Partial SELECT When the Synth Tone Edit screen is displayed you can use the PART BALANCE area of the panel to turn the three Partials on off and adjust their volume Turns each Partial on off Controls the AMP level of each Partial The AMP level of each Partial is shown by the level meter By holding down the SHIFT button and pressing the PART PE...

Page 68: ...Destination MEMO You can also change the write destination by moving the cursor to Write Destination and using the value dial or the DEC INC buttons 3 Touch the save destination SuperNATURAL Synth Tone number and then touch Select 4 Touch WRITE A message will ask Are you sure 5 To save the Tone touch OK A message will indicate Completed The Synth Tone has been saved in the save destination SuperNA...

Page 69: ...Select A message will ask Are you sure 4 To initialize touch OK MEMO By holding down the SHIFT button and touching a knob or slider you can return that parameter to the default value the message Reset Value will appear Copying a Partial Here s how to copy the Partial settings from a SuperNATURAL Synth Tone to the specified Partial of the currently selected SuperNATURAL Synth Tone 1 In the Synth To...

Page 70: ...70 MEMO ...

Page 71: ...Introduction Playing Sounds Editing Sounds Other Convenient Functions Connecting Other Equipment Appendix Other Convenient Functions ...

Page 72: ... 74 Turn center cancel on off and make settings for it p 73 Set the playback speed and pitch p 73 Indicates the current time of the audio file Playback Here s how to play back audio files saved on the USB flash drive 1 Press the SONG button The Song screen will appear A list of the audio files on the USB flash drive will appear MEMO If the file name or folder name contains double byte characters e...

Page 73: ...rthePlay Pitch Parameter Value Explanation Play Speed 75 125 Changes the speed of playback Play Pitch 30 170 Changes the pitch of playback Adjusting the Balance of Frequency Ranges Equalizer The USB memory song player provides a four band equalizer You can apply an equalizer to the audio file playback and to the sound being input via the AUDIO IN jack 1 In the MENU screen p 34 touch System 2 Touch...

Page 74: ...yback will turn off the button will go out MEMO You can t play back a loop of a specified time if chain play is on Playing Audio Files Consecutively Chain Play Here s how the audio files in the same folder can be played consecutively 1 In the Song screen p 34 touch Chain Play Chain play will turn on the button will light 2 Press the PLAY button The audio files will begin playing When a song ends p...

Page 75: ...Here s how to delete an unwanted audio file or folder NOTE There is no way to recover a deleted audio file or folder MEMO You can t delete a folder that contains files Before you can delete a folder you must delete all the files within that folder 1 First select the audio file or folder that you want to delete p 72 2 In the Song screen p 34 touch UTILITY The Song Utility Menu screen will appear 3 ...

Page 76: ...lder and then touch Select The Move Folder Select screen will appear 4 Select the move destination folder and touch it or press the ENTER buttontoviewthecontentsofthefolder p 72 MEMO As the destination of the move you cannot specify a sub folder folder 2 of the folder you re moving folder 1 Folder 1 Folder 3 Folder 2 Root folder OK OK 5 Touch Execute The message Are you sure will appear 6 To execu...

Page 77: ...recording will be saved Recording Folder Recording File Indicates the name of the folder and file in which the recorded result will be saved Recording Your keyboard performance can be recorded to a USB flash drive The audio being input via the JUPITER 80 s AUDIO IN jack and USB COMPUTER connector can also be recorded MEMO Sounds for which the Output Assign MAIN OUT check box is selected p 86 will ...

Page 78: ...sh drive connected to the JUPITER 80 NOTE You must use the included screws You must use the included Allen wrench to tighten or remove the screws Using a tool that does not match the screw heads will damage them Be careful not to over tighten the screws Doing so may damage the screw s head causing the wrench to rotate uselessly To tighten the screws turn the Allen wrench clockwise To loosen the sc...

Page 79: ...can back up all of settings in the JUPITER 80 to a USB flash drive sold separately or restore those settings into the JUPITER 80 s memory MEMO One set of backup data can be saved on a USB flash drive NOTE When you execute the backup operation the backup data that is currently saved on the USB flash drive will be overwritten If you want to keep the backup data that s on the USB flash drive copy it ...

Page 80: ...OTE You must copy the entire ROLAND folder The data will not be backed up correctly if you copy only part of the files in the ROLAND folder 5 When the copy is completed unmount eject the USB flash drive from your computer and then disconnect it from the computer Windows 7 WindowsVista Windows XP users In My Computer or Computer right click the removable disk icon and choose Eject Mac OS X users Dr...

Page 81: ... formatted Disabling the Registration Buttons The JUPITER 80 s settings will change if you press a Registration button unintentionally or switch Registration Sets Use the Registration Button Lock function if you don t want the Registration buttons to switch Registrations while you perform 1 In the MENU screen p 34 touch Regist Button Lock The Registration Button Lock screen will appear 2 Touch LOC...

Page 82: ...n exchanged the message Exchange Completed will appear NOTE Never turn off the power while a Registration Set is being exchanged Calibrating theTouch Panel Perform this calibration if the touch panel does not operate as you expect 1 In the MENU screen p 34 touch Touch Screen Calibration The Touch Screen Calibration screen will appear 2 Touch the center of the symbol indicated by the symbol Touch t...

Page 83: ... FOOT PEDAL CTRL 1 and 2 jacks will be determined by the system settings SYSTEM or by the Registration Settings REGISTRATION Control Pedal 1 Assign Control Pedal 2 Assign Functions controlled by the pedals connected to the FOOT PEDAL CTRL 1 and 2 jacks OFF No function is assigned CC01 31 32 OFF 33 95 Controller number 1 95 AFTERTOUCH Aftertouch BEND UP The same effect as moving the pitch bend leve...

Page 84: ...ply aftertouch Normally you can leave this set at 100 Sound Parameter Value Explanation Sound Local Switch OFF ON Specifies whether the controller section keyboard pitch bend modulation lever S1 S2 buttons D Beam controller pedals etc will be connected to the internal sound generator Normally this should be left at ON Turn it OFF if you want to use the JUPITER 80 s controllers only to control an e...

Page 85: ... external MIDI device Turn this OFF if you don t want to switch Registrations from a connected MIDI device Part Channel 1 16 Specifies the MIDI receive channel that will play each of the JUPITER 80 s Parts PREC LOWER UPPER SOLO and the MIDI transmit channel on which each Part will transmit to an external MIDI device MIDITx Rx Parameter Value Explanation MIDI Transmit Transmit Program Change OFF ON...

Page 86: ...E4 Specifies the metronome type System Control Parameter Value Explanation System Control 1 4 Source Here you can specify the MIDI messages that will be used as system controls System controls 1 4 are parameters to which you can assign MIDI messages such as control change messages For example on the JUPITER 80 if you choose a system control as the MFX CONTROL Source Live Set MFX screen p 33 you ll...

Page 87: ...signed to the Lower Part sound buttons LOWER Alternate Specifies the sounds that will be assigned to the sound buttons when the Lower Part ALTERNATE button is pressed PERCUSSION Specifies the sounds that will be assigned to the Percussion Part sound buttons INFORMATION Here you can view information such as the JUPITER 80 s software version and the amount of free space available on the USB flash dr...

Page 88: ...88 MEMO ...

Page 89: ...Introduction Playing Sounds Editing Sounds Other Convenient Functions Connecting Other Equipment Appendix Connecting Other Equipment ...

Page 90: ...e application e g DAW software on your computer when the JUPITER 80 is connected via USB to your computer The USB driver sends data from your application to the JUPITER 80 and data from the JUPITER 80 to your application USB audio Settings for JUPITER 80 computer If the JUPITER 80 is connected via a USB cable to your computer the same sound as from the JUPITER 80 s MAIN OUT can be recorded into yo...

Page 91: ...DI messages to an external MIDI device Use it when you want to control an external MIDI device MIDITHRU connector MIDI messages received at MIDI IN are re transmitted without change from this connector to an external MIDI device Use this in situations such as when you use multiple MIDI devices simultaneously Using the JUPITER 80 as a Master Keyboard External Part Settings You can connect external ...

Page 92: ... data of the External Part will be transmitted MSB 0 127 Not transmitted for Parts whose KBD is off Specifies the MSB controller number 0 of the bank select number transmitted when you switch Registrations Choose if you don t want this to be transmitted LSB 0 127 Not transmitted for Parts whose KBD is off Specifies the LSB controller number 32 of the bank select number transmitted when you switch ...

Page 93: ...System Setup screen touch MIDI p 85 2 In Part Channel specify the MIDI channel of each Part 3 To save the settings touch SYSTEM WRITE Setting the Program Change Receive Switch Here s how to turn on the receive switch for program change and bank select messages With the factory settings both are turned ON 1 In the System Setup screen touch MIDI Tx Rx p 85 2 Turn on Receive Program Change and Receiv...

Page 94: ...external MIDI device Connection example MIDI OUT connector MIDI OUT connector MIDI IN connector MIDI IN connector MIDI device JUPITER 80 1 In the System Setup screen touch Sync Metronome p 86 2 Set the Sync Mode Sync Out and Sync Source For details on each parameter refer to Sync Metronome p 86 3 To save the settings touch SYSTEM WRITE ...

Page 95: ... can be connected to electronic musical instruments via their MIDI ports making it easy to enjoy a variety of visual effects that are linked with the performance MEMO You ll need a MIDI cable sold separately to connect the JUPITER 80 to your Visual Control compatible device Connection example Use a MIDI cable to connect the JUPITER 80 s MIDI OUT connector p 20 to the Visual Control compatible devi...

Page 96: ...r value and maximum value respectively Dissolve Time Ctrl OFF CC01 CC31 CC64 CC95 Bender Ch Aftertouch Specifies the controller used to control the dissolve time video switching time Effect Ctrl 1 OFF CC01 CC31 CC64 CC95 Bender Ch Aftertouch Specifies the controller used to control the video effect Effect Ctrl 2 Effect Ctrl 3 Keyboard Range Lower E1 G7 Specifies the range of keys that will switch ...

Page 97: ...Introduction Playing Sounds Editing Sounds Other Convenient Functions Connecting Other Equipment Appendix Appendix ...

Page 98: ...d not be processed Reduce the amount of MIDI messages that are being transmitted MIDI Offline The MIDI IN connection was broken Check that there is no problem with the MIDI cable connected to the JUPITER 80 s MIDI IN and that the MIDI cable was not disconnected Permission Denied The operation could not be performed because the read only attribute is set for the folder or file Use your computer to ...

Page 99: ... buttons p 37 p 58 No sound from a specific range of keys Could a key range be set If you don t hear sound from a specific range of keys check the key range settings p 39 Sound is distorted Could you be applying an effect that intentionally distorts the sound If the sound of a specific Part or Live Set layer is distorted lower the volume for that Part or Live Set layer p 37 p 58 Could the VOLUME k...

Page 100: ...ayer sounds wrong Could Center Cancel be ON Turn off the center cancel function p 73 Noise and distortion is heard in the recorded sound Was the input sensitivity appropriate If the input sensitivity is too high the recorded sound will be distorted if the input sensitivity is too low the recorded sound will be buried in noise Raise the Recording Level knob as high as possible without causing the l...

Page 101: ...cts are used Others Arpeggiator Preset 128 styles User 128 styles Harmony Intelligence 17 types Controllers D Beam Controller Pitch Bend Modulation Lever Assignable buttons S1 S2 Assignable knobs E1 E4 PART LEVEL sliders PERC LOWER UPPER SOLO Display Graphic Color LCD 800 x 480 dots touch screen Connectors PHONES jack stereo 1 4 inch phone type MAIN OUT jacks L R XLR type MAIN OUT jacks L MONO R 1...

Page 102: ...o o o o o o o o o o o o o Tone Variation 1 o Tone Variation 2 o Tone Variation 3 o Tone Variation 4 o o Reverb x Chorus o x x o x 1 1 1 1 1 1 1 1 1 1 1 1 1 1 1 1 1 1 1 1 1 1 1 1 Bank select Modulation Breath type Foot type Portamento time Data entry Volume Panpot Expression General purpose controller 1 General purpose controller 2 General purpose controller 3 General purpose controller 4 Hold 1 Po...

Page 103: ...rpeggio 45 INC button 19 25 Incorrect File 98 Incorrect File Name 98 INFORMATION 87 Initializing Live Set 64 Partial 69 Registration 55 SuperNATURAL Synth Tone 69 USB Flash Drive 81 K KBD 92 Keyboard 84 KEYBOARD 77 Keyboard Range 96 Keyboard Velocity 84 Key Lo Key Up 92 Key Ranges 39 KS 18Z KS G8 22 L LAYER 56 61 Layer On Off 58 Level 73 85 92 LEVEL slider 18 LFO screen 33 Live Set 11 12 14 Editin...

Page 104: ...ration 86 SUB OUT jacks 21 SuperNATURAL 10 Acoustic Tone 10 13 Initializing a Synth Tone 69 Synth Tone 10 13 SuperNATURAL Synth Tone Not Selected 98 Synchronizing with an External MIDI Device 94 Sync Metronome 86 Sync Mode 86 Sync Output 86 Synth Edit 66 Synth Tone Editing 60 66 Saving 68 Synth Tone Edit screen 33 System 73 83 System Parameters 83 Restoring the Factory Settings 87 Saving 83 Settin...

Page 105: ...e Instrumentos Musicales J E Olear y ESQ Manduvira Asuncion PARAGUAY TEL 595 21 492147 PERU Audionet Distribuciones Musicales SAC Juan Fanning 530 Miraflores Lima PERU TEL 511 4461388 TRINIDAD AMR Ltd Ground Floor Maritime Plaza Barataria TRINIDAD W I TEL 868 638 6385 URUGUAY Todo Musica S A Francisco Acuna de Figueroa 1771 C P 11 800 Montevideo URUGUAY TEL 02 924 2335 VENEZUELA Instrumentos Music...

Page 106: ...106 For EU Countries For China ...

Page 107: ...off and on the user is encouraged to try to correct the interference by one or more of the following measures Reorient or relocate the receiving antenna Increase the separation between the equipment and receiver Connect the equipment into an outlet on a circuit different from that to which the receiver is connected Consult the dealer or an experienced radio TV technician for help This device compl...

Page 108: ... 5 1 0 0 0 2 0 6 8 2 0 1 ...

Reviews: