Roland DP90e Owner'S Manual Download Page 62

&

&

Assembling

*

5

1

0

0

0

2

8

3

8

0

-

0

2

*

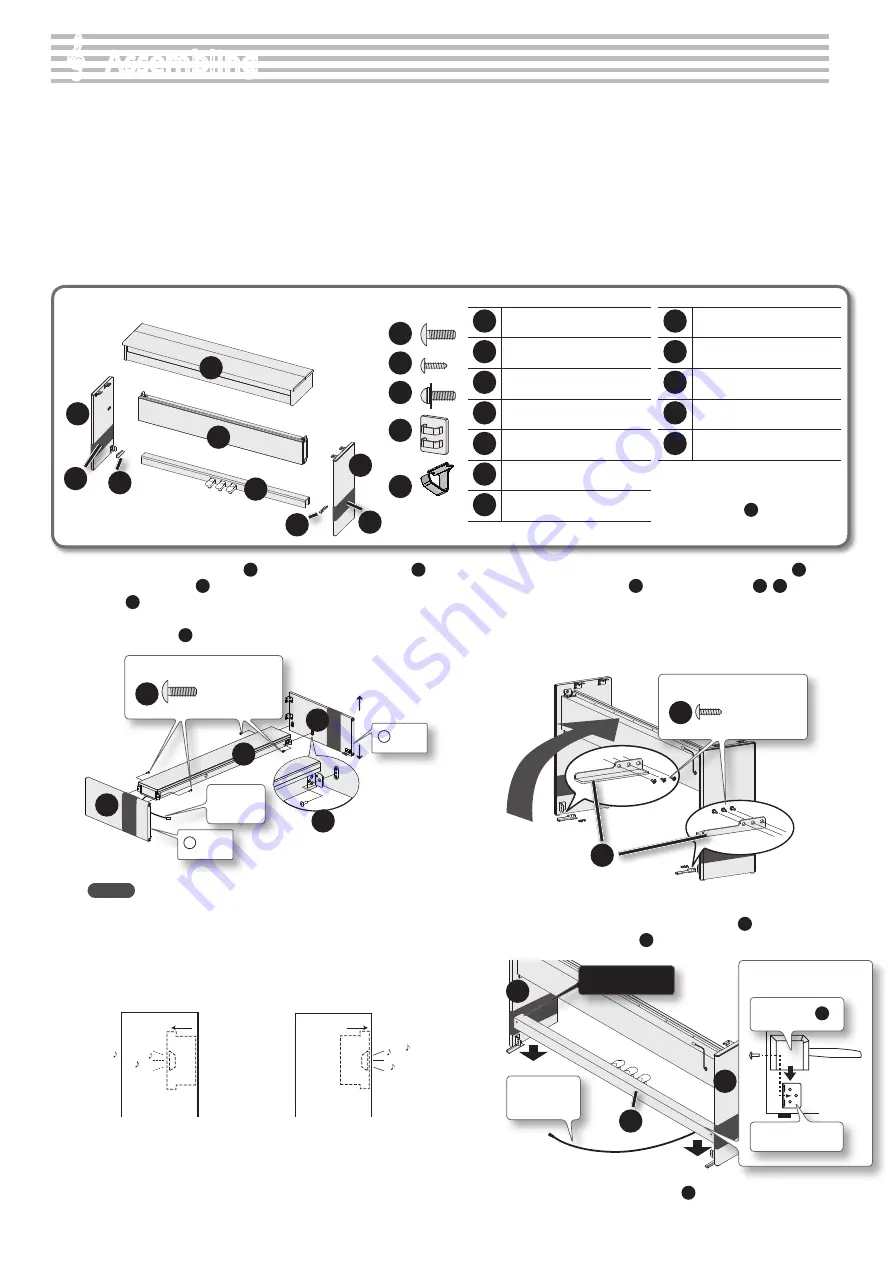
Assembling the DP90/DP90S

*  To ensure that you assemble this unit correctly, please read this manual carefully 

before you begin assembly. Keep this manual nearby for reference when needed.

*  Keep this unit horizontal when lifting it during assembly or transport.
*  Be careful not to pinch your hands or drop this unit on your foot during assembly or 

transport.

*  You must obtain the assistance of at least one additional person when assembling or 

transporting this unit.

*  Keep small parts such as screws, stabilizers, and cord clamps out of the reach of small 

children to ensure that these items are not swallowed accidentally.

*  The screwdriver needed for assembly is not included. You’ll need have a Phillips 

screwdriver on hand.

*  Hand-tighten the screws fi rst, and then tighten them fi rmly. Start by tightening the 

screws until they are approximately half hidden. Do not use a power screwdriver 

when tightening the screws to their fi nal position. Doing so may strip the threads.

*  Tighten the screws fi rmly, and place the unit at a location that is level and sure to 

remain stable. Never place the unit on a shag carpet. If you do so, the pedal may be 

unstable, causing damage.

*  Do not place the body of the piano directly on the fl oor. By doing so, you risk damag-

ing the bottom of the piano, the jacks on the bottom of the piano, and the USB case.

Copyright © 2012 ROLAND CORPORATION

All rights reserved. No part of this publication may be reproduced in any form without 

the written permission of ROLAND CORPORATION.

1

Piano main unit

2

Side board (left)

3

Side board (right)

4

Speaker box

5

Pedal board

6

Stabilizers (left/right)

7

Protective sheets

8

Screws (large): 8 pcs.

9

Screws (small): 6 pcs.

10

Screws (with washers): 2 pcs.

11

Cord clamps: 2 pcs.

12

Headphone hook

*  To prevent the side boards from 

getting scratched, do not remove the 
protective sheets 

7

 until you are 

directed to do so.

1. 

Attach the side board (left) 

2

 and the side board (right) 

3


to the speaker box 

4

, and hand-tighten four of the screws 

(large) 

8

 to fasten them provisionally (four locations) .

Attach the speaker box so that the speaker cord is on the same side as 

the left side board 

2

.

L  Mark

Speaker 

cord

2

Front

Rear

R  Mark

4

3

8

Screws (large): use four screws

8

MEMO

The speaker box can also be installed so that it faces toward the 

rear instead of toward the front. Having the speaker box face 

out the rear of the instrument allows the speakers to be directed 

toward listeners when the back of the instrument faces the 

audience.

Normal direction

Speaker box

Speaker box

Front

Front

Rear

Rear

When facing to the rear

2. 

Place the unit upright, and use the screws (small) 

9

 to 

fasten the stabilizers 

6

 to the side boards 

2

3

 (six 

locations) .

When standing the assembled unit up, grasp near the speaker box, 

and gently raise the assembly.
Take care not to attach the left and right stabilizer to the wrong sides.

Left

Right

Front

Rear

6

Screws (small): use six screws

9

3. 

Place the pedal board onto the metal fi xtures .

If you fi nd it diffi  cult to attach the pedal board 

5

, slightly loosen the 

speaker box screws (large) 

8


that you fastened provisionally in step 1.

5

2

3

Avoid scratches!

Putting the Pedal Board 

(a lateral view)

Pedal board 

5

Metal fi xtures

Extend the 

pedal cord

4. 

Remove the protective sheets 

7

 from each side board .

Check the Parts

1

2

3

7

7

4

5

6

6

8
9

10

11

12

When moving the unit

If you need to move the unit, close the keyboard cover and 

disconnect the AC adaptor. With at least one other person 

helping you, lift the unit horizontally and carry it, taking care 

not to pinch your hands or drop the unit on your feet.

5. 

Hand-tighten the screws (large) 

8

 to provisionally fasten 

the pedal board 

5

 to the side boards 

2

3

 (two locations) .

3

2

5

Screws (large): use two screws

8

6. 

Firmly tighten each of the side board screws (four locations) 

that you provisionally tightened in step 1, making sure that 

they are secure .

2

3

7. 

Step on the pedals of the pedal board 

5

, and make sure 

that the rubber feet on the bottom of the pedals are in 

contact with the fl oor . Firmly tighten the pedal board 

screws 

8

 (two locations) that you provisionally tightened 

in step 5, making sure that they are secure .

5

8. 

Align the protruding screws (one each at right and left) 

on the bottom of the piano 

1

 with the openings in the 

metal fi ttings on the side board 

2

3

, then slide the piano 

forward until the screws are held in place .

Place the keyboard so that it is centered, both front to back and left 

to right.

NOTE

Grasp the piano 

1

 in the middle at the front and rear, taking care 

not to pinch your hands.

1

Screws (large): use two screws

8

 Used in step 9.

Front

Please don’t 

get your fi ngers 

pinched

9. 

Use the screws (large) 

8

 to fasten the piano main unit 

1

 to 

the side boards 

2

3

 (one each for the right and left) .

Make sure to insert the screws 

8

 by hand and give them a few turns 

by hand before using a screwdriver to tighten them.

10. 

Connect the speaker cord extending from the rear of the 

speaker box to the piano main unit’s speaker connector .

Rear DP90/DP90S

Hold and insert the cord so that the 

clip portion extends into the stand 

and is securely connected.

Speaker connector

Clip 

portion

Speaker cord

11. 

Use screws (with washers) 

10

 to fasten the headphone hook 

12

 .

Screws (with washers): use two screws

10

12. 

Connect the AC adaptor to the DC In jack, the pedal cord to 

the Pedal jack .

Firmly plug the AC adaptor 

and the pedal cord all the way 

into the sockets.

Pedal cord

AC adaptor

13. 

Connect the supplied AC adaptor and power cord .

Place the AC adaptor so the side with the indicator faces upwards and 

the side with textual information faces downwards. The indicator will 

light when you plug the AC adaptor into an AC outlet.

To AC outlet

Power cord

14. 

As necessary, affi  x cord clamps to fasten the pedal cord .

Cord clamps

Example attachment location

62

Summary of Contents for DP90e

Page 1: ......

Page 2: ...your left and right hands You can divide the keyboard into left and right zones and select a different tone for each zone e e Play duets You can divide the keyboard into left and right halves playing...

Page 3: ...tions e e Transpose the pitch of the keyboard or song The Transpose function lets you shift the pitch of the keyboard or a song so that you can perform more conveniently e e Disable the buttons The Pa...

Page 4: ...g the Memory Format Media 41 Disabling the Buttons Panel Lock 42 About the Wireless LAN Function 43 Basic Connection Method Connect by WPS 43 Wireless LAN Function Settings 44 Status Indication 44 Con...

Page 5: ...important information concerning the proper operation of the unit Additionally in order to feel assured that you have gained a good grasp of every feature provided by your new unit Owner s Manual sho...

Page 6: ...ined page 39 TransposingYour Performance Transpose You can transpose the notes you play on the keyboard or the notes of a song you play back To turn transpose on Press the Transpose button so it s lit...

Page 7: ...n divides the keyboard into left and right zones allowing you to play a different tone in each zone To turn split on While holding down the Transpose button press the Twin Piano button To change the t...

Page 8: ...s page 22 Changing theTempo orTime Signature You can adjust the tempo of the metronome or song To change the tempo Use the Slow Fast buttons To change the time signature While holding down the Metrono...

Page 9: ...n 4 Press the button 5 Press the button of the part that you want to record making it blink 6 Press the Play Stop button to start recording 7 Press the Play Stop button to stop recording page 29 page...

Page 10: ...is connected you can use it to save or play back songs You can do the following things using a USB flash drive WAVE files or MIDI files SMF data copied from your computer can be played back by the un...

Page 11: ...63 page 63 Rear side GroundTerminal Depending on the circumstances of a particular setup you may experience a discomforting sensation or perceive that the surface feels gritty to the touch when you t...

Page 12: ...n will be using the unit adult supervision should be provided For safety be sure to close the lid before transporting the piano 1 Grasp and lift the lid with both hands Arm Arm 2 Close the blind and o...

Page 13: ...rs Volume adjustment screen when using headphones MEMO The unit is designed so that nuances in the dynamics of your playing will be clearly heard even at low volume and that the sound will remain clea...

Page 14: ...of sounds such as organ bass or accompaniment sounds If you select tone numbers 43 51 you ll be able to use the keyboard to play the sounds of a drum set or SFX If you ve selected an organ sound that...

Page 15: ...fect how the tone sounds It s not possible to layer Piano Grand and Piano Upright tones together Selecting tones for dual play Tone name Corresponding button How to select tones Tone 1 Left tone butto...

Page 16: ...s turned on the keyboard settings will be as follows Split Point Power up default F 3 Left hand Tone Right hand Tone 2 To exit Split Play hold down the Transpose button and press the Twin Piano button...

Page 17: ...the left hand section Split Point Range in which you can specify the split point B1 B6 Left hand Tone Right hand Tone 1 1 While holding down the Transpose button and Twin Piano button press the key th...

Page 18: ...using headphones and the Headphones 3D Ambience effect p 46 is set to ON this lets you adjust the depth of the Headphones 3D Ambience effect 3 To turn off the ambience effect press the Ambience butto...

Page 19: ...he keyboard feels lighter This setting makes it easy to play even for children M This sets the standard keyboard touch You can play with the most natural touch This is the closest to the touch of an a...

Page 20: ...ss the buttons The display will indicate Twin Piano mode Screen Value Explanation 1 default The sound of the right hand keyboard zone will be heard more loudly from the right speaker than from the lef...

Page 21: ...nsposed If you want to transpose only the keyboard or only the song make the appropriate setting as described in Specifying What the Transpose will Affect Transpose Mode p 47 2 1 3 1 Press the Transpo...

Page 22: ...ain The Metronome button will go out Changing theTempo 1 Press the Slow Fast buttons When you select or play back a song p 24 the tempo of the metronome will be set to that song s tempo Changing theTi...

Page 23: ...hronizeYour Performance A series of sounds rhythmically played to indicate the tempo before a song starts is called a count in If you sound a count in it will be easier for you to synchronize your own...

Page 24: ...er use the button to select Fld UP and then press the Play Stop button If one folder contains more than 500 files or folder some of the files or folders might not be displayed 4 Press the Play Stop bu...

Page 25: ...he balance between the song and your keyboard performance by changing the volume of the song 2 1 3 1 Press the Song Balance button The Song Balance button will light 2 While holding down the Song Bala...

Page 26: ...Practicing One Hand at aTime Part Mute Here s how to have only the selected part play back This allows you to practice playing the left or right hand part of a song while listening to the other hand p...

Page 27: ...ss a part button and turn off its indicator This setting lets you play a specific part at a reduced volume and use it as a guide for your playing 1 While holding down the part button press the buttons...

Page 28: ...light and playback will begin repeating 4 To cancel the repeat function press the AB Repeat button once again The AB Repeat button will go out the repeat points you specified will be cleared MEMO The...

Page 29: ...his method is convenient when you simply want to record your performance as easily as possible Getting ready to record 1 Select the tone that you want to use for performing p 14 2 Press the Rec button...

Page 30: ...t to erase the song 2 Press the Fast button to erase the song Listening to a performance you ve recorded 1 Press the Play Stop button Playback will start from the beginning of the recorded performance...

Page 31: ...g standby mode At this time New Song will be selected If you decide not to record press the Rec button once again 2 Reselect the song you saved earlier by pressing the button MEMO The song s tempo and...

Page 32: ...want to record so it s blinking Parts whose buttons are lit will play back during recording MEMO If you want to re record only a portion of the song use the Bwd button or Fwd button to move to the mea...

Page 33: ...to convert to audio p 24 3 While holding down the Rec button press the buttons to select Audio 4 Press the Rec button The Rec button will light and the Play Stop button will blink the unit will enter...

Page 34: ...he Rec button will light the Play Stop button will blink and the unit will enter recording standby mode If you decide not to record press the Rec button once again 5 If desired sound the metronome p 2...

Page 35: ...e Transpose will Affect Transpose Mode p 47 If you select a different song the audio transposition setting will be canceled 3 To cancel the transposition press the Transpose button once again The Tran...

Page 36: ...ile menu click New Playlist to create a playlist Newly created playlist 3 From the desktop or other location where you copied it drag and drop the song WAV file to add it to the playlist you created i...

Page 37: ...that unwanted song 6 Press the Fast button A screen will appear allowing you to specify a name for your song 7 Edit the name using the buttons shown in the illustration below Select the character to c...

Page 38: ...saved in song numbers shown as Empty in the song name column If you want to save the song as a new song choose a song number in which no song has been saved If you want to save your song by overwriti...

Page 39: ...mory Backup Page Ambience on off depth p 18 Brilliance on off depth p 18 Split Point p 17 Twin Piano mode p 20 Key Touch on off value p 19 Damper Resonance p 46 String Resonance p 47 Key Off Resonance...

Page 40: ...r audio files in the copy source memory will be copied 7 Press the Fast button 8 Use the buttons to select the copy destination number No song has been saved at song numbers for which Empty is shown a...

Page 41: ...USB flash drive connect the USB flash drive to the USB memory port p 10 1 While holding down the Key Touch button press the Transpose button 2 Use the Slow Fast buttons to select Format 3 Press the S...

Page 42: ...button until the following display appears Panel Lock will be activated All button operations will be disabled 2 To cancel Panel Lock once again hold down the AB Repeat button for a while Panel Lock...

Page 43: ...WPS to join the wireless network This procedure is required only the first time Once you ve joined the network this procedure will no longer be necessary What isWPS This is a standard that makes it e...

Page 44: ...cting in Ad Hoc Mode p 45 2 Press the Fast button to display the IP address Connecting to aWireless LAN Access PointThatYou Select Select AP This method lets you connect by choosing a wireless LAN acc...

Page 45: ...iPad or other wireless device that has cellular capability will be able to connect to the Internet via the cellular connection Please be aware that if you use a cellular connection for Internet connec...

Page 46: ...and cannot be transposed but is capable of beautiful sonorities MIN Just Minor The Just tunings differ from major and minor keys You can get the same effect with the minor scale as with the major scal...

Page 47: ...dard tuning curve created for the unit will be used OFF 1 2 USER USER 50 0 50 Note Vol 1 Adjusting the volume of each Individual Key NoteVolume This lets you adjust the volume of each individual key H...

Page 48: ...y LocalCtl Preventing Doubled NotesWhen Connected to a Sequencer Local Control When you have a MIDI sequencer connected via USB set this parameter to Local Off Since most sequencers have their Thru fu...

Page 49: ...e keyboard of unit will control the images produced by the Visual Control device connected to unit using a USB cable OFF Visual Control is off MVC MIDI Visual Control mode is selected VLNK V LINK mode...

Page 50: ...you stop playing or operating the unit If you don t want the power to turn off automatically change the Auto Off setting to OFF as follows p 39 MEMO This setting is automatically saved in the unit Bac...

Page 51: ...using a connection cable that contains a resistor Use a connection cable that does not contain a resistor No sound No sound Could the unit s volume or the volume of the connected equipment be turned...

Page 52: ...le is empty or consists only of spaces Is the filename extension MID Files with other filename extensions cannot be handled as song data Song names can consist only of English letters numerals certain...

Page 53: ...you have tried several times contact the Roland service center Error 65 The USB memory port was subjected to excessive current Make sure that there is no problem with the external media then turn the...

Page 54: ...nd will feel closer to you 2 MellowUp A mellow upright piano sound 3 BrightUp A brilliant upright piano sound 4 Rock Pno A robust piano sound recommended for boogie woogie playing 5 Ragtime A honky to...

Page 55: ...e T nze 5 Johannes Brahms a 045 T rkischer Marsch Ludwig van Beethoven a 046 Nocturne No 2 Fryderyk Franciszek Chopin a 047 Fr hlingslied Felix Mendelssohn a 048 Pr ludium Johann Sebastian Bach a 049...

Page 56: ...cel Internal Memory Save Song Standard MIDI Files Format 0 Songs Max 99 songs External Memory External Storage USB Flash Memory Playable Software Standard MIDI Files Format 0 1 Roland Original Format...

Page 57: ...MEMO 57 Operation Guide Panel Descriptions Before You Play Performing Practicing Convenient Functions Appendix Function Mode...

Page 58: ...abnormality or malfunction occurs Immediately turn the unit off remove the AC adaptor from the outlet and request servicing by your retailer the nearest Roland Service Center or an authorized Roland d...

Page 59: ...se the lid Unplug the AC adaptor from the outlet before cleaning Before cleaning the unit turn it off and unplug the AC adaptor from the outlet p 62 CAUTION If there is a possibility of lightning stri...

Page 60: ...n Since wood will expand and contract depending on how it is used and the environment in which it is located products made of wood may experience a gradual loosening of the screws over time To ensure...

Page 61: ...mputer network MMP Moore Microprocessor Portfolio refers to a patent portfolio concerned with microprocessor architecture which was developed by Technology Properties Limited TPL Roland has licensed t...

Page 62: ...ide board right 4 Speaker box 5 Pedal board 6 Stabilizers left right 7 Protective sheets 8 Screws large 8 pcs 9 Screws small 6 pcs 10 Screws with washers 2 pcs 11 Cord clamps 2 pcs 12 Headphone hook T...

Page 63: ...pinch your hands 1 Screws large use two screws 8 Used in step 9 Front Please don t get your fingers pinched 9 Use the screws large 8 to fasten the piano main unit 1 to the side boards 2 3 one each for...

Page 64: ...ter 47 Note Vol 47 Note Volume 47 O Octave Shift 47 Oct Shft 47 Opening the Lid 12 Other button 14 Output Jacks 11 Overdubbing 30 P Panel Lock 9 42 Part 26 Part Mute 26 Pedal connector 11 Phones jacks...

Page 65: ...65 Operation Guide Panel Descriptions Before You Play Performing Practicing Convenient Functions Appendix Function Mode...

Page 66: ...For EU Countries For China 66...

Page 67: ...equency energy and if not installed and used in accordance with the instructions may cause harmful interference to radio communications However there is no guarantee that interference will not occur i...

Page 68: ...5 1 0 0 0 3 6 7 8 2 0 1 5 1 0 0 0 3 6 7 8 2 0 2...

Reviews: