background image

Operating the instrument

R&S

®

RTP

50

Getting Started 1337.9946.02 ─ 07

Histogram and histogram area

A histogram shows the frequency of occurrence of voltage or time values in a bar
chart directly in the diagram. The rectangular histogram area indicates the part of
the waveform that is considered in the histogram. The vertical histogram counts
the voltage values, and the horizontal histogram counts time values. You can
switch between vertical and horizontal mode, and modify the histogram area by
dragging the rectangle as a whole, by dragging its edges, or by setting exact posi-
tions.

6.2.2


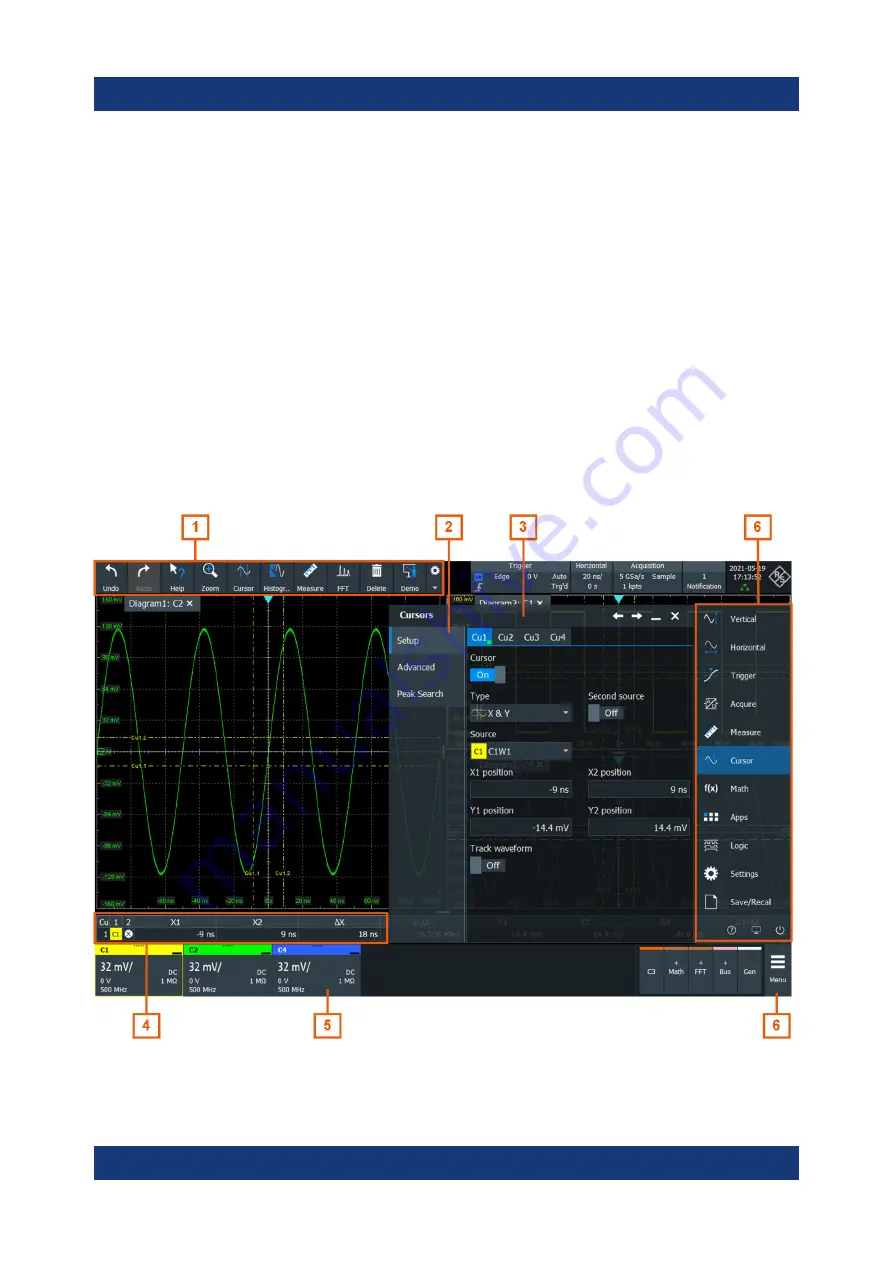
Control elements on the touchscreen

The touchscreen provides everything you need to control the instrument, to ana-
lyze waveforms, and to get measurement results. 

Figure 6-6

 shows the control

elements on a glance.

Figure 6-6: Control elements on the touchscreen

Touchscreen display

Summary of Contents for RTP

Page 1: ...R S RTP High Performance Oscilloscope Getting Started 1337994602 Version 07 Uñ 2 ...

Page 2: ...o KG Mühldorfstr 15 81671 München Germany Phone 49 89 41 29 0 Email info rohde schwarz com Internet www rohde schwarz com Subject to change data without tolerance limits is not binding R S is a registered trademark of Rohde Schwarz GmbH Co KG Trade names are trademarks of the owners 1337 9946 02 Version 07 R S RTP Throughout this manual products from Rohde Schwarz are indicated without the symbol ...

Page 3: ...trument help 14 3 2 Data sheet and brochure 15 3 3 Release notes open source acknowledgment 16 3 4 Application notes application cards videos 16 4 Preparing for use 17 4 1 Lifting and carrying 17 4 2 Unpacking and checking 17 4 3 Choosing the operating site 17 4 4 Setting up the product 18 4 5 Considerations for test setup 20 4 6 Connecting to power 21 4 7 Switching on or off 22 4 8 Connecting ext...

Page 4: ...king with waveforms 53 6 5 Rohde Schwarz smartgrid 56 6 6 Toolbar 57 6 7 Displaying results 66 6 8 Using dialog boxes 68 6 9 Entering data 69 6 10 Instrument information and notifications 72 6 11 Getting information and help 73 7 Setting up the instrument 77 7 1 Performing a self alignment 77 7 2 Setting the display language 78 8 Contacting customer support 79 Index 80 ...

Page 5: ...f potential dangers and gives instructions on how to prevent personal injury or damage caused by dangerous situations Safety information is provided as follows In Chapter 1 1 Safety instructions on page 5 The same information is provided in many languages as printed Safety Instructions The printed Safety Instructions are delivered with the product Throughout the documentation safety instructions a...

Page 6: ...elf Use the instrument handles to move or carry the instrument Do not use the mounted accessories instead of the handles Accessories are not designed to carry the weight of the instrument To move the instrument safely you can use lifting or transporting equipment such as lift trucks and forklifts Follow the instructions provided by the equipment man ufacturer Choosing the operating site Only use t...

Page 7: ...ecting to power and grounding The mains power supply input of the instrument complies with overvoltage cate gory II It has to be connected to a fixed installation used to supply energy con suming equipment such as household appliances and similar loads Be aware that electrically powered products have risks such as electric shock fire per sonal injury or even death Take the following measures for y...

Page 8: ...eed the value specified in the data sheet Observe all voltage and current ratings of the instrument the probes and the accessories Limits and ratings are marked on the products and listed in the data sheets Consider that the rated voltage depends on the frequency The voltage limita tion curves or values are provided in the data sheet Do not exceed the maxi mum measurement voltage from the probe ti...

Page 9: ...ive measures to pre clude direct contact with the measurement setup Do not touch exposed connections and components when power is applied Switch off the test circuit while connecting and disconnecting probe leads Use only insulated voltage probes test leads and adapters Make sure that the input leads fulfill the safety requirements for your measure ment The delivered input leads might have a jacke...

Page 10: ...hout rated measurement category For measurements performed on circuits not directly connected to mains for example electronics circuits powered by batteries and specially protected secondary circuits This measurement category is also known as CAT I CAT II For measurements performed on circuits directly connected to the low voltage installation by a standard socket outlet for example household appl...

Page 11: ...isk of electric shock fire personal injury or even death Protective conductor terminal Connect this terminal to a grounded external conductor or to protective ground This protects you against electric shock should an electric problem occur 1 2 Labels on the product Labels on the casing inform about Personal safety see Meaning of safety labels on page 11 Product and environment safety see Table 1 1...

Page 12: ...cur if you do not follow the safety precautions WARNING Potentially hazardous situation Could result in death or serious injury if not avoi ded CAUTION Potentially hazardous situation Could result in minor or moderate injury if not avoided NOTICE Potential risks of damage Could result in damage to the supported product or to other property 1 4 Korea certification class A 이 기기는 업무용 A급 전자파 적합기기로서 판매...

Page 13: ...e powerful protocol analysis jitter analysis functions automatic compliance tests spectrograms and precise and wideband RF analysis Multiple instrument capability Time correlated analysis of different signal types Easy to use serial protocol analysis for various protocols used in embedded design mobile communications and more General purpose mixed signal option Multi channel power consumption anal...

Page 14: ...e basic functionality and applications User manual Instrument Describes all instrument functions in detail It also provides an introduction to remote control a complete description of the remote control commands with pro gramming examples and information on maintenance and instrument interfaces Includes the contents of the getting started manual The online version of the user manual provides the c...

Page 15: ...des safety information in many languages The printed document is deliv ered with the product Instrument security procedures manual Deals with security issues when working with the R S RTP in secure areas Service Manual Describes the performance test for checking the rated specifications module replacement firmware update troubleshooting and fault elimination and contains mechanical drawings and sp...

Page 16: ...re installation The open source acknowledgment document provides verbatim license texts of the used open source software It can also be read directly on the instrument See www rohde schwarz com firmware rtp 3 4 Application notes application cards videos These documents deal with special applications or background information on particular topics See www rohde schwarz com application rtp and Oscill...

Page 17: ...acking material Use it when transporting or shipping the product later 3 Using the delivery notes check the equipment for completeness 4 Check the equipment for damage If the delivery is incomplete or equipment is damaged contact Rohde Schwarz 4 3 Choosing the operating site Specific operating conditions ensure proper operation and avoid damage to the product and connected devices For information ...

Page 18: ... equipment causes radio disturbances take appropriate measures to eliminate them 4 4 Setting up the product When setting up the instrument follow the safety instructions Setting up the product on page 7 Intended use on page 5 4 4 1 Placing the product on a bench top For standalone operation place the instrument on a horizontal bench with even flat surface The instrument can be used in horizontal p...

Page 19: ...4 2 Mounting the product in a rack The instrument can be installed in a rack using a rack adapter kit The order num ber is given in the data sheet The installation instructions are part of the adapter kit To prepare the rack 1 Observe the requirements and instructions in Setting up the product on page 7 2 NOTICE Insufficient airflow can cause overheating and damage the product Design and implement...

Page 20: ...Considerations for test setup Observe safety instructions see Performing measurements on page 8 Cable selection and electromagnetic interference EMI Electromagnetic interference EMI can affect the measurement results To suppress electromagnetic radiation during operation Use high quality shielded cables for example double shielded RF and LAN cables Always terminate open cable ends Ensure that conn...

Page 21: ... disturbance 4 6 Connecting to power For safety information see Connecting to power and grounding on page 7 The R S RTP can be used with different AC power voltages and adapts itself automatically to it The instrument has a C20 connector A list of appropriate power cables is given in the user manual Refer to the data sheet for the requirements of voltage and fre quency The nominal ranges are 100 V...

Page 22: ... Press the Power key on the front panel The instrument performs a system check boots the operating system and then starts the R S RTP firmware The Power key turns green and the illuminated keys on the front panel light up If the previous session was terminated regularly the oscilloscope uses the last settings Before you start measurements be sure to comply with the warm up phase specified in the d...

Page 23: ...ting USB devices The USB interfaces on the front and rear panels allow you to connect USB devi ces directly to the instrument The number of USB connectors can be increased by using USB hubs Due to the large number of available USB devices there is almost no limit to the expansions that are possible with the R S RTP The following USB devices can be useful for example USB flash drives to save screen...

Page 24: ...ccess and modify the settings of the Windows operating system To access Windows press the Windows key on the external keyboard or select Menu Minimize Application on the R S RTP menu Connecting a USB flash drive If the installation of a USB flash drive is successful Windows informs you that the device is ready to use The device is made available as a new drive D and is displayed in Windows Explore...

Page 25: ...onfigure the displays directly in the instrument setup 1 Check the input type of the monitor or projector Make sure to select the cor rect cable To use a VGA monitor you need an active DVI D to VGA adapter 2 Open Menu Settings Display 3 Select the Monitors tab 4 Select how to display the screen 5 To access Windows display settings tap Additional settings The touchscreen of the R S RTP has a screen...

Page 26: ...instrument including all function keys and connectors 5 1 Front panel This section provides an overview of the R S RTP front panel and explains the various connectors and the option slots at the front Figure 5 1 Front panel of R S RTP 1 Touchscreen 2 Setup controls 3 Horizontal controls 4 Trigger controls 5 Analysis keys Front panel ...

Page 27: ...nnectors are provided with a special Rohde Schwarz active probe interface and they are BNC compatible Thus the instrument can automatically detect active probes that have the Rohde Schwarz probe interface The maximum input voltage on channel inputs and the external trigger input is 5 V peak The input impedance of the inputs is 50 Ω USB Two USB type A connectors that comply with standard USB 3 1 ge...

Page 28: ...ides the connectors for the R S RT ZVC multi channel power probe without MSO The connectors are used to connect two flat interface cables of R S RT ZVC One of the options can be installed in one of option slots at the front panel or in the option slot at the rear panel The maximum input voltage is 40 V peak at 100 kΩ input impedance The maxi mum input frequency for a signal with the minimum input ...

Page 29: ...tors K type for reference signal output 5 2 Rear panel This section explains the rear panel of the R S RTP including the various con nectors and the option slot Figure 5 2 Rear panel of R S RTP 1 AC power supply connector and main power switch 2 USB device connector type B 3 USB connectors type A 4 LAN connector 5 DVI D connector for external monitor Rear panel ...

Page 30: ...l and an appropriate cable The AC main power switch also interrupts the power supply of the OCXO When you power up the instrument be sure to comply with the warm up phase specified in the data sheet before you start measurements USB Device USB 3 0 interface of type B device USB to be used for remote control of the instrument USB Four USB type A connectors Two connectors comply with standard USB 3 ...

Page 31: ... instrument can also send the pulse on mask test violation or violation of measurement limits and margins If the connector is terminated with 50 Ω the signal level is 2 5 V 50 mA With 1 MΩ termination the level is 5 V A short circuit of the connector to ground cre ates current of 100 mA To enable the trigger out signal select Trigger menu Ctrl Action Here you also adjust polarity delay and length ...

Page 32: ...t down orange The instrument is ready for operation green See also Chapter 4 7 Switching on or off on page 22 5 3 2 Setup controls Setup keys set the instrument to a defined state change basic settings and pro vide saving and help functions The intensity rotary knob adjusts the display con trast for several display elements Autoset The instrument analyzes the enabled channel signals and adjusts ap...

Page 33: ...default the key saves a screenshot of the waveform display You can assign the function to the key Quick Action Starts an external application opens the graphical recall or deletes the all mea surement results waveforms and the history The function is assigned to the key in File menu Frontpanel Setup Hardkeys By default the key opens the setup dialog box Help Opens the appropriate help topic for th...

Page 34: ...b to toggle between the three settings The controlled parameter and its value are shown in the input box in the lower right corner of the screen 5 3 3 Horizontal controls The keys and rotary knobs in the Horizontal functional block adjust the acquisition settings and horizontal parameters These settings are effective for all channel waveforms Res Rec Len Horizontal Open and close the Setup tab in ...

Page 35: ...the reference point on the screen You can select if the knob changes the position or the reference point in File menu Frontpanel Setup Knobs To set the value to zero press the knob The current value is shown in the input box in the lower right corner of the screen Horizontal position defines the time distance of the reference point from the zero point of the diagram Turn clockwise to move the wave...

Page 36: ...form If the waveform is selected Pressing the key opens the Vertical dialog box for the appropriate channel The vertical rotary knobs are focused on the selected waveform They are illumi nated in the color of the selected waveform Logic Opens the dialog box for configuration of parallel buses and digital channels The key lights up if you enable at least one parallel bus You can switch off the sele...

Page 37: ...u can select if the knob changes the position or the offset in Menu Set tings Frontpanel Knobs dialog Position indicates the vertical location in divisions Offset moves the vertical center of the selected channel to the offset value Scale This rotary knob adjusts the vertical scale for the selected waveform The knob lights up in the color of the selected waveform Turn clockwise to stretch the wave...

Page 38: ...otary knob sets the trigger level for all trigger types Turn clockwise to move up the trigger level If the selected trigger type requires two trigger levels upper and lower level press the knob to toggle between the two levels Source Opens a dialog box where you can select the trigger source Press the key again to switch the source The key lights up in the color of the selected trigger source Slop...

Page 39: ...ab and set Average count N single count 5 3 6 Analysis keys The keys in the Analysis functional block provide direct access to measurement and analyzing functions If you press Cursor Zoom or Meas the action starts on first keypress and a second keypress opens the corresponding dialog box If you press another function key the dialog box opens Cursor Displays vertical and horizontal cursors in the a...

Page 40: ...s function directly without knowing its position in the menu or toolbar Zoom Displays a zoom diagram for the active diagram The key is illuminated if at least one zoom is active If you press the key while the zoom function is on the Zoom dialog box opens where you can configure several zoom areas for detailed signal observation Protocol Opens the Protocol dialog box which contains the configuratio...

Page 41: ...n view the stored acquisitions and use them for further analysis Press the key again to open the main History dialog box with more set tings and information The key is illuminated as long as a history acquisition or replay is displayed FFT Opens and closes the FFT setup The key lights up if an FFT is active You can switch off the FFT math waveform using the Signal Off key 5 3 7 Navigation controls...

Page 42: ...or input box Undo Reverses the last setting actions step by step Undo is not possible after load and recall actions and after creating a reference waveform Redo Recovers the undo steps in reverse order OK The OK key has various functions In dialog boxes and opened selection lists the key applies the selected value In tables the key activates the edit mode If the table cell is in edit mode the key ...

Page 43: ...row The up and down arrow keys have the following effects In numeric edit fields increase or decrease the parameter value In tables scroll vertically through the rows In dialog boxes for option buttons in a column select an option In an open selection list the keys scroll the list Left arrow Right arrow The left and right arrow keys have the following effects In edit fields move the cursor In tabl...

Page 44: ...n computers with non Windows operating systems a remote desktop connection is possible using RDP applications For details refer to the user manual chapter Remote Desktop Connection Remote monitoring and control of the instrument from a connected computer is also possible with a standard web browser and a LAN connection For details refer to the user manual chapter Web Control Alternatively you can ...

Page 45: ...two fingers vertically to change the vertical scale of the active waveform Function keys and rotary knobs The front panel provides nearly all functions and controls to operate the instru ment in the classic ways without touchscreen As an exception the signal bar cannot be used with front panel controls Optional mouse and or keyboard These devices work conform to Windows standards The navigation ke...

Page 46: ...cquisition label 6 Notifications 7 Zoom area 8 Zoom diagram 9 Trigger level 10 Signal bar with inactive waveforms 10a minimized live waveform 10b and signal icon with vertical settings 10c 11 Histogram area 12 Histogram Diagram A diagram shows one or more waveforms channel reference and math wave forms together with histograms masks etc Zoom details XY waveforms spectra and other special waveforms...

Page 47: ... The grid labels have the color of the waveform to which they belong If several waveforms are shown in one diagram the grid has the color of the selected waveform Trigger position and trigger level The blue markers show the horizontal position of the trigger and the vertical trig ger level You can touch and move the trigger markers in the diagram to set the positions The trigger point is the zero ...

Page 48: ...Posi tion knob Notification The Notification button on the toolbar points to the status messages of the instrument To open the message box tap the button See also Chapter 6 10 Instrument information and notifications on page 72 Zoom diagram and zoom area Zoomed waveforms are shown in separate zoom diagrams in addition to the waveform diagrams On the original waveform diagram a rectangle indicates ...

Page 49: ...n settings If you tap the Minimize icon on the signal icon the waveform switches from the diagram area to the signal icon the icon shows the real time preview of the waveform If you tap a signal icon the dialog box with vertical settings for this waveform opens See Chapter 6 4 Working with waveforms on page 53 for a detailed description In Figure 6 1 the signal icons C1 and C2 show the main settin...

Page 50: ...am counts the voltage values and the horizontal histogram counts time values You can switch between vertical and horizontal mode and modify the histogram area by dragging the rectangle as a whole by dragging its edges or by setting exact posi tions 6 2 2 Control elements on the touchscreen The touchscreen provides everything you need to control the instrument to ana lyze waveforms and to get measu...

Page 51: ... Dialog box 2 3 The tabs of the dialog boxes contain all task oriented settings and operations and black buttons for calling related tabs The usage of dialog boxes is described in Chapter 6 8 Using dialog boxes on page 68 Result table 4 If you perform cursor or automatic measurements mask testing or a search the result table shows the results of the action The position of the result table is adjus...

Page 52: ...exact numerical value change the step size and if available autoset the value directly in the input box The box title shows the name of the currently adjusted parameter The input box is helpful when using the multi function rotary knobs for example horizontal or vertical Position knobs See also Chapter 6 9 Entering data on page 69 6 3 App cockpit The app cockpit provides fast access to all availab...

Page 53: ...rms Up to three waveforms per input channel can be shown For a four channel instrument 12 channel waveforms are available Reference waveforms Four waveforms can be used as reference for comparison and analysis Math waveforms Eight mathematic waveforms can be created with mathematic operations per formed on channel reference and other math waveforms Zoom waveforms Working with waveforms ...

Page 54: ...o a waveform Settings Menu Settings Appearance Colors tab Waveforms can be minimized to signal icons showing a small real time signal view Thus more space in the diagram area is available without switching off waveforms Diagrams are displayed on tabs you can arrange them side by side or one above the other To change the diagram name double tap the tab name The Rohde Schwarz SmartGrid function help...

Page 55: ... On The waveform is now active selected and is shown in the diagram To select a waveform Choose one of the following ways Tap the waveform in the waveform diagram To select a channel reference or math waveform press the correspond ing key Tap the signal icon Note Zoom waveforms in zoom diagrams cannot be selected To minimize a waveform Choose on of the following ways Tap the Minimize icon in the u...

Page 56: ...ms overlap or lie close together the upper selected waveform is switched off 6 5 Rohde Schwarz smartgrid The Rohde Schwarz SmartGrid helps to create and arrange the diagrams on the screen with drag drop The diagram layout depends on the position where you drop the signal icon in relation to an existing diagram Figure 6 7 SmartGrid positions 1 In the existing diagram overlay of signal 2 New diagram...

Page 57: ...ound The Rohde Schwarz SmartGrid appears and a blue area shows where the waveform will be placed 2 Drop the waveform in the target area The waveform appears in an existing or in a new diagram and it is selected for further actions 3 To change the size of a diagram tap the handle between two diagram frames and drag it to the required position 6 6 Toolbar The toolbar provides direct access to import...

Page 58: ...ar functions are one click actions These actions are performed immediately when you tap the icon Other toolbar functions are analyzing functions These actions are interactive actions To use analyzing functions interactive actions 1 If several waveforms are shown in the diagram select the waveform that you want to analyze See To select a waveform on page 55 2 Tap the icon of the function in the too...

Page 59: ...ser preferences It is retained when you switch off and on the instrument and you can save it in the user preferences and user defined preset 1 To open the toolbar configuration tap the icon in the toolbar 2 Select the required toolbar functions Disable the functions that you do not need Enable the functions that you want to add to the toolbar A detailed description of the toolbar functions is give...

Page 60: ...46 02 07 One click actions Interactive actions Undo Zoom Redo Search Help Cursor Graphical Saveset Mask Test Saveset Histogram Image Measure Report Quick meas Clear FFT Autoset and Preset Label Run Stop and Single Save Reference Find Level Save Waveform Toolbar ...

Page 61: ...d and preset with active reference waveform Redo Recovers the undo steps in reverse order Help Enables the tooltip display A short description appears when you tap a parameter in a dialog To open the corresponding help topic tap the Show Help button in the lower right corner of the tooltip See also Chapter 6 11 Getting information and help on page 73 Graphical Saveset Opens a window to select and ...

Page 62: ...rument remotely Run Stop and Single Starts and stops the continuous acquisition or starts a defined num ber of acquisition cycles The icons have the same functionality as the corre sponding keys on the front panel They are useful when you control the instru ment remotely Find Level Analyses the signal and sets the trigger level to the middle of the signal peaks Force Trigger Starts an immediate si...

Page 63: ...oom Zoom Creates a coupled zoom area and its related zoom diagram If you change the size of one zoom area the size of all coupled zoom areas is changed as well First create a zoom using the Standard zoom Then tap Coupled zoom and tap the existing zoom area The zoom area is duplicated Drag the duplicate to the required position Fingertip zoom Zoom Magnifies the waveforms around your fingertip Tap t...

Page 64: ...gle on the screen You can add more segments to the test and add another test You can also move the mask segments on the screen To configure the mask test settings tap the icon in the Mask result box Histogram The histogram icon on the toolbar shows the last selected histogram type A short tap on the icon activates the selected histogram To use another histogram type select it in the toolbar assist...

Page 65: ...he waveform Tap the icon and then tap the waveform to be labeled Enter the label text using the on screen keyboard The text is shown in the same color as the waveform If you tap the display background the label is assigned to the selected waveform You can drag the label to another position Save Reference Copies the selected source waveform with all its settings to the reference waveform If the acq...

Page 66: ...ments from the display Tap the icon and then tap the element to be deleted or the waveform to be switched off 6 7 Displaying results The results of measurements mask tests searches protocol decoding and oth ers are displayed immediately There are several places to display the results In a table that is docked below the diagram not available for mask test results In a floating result box in front o...

Page 67: ...Once you undock the measurement results you cannot move the result box back to the docked position 2 Touch and hold the title of the result box and drag the box on the screen The SmartGrid indicates where the result box will be placed If you drop the box on one of the buttons the results are shown in a sepa rate tab besides above or below the diagram If you drop the box on the signal bar a result ...

Page 68: ...y is provided in dialog boxes as known from computer programs You can control the instrument intuitively with the touchscreen This section pro vides an overview of the accessing methods and describes how to use the dialog boxes Each dialog box has four icons in the upper right corner Go back opens the previously opened dialog box Go forward opens the next dialog box Minimizes the dialog box to a s...

Page 69: ...ant to change only one setting during analysis and you need to change it often you can display a small box that only contains the required setting 1 Tap the setting that you need to modify 2 Tap the Minimize icon in the upper right corner of the dialog box The dialog box turns into a small box that contains only the setting that was last selected 3 To restore the complete dialog box tap the Maximi...

Page 70: ... the increment Position to set to zero Levels to set the trigger level to 50 of the signal 3 The input box also provides settings Tap the Steps icon to toggle the increment Tap the Reset icon to set the parameter to the autoset value if availa ble The Navigation knob is described in Chapter 5 3 Keys and controls on page 32 To enter values with the on screen keypad For data input in dialog boxes th...

Page 71: ...between small steps and large steps tap the Steps icon To get the value that was used before the keypad was displayed tap Cur To enter a user defined value tap the numbers and complete the entry by tapping the unit button The arrow buttons move the cursor left or right Bksp deletes the last character before the cursor changes the sign of the value To enter data with the on screen keyboard 1 Double...

Page 72: ...the entry To enter numeric data in a dialog box with navigation controls 1 To navigate to the entry field press the and keys 2 To change the value with a small step size turn the rotary knob Alternatively press the and keys for a larger step size If you edit numeric data in tables the entry field must be in edit mode To activate the edit mode press ENTER or the key or the navigation rotary knob 6 ...

Page 73: ... saved The color of the dot before the text indicates the severity gray for information orange for warnings and red for errors To read the notifications tap Notification You can also delete the list of notifications 1 To hide the date and time open Menu Settings Appearance Dia gram tab 2 Disable Show date time 6 11 Getting information and help If you need information on the instrument s functional...

Page 74: ...the toolbar 2 Tap the parameter for which you need information The tooltip opens 3 To open the corresponding help topic tap the Show Help button in the lower right corner of the tooltip The Help window opens and displays the comprehensive description and the corresponding remote command You can browse the help for further information Note The tooltip icon disables automatically when you tap a para...

Page 75: ... entries in the list 1 Switch to the Index tab 2 Select the Keyboard icon besides the entry field 3 Enter the first characters of the keyword you are interested in The entries containing these characters are displayed 4 Double tap the suitable index entry The View tab with the corresponding help topic is displayed To search topics for a text string 1 Switch to the Search tab 2 Select the Keyboard ...

Page 76: ...er qualification finds all topics that contain the words trigger and qualification Use Match whole word and Match case to refine the search Use operators AND OR and NOT To close the Help window Select the Close icon in the upper right corner of the help window Or Press the Esc key Getting information and help ...

Page 77: ...or the first time After a firmware update Once a week When major temperature changes occur 5 1 Warm up the instrument before you start the self alignment The minimum warm up time is indicated in the data sheet 2 Remove the probes from the input connectors 3 In the Menu Settings menu select Maintenance 4 In the Alignment tab tap Start Alignment The alignment is performed the process might take seve...

Page 78: ...oxes result boxes and other screen information is displayed A reboot of the instrument is not necessary 1 Open the Menu Settings System dialog 2 Select the Localization tab 3 Tap the Language button The button shows the current language 4 Select the required language The instrument changes the language after a few seconds Setting the display language ...

Page 79: ...uct contact our customer support center A team of highly qualified engineers provides support and works with you to find a solution to your query on any aspect of the operation program ming or applications of Rohde Schwarz products Contact information Contact our customer support center at www rohde schwarz com support or fol low this QR code Figure 8 1 QR code to the Rohde Schwarz support page ...

Page 80: ...upport 79 D Data entry 69 Data sheet 15 Delete 66 Demo 62 Diagrams 46 Dialog boxes 50 Background transparency 34 Usage 68 Digital waveforms 53 Display Key 33 Overview 45 Display elements Diagram 45 Input box 50 Menu 50 Result box 50 Signal bar 45 Toolbar 50 DisplayPort 25 31 DVI D 25 30 DVI D connector 30 E Esc key 42 External monitor 25 30 External trigger output 31 F FFT 65 Key 41 Find Remote co...

Page 81: ...ouse connecting 24 MSO 28 N Navigation controls Data input 72 Keys 42 Overview 41 Normal trigger mode 39 Notification 48 Numeric data entry 69 O OCXO 31 Offset Channel 37 OK key 42 On Off key 32 Open source acknowledgment 16 Operation Concepts 44 Manual 44 Options hardware installation 28 R S RTP B1 MSO 28 R S RTP B1E for R S RT ZVC 28 R S RTP B6 waveform and function generator 28 P Position Horiz...

Page 82: ... 32 Key 33 Signal bar 49 Signal icons 49 Signal label 49 Signal Off key 37 Signal view 49 Single 62 Single key 39 Slope Key 38 SmartGrid 56 Source key 38 Spectrogram 66 Switch off Waveform 56 Switch on Waveform 55 T Temperature Changes 77 Text entry 69 Time base 35 Time scale 35 Toolbar 57 Coupled zoom 63 Cursor 63 Delete 66 FFT 65 Find level 62 Hardware zoom 63 Hide show icons 59 Histogram 64 Lab...

Page 83: ...B flash drive connecting 24 User manual 14 V Vertical Controls 36 Position Offset 37 VNC 44 W Waveform generator option 28 Waveforms Arrange 56 Channel 53 Display intensity 34 Math 53 Minimize 55 Overview and usage 53 Reference 53 Select 55 States 54 Switch off 56 Switch on 55 XY 53 Zoom 53 Web interface 44 Windows Access 24 X XY waveforms 53 Z Zone trigger 65 Zoom Area 48 Diagram 48 Key 40 Quick ...

Reviews: