


4
Assembly
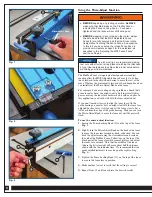
1.
Slide a 5/16"-18 x 1" T-Bolt (4) into the forward-facing T-Slot
of each MDF Adjustable Fence Face (2). Fit the Bit Safety
Guard (3) over the T-Bolts and secure with a 1" Round
Knob (8) on each T-Bolt.
2.
Insert the appropriate 5/16"-18 Bolts for your router
tabletop (5, 6 or 7) into the slots in the bottom of the
Fence Body (1) and out the slots in the top. Then fit a
5/16" Nylon Washer (10) and loosely thread a 5/16"-18
Five-Star Knob (9) on each.
3.
Fit the bottoms of the appropriate 5/16"-18 Bolts (5, 6 or 7)
into the mounting slots in your router table.
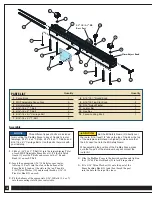
Quantity
1
Fence Body
1
2
MDF Adjustable Fence Face
2
3
Bit Safety Guard
1
4
5/16"-18 x 1" T-Bolt
2
5
5/16"-18 x 5" T-Bolt
2
6
5/16"-18 x 4
1
⁄
2
" Carriage Bolt
2
7
5/16"-18 x 3
1
⁄
2
" T-Bolt
2
PARTS LIST
Quantity
8
5/16"-18 1" Round Knob
2
9
5/16"-18 Five-Star Knob
2
10
5/16" Nylon Washer
3
11
Jointer Bar
2
12
Hex Key
1
13
Fence-Locking Knob
1
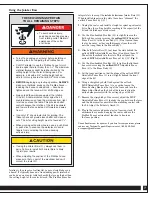
Three different types of bolts are included
for mounting the ProMax Fence to any of Rockler’s router
tabletops: 5/16"-18 x 5" T-Bolts; 5/16"-18 x 3
1
⁄
2
" T-Bolts; and
5/16"-18 x 4
1
⁄
2
" Carriage Bolts. Use the bolts that work with
your tabletop.
Set the Bit Safety Guard (3) directly over
the router bit, at least 1/2" above the top of the bit or the top
of the workpiece (whichever is highest) to make sure that
the bit doesn’t cut into the Bit Safety Guard.
When adjusting the position of the ProMax Fence, make
sure that no part of the aluminum body will contact the
router bit.
4.
Slide the ProMax Fence to the desired position and tighten
the 5/16"-18 Five-Star Knobs (9) to lock it in position.
5.
Fit a 5/16" Nylon Washer (10) onto the post of the
Fence-Locking Knob (13) and then thread the post
into the hole in the top of the fence.
2
1
⁄
4
" ID / 2
1
⁄
2
" OD
Dust Port
Micro-Adjust Knob
11
7
6
5
8
3
4
7
6
5
12
10
9
13
10
1
10
9
2