
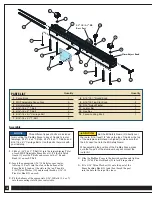


7
Using the Jointer Bars
Jointing is the process of cutting flat, square, straight edges on
a board. It’s typically done on a free-standing power jointer but
can be done on a router table for boards that are no thicker than
the cutting height of the router bit used. The ProMax Fence has
integral slots to accept the included aluminum Jointer Bars (11).
When installed in pairs in the slots, these bars “shim out” the
outfeed Fence Face by 1/32".
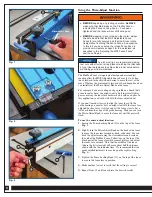
1.
Unplug the router and install a straight or spiral up-cut router
bit, setting the cutting height according to the capacity of the
bit and the thickness of your stock.
2.
Use the blue-handled Hex Key (12) to slightly loosen the
flat-head hex screws securing the
outfeed
MDF Adjustable
Fence Face (2) to the Fence Body (1). (Don’t loosen them
too far, however, or they could disengage from the weld
nuts that snug them to the Fence Body.)
3.
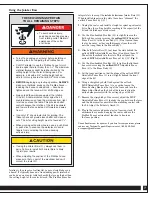
Slide both Jointer Bars (11) out from the slots behind the
outfeed MDF Adjustable Fence Face (2) and turn them 90°.
Then slide them back into the slots. This will push the
outfeed MDF Adjustable Fence Face out by 1/32".
Fig. 3.
4.
Use the blue-handled Hex Key (12) to tighten the flat-head
hex screws securing the
outfeed
MDF Adjustable Fence
Face (2) to the Fence Body (1).
5.
Set the fence position so that the plane of the outfeed MDF
Adjustable Fence Face (2) is just slightly behind the front
edge of the bit.
6.
Using a straightedge held flush against the outfeed
MDF Adjustable Fence Face (2) as a guide, loosen the
Fence-Locking Knob on the top of the fence and turn the
Micro-Adjust Knob on the back of the fence to align the
outfeed side precisely with the cutting edge of the bit.
7.
Remove the straightedge. If necessary, adjust the MDF
Adjustable Fence Faces (2) to make the gap between the faces
and the bit as small as possible without making contact with
the bit. Adjust the Bit Safety Guard (3).
8.
Plug in the router and make a test cut in scrap stock. If
adjustments are needed, unplug the router and use the
ProMax Fence’s micro-adjust function to fine-tune
the fence position.
THESE WARNINGS PERTAIN
TO ALL REMAINING STEPS:
>
To avoid serious injury,
keep hands and fingers away
from rotating cutter. Maintain
awareness of the cutter
at all times.
>
Turn off and unplug your router before installing or
adjusting the bit or adjusting the ProMax Fence.
>
Do NOT attempt to use the ProMax Fence to joint
board edges that are thicker than 1
1
⁄
4
". The maximum
material thickness might be further limited by the
cutting height of the router bit being used. For
example, a bit with a 3/4" cutting height will be
able to joint only boards that are 3/4" thick or less.
>
BEFORE
beginning any routing operation,
ALWAYS
make sure that
ALL
knobs on the ProMax Fence —
including the Fence Locking Knob —have been
tightened and the fence will not shift during use.
>
Always feed the workpiece against the rotation
of the bit. A table-mounted router spins the bit
counterclockwise, so feed the workpiece from right
to left as you face the table. This provides better
control because the rotation of the bit is backward
and toward the fence instead of forward and away
from it.
>
Use only 1/2" shank router bits for jointing. The
thicker shank will provide less chatter and cleaner
cuts. The bit’s cutting height must not exceed 1
1
⁄
2
".
>
When working with narrow boards, use a push block
or push stick to advance the workpiece to avoid
fingers from contacting the bit and causing
serious injury.
>
If using the Jointer Bars (11), always use them in
pairs. Failure to install both Jointer Bars is likely
to yield poor results.
>
When adjusting the position of the ProMax Fence,
make sure that no part of the aluminum body will
contact the router bit.
Check Rockler.com for updates. If you have further questions, please
contact our Technical Support Department at 1-800-260-9663


