


94
Cedex HiRes Analyzer Operator’s Guide
D
D
6.1.2.
Export to fi le
Exporting data is done via the
Export to fi le
area of the
Measurement List
window or via the
Export to fi le
option in the
Functions
menu of the
Control Center
. Four different formats can be chosen including CSV,
XML, Excel-DIF and Flat fi le. In addition, a sub-set of parameters to be included in the fi le can be selected.
To export measurement results to a fi le, follow the instructions below:
1
Select the
Export to fi le
option in the
Functions
menu of the
Control Center
. The
Measurement List
window will appear with the
Export To File
button located at the bottom of the window.
2
Select a single measurement from the list by clicking on the
fi eld to the left of the desired line.
To choose a set of measurements, hold down the
Ctrl
button while selecting the appropriate lines.
Alternatively, the desired measurements can be searched for using different fi lter criteria
(see “
Searching for measurements
”).
3
Click on the
Export To File
button. The
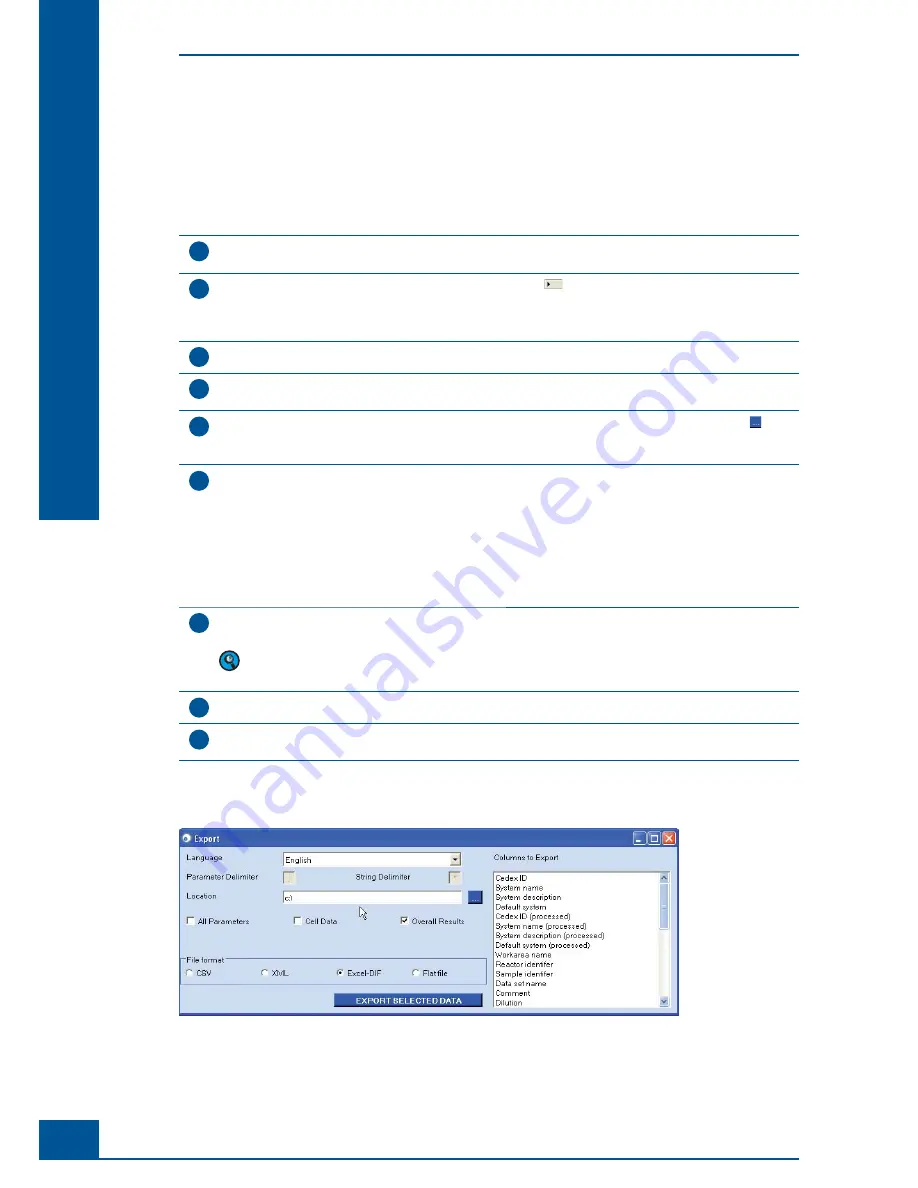
Export
window will open (see Figure 69).
4
In the
Export
window, individual
Parameter
and
String
delimiters
can be defi ned (this only applies to CSV
and Flat fi les).
5
In the
Location
area, the target path to be used for storage of the export fi le is entered. The button on the
right of the entry fi eld opens a window in which the path can be directly selected. The name of the fi le will
be automatically generated.
6
To specify a sub-set of parameters to be exported, either click the check-boxes beside the preset options
(
i.e.,
All Parameters, Cell Data and Overall Results) or select the desired parameters from the
Columns to
Export
area. To choose a set of parameters, keep the
<Ctrl>
button pressed while making selections. The
preset options are:
All Parameters
: All parameters about the measurement.
Cell Data
: Data for each and every cell and object detected in the measurement.
Overall Results
: Results such as average cell diameter, %viability, total cell concentration, viable cell
concentration, etc..
7
In the
File format
area, select the fi le format by clicking on the appropriate check-boxes. The fi les will
automatically and unchangeably receive .dif or .csv fi le name extensions.
The fi le format Excel-DIF should always be chosen if a fi le is to be exported into Excel.
8
Click on the
Export Selected Data
button.
9
A message window will appear to confi rm successful export of information.
Click on
OK
.
■
The measurement data can then be viewed in the fi le created.
Figure 69: The Export window
General Functions of the System
Data Management
Summary of Contents for Cedex HiRes
Page 8: ......
Page 14: ...8 Cedex HiRes Analyzer Operator s Guide...
Page 24: ...18 Cedex HiRes Analyzer Operator s Guide...
Page 164: ...158 Cedex HiRes Analyzer Operator s Guide G G Index...
Page 165: ......