background image

Please read this 

fi rst

3

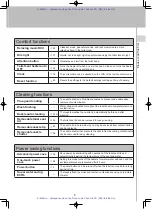
Section names

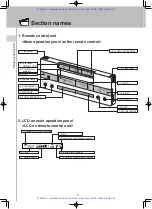
1. Remote control unit

2. LCD on main operation panel

(1) Indicator for signal reception

(2) Time

(4) Dry

(5) Activation of anti-freeze function

(7) Activation of power save function

(6) Battery level indicator

(3) Spray strength

(9) FLUSH FULL/PARTIAL

(2) Toilet seat 

OPEN/CLOSE

(1) Transmitter

(11) MILD

(12) BIDET

(13) POWER

(14) DRY

(15) NOZZLE POSITION

(5) Indicator lamp

(6) DEODORIZER for 

turbo deodorizing

(7) MASSAGE

(3) SHOWER for 

posterior

(8) SPRAY STRENGTH

(4) STOP

(10) Transmitter

<LCD on remote control unit>

<Main operation panel on the remote control>

E-Bidet.ru - 

официальный


дилер

 Roca Lumen Avant 

в


РФ

 (http://e-bidet.ru)

E-Bidet.ru - 

официальный


дилер

 Roca Lumen Avant 

в


РФ

 (http://e-bidet.ru)

Summary of Contents for LUMEN AVANT

Page 1: ...an refer to it easily Be sure to follow the safety precautions Failure to follow the warning and cautions described on pages 7 11 may result in serious accidents under some circumstances Each of these items is extremely important for safety and should be strictly observed In the event an accident occurs as a result of improper usage we will in no case assume responsibility for damages Give this ma...

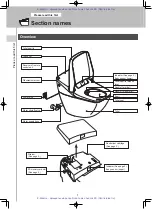
Page 2: ...r Water supply hose Power plug Water shutoff valve Nozzle for posterior Bowl Strainer See page 2 SD memory card slot See page 2 Indicator See page 2 Body sensor upper Deodorizer cartridge See page 2 Top cover Receiver of remote control unit Plasmacluster vent E Bidet ru официальный дилер Roca Lumen Avant в РФ http e bidet ru E Bidet ru официальный дилер Roca Lumen Avant в РФ http e bidet ru ...

Page 3: ... starts when the toilet seat lid opens 3 Washing with shower 4 Drying 5 Auto flushing when the user stands up 6 The seat and toilet seat lid close when the user leaves 17 18 19 23 24 25 Useful functions Power save One touch power save Advanced power save 26 Powerful deodorizing Deodrizer 27 Comfort with ions Plasmacluster 28 Listening to music Relaxing music DXII 29 Automatic music play 31 Manual ...

Page 4: ...trength 9 FLUSH FULL PARTIAL 2 Toilet seat OPEN CLOSE 1 Transmitter 11 MILD 12 BIDET 13 POWER 14 DRY 15 NOZZLE POSITION 5 Indicator lamp 6 DEODORIZER for turbo deodorizing 7 MASSAGE 3 SHOWER for posterior 8 SPRAY STRENGTH 4 STOP 10 Transmitter LCD on remote control unit Main operation panel on the remote control E Bidet ru официальный дилер Roca Lumen Avant в РФ http e bidet ru E Bidet ru официаль...

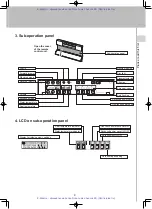
Page 5: ...ure Hr Min 3 Sub operation panel 4 LCD on sub operation panel Water temperature indicator One touch power save ON OFF Advanced power save ON OFF Auto flushing ON OFF Auto seat open setting Display for relaxing music settings Seat temperature indicator Open the cover of the remote control unit Sub operation panel E Bidet ru официальный дилер Roca Lumen Avant в РФ http e bidet ru E Bidet ru официаль...

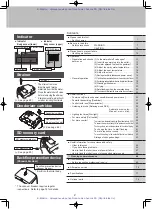
Page 6: ...unctions Seat heating 15 Warms the seat Temperature control 15 Adjusts the temperature of the water spray and seat Drying with warm air 23 Dries the washed posterior with warm air This makes you feel refreshed Deodorizing function 18 The body sensor is activated to start deodorizing Performs stronger deodorizing after using the toilet Turbo deodorizing 27 Increases the suction power to perform mor...

Page 7: ...m water and seat and the set temperatures are recovered after 8 hours Power button 3 The power button can be turned off when the toilet is not used for a long period of time Super water saving ECO6 Thoroughly flush the toilet and remove contamination using only 6 liters of water Cleaning functions Plus guard coating The nozzle shutter is Plus Guard coated to prevent and enable easy removal of cont...

Page 8: ... not plug too many leads into a single socket Fire may occur 220 240V Hold the plug when inserting or disconnecting the power plug If the plug is inserted or disconnected by holding the cord the plug or cord may be damaged resulting in fire or electric shock Completely insert the power plug Electric shock or fire may occur Disconnect the power plug periodically and clean it with a dry cloth Dust a...

Page 9: ...t makes them drowsy Persons who are very drunk Persons who are extremely fatigued If the drying function is used for a long period of time with the temperate on a setting other than Lo the user may suffer burns Never do the following while handling batteries Do not contact metal items necklace hair pin etc or store them with the battery Do not use new and old batteries or different types of batter...

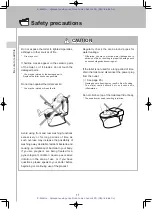
Page 10: ...de resulting in electric shock fire or inflammation of skin Keep the SD memory card in a safe place where babies and infants cannot reach it If they swallow the card by mistake it could block their windpipe If there is any possibility of the water freezing be sure to activate the anti freeze function See page 66 Damage due to freezing may cause fire or flooding Safety precautions 7 2 7 2 E Bidet r...

Page 11: ...he outlet during cleaning Neglecting to do so could cause electric shock Clean the nozzle with the power on Close the water shutoff valve when removing the strainer When installing the strainer tighten it fully so there is no gap Check that the O ring is free from foreign materials when attaching it Failure to do so could result in water leakage and flooding Use a cleanser suitable for the seat de...

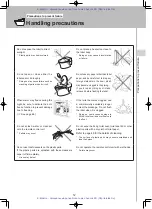
Page 12: ...h as household goods becoming wet If the toilet is not used for a long period of time drain the toilet and disconnect the power plug from the outlet See page 65 Damage due to freezing may result in fire or flooding The water could become dirty and cause skin inflammation 54 54 Avoid using front and rear washing functions excessively or for long periods of time as such overuse may increase the poss...

Page 13: ...omes clogged use a commercially available plunger to clear the blockage Do not flush the toilet when it is clogged Doing so could cause sewage to fill the toilet bowl and overflow onto the floor Do not splash water or cleanser onto the remote control unit Failure may occur Do not wipe the body toilet seat toilet seat lid or other plastic parts with a dry cloth or toilet paper Refer to page 49 for ...

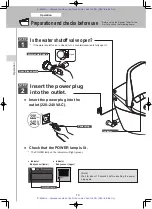
Page 14: ...icator will light green Preparation and checks before use Before using the Shower Toilet for the first time check the following items STEP 1 Power plug STEP 2 Note Wait for about 10 seconds before inserting the power plug again Indicator POWER lamp Indicator Body sensor lower Indicator Body sensor upper Operation Open Close handle Water shutoff valve E Bidet ru официальный дилер Roca Lumen Avant в...

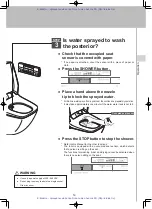
Page 15: ...Is water sprayed to wash the posterior At this time water sprays from a point near the nozzles as a preparatory operation It may take approximately one minute if the warm water tank is not full STEP 3 Use only a power supply of 220 240 VAC Do not plug too many leads into a single socket Fire may occur Check that the occupied seat sensor is covered with paper Occupied seat sensor If no paper is att...

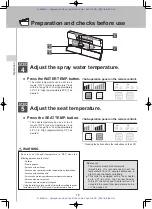
Page 16: ...let seat heater when it is occupied to prevent low temperature burns See page 39 Pressing the buttons alters the indications on the LCD Adjust the spray water temperature STEP 4 Adjust the seat temperature STEP 5 Be sure to set the seat temperature to OFF when the following persons use the toilet Children Elderly persons Persons with an illness Persons who cannot adjust the temperature by themselv...

Page 17: ...lso activated Refer to Power save on page 26 for details When the button is pressed the indication on the LCD changes from OFF to ON When the toilet seat lid is closed the temperatures of the water and the seat are lowered to reduce power consumption Sub operation panel on the remote control Main operation panel on the remote control Sub operation panel on the remote control Main operation panel o...

Page 18: ...opens Setting of AUTO SEAT OPEN To manually open and close the toilet seat lid and seat Set the AUTO SEAT OPEN function to OFF When a small child uses the toilet set the AUTO SEAT OPEN button on the remote control unit to the OFF position The occupied seat sensor may not be able to detect a small child s body and although rarely the toilet seat lid may start to close during use of the toilet The b...

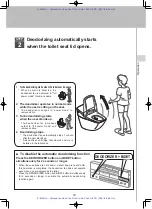
Page 19: ...dorizing starts when the toilet seat lid opens When a person is detected the deodorizer fan is activated in full power mode to remove odors The deodorizer changes to power mode to remove odors The deodorizer fan increases output to full power mode and removes odors 2 The deodorizer operates in normal mode while the user is sitting on the seat 3 Turbo deodorizing starts when the user stands up The ...

Page 20: ... water For wide washing Press the SHOWER button again while washing the posterior The nozzle moves back and forth to wash a wider range Press the STOP button to stop spraying water For wide S washing Press the SHOWER button again while washing the posterior in wide mode The nozzle moves back and forth in a short stroke for more thorough washing Press the STOP button to stop spraying water Press th...

Page 21: ...here are six levels of spray strength Adjust the spray strength as desired The strength is indicated by the spray strength indicator on the LCD Press the or SPRAY STRENGTH button Washing function The bidet washing function includes an auto stop function to stop washing after 2 minutes A nozzle auto cleaning function is provided to automatically clean the nozzle before and after washing What are wi...

Page 22: ...idet washing There are six levels of spray strength Adjust the spray strength as desired The strength is indicated by the spray strength indicator on the LCD Press the or SPRAY STRENGTH button Bidet washing The bidet washing function includes an auto stop function to stop washing after 2 minutes A nozzle auto cleaning function is provided to automatically clean the nozzle before and after washing ...

Page 23: ...ted to five levels in total There are two levels in the front the initial position and two levels in the rear If you stand up the nozzle position will automatically return to the initial position Press the FRONT or REAR NOZZLE POSITION button Initial position Nozzle position The nozzle position can be adjusted back and forth while washing the posterior or using the bidet NOZZLE POSITION FRONT or R...

Page 24: ...nnot adjust the temperature by themselves Persons with sensitive skin Persons who are taking medication that makes them drowsy Persons who are very drunk Persons who are extremely fatigued If the drying function is used for a long period of time with the temperate on a setting other than Lo the user may suffer burns STEP 4 To change the air temperature Press the DRY button again while drying Refer...

Page 25: ...performed even if the seat is occupied for less than 50 seconds In AUTO CLEAN mode flushing automatically starts approximately 6 seconds after the user stands up This time can be changed to approximately 2 10 or 15 seconds See page 41 STEP 5 To deactivate the auto flushing function Set AUTO CLEAN to OFF Note In the event a power failure occurs flush the toilet as described in How to flush the toil...

Page 26: ...r detect a person and automatically open or close the toilet seat and or seat lid STEP 6 To open and close only the toilet seat with the remote control unit Press the OPEN CLOSE button Pressing opens and closes the seat and or seta lid alternately OPEN CLOSE To manually open and close the toilet seat lid and seat Set the AUTO SEAT OPEN button to OFF AUTO SEAT OPEN General operation E Bidet ru офиц...

Page 27: ...er of times in a day When 8 hours has passed the function automatically returns to the temperature originally set and the ONE TOUCH POWER SAVE lamp changes from ON to OFF Power save Useful functions When the power save function is activated the water and toilet seat temperatures are lowered so they may feel cold In this a case cancel the power save function Even when the power save function is tur...

Page 28: ...atic deodorizing function Press the DEODORIZER button and BIDET button simultaneously for 2 seconds or longer When these buttons are held down a beep is heard After this operation is completed the deodorizer fan does not operate even when a user approaches the toilet Press the DEODORIZER button and BIDET button simultaneously for 2 seconds or longer to activate the automatic deodorizing function a...

Page 29: ...oom The plasmacluster function operates to clean air continuously in clean mode for 1 hour after the button is pressed and then switches to intermittent operation When a person is detected the plasmacluster function automatically switches to refresh mode and the indicator lamp lights green When no person is detected it switches to clean mode and the indicator lamp lights blue When the plasmacluste...

Page 30: ... or sits down on the seat music can be played and stopped by pressing the button Jazz Aria on the G string Bach Je te veux Satie Pavane Fauré Sicilienne Fauré Green Sleeves ー Scarborough Fair ー Minuet Bach Etude Op 10 3 Chanson de l Adieu Chopin Danny Boy ー Ave Maria Chopin When The Saints Go Marching In ー Summer Time Gershwin Classical L Arlesienne Bizet Morning mode The Swan Saint Saëns Night mo...

Page 31: ...dom play See page 33 ON OFF of morning night mode setting See page 34 Changing the time to start morning mode See page 35 Changing the time to start night mode See page 36 End mode change Use the upper buttons to change the relaxing music setting E Bidet ru официальный дилер Roca Lumen Avant в РФ http e bidet ru E Bidet ru официальный дилер Roca Lumen Avant в РФ http e bidet ru ...

Page 32: ...e SWITCH MODE button is pressed instead of the MODE EXCHANGE button the music mode is changed to auto See page 33 When no operation is performed for 15 seconds while making this setting the indication returns to the normal status In this case the music mode is not changed to auto or manual Pressing and turns on and off the indication AUTO on the LCD SETTINGS BEING CHANGED flashes while the mode is...

Page 33: ...Press the PLAY STOP button To adjust the volume Use the Vol and buttons The volume can be adjusted in 16 steps as desired Sub operation panel on the remote control Press the REV button once while music is played to return to the beginning of the track Press the REV button continuously The next music track is selected The previous music track is selected E Bidet ru официальный дилер Roca Lumen Avan...

Page 34: ...dication of the desired mode is flashing or turned off in the case of single track repeat mode Play mode Multiple play modes cannot be set together However each play mode can be selected with either morning mode or night mode Sub operation panel on the remote control Pressing the button turns on and off the indications ALL REPEAT and RANDOM 2 Press the or CHANGE MODE button Single track repeat is ...

Page 35: ...ode starts While SET MORNING NIGHT is lit What are morning and night modes The default settings for morning and night modes are as follows Time for morning mode AM 6 00 AM 11 00 Time for normal mode AM 11 00 PM 6 00 Time for night mode PM 9 00 AM 6 00 Night mode AM 6 00 PM 12 00 AM 12 00 PM 6 00 PM 9 00 AM 11 00 Sub operation panel on the remote control When no operation is performed for 15 second...

Page 36: ...MODE EXCHANGE button to define the setting When the SWITCH MODE button is pressed instead of the MODE EXCHANGE button the process to change the start time for night mode starts After setting the desired time Time for morning mode The duration of morning mode is 5 hours after the preset start time Sub operation panel on the remote control When no operation is performed for 15 seconds while making t...

Page 37: ...ting the desired time 2 Press the or CHANGE MODE button Time for night mode The duration of night mode is from the preset start time to the start time for morning mode Sub operation panel on the remote control When no operation is performed for 15 seconds while making this setting the indication returns to the normal status In this case the time setting will not be changed Pressing the button chan...

Page 38: ...o turn off only the dim light in the bowl Press the STOP button and REAR button NOZZLE POSITION simultaneously for 2 seconds or longer A short beep is heard when the setting is completed Press the STOP button and REAR button NOZZLE POSITION simultaneously again for 2 seconds or longer to reset the setting A beep will be heard and the setting will return To stop the STOP button flashing Press the W...

Page 39: ...R SAVE button and ATTENTION button simultaneously for 2 seconds or longer A short beep is heard when the setting is completed and a bell chimes at the new volume level Volume high Initial level Volume low To return to the default setting Press the ONE TOUCH POWER SAVE button and ATTENTION button simultaneously for 2 seconds or longer repeatedly until a beep is heard ATTENTION ONE TOUCH POWER SAVE ...

Page 40: ...ng even at the weakest setting This function is not activated at the time of delivery Press the STOP button and FLUSH PARTIAL button simultaneously for 2 seconds or longer A short beep is heard and the spray strength is lowered There are two lower levels Pressing these buttons gradually lowers the spray strength Set the strength to the desired level Even when these buttons are pressed three times ...

Page 41: ...r A short beep is heard when the setting is completed The air temperature when drying starts changes accordingly The indication on the LCD also changes accordingly The sequence to alter temperature settings is as shown on the right STOP DRY Setting operation Start temperature Temperature and how it changes when the DRY button is pressed during use 1st 2nd 3rd Default setting at time of delivery Mi...

Page 42: ...s the time accordingly Refer to the figure below Press the DEODORIZER button and FLUSH FULL button simultaneously for 2 seconds or longer A short beep is heard when the setting is completed To return to the default setting Press the DEODORIZER button and FLUSH FULL button simultaneously for 2 seconds or longer repeatedly until a beep is heard DEODORIZER FLUSH FULL 6 seconds 10 seconds 15 seconds 2...

Page 43: ...are also muted The buzzer sound is set to ON at the time of delivery Press the DEODORIZER button and MILD button simultaneously for 2 seconds or longer To generate the buzzer sound Press the DEODORIZER button and MILD button simultaneously for 2 seconds or longer DEODORIZER MILD E Bidet ru официальный дилер Roca Lumen Avant в РФ http e bidet ru E Bidet ru официальный дилер Roca Lumen Avant в РФ ht...

Page 44: ...Auto music play ON OFF ON Repeat play Single track repeat Turn off the seat heater only when the seat is occupied Not turned off Spray strength setting Strong side of three levels The order to change air temperatures by pressing the DRY button Mid Hi Low Time to start auto flushing 6 seconds after the user stands up Places illuminated by the dim light Base of toilet and inside of bowl Indication t...

Page 45: ...Useful functions 44 E Bidet ru официальный дилер Roca Lumen Avant в РФ http e bidet ru E Bidet ru официальный дилер Roca Lumen Avant в РФ http e bidet ru ...

Page 46: ... open or with the battery indicator flashing the signal may not reach the toilet and the specified function may not be activated A low battery indicator is provided Since the occupied seat sensor uses light reflection it does not function in the following cases If the user bends forward or sits on the front of the seat Change your sitting posture for example sit further back on the seat If the use...

Page 47: ...extended periods be sure to turn the power off while you are away Use a seat cover of the specified type and wash it frequently to keep it clean If there is any possibility of water freezing the power needs to be kept on so do not disconnect the power plug from the outlet Activate the anti freeze function See page 66 If you have these problems Suitable cleansers Use a neutral cleanser or similar s...

Page 48: ...urn the top cover to its original condition Check that the top cover is correctly installed Return the manual lever red to its original position and turn it clockwise approximately 180 to stop water Check that water supply to the bowl has stopped Turn the manual lever red counterclockwise approximately 180 to supply water for at least 10 seconds Water will not run over from the toilet Pull up Manu...

Page 49: ...ce in a shorter time Finally pour 3 to 4 liters of water into the toilet so that the water level in the bowl reaches the normal height Perform the same procedures after urinating Note Be very careful not to spill water onto the floor when carrying water in a bucket or pouring water into the toilet Do not allow water to splash on the outlet How to flush the toilet in event of suspended water supply...

Page 50: ...ace of the ceramic parts may be damaged Toilet Rubber gloves To prevent rough skin on hands Fold up the edges of gloves to prevent water and cleanser from entering Tooth brush It is very useful for hidden parts or tight areas Use an old brush Deodorizer cartridge Type Applicable place Neutral cleanser for toilet Removes yellowish and or blackish contamination from the toilet ceramic parts Ceramic ...

Page 51: ...ineffective 62 When spray strength becomes too low 63 When the battery indicator on the remote control unit flashes 64 When not used for extended periods 65 When water may freeze 66 Use a cleanser suitable for the seat cleansers for plastics when cleaning the plastic parts Toilet cleanser home cleanser bleach benzene paint thinner scouring powder cresol etc may damage the plastic parts resulting i...

Page 52: ...t to remove Wipe the surfaces frequently with a slightly dampened soft cloth Wiping with a damp cloth also prevents static electricity Static electricity attracts dust particles resulting in blackish contamination Cleaning the toilet seat and lid For noble black type It is recommended to frequently clean the noble black type product on which contamination stands out easily E Bidet ru официальный д...

Page 53: ...Cleaning and maintenance 52 E Bidet ru официальный дилер Roca Lumen Avant в РФ http e bidet ru E Bidet ru официальный дилер Roca Lumen Avant в РФ http e bidet ru ...

Page 54: ...ot use excessive force on the toilet seat lid Doing so could damage it Do not open the toilet seat with the toilet seat lid removed Doing so could cause the cover or toilet seat to become scratched or damaged Do not use the toilet with the toilet seat lid removed When the toilet seat lid is lowered to the closed position and then removed the WASH BIDET and DRY buttons do not operate when using the...

Page 55: ...the toilet seat lid release lever downward until a click is heard Lift the seat lid and set the right side to the pin Press the POWER button to turn the power on and check that the POWER lamp is lit Turn down Toilet seat lid release lever Hinge pin POWER lamp Indicator Body sensor lower Indicator Body sensor upper POWER Pin hole E Bidet ru официальный дилер Roca Lumen Avant в РФ http e bidet ru E ...

Page 56: ...hlorinated cleansers acidic cleansers or toxic cleansers The vaporized gases could damage this product or cause failures Do not use hot water The toilet may be damaged Do not use an abrasive brush or cleanser They will deteriorate the effects of Pro Guard Contamination at the bottom of the bowl While the dim light is lit a shadow in the bottom of the toilet bowl might look like dirt E Bidet ru офи...

Page 57: ... wiping with dry cloth or toilet paper Doing so could result in scratches Do not use an abrasive brush or cleanser They will deteriorate the effects of Plus Guard Assembling the nozzle shutter Press the knobs on both sides of the nozzle shutter and slowly insert the shutter Note Push the nozzle shutter until a click is heard Check that the shutter is correctly assembled Wash the removed nozzle shu...

Page 58: ...before and after the washing or bidet function To thoroughly clean the nozzle when cleaning the toilet Cleaning the nozzle Cleaning the nozzle during maintenance Otherwise the sensor may detect a person and close the toilet seat or flush the toilet Set the AUTO SEAT OPEN and AUTO CLEAN buttons to OFF Lift the seat lid and seat Water comes out from a point near the nozzles for approximately 3 secon...

Page 59: ...zle Press the NOZZLE CLEANING button Since the nozzle moves in a short stroke the nozzle can be cleaned by simply applying the sponge to it The nozzle stops for approximately 5 minutes and then automatically retracts Clean the posterior nozzle Since the nozzle moves in a short stroke the nozzle can be cleaned by simply applying the sponge to it The nozzle automatically retracts after 1 minute When...

Page 60: ... 5 minutes Turn the nozzle tip counterclockwise to align the right corner of the nozzle tip with the left corner of the nozzle and pull out the nozzle tip Install a new nozzle tip as described in Assembling the nozzle page 60 while the nozzle is stopped The posterior nozzle extends and moves back and forth Water will spray out from a point near the nozzles Turn counterclockwise Pull Note The nozzl...

Page 61: ...ed with that of the nozzle tip and that the engaged section is flat Inappropriate engagement may cause failures Also the angle of the water spray may change Insert Turn clockwise Left corner of the nozzle O ring Right corner of the nozzle tip Press the STOP button to return the nozzle to its original position Check the engaged point Check that the corner of the nozzle is aligned with that of the n...

Page 62: ...he filters Remove the filters from the two air inlets at each side of the toilet Mount the top cover Remove the top cover Press the top cover until a click is heard If the top cover cannot be set in place the filter may not be inserted completely Insert the filter again Top cover Anti bacteria ion filter Deodorizing filter Disconnect the power plug from the outlet Insert the power plug into the ou...

Page 63: ...heck the when replacement of the deodorizer cartridge is due Record the usage start date on the date label of the new cartridge Record the date you start using the toilet Month Date Year Take the deodorizer cartridge out of the deodorizer cartridge cover Set the cleaned deodorizer cartridge into the deodorizer cartridge cover so that the cut corner is placed on the right side Press the top cover u...

Page 64: ...checks before use See page 13 Disassemble the strainer into the threaded section and net section and thoroughly wash them in water to remove dust from the inside of the net or O ring When spray strength becomes too low Close the water shutoff valve to stop water supply Strainer Water shutoff valve Turn and remove the strainer from the top of the toilet A small amount of water spills out Remove the...

Page 65: ...s Attach the back cover and slide the remote control unit into its bracket from the top Press the Hr and Min buttons to adjust the time See page 16 Reference The batteries were used for operation checks while the remote control unit was installed so their service life may be shorter than commercially available batteries Depending on the size of the room finishing and color particularly a dark colo...

Page 66: ...ove the strainer Check that no water leaks from the water shutoff valve Mount the top cover Mount the strainer Strainer Connect the water supply hose Refer to page 68 for how to connect the water supply hose Disconnect the water supply hose from the water shutoff valve and drain water from inside the hose Refer to page 68 for how to disconnect the water supply hose Water supply hose Washbowl Water...

Page 67: ...ction Press the MASSAGE button and FRONT button NOZZLE POSITION simultaneously for 2 seconds or longer again to cancel the anti freeze function If the shower stops working due to water freezing If the water supply hose or the water supply connection freezes and water do not spray out gradually warm up the water supply hose and or water supply connection with a cloth soaked in warm water etc or hea...

Page 68: ...er Check that no water leaks from the water shutoff valve Connect the water supply hose Mount the top cover Mount the strainer Strainer Refer to page 68 for how to connect the water supply hose Disconnect the water supply hose from the water shutoff valve and drain water from inside the hose Refer to page 68 for how to disconnect the water supply hose When using the toilet againBe sure to perform ...

Page 69: ...s firmly secured Clip ring Water supply hose Insert a flat screwdriver into the gap Push the screwdriver forward to release the claw Lock The clip ring is designed so that the lock claw catches the other end of the ring Gap Press the screwdriver inserted into the gap down toward the bottom of the box shaped section Slightly twist the screwdriver to push it forward easily Flat screwdriver Flat scre...

Page 70: ...it The battery in the remote control unit has expired Battery lamp flashes Replace the battery with a new one See page 64 The battery is set in the remote control unit in the wrong direction Insert the battery in the correct direction See page 64 Remote control s transmitter receiver is dirty or wet Remove dirt or water The inverter lamp is used Turn off the lamp and check the operation The power ...

Page 71: ...tton and adjust the temperature to the appropriate level See page 15 Deodorizing function Symptom Cause Solution The deodorizer fan runs continuously The plasmacluster is activated The plasmacluster operates intermittently When air blows from the outlet of the plasmacluster see page 1 the sound is not the operating noise of the deodorizer fan but generated due to operation of the plasmacluster fan...

Page 72: ...ore requesting professional repairs Drying with warm air Symptom Cause Solution Warm air does not blow The occupied seat sensor is not on Sit on the toilet seat See page 45 Dry air is not warm The warm air temperature is not set to an appropriate temperature Press the DRY button and adjust the temperature to the appropriate level See page 23 Warm air stops suddenly before finishing The drying func...

Page 73: ... OPEN button to 1 or 2 See page 17 The commercial seat cover is too heavy or caught somewhere Remove the seat cover The body sensor is dirty Wipe the sensor with a damp soft cloth See page 45 The toilet seat and seat lid remain open Or it opens and closes repeatedly even though there is no person nearby The body sensor is dirty Wipe the sensor with a damp soft cloth See page 45 Relaxation music Sy...

Page 74: ... The plasmacluster ion function is faulty There is a problem with the plasmacluster function Disconnect the power plug from the outlet and request repairs The rear feet projections at the back of the toilet seat are not attached to the toilet are floating free This is not a problem The toilet is designed so that the rear feet projections float free Use the toilet as usual To reset settings to the ...

Page 75: ...Troubleshooting 74 E Bidet ru официальный дилер Roca Lumen Avant в РФ http e bidet ru E Bidet ru официальный дилер Roca Lumen Avant в РФ http e bidet ru ...

Page 76: ...s you will be asked When requesting repairs be sure to present the Warranty Certificate Repairs will be performed in accordance with the provisions of the warranty If the repair is effective in maintaining the function of the toilet at your request the repairs will be made on a charged basis Charges for repairs include a technical service fee travel expenses and parts costs 1 Address name and tele...

Page 77: ...ars after the discontinuation of manufacture Suitable spare parts may not be available after this minimum retention period has passed Spare parts are required to maintain the appropriate function of the product E Bidet ru официальный дилер Roca Lumen Avant в РФ http e bidet ru E Bidet ru официальный дилер Roca Lumen Avant в РФ http e bidet ru ...

Page 78: ...and float switch Drying with warm air Air flow 0 3 m3 min DC sirocco fan 12 VDC Air heater capacity 380 W Air temperature control Low room temperature Mid and Hi thermistor control Safety device Temperature fuses 2 Toilet seat lid Heater capacity 48 W Surface temperature OFF room temperature and within the range from Low approx 28 C to High approx 40 C Temperature control Adjustable to 6 levels wi...

Page 79: ...Specifi cations 78 E Bidet ru официальный дилер Roca Lumen Avant в РФ http e bidet ru E Bidet ru официальный дилер Roca Lumen Avant в РФ http e bidet ru ...

Page 80: ...The service life of the deodorizer cartridge is about 7 years Replace the cartridge if you experience odor The nozzle tips can be replaced if contamination stands out The nozzle tips can be kept clean See page 59 Posterior nozzle tip part No CWA 208 Bidet nozzle tip part No CWA 209 Optional parts E Bidet ru официальный дилер Roca Lumen Avant в РФ http e bidet ru E Bidet ru официальный дилер Roca L...

Page 81: ... and release it Mount the top cover SD memory card Cut off corner Slot The relax music DXII function allows you to save music data in the SD memory card and listen to it In addition music in morning and night modes can be changed as desired 1 Music tracks are played in the storage order In auto play mode and all track repeat mode 2 The second last music track saved will be the track used for morni...

Page 82: ...Sanitario S A Avda Diagonal 513 08029 Barcelona España Tel 34 93 366 12 00 Authorized Dealer E Bidet ru официальный дилер Roca Lumen Avant в РФ http e bidet ru E Bidet ru официальный дилер Roca Lumen Avant в РФ http e bidet ru ...

Reviews: