


Robotiq 2-Finger Adaptive Robot Gripper - 200
Instruction Manual
Robotiq inc. © 2008-2013
94
1.
2.
3.
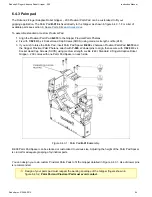
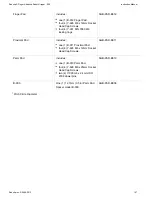
6.4.3 Palm pad
The Robotiq 2-Finger Adaptive Robot Gripper – 200 Proximal Palm Pad can be customized to fit your
gripping application. The Palm Pad
is fixed directly to the Gripper as shown in figure 6.4.3.1. For a list of
B-010
Accessories
.
To assemble standard or custom Proximal Pad :
Align the Proximal Palm Pad
to the Gripper Proximal Palm Phalanx.
B-010
Fix with
M6 x 4 Socket Head Cap Screws (SHCS) using medium strength
(248).
Y-828
Loctite
If you wish to raise the Palm Pad, insert Palm Pad Spacer
x2 between Proximal Palm Pad
and
B-009
B-010
the Gripper Proximal Palm Phalanx, attach with
x2 dowel pins to align, then secure with
M6 x 4
Y-995
Y-828
Socket Head Cap Screws (SHCS) using medium strength
(248). Standard 2-Finger Adaptive Robot
Loctite
Gripper – 200 comes with one Palm Pad Spacer on each side.
Figure 6.4.3.1 : Palm Pad
assembly.
B-010
B-009 Palm Pad Spacer can be stacked or customized to various size. Adjusting the height of the Palm Pad Spacer
is crucial for adequate grasping of cylindrical parts.
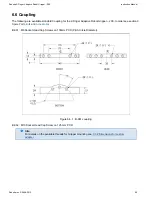
You can design your own custom Proximal Palm Pads to fit the Gripper detailed in Figure 6.4.3.1. Use of dowel pins
is recommended.
Design of your palm pad must respect the working envelope of the Gripper fingers shown in
figure 6.4.3.2,
.
Palm Pad and Proximal Pad must avoid contact