


Robotiq 2-Finger Adaptive Robot Gripper - 200
Instruction Manual
Robotiq inc. © 2008-2013
88
1.
2.
3.
6.4 Pad design and customization
Pads for the Robotiq 2-Finger Adaptive Robot Gripper 200 can be customized to fit your gripping application. The
–
following subsection details the design of standard Finger Pads, Palm Pads and Proximal Pads, information for
custom design is also provided. For a list of available parts to replace the various pads see section
.
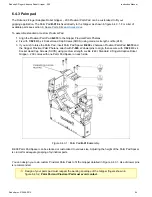
6.4.1 Finger Pad
The Robotiq 2-Finger Adaptive Robot Gripper 200 Finger Pads can be customized to fit your gripping application.
–
The Finger Pad B-012 is fixed to the Pad Holder B-005 and the Pad Holder is fixed to the Gripper as shown in figure
6.4.1.1. For a list of available parts see section
.
Hint
Note that the B-005 Pad Holders can be oriented so that the finger pads point to the inside or the
outside of the Gripper fingers. This possibility allows for part picking from the inside or the
outside of the fingers, so you can orient the pad holders to suit your application.
To assemble standard or custom Finger Pad :
Press
m6 x 12 Dowel Pins into the Pad Holder. Dowel pins must meet DIN 7-m6 standard.
Y-996 Ø6
Align the Finger Pad
to the Pad Holder
, fix with
M6 x 12 Socket Head Cap Screws
B-012
B-005
Y-826
(SHCS) using the
lock washers.
Y-931
Align the Pad Holder
to the Gripper finger using the dowel holes present on the finger phalanx, fix with
B-005
M6 x 12 Socket Head Cap Screws (SHCS) using medium strength Loctite (248).
Y-826