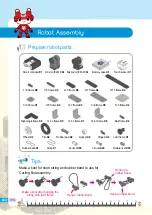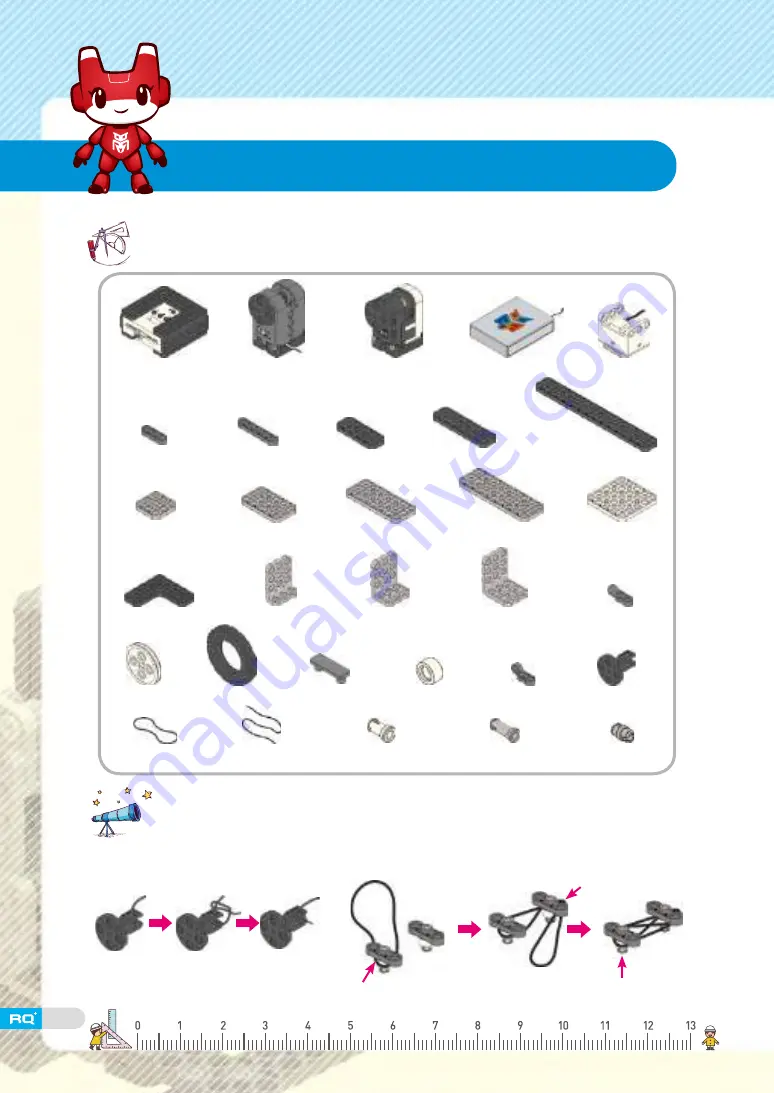
Smart controller X1
1×3 frame X6
3×3 frame X1
Right angle frame X2
Wheel X2
Rubber band X1
String X1
2s rivet X99
3s rivet X24
Double rivet X38
Tire X2
Rubber pad X2
Spacer X2
Hinge A X2
Joint frame X1
3×4 L frame X5
3×6 L frame X7
3×6 L frame X8
Ball frame X2
1×5 frame X2
3×5 frame X4
2×5 frame X6
3×7 frame X3
2×7 frame X2
3×9 frame X5
2×15 frame X4
5×5 frame X2
R. motor (ID29,30) X2 Smart servo (ID00~03) X4
Battery case X1
Touch sensor X1
Prepare robot parts.
Tips.
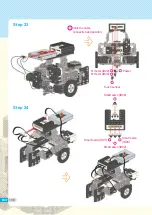
Make a knot for short string and rubber band to use for
Curling Bot assembly.
Make a knot after hanging the
string onto joint frame
Hang a rubber band.
Wind up a
rubber band.
Hang a rubber band.
Robot Assembly
118
Summary of Contents for RQ PLUS 130
Page 1: ...ROBOT CONSTRUCTION KIT Construct more than 30 models with RQ 110 RQ 120 and RQ 130 ...
Page 2: ...List BASICS Tank Bot Four wheeled Bot Dino Vulcan Bot Forklift 06 12 30 48 68 88 ...
Page 20: ...Step 16 Tip Tip 3s rivet X4 2s rivet X1 Step 15 22 ...
Page 22: ...Smart servo ID00 Smart servo ID01 Smart servo ID02 Tip Double rivet X4 Step 20 Step 19 24 ...
Page 23: ... Tank Bot is ready completion 25 ...
Page 27: ...MEMO 29 ...
Page 37: ...Step 14 Tip Tip 2s rivet X2 2s rivet X8 Step 13 Step11 39 ...
Page 45: ...MEMO 47 ...
Page 52: ...Step 8 Tip Tip 3s rivet X3 3s rivet X3 Step 7 Step5 54 ...
Page 60: ...Step 24 Tip Tip 2s rivet X4 Double rivet X2 Step 23 Step17 Step18 62 ...
Page 61: ... Dino robot is ready completion 63 ...
Page 65: ...MEMO 67 ...
Page 71: ...Step 6 Tip Tip 3 7 frame X2 3 9 frame X3 3s rivet X8 2s rivet X4 Step 5 73 ...
Page 81: ... Vulcan Bot is ready completion Tip Double rivet X4 Step 25 83 ...
Page 85: ...MEMO 87 ...
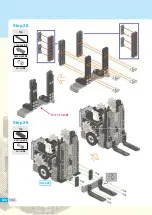
Page 94: ...Step 13 Step 12 Tip Tip 2s rivet X4 2s rivet X8 Step6 96 ...
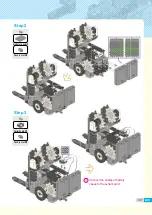
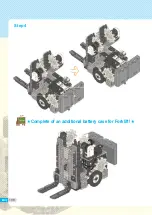
Page 106: ... Complete of an additional battery case for Forklift Step 4 completion 108 ...
Page 113: ...MEMO 115 ...
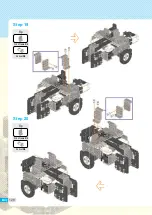
Page 126: ...Tip Tip 3 4 L frame X2 2s rivet X4 3 4 L frame X2 2s rivet X4 Step 19 Step 20 128 ...
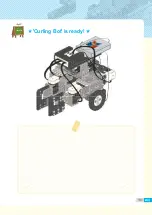
Page 129: ... Curling Bot is ready completion 131 ...
Page 133: ...MEMO 135 ...
Page 142: ...Tip Tip Battery case X1 Double rivet X4 2s rivet X8 Step 11 Step 12 144 ...
Page 146: ...Tip Tip 7 7 frame X1 2s rivet X6 2s rivet X4 Step 19 Step 20 Step17 148 ...
Page 153: ... Exploration Bot is ready completion Do not fold the solar light panel by force 155 ...
Page 155: ...Take out the smart controller and connect the serial board then reassemble 157 ...
Page 156: ...Tip Tip 2s rivet X4 Battery case X4 1 5 frame X1 Double rivet X4 Step 4 Step 5 158 ...
Page 157: ...Step 6 Complete of an additional battery case for Exploration Bot completion 159 ...
Page 161: ...MEMO 163 ...
Page 165: ...Tip Tip 2s rivet X4 2 5 frame X2 2s rivet X6 Step 3 Step 4 167 ...
Page 173: ...Tip Tip 2 15 frame X2 2s rivet X8 2s rivet X2 Step 17 Step 18 Step15 175 ...
Page 183: ...Tip Serial board X1 Double rivet X2 Step 2 Step 3 185 ...
Page 184: ... Complete of an additional battery case for Crane completion 186 ...
Page 205: ...Tip Battery case X1 Double rivet X2 Step 2 Step 3 207 ...
Page 206: ...completion Complete of an additional battery case for Excavator 208 ...
Page 217: ...Tip Tip IR sensor X1 Double rivet X2 2s rivet X4 Step 16 Step 17 219 ...
Page 220: ...Tip Tip 2s rivet X4 2s rivet X6 Step 22 Step 23 Step19 222 ...
Page 229: ...Tip Battery case X1 Double rivet X2 Step 2 231 ...
Page 230: ... Complete of an additional battery case for Hu tank completion 232 ...
Page 242: ...MEMO 244 ...
Page 243: ...MEMO 245 ...

