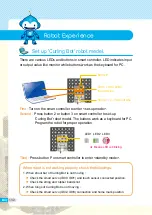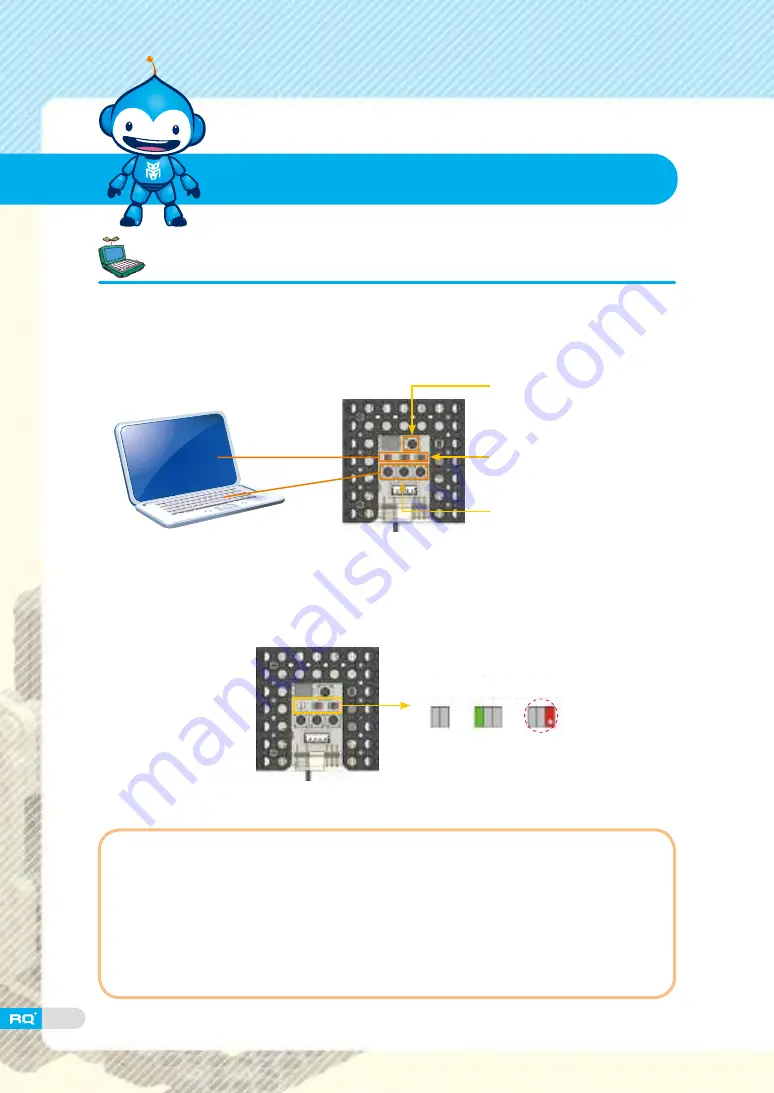
There are various LEDs and buttons in smart controller. LED indicates input
or output value like monitor while buttons work as the keyboard for PC.
Set up 'Curling Bot' robot medel.
First
:
Turn on the smart controller to enter <set-up mode>.
Second
:
Press button 2 or button 3 on smart controller to set-up
'Curling Bot' robot model. The buttons work as a keyboard for PC.
Program the robot for proper operation.
Third
:
Press button P on smart controller to enter <standby mode>.
LED1 LED2 LED3
When robot is not working properly, check the followings.
1. When shoot bar of Curling Bot is not moving :
▶
Check the smart servo (ID00, ID01) and touch sensor connected position.
▶
Check the string and rubber band knot.
2. When tongs of Curling Bot is not moving :
▶
Check the smart servo (ID02, ID03) connection and home mark position.
Button P
LED1, LED2, LED3
from left side
Button 1, 2, 3 from left side
★
Means LED is blinking.
Robot Experience
132
Summary of Contents for RQ PLUS 130
Page 1: ...ROBOT CONSTRUCTION KIT Construct more than 30 models with RQ 110 RQ 120 and RQ 130 ...
Page 2: ...List BASICS Tank Bot Four wheeled Bot Dino Vulcan Bot Forklift 06 12 30 48 68 88 ...
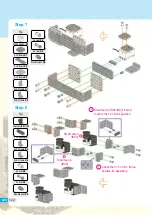
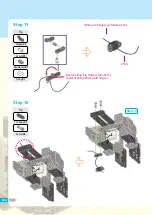
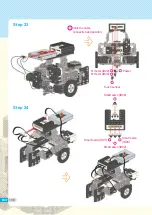
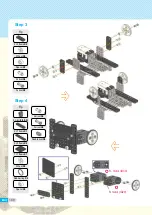
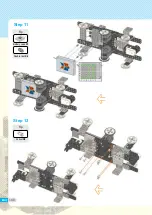
Page 20: ...Step 16 Tip Tip 3s rivet X4 2s rivet X1 Step 15 22 ...
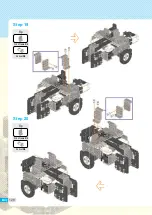
Page 22: ...Smart servo ID00 Smart servo ID01 Smart servo ID02 Tip Double rivet X4 Step 20 Step 19 24 ...
Page 23: ... Tank Bot is ready completion 25 ...
Page 27: ...MEMO 29 ...
Page 37: ...Step 14 Tip Tip 2s rivet X2 2s rivet X8 Step 13 Step11 39 ...
Page 45: ...MEMO 47 ...
Page 52: ...Step 8 Tip Tip 3s rivet X3 3s rivet X3 Step 7 Step5 54 ...
Page 60: ...Step 24 Tip Tip 2s rivet X4 Double rivet X2 Step 23 Step17 Step18 62 ...
Page 61: ... Dino robot is ready completion 63 ...
Page 65: ...MEMO 67 ...
Page 71: ...Step 6 Tip Tip 3 7 frame X2 3 9 frame X3 3s rivet X8 2s rivet X4 Step 5 73 ...
Page 81: ... Vulcan Bot is ready completion Tip Double rivet X4 Step 25 83 ...
Page 85: ...MEMO 87 ...
Page 94: ...Step 13 Step 12 Tip Tip 2s rivet X4 2s rivet X8 Step6 96 ...
Page 106: ... Complete of an additional battery case for Forklift Step 4 completion 108 ...
Page 113: ...MEMO 115 ...
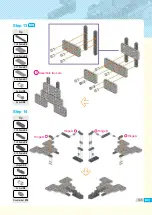
Page 126: ...Tip Tip 3 4 L frame X2 2s rivet X4 3 4 L frame X2 2s rivet X4 Step 19 Step 20 128 ...
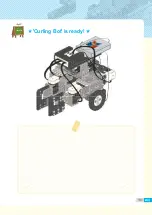
Page 129: ... Curling Bot is ready completion 131 ...
Page 133: ...MEMO 135 ...
Page 142: ...Tip Tip Battery case X1 Double rivet X4 2s rivet X8 Step 11 Step 12 144 ...
Page 146: ...Tip Tip 7 7 frame X1 2s rivet X6 2s rivet X4 Step 19 Step 20 Step17 148 ...
Page 153: ... Exploration Bot is ready completion Do not fold the solar light panel by force 155 ...
Page 155: ...Take out the smart controller and connect the serial board then reassemble 157 ...
Page 156: ...Tip Tip 2s rivet X4 Battery case X4 1 5 frame X1 Double rivet X4 Step 4 Step 5 158 ...
Page 157: ...Step 6 Complete of an additional battery case for Exploration Bot completion 159 ...
Page 161: ...MEMO 163 ...
Page 165: ...Tip Tip 2s rivet X4 2 5 frame X2 2s rivet X6 Step 3 Step 4 167 ...
Page 173: ...Tip Tip 2 15 frame X2 2s rivet X8 2s rivet X2 Step 17 Step 18 Step15 175 ...
Page 183: ...Tip Serial board X1 Double rivet X2 Step 2 Step 3 185 ...
Page 184: ... Complete of an additional battery case for Crane completion 186 ...
Page 205: ...Tip Battery case X1 Double rivet X2 Step 2 Step 3 207 ...
Page 206: ...completion Complete of an additional battery case for Excavator 208 ...
Page 217: ...Tip Tip IR sensor X1 Double rivet X2 2s rivet X4 Step 16 Step 17 219 ...
Page 220: ...Tip Tip 2s rivet X4 2s rivet X6 Step 22 Step 23 Step19 222 ...
Page 229: ...Tip Battery case X1 Double rivet X2 Step 2 231 ...
Page 230: ... Complete of an additional battery case for Hu tank completion 232 ...
Page 242: ...MEMO 244 ...
Page 243: ...MEMO 245 ...

