background image

- 50 -

9-3 CHECK AFTER REASSEMBLE

(1) Pull the starter knob a few times to check if:

A. The starter knob is too heavy to pull, check that each part has been assembled as specified.

B. The ratchet fails to function, check is parts such as friction spring have been missing.

(2) Pull out the starter knob to extend the rope to its extreme to see if:

A. The starter rope still remains in the rope slot of the reel, unwind the rope by 1 to 2 turns as shown

in Fig. 9-1, as the spring may be over-stressed.

B. The starter rope is found weak to recoil or droops in halfway, apply grease or mobile oil to the

rotating part and to the friction parts. If it persists, wind-up the spring by 1 to 2 turns. (In this case,
check that the spring is not over-stressed.)

C. The spring escapes with a sound and the starter rope fails to spring back to its original position,

reassemble the starter from the beginning.

9-4 OTHER GUIDES

(1) When the spring escapes from the reel :

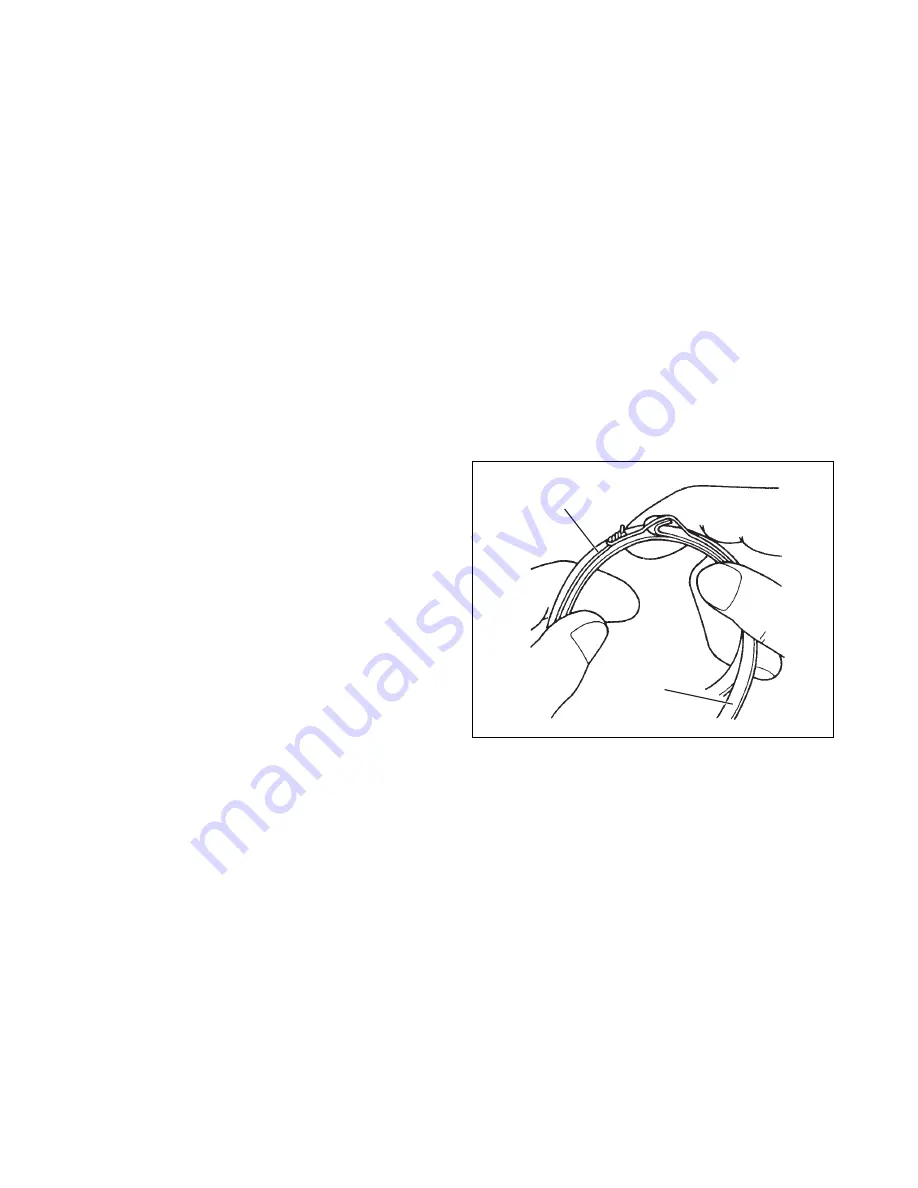
Make a ring having a rather small diameter
than spring housing using a thin wire.
Hook the outer end of the spring onto a part of
the ring and re-wind the spring into the wire
ring as shown in Fig.9-6 then put it into the
housing.
Remove the ring slowly while holding down
the spring to avoid getting out of place.
The ring can easily be removed by prying it
with the tip of a screwdriver.
Refer to Fig.9-4 for which way the spiral spring
must be placed.

(2) When it is lubricated :

Lubricate the starter shaft and spring with a
grease (If possible, heat-resistant type is pref-
erable) or a mobile oil when the starter is be-
ing disassembled and prior to long-term stor-
age.

(3) When the swing arm does not move smoothly:

Apply grease (Alevin No. 3) or mobile oil on it.

Fig. 9-6

SPRING

WIRE RING

Summary of Contents for EH025

Page 1: ...SERVICE MANUAL EH025 EH035 ENGINE Model PUB ES1740 Rev 05 03 ...

Page 2: ... Copyright 2003 Robin America Inc 940 Lively Blvd Wood Dale IL 60191 Phone 630 350 8200 Fax 630 350 8212 e mail sales robinamerica com www robinamerica com ...

Page 3: ...SCRIPTION OF ENGINE COMPONENTS 8 4 1 CYLINDER BLOCK AND CRANKCASE 8 4 2 CRANKSHAFT AND CONNECTING ROD 8 4 3 PISTON 8 4 4 PISTON RINGS 9 4 5 CAM GEAR 9 4 6 COOLING SYSTEM 9 4 7 LUBRICATION SYSTEM 9 4 8 IGNITION SYSTEM 10 4 9 CARBURETOR 10 4 10 AIR CLEANER 10 4 11 DECOMPRESSION SYSTEM 11 4 12 SECTIONAL VIEW OF ENGINE 12 5 DISASSEMBLY AND REASSEMBLY 14 5 1 PREPARATIONS AND SUGGESTIONS 14 5 2 SPECIAL ...

Page 4: ...ENGINE OVERHEATS 53 10 5 ENGINE KNOCKS 53 10 6 ENGINE BACKFIRES THROUGH CARBURETOR 53 11 INSTALLATION 54 11 1 INSTALLING 54 11 2 VENTILATION 54 11 3 EXHAUST GAS DISCHARGE 54 11 4 POWER TRANSMISSION TO DRIVEN MACHINES 54 12 SERVICE DATA 55 12 1 CLEARANCE DATA AND LIMITS 55 12 2 TORQUE SPECIFICATIONS 58 12 3 OIL GRADE CHART 59 13 MAINTENANCE AND STORAGE 60 13 1 DAILY MAINTENANCE 60 13 2 INITIAL 20 H...

Page 5: ...de Cooling system Forced Air Cooling Valve Arrangement Overhead Valve Lubrication Forced Lubrication Lubricant Automotive Oil SAE 20 30 or 10W 30 Class SF or higher Capacity of Lubricant 0 08 liters 0 021 U S gal 0 10 liters 0 026 U S gal Carburetor Diaphragm Type Fuel Automotive Unleaded Gasoline Fuel Consumption Ratio 408 g kW h 300 g HP h 340 g kW h 250 g HP h At Continuous Rated Output Fuel Fe...

Page 6: ...at optimum governed speed which is most favor able from the view point of engine s life and fuel consumption When the engine is installed on a certain equipment it is recommended that the continuous output required from the equipment should be kept below this continuous rated output 2 3 MAXIMUM TORQUE AND FUEL CONSUMPTION WITH MAXIMUM OUTPUT The maximum torque is the torque at the output shaft whe...

Page 7: ...025 0 10 1 2 0 12 g kWh g PSh Nm kg m PS kW 250 300 350 400 450 400 500 300 600 4000 5000 6000 7000 8000 OUTPUT MAXIMUM TORQUE RECOMMENDED HORSEPOWER RANGE CONTINUOUS RATED HORSEPOWER MAXIMUM HORSEPOWER TORQUE FUEL CONSUMPTION RATE r p m Revolution CLUTCH MEET 4000 4400 r p m CLUTCH CHARACTERISTICS ...

Page 8: ...035 0 16 1 8 0 18 g kWh g PSh Nm kg m PS kW 250 300 350 400 450 400 500 300 600 4000 5000 6000 7000 8000 OUTPUT MAXIMUM TORQUE RECOMMENDED HORSEPOWER RANGE CONTINUOUS RATED HORSEPOWER M AXIM UM HO RSEPO W ER TORQUE FUEL CONSUMPTION RATE r p m Revolution CLUTCH MEET 4000 4400 r p m ...

Page 9: ...eight construction because of the resin made came gear rocker cover and other parts EH025 And because of the resin made came gear other parts EH035 5 Parts of the valve driving system with thoroughgoing light weight construction 3 2 4 STROKE ENGINE ALLOWING OPERATION IN THE TILTED POSITION REQUIRED IN BRUSH CUTTING WORK AND OTHER SIMILAR APPLICATIONS 1 Robin s original lubricating system Small siz...

Page 10: ...he engine The remain ing oil mist returns to the oil tank via bypass hole d The oil tank has two pressure relief holes located at its left and right sides which are connected to the assist hole of the cylinder unit These pressure relief holes have the function to keep the pressure of the oil tank constant e Oil inside the rocker arm compartment is sucked back to the crankcase by the strong negativ...

Page 11: ... positions are taken into consideration as priorities Measures are adopted however so that the engine can be run for a short time in upside down positions during the work and or during idling The oil return passage tube at the muffler side is extended up to the rocker arm cover in or der to suck the oil that stagnates in the rocker arm compartment while the engine is in the upside down position At...

Page 12: ...ess fitted The cylinder bore is finished with hard chromium plating 4 2 CRANKSHAFT AND CONNECTING ROD The crankshaft is made of malleable cast iron and the entire crank pin surface is hardened by ce mentation The crank gear is press fitted at the opposite side to the P T O The connecting rod is a carbon steel casting and needle roller bearings are press fitted in the large and small ends 4 3 PISTO...

Page 13: ... engine adopts the forced air cooled system where cooling air is sent to the cylinder block by an even pitched cooling fan that works as a flywheel as well This cooling air is guided properly to the cylinder block by the baffle plate 4 7 LUBRICATION SYSTEM The rotary parts and the sliding parts of the engine are lubricated by lubricant oil which is forcibly sup plied by utilizing the pressure gene...

Page 14: ...n coil is mounted directly on the cylinder block Fig 4 7 4 9 CARBURETOR This engine adopts a diaphragm type carburetor The carburetor is calibrated carefully for easy start ing good acceleration low fuel consumption and sufficient output Fig 4 8 4 10 AIR CLEANER The air cleaner element is urethane foam semi wet type This air cleaner has a compartment that separates blow by gas from lubricant oil P...

Page 15: ... The decompression equipment is installed inside the gear of the cam gear unit The decompres sion equipment opens the intake valve before the compression top to relieve the compression pres sure for easy start WEIGHT CAMLIFTER CRESCENT CAM ...

Page 16: ... 12 4 12 SECTIONAL VIEW OF ENGINE Fig 4 10 INTAKE VALVE CARBURETOR EXHAUST VALVE MUFFLER COVER CONNECTING ROD CHECK BALL BREATHER PIPE AIR CLEANER RETURN PIPE MUFFLER OIL GAUGE ...

Page 17: ... 13 Fig 4 11 ROCKER ARM PUSH ROD PISTON PISTON RING PISTON PIN CAM GEAR RECOIL STARTER OIL TUBE IGNITION COIL SPARK PLUG FUEL TANK FLYWHEEL ...

Page 18: ... 5 DISASSEMBLY AND REASSEMBLY 5 1 PREPARATIONS AND SUGGESTIONS 1 When disassembling the engine memorize the locations of individual parts so that they can be reassembled correctly If you are uncertain of identifying some parts it is suggested attach tags to them 2 Have boxes ready to keep disassembled parts by group 3 To prevent losing and misplacing temporarily assemble each group of disassembled...

Page 19: ... STOP SWITCH M4 SCREW AND WASHER 2 pcs M5 SCREW AND WASHER 2 pcs PLUG COVER M5 x 8 SCREW 1 pce ENGINE COVER M5 x 12 SCREW AND WASHER AY 1 pce M5 x 12 SCREW AND WASHER AY 2 pcs STEP 1 STEP 1 EH035 EH025 Fig 5 4 Fig 5 3 OIL GAUGE LEAD WIRE Fig 5 6 ...

Page 20: ...retor Remove insulator and insulator carburetor M5 x 14 mm 1 pc M5 x 68 mm 2 pcs M5 x 18 mm 2pcs M5 x 12 mm 1pce Breather unit of the air cleaner plate separator check valve Disassemble the breather unit only if necessary 1 2 3 Remove the plate separator Make sure of removing the plate separator by holding its edge When holds the square pipe there is risk of damaging the pipe Remove the check valv...

Page 21: ...SCREW AND WASHER 1 pce GASKET CARBURETOR CHECK VALVE PLATE PLATE SEPARATOR CHECK VALVE O RING GASKET SEPARATOR RETURN PIPE Fig 5 11 AIR CLEANER COVER AIR CLEANER PLATE ELEMENT RETURN PIPE PLATE CHOKE PLATE CHECK VALVE 1 CHECK VALVE PLATE CHOKE LEVER O RING PLATE SEPARATOR INSULATOR INSULATOR CARBURETOR CARBURETOR M5 x 40 SCREW 2 pcs M5 x 14 SCREW AND WASHER 1 pce GASKET CARBURETOR CHECK VALVE O RI...

Page 22: ... recoil starter from crankcase M4 x16mm 2 pcs EH025 M5 x14mm 4 pcs EH035 Fuel tank Remove fuel tank from housing blower Pulley Remove the pulley from the crank shaft Utilize the hole of the pulley and remove the pulley by tapping it with a metallic rod and a hammer The thread is clockwise M5 SCREW 1 pc MUFFLER MUFFLER COVER MUFFLER GASKET PULLEY PULLEY RECOIL STARTER RECOIL STARTER FUEL TANK M4 SC...

Page 23: ... and crankcase M5 x18mm 3 pcs EH025 M5 x16mm 4 pcs EH035 Clutch Remove the clutch from the flywheel M6 x23mm 2 pcs EH025 M8 x23 5mm 2 pcs EH035 BLOWER HOUSING CLUTCH SPRING M6 BOLT CLUTCH 2 pcs M5 SCREW AND WASHER 3 pcs M8 BOLT CLUTCH 2 pcs M5 SOCKET HEAD BOLT 4 pcs BLOWER HOUSING SPRING STEP 4 STEP 4 EH035 EH025 CLUTCH ...

Page 24: ...o remove Remarks and procedures Fasteners 5 Flywheel 1 Remove flywheel from crankshaft Use the flywheel puller as shown in the Figure and remove the fly wheel by rotating the center shaft clockwise Ignition coil Remove ignition coil from cylinder block M4 x 20 mm 2 pcs Spark plug Remove the spark plug from the cylin der block ...

Page 25: ... M5 x18 mm 4 pcs Oil tube and Retainer plate 1 2 Pull out the oil tube by holding its base It is recommendable to pry the oil tube with a small sized screwdriver Remove retainer plate from crank case When removing the retainer plate take care not to lose the lead valve M4 x10 mm 1 pc Fig 5 17 M5 SCREW AND WASHER 4 pcs M4 SOCKET HEAD BOLT 1 pce OIL CASE OIL TUBE GASKET CASE RETAINER PLATE OIL WEIGH...

Page 26: ...ove the cam lifter shaft and remove the cam lifter Remove the cam gear shaft and remove the cam gear Remove the push rod Rocker arm Remove the rocker arm shaft then re move the rocker arm Hold the rocker arm shaft that can be seen between the intake and exhaust rocker arm with pincers then remove the shaft CAMGEAR COVER GASKET CAMGEAR COVER ROCKER ARM ROCKER SHAFT ADJUSTING SCREW PUSH ROD GASKET R...

Page 27: ... from the recoil side Take care not to lose the check balls 2 pcs that are held by the washer of the screw M5 x 14mm 8 pcs EH025 M5 x 16mm 4 pcs EH035 M5 x 33mm 4 pcs EH035 Crankshaft Remove crankshaft from cylinder block When removing the crankshaft from the cylinder block take care not to damage the oil seal CYLINDER BLOCK M5 SOCKET HEAD BOLT 8 pcs STEP 8 CRANKCASE CRANKSHAFT ...

Page 28: ...marks and procedures Fasteners 9 Valve Valve spring and Spring retainer Hold the valve from the inner side of the cylinder then push the spring retainer and remove it by sliding SPRING RETAINER SPACER EXHAUST VALVE INTAKE VALVE VALVE SPRING STEP 9 ...

Page 29: ...end of the connecting rod When removing the piston take care to prevent dust from getting in the bearing at the connecting rod small end To remove the two piston rings and the oil ring open wide the open end of the rings and remove them from the piston Take care not to widen the open end of the rings too much or the rings may break PISTON PIN PISTON PISTON RING CRANKSHAFT CLIP CLIP STEP 10 ...

Page 30: ...e lip before reassembly 4 Replace all the gaskets with new ones 5 Replace keys pins bolts nuts etc if necessary 6 Torque bolts and nuts to specification referring to the TORQUE SPECIFICATIONS 7 Apply oil to rotating and sliding portions 8 Check and adjust clearances and end plays where specified in this manual 9 Check resistance and or noise by rotating parts by hand when reassemble main parts 5 4...

Page 31: ...nd the second ring with their open ends displaced by 180 degrees When installing a new ring place the white mark at the right hand side and when reassembling a used one install it with the contact face down Fig 5 28 TAPER 1 2 3 1 2 3 TOP RING SECOND RING OIL RING BARREL THREE PIECE ASSEMBLY Fig 5 29 PISTON PIN PISTON PISTON RING CRANKSHAFT CLIP CLIP WHITE MARK APPLY GREASE ON THE INNER FACE ...

Page 32: ...e hexagonal socket head bolts 8 pce of the lower part of the crankcase Fig 5 33 M5 SOCKET HEAD BOLT 8 pcs CRANKCASE LOWER PART 1 2 3 4 5 6 7 8 CYLINDER BLOCK M5 SOCKET HEAD BOLT 8 pcs LIQUID PACKING THREE BOND 1216 DO NOT APPLY LIQUID PACKING IN EXCESS CRANKCASE Tightening torque 4 5 6 5 N m 45 65 kgf cm 3 3 4 7 ft lb Tightening order Fig 5 30 Fig 5 31 Fig 5 32 M5 x 33 SOCKET HEAD BOLT 4 pcs M5 x ...

Page 33: ...d bolt 1 pc Oil case M5 x 18 mm screw and washer 4 pcs Fig 5 34 M5 SCREW AND WASHER 4 pcs M4 SOCKET HEAD BOLT 1 pce OIL CASE OIL TUBE ASSEMBLE SEPARATELY CRANKCASE LOWER PART OIL WEIGHT GASKET CASE RETAINER PLATE LEAD VALVE CUTOUT Tightening torque M4 BOLT M5 SCREW 3 4 N m 30 40 kgf cm 2 2 2 9 ft lb 4 5 5 N m 40 55 kgf cm 2 9 4 0 ft lb ...

Page 34: ...g 5 35 Tightening torque 9 12 N m 90 120 kgf cm 6 5 8 8 ft lb 5 4 6 IGNITION COIL Installing the ignition coil Air gap adjustment Air gap 0 3 mm Ignition coil tightening torque M4 x 20 mm with washer and spring washer 2 pcs NOTE Measure the air gap between the flywheel mag net and the ignition coil Fig 5 37 Tightening torque 2 4 N m 20 40 kgf cm 1 4 2 9 ft lb Fig 5 36 THICKNESS GAUGE PLUG CAP IGNI...

Page 35: ...0 55 kgf cm 2 9 4 0 ft lb Fig 5 38 5 4 8 CAM GEAR Installing the cam gear 1 Align the mark punched on the flywheel key position groove with the timing mark on the ignition coil Fig 5 39 Fig 5 40 2 Install the cam gear with the cam top facing down vertically use the timing mark for reference Fig 5 41 TIMING MARK TIMING MARK BLOWER HOUSING M5 SCREW AND WASHER 3 pcs CAMGEAR SHAFT CAMGEAR ...

Page 36: ...lifter and rocker arm 1 Apply sufficient oil in the rocker shaft hole Fig 5 42 Fig 5 44 APPLY A SUFFICIENT AMOUNT OF OIL ADJUSTING SCREW PUSH ROD BALL GROOVE BALL GROOVE CAM LIFTER CAM LIFTER SHAFT CAM LIFTER ROCKER ARM ADJUSTING SCREW PUSH ROD 2 Install the cam lifter 3 Pass the push rod through the hole of the cyl inder block Align the push rod end with the cam lifter ball groove ...

Page 37: ... ft lb 5 4 11 VALVE CLEARANCE ADJUSTMENT Loosen the nut and adjust the valve clearance by rotating the adjusting screw with a hexagon bar wrench Adjust the valve clearance at the com pression top dead center After the adjustment tighten the nut firmly Fig 5 47 Tightening torque 5 6 5 N m 50 65 kgf cm 3 6 4 7 ft lb Valve clearance 0 15 mm 0 0059 in Fig 5 46 CAMGEAR COVER CAMGEAR COVER GASKET CAMGEA...

Page 38: ... screw 4 pcs EH035 5 4 14 MUFFLER AND MUFFLER GASKET Install the gasket muffler and muffler cover on the cylinder head exhaust port M5 x 40 mm socket head bolt 2 pcs M5 x 5 mm screw 1 pc Tightening torque 4 5 5 N m 40 55 kgf cm 2 9 4 0 ft lb Tightening torque 1 2 5 N m 10 25 kgf cm 0 7 1 8 ft lb Tightening torque M5 BOLT M5 SCREW 7 9 N m 70 90 kgf cm 5 1 6 5 ft lb 3 5 N m 30 50 kgf cm 2 2 3 6 ft l...

Page 39: ...ew shall be aligned with the insulator end face no protrusion The angular side of the gasket shall face up Fig 5 50 Tightening torque 4 5 5 N m 40 55 kgf cm 2 9 4 0 ft lb Fig 5 51 Approx 2 mm Alignment INSULATOR INSULATOR CARBURETOR M5 x 18 SCREW AND WASHER 2 pcs GASKET INSULATOR INSULATOR INSULATOR CARBURETOR GASKET INSULATOR M5 x 18 SCREW AND WASHER 2 pcs EH035 EH025 M5 x12 SCREW AND WASHER 1 pc...

Page 40: ...cm 1 4 2 9 ft lb AIR CLEANER COVER AIR CLEANER PLATE ELEMENT BREATHER PIPE SPACER RETURN PIPE PLATE CHOKE PLATE CHECK VALVE 1 CHOKE LEVER O RING CARBURETOR M5 SCREW 2 pcs M5 SCREW AND WASHER 1 pce GASKET CARBURETOR AIR CLEANER COVER AIR CLEANER PLATE ELEMENT RETURN PIPE PLATE CHOKE PLATE CHECK VALVE 1 CHECK VALVE PLATE CHOKE LEVER O RING PLATE SEPARATOR CARBURETOR M5 SCREW 2 pcs M5 SCREW AND WASHE...

Page 41: ...upper claw of the air cleaner plate Fig 5 54 5 4 17 SPARK PLUG Installing the spark plug Fig 5 55 5 4 18 CLUTCH Install the clutch with the EH025 R EH035 mark on the clutch shoe at the front side facing the assembly worker Bolt clutch M6 x 23mm 2 pcs EH025 M8 x 23 5mm 2 pcs EH035 Tightening torque 7 5 10 N m 75 100 kgf cm 5 4 7 2 ft lb RETURN PIPE BREATHER PIPE HOSE CLAMP AIR CLEANER PLATE UPPER C...

Page 42: ...coil terminal EH025 Faston terminals 2 places of the coil EH025 The cylinder side is the grounding terminal EH025 Install the engine cover by placing it on the engine from above and screw its front side on the blower housing two places and its rear side on the crankcase two places screw the rear side together with the recoil NOTE When installing the engine cover make sure that there is no coil ter...

Page 43: ... Tightening torque 2 4 N m 20 40 kgf cm 1 4 2 9 ft lb Tightening torque 1 2 N m 10 20 kgf cm 0 7 1 4 ft lb Fig 5 58 PLUG COVER ENGINE COVER STOP SWITCH M4 x 16 SCREW AND WASHER 2 pcs M5 x 12 SCREW AND WASHER 2 pcs PLUG COVER M5 x 8 SCREW 1 pce ENGINE COVER M5 x 14 SCREW AND WASHER M5 x 12 SCREW AND WASHER AY 2 pcs EH035 EH025 Tightening torque 1 5 3 N m 15 30 kgf cm 1 1 2 1 ft lb Tightening torque...

Page 44: ...r higher Oil capacity EH025 0 08L 80 cc EH035 0 10L 100 cc 2 After filling oil tighten the oil gauge 3 Test run An engine that has been completely over hauled should be thoroughly RUN IN espe cially when the cylinder piston rings valves etc have been changed with new ones End of the reassembly Fig 5 59 Fig 5 60 OIL GAUGE OIL LEVEL UPPER LIMIT MOUTH OF THE OIL CHARGING PORT ...

Page 45: ...mage and short circuit 2 Check the spark 1 Remove the spark plug from the cylinder and connect the spark plug with the plug cap and ground it to the cylinder The electrode gap of the spark plug should be 0 7 to 0 8 mm 2 Rotate the flywheel by pulling the recoil starter and check the spark and examine the intensity of the spark 3 If the plug does not spark remove the spark plug and the plug cap pla...

Page 46: ... than the centrifugal force on the weight at the low cam gear revolution when starting the crescent cam projects the cam profile and lifts up the follower of the cam lifter opens the intake valve FLYWEIGHT CAMLIFTER CRESCENT CAM ROTATION When the engine is running the crescent cam is retracted into the camshaft profile because the centrifu gal force applied onto the flyweight becomes larger than t...

Page 47: ...float chamber is provided with a diaphragm and is covered with a cover When negative pressure is generated in the air intake the diaphragm bulges up thereby pushing up the metering lever and opening the inlet needle valve When the negative pressure disappears the spring forces the valve shut Therefore fuel flow rate can be controlled by appropriately determining the diaphragm area and the spring l...

Page 48: ...ve 18 Metering lever 19 Screw metering lever pin 20 Metering diaphragm gasket 21 Diaphragm assembly metering 22 Body assembly air purge 23 Primer pump 24 Primer pump cover 25 Screw 1 2 12 3 4 5 6 8 9 14 17 15 16 20 21 22 23 24 25 18 19 10 11 13 9 Jet 10 Gasket pump 11 Diaphragm pump 12 Spring pump 13 Body assembly pump 14 Inlet screen 15 Metering lever spring 16 Metering lever pin ...

Page 49: ...placing a jet be sure of using a new one with the same number 3 Check the gasket for deformation and damage If it is deformed or damaged change with a new one 4 The pump diaphragm should not be hardened nor damaged 5 The inlet valve and the outlet valve should be flat and not bent 6 The diaphragm assy should be free of any hardening damage or bent 7 After assembling the pump body assy check it for...

Page 50: ...ON THE CARBURETOR Marks are stamped as shown in the figure at the right 1 1 1 1 1 Model No 2 2 2 2 2 Date of manufacture Example 1 1 1 1 1 116 WYL116 Walbro model No 2 2 2 2 2 914 1 2 Fig 8 3 week 14 May 29 Apr 2 1999 ...

Page 51: ...pliers 1 Remove the recoil starter from the engine 2 Pull out the starter knob hold the rotary reel with your thumb as shown in Figure 9 1 when the reel notch gets aligned with the starter rope outlet and pull the starter rope to inside the recoil starter with a screwdriver Hook the starter rope to the notch and rewind the reel to the arrow direction until it stops by controlling the rotation of t...

Page 52: ... escase from the case which may invite danger It the spiral spring escapes put it in the case by following procedure shown in Fig 9 6 Untie the starter rope knot at the reel end and withdraw it to complete disassembling SET SCREW REEL SPIRAL SPRING STARTER SHAFT STARTER KNOB SWING ARM COLLAR SET SCREN REEL SPIRAL SPRING STARTER KNOB EH035 EH025 ...

Page 53: ...g the reel in the starter case wind the starter rope to the reel in the arrow direction of Figure 9 5 take out the third turn of the starter rope from the reel notch and then install the reel securely inside the starter case so that the spiral spring inner end catches the hook Next hold the starter rope as shown in Figure 9 5 and rotate the reel 4 to 5 turns in the arrow direction by utilizing the...

Page 54: ...h a sound and the starter rope fails to spring back to its original position reassemble the starter from the beginning 9 4 OTHER GUIDES 1 When the spring escapes from the reel Make a ring having a rather small diameter than spring housing using a thin wire Hook the outer end of the spring onto a part of the ring and re wind the spring into the wire ring as shown in Fig 9 6 then put it into the hou...

Page 55: ... the engine making the fuel air mixture too rich to burn If this happens remove the spark plug and turn the starting pulley a few turns in order to let the rich fuel air mixture out of the spark plug hole into the atmosphere Keep the choke valve open during this operation Dry the spark plug well screw it into place and try to start again 10 1 2 COMPRESSION SYSTEM If starting difficulties and loss ...

Page 56: ...t spark plug electrode gap Adjust it to anywhere between 0 7 and 0 8 mm 2 Ignition cable worn and leaking 3 Sparks weak 4 Ignition wire connections loose 5 Water in gasoline 6 Insufficient compression 10 3 ENGINE STOPS 1 Fuel tank empty Water dirt gum etc in gasoline 2 Vapor lock i e gasoline evaporating in the fuel lines due to overheat around the engine 3 Vapor lock in the fuel lines or carburet...

Page 57: ...restricted or carbon deposits in the combustion chamber 9 Engine running on low octane gasoline detonates due to heavy load at low speed 10 5 ENGINE KNOCKS 1 Poor quality gasoline 2 Engine operating under heavy load at low speed 3 Carbon or lead deposits in the cylinder head 4 Spark timing incorrect 5 Loose connecting rod bearing due to wear 6 Loose piston pin due to wear 7 Curses of engine overhe...

Page 58: ...on of the hot air used for engine cooling and temperature rise of the machine Keep the engine room temperature below 50 C even in the hottest period of the year 11 3 EXHAUST GAS DISCHARGE Exhaust gas is noxious When operating the engine indoors be sure to discharge the exhaust gas outdoor If a long exhaust pipe is used in such a case the internal resistance increases causing loss of engine power T...

Page 59: ...MITS Unit mm in ITEM STD Limit CYLINDER Valve guide inside dia 3 005 3 025 0 118 0 119 3 1 0 122 3 505 3 525 0 138 0 139 3 6 0 142 Inside dia STD EH025 EH035 EH025 EH035 34 00 34 02 1 3386 1 3394 34 06 1 3409 39 00 39 02 1 5354 1 5362 39 06 1 5378 ...

Page 60: ...12 0 005 2nd 0 02 0 06 0 0008 0 0024 0 12 0 005 0 03 0 07 0 0012 0 0028 Oil ring EH025 EH035 EH025 EH035 0 04 0 14 0 0016 0 0055 0 20 0 008 Piston pin hole 7 996 8 005 0 3148 0 3152 8 03 0 3161 9 996 10 005 0 3935 0 3939 10 03 0 3949 Piston pin outside dia 7 994 8 000 0 3147 0 3149 7 988 0 3145 9 994 10 000 0 3935 0 3937 9 988 0 3932 Piston ring end gap Top 0 1 0 25 0 0039 0 0098 0 8 0 0315 2nd 0 ...

Page 61: ...969 21 0 0 8268 EH025 EH035 EX 2 950 2 965 0 1161 0 1167 3 450 3 465 0 1358 0 1364 2 9 0 1142 3 4 0 1339 2 9 0 1142 3 4 0 1339 EH025 EH035 IN 0 015 0 050 0 0006 0 0020 0 017 0 050 0 0007 0 0020 EH025 EH035 EX 0 040 0 075 0 0016 0 0030 0 2 0 0079 0 2 0 0079 CAMSHAFT Cam height IN and EX Journal outside dia D2 VALVE Valve stem outside dia Clearance between valve stem dia and valve guide Valve cleara...

Page 62: ...120 6 5 8 8 Clutch 7 5 10 75 100 5 4 7 2 Rocker arm adjust screw 5 6 5 50 65 3 6 4 7 Rocker cover 4 5 5 40 55 2 9 4 0 Muffler 7 9 70 90 5 1 6 5 Muffler cover 3 5 30 50 2 2 3 6 Insulator carburetor insulator crankcase 4 5 5 40 55 2 9 4 0 Recoil starter 1 2 5 10 25 0 7 1 8 Blower housing engine cover 2 4 20 40 1 4 2 9 Spark plug 9 13 90 130 6 5 9 4 Cover air cleaner 0 5 1 5 10 0 04 0 7 Air cleaner p...

Page 63: ...de Specified Lubricant Quality Comparison between oil viscosity and temparature 20 4 10 14 0 32 10 50 20 68 30 86 40 C 104 F 20W 40 12 3 OIL GRADE CHART Use oil classified SF or higher Multi grade oil tends to increase its consumption at high ambient temperature ...

Page 64: ...NANCE 13 3 EVERY 50 HRS 10 DAYS MAINTENANCE MAINTENANCE ITEMS REMARKS 1 Change crankcase oil Contaminated oil quickens wear 2 Clean air cleaner 3 Check and clean spark plug MAINTENANCE ITEMS REMARKS 1 Change crankcase oil To remove sludge from run in operation MAINTENANCE ITEMS REMARKS 1 Clean away dust and chaff from engine Governor linkage is especially sensitive to dust 2 Check fuel leakage fro...

Page 65: ...loth 6 Put a plastic cover or the like over the engine and store the engine in dry place S M E T I E C N A N E T N I A M S K R A M E R k n a t l e u f d n a r e t l i f l e u f n a e l C 1 f f a h c d n a t r i d e v o m e r d n a m e t s y s g n i l o o c t c e p s n I 2 s n i f n e e w t e b p u n a e l c d n a g n i s u o h r e w o l b e v o m e R g n i s u o h d n a e n i g n e l u a h r e v O...

Page 66: ...PRINTED IN THE USA ...

Reviews: