MUTE
PLAY STOP
PAUSE/STEP
ADD/CLEAR NAVIGATION
SELECT
OPEN/CLOSE
STANDBY/ON
SCAN
SETUP
TITLE
TIMER
REC/OTR
EDIT
AV
TV
DV
DISC OPER
MENU
CH+
REV PREV
FWD NEXT
CH-
VOL+
VOL-
AUDIO SUBTITLE ANGLE RETURN
REPEAT
SLOW
ZOOM
GOTO
V-Mode
PROG
DISPLAY
RANDOM
0
//
1
2
3
4
5
6
7
8
9
DVD + ReWritable
6
IN
OUT
TV75
ANTENNA
INPUT
R
VIDEO
S-VIDEO
L
VIDEO OUTPUT
AUDIO OUTPUT
Y
FL
SR
SW
SL
C
L
R
FR
CB
CR
VIDEO
S-VIDEO
OPTICAL
COAXIAL
DOWNMIX 5.1CH
DIGITAL
OUTPUT
OPEN/CLOSE
PLAY
SOURCE
STOP
DV INPUT
VIDEO S-VIDEO
L---- AUDIO ----R
RECORD
RJ-100 DVRW
STANDBY/ON
DVD + ReWritable
Identification of Controls
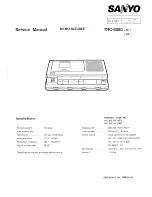
FRONT PANEL
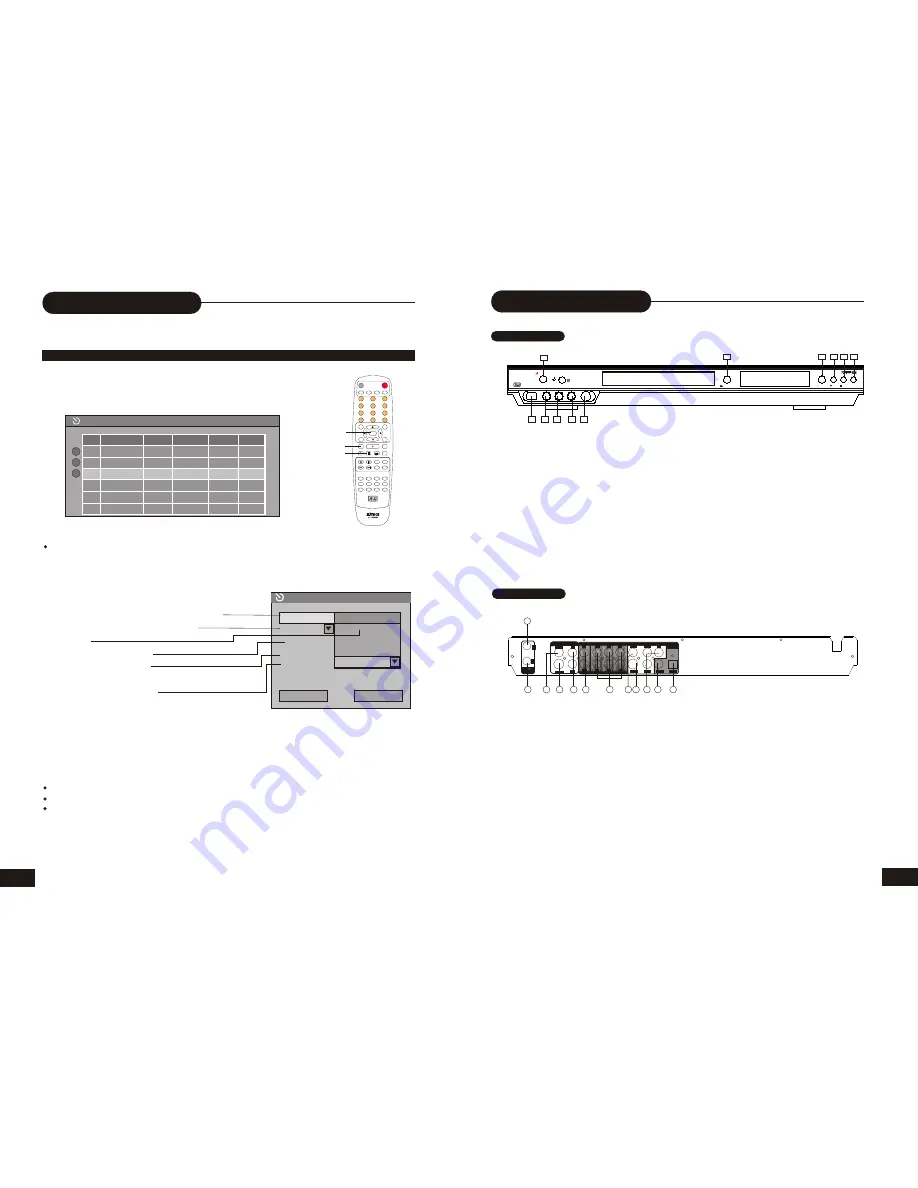
REAR PANEL
1.STANDBY/ON
2. OPEN/CLOSE
3.RECORD
4.PLAY
5.STOP
6.SOURCE
1. RF SIGNAL INPUT
2. RF SIGNAL OUTPUT
3. COMPOSITE VIDEO INPUT(REAR)
4.S-VIDEO INPUT
5. AUDIO INPUT (REAR LEFT/RIGHT)
6.AUDIO OUTPUT (MIXED)
1
9
10
11
2
3
4 5 6
7
8
7.DIGITAL VIDEO INPUT
8.AUDIO INPUT (FRONT LEFT)
9.AUDIO INPUT (FRONT RIGHT)
10.COMPOSITE VIDEO INPUT(FRONT)
11.S-VIDEO INPUT(FRONT)
1
2
3
4
5
6
8 9
11
12 10
7
7. 5.1CH AUDIO OUTPUT
8. COMPOSITE VIDEO OUTPUT
9. S-VI DEO OUTPUT(REAR)
10. DIGITAL AUDIO-COAXIAL OUTPUT
11. DIGITAL AUDIO- OPTICAL OUTPUT
12. COMPONENT OUTPUT FOR
PROGRESSIVE SCAN
Source
ONCE
Start
End
Quality
Item Editor
Confirm
DV
0 1/ 0 1 /0 0
1 4 : 4 1
1 5 : 1 1
SP
Cancel
Recording Options
29
1.First setup the clock of your system as “CLOCK SETUP” on page 26.
It is recommended to setup your local date and time.
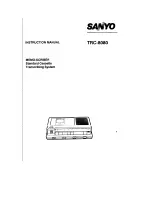
2.Press TIMER, the record scheduler will pop up.
TIMER RECORD
Note:
If you want to delete a scheduled recording, highlight the specific schedule and press ADD/CLEAR.
2.Use UP/DOWN to select one schedule, and press SELECT to access Item Editor as below:
In each item you can also use direction keys to highlight and press SELECT to choose your
setting:
Signal input source, details see page 27,step 3.
Record frequency, once, daily or weekly.
Mm/dd/yy
Start time for recording
End time for recording
Record quality, details see
page 27 setup record quality.
3.Select CONFIRM to save your settings.
4.Five minutes before the schedule recording is to begin, Record Prompt Menu will appear.
Press Confirm to continue or press Cancel to delete. If no instructions are given, the unit will
record automatically.
Note:
In standby mode, your recorder can wake up in 2 minutes before recording.
During recording, you can press STOP to suspend the recording.
A DVD+RW/DVD+R can record for upto 360 minutes.
SELECT
TIMER
STOP
Source
Quality Date
Start
End
DV
SP
12/01/03 14:41 15:11
Ch057
HQ 12/31/03 12:44 13:05
1
2
3
4
5
6
Record scheduler
SP
DAILY
07:03
08:33
Rear CVBS
W
W
W
110V~220V
~50/60Hz