background image

49

2

Other Trouble

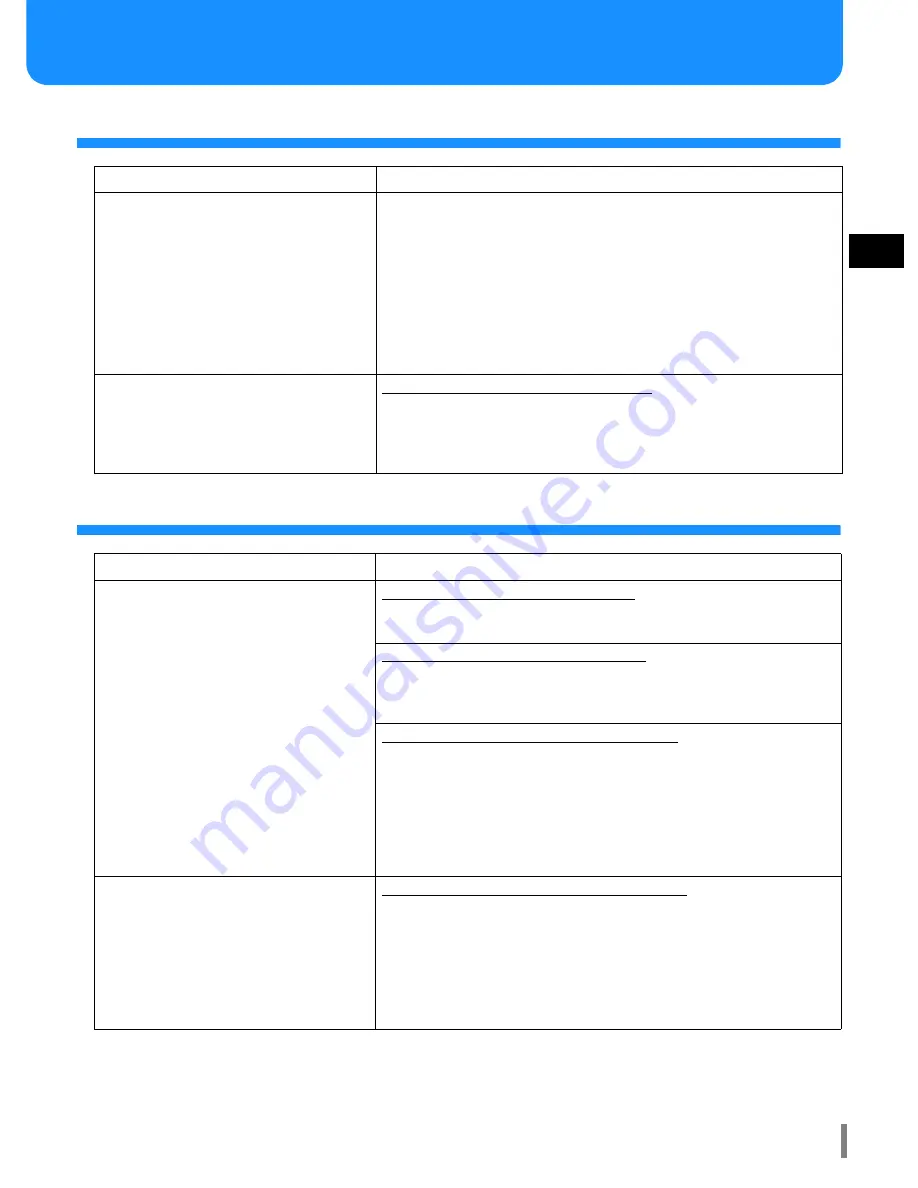
The Finisher Does Not Operate

The Finisher Does Not Operate according to the Setting

Problem

Cause and Solution

The Finisher does not operate.

• Check to see if the power plug is properly inserted into the outlet.

• Check to see if the printer is securely connected to this unit through the 

cord.

• Check to see if the printer main power is on. If the power is off, turn on the 

power and then press the Sleep Key on the Operation Panel of the printer.

• Turn off the printer power and then on again.

Alternatively, restart the computer that is connected to the printer.
If the Finisher does not operate nevertheless, contact your local dealer (or 
service representative).

An error occurs.

An error occurs in the printer or the Finisher.
Check the error message displayed on the Operation Panel of the printer and 
take proper measures.
"Chapter 3 Troubleshooting" of "HC5500 User's Manual for Printer Main 
Body"  

#

p.3-1

Problem

Cause and Solution

Covers cannot be added.

[Add cover] is not set in the printer driver.
Set [Add cover] on the [Finisher] tab in the printer driver.
"Add cover" of "HC5500 User's Manual for Printer Driver"  

#

p.3-3

Paper is not loaded in the Cover Sheet Tray.
Check the paper types and the number of sheets that can be loaded in the 
Cover Sheet Tray and load the paper.
"Add cover" 

#

p.2

Setting of the Cover Sheet Tray is not performed.
For loading paper in the Cover Sheet Tray, register the type of paper to be 
loaded using menu setting "4.11 Cover Sheet Tray" of the printer.
"4.11 Cover Sheet Tray" of "HC5500 User's Manual for Printer Main Body"  

#

p.2-29

When registering, match the menu settings with the settings of [Output paper 
size] and [Paper type] of the printer driver. If the settings do not match, the 
printer judges that no paper is loaded and does not perform printing.

The orientation of the covers is different from 
the setting.

The orientation of setting of the covers is different.
For adding covers to booklets, load the paper with the back side up and the 
first page to the left in the Cover Sheet Tray.
For adding covers to prints other than booklets using stapling or punching, 
load the paper with the front side up and the stapling or punching position to 
the right.
"Chapter 3 Troubleshooting" of "HC5500 User's Manual for Printer Main 
Body" 

#

p.3-1

Summary of Contents for HC5500T

Page 1: ...cations However there is no guarantee that interference will not occur in a particular installation If this equipment does cause harmful interference to radio or television reception which can be determined by turning the equipment off and on the user is encouraged to try to correct the interference by one or more of the following measures Reorient or relocate the receiving antenna Increase the se...

Page 2: ...e 3 Note that RISO is not liable for any influence caused by use of this manual or this unit 4 For operation of the printer and the printer driver manufactured by our company refer to the manuals supplied with the printer 5 For scanning paper originals using an optional scanner refer to the Help of the optional touch panel 6 In this manual the number of sheets is based on the dedicated paper A4 85...

Page 3: ... Manual Notation of Explanation of Operation The following symbols are used in this manual for description of functions operation and notes and are cautions for safety Be sure to read these items before using this machine ...

Page 4: ...n the machine and the wall socket If an extension cord is absolutely required do not use longer than 5m 15ft Otherwise a fire or an electric shock might occur Do not damage or rebuild the power cord Placing a heavy object on the cord or pulling or bending forcibly the cord may damage the cord resulting in a fire or an electric shock The power cord supplied with this product can be used only for th...

Page 5: ...ning A fire or an electric shock might occur Do not remove the covers Otherwise you might be electrically shocked by the high voltage part inside Do not disassemble or rebuild the machine by yourself Otherwise a fire or an electric shock might occur If the machine emits excessive heat smokes or foul odour immediately turn off the power unplug the electrical power cord and contact your service repr...

Page 6: ... direct hot air or direct radiant heat Badly ventilated locations Dusty locations Locations that are subject to frequent vibration Operation Environment Install the machine in a location of which the levelness meets the following conditions Front to rear 3 mm 1 8 or less Side to side 3 mm 1 8 or less Appropriate environment conditions are shown below Temperature range 15 C 30 C 59 F to 86 F Humidi...

Page 7: ...ed in the printer or in the controller When using non standard size paper be sure to register the size Up to five sizes can be registered in the printer and up to 20 sizes can be registered in the controller The paper sizes that can be registered are shown below The paper sizes that can be used however differ depending on the finisher functions to be used Paper sizes that can be registered Relatio...

Page 8: ...viii Name of part ...

Page 9: ...remove prints output on the Booklet tray so that the tray moves to a position that facilitates removal of prints 5 Booklet tray Booklets or twice folded prints are output here Paper capacity 20 sets 6 Right cover 7 Left cover 8 Transfer Cover If a paper jam occurs when paper is transferred from the printer to the Fin isher open this cover and remove the jammed paper 9 Stapler cartridge A stapler c...

Page 10: ...are stapled p 6 Booklet 2 fold booklets are made Also centre binding can be performed with the Stapler function p 13 Punching Prints are punched p 8 If HC Finisher A is connected 2 hole or 3 hole punching can be made If HC Finisher B is connected 2 hole or 4 hole punching can be made Offset output Prints are output into the Stacking Tray with offset positioning p 15 ...

Page 11: ...Error Display 24 Error Message and Error symbols 24 Paper Jam Occurs 28 H3 Paper Jam in the Paper Receiving Section 30 H4 Paper Jam at the Right Transfer Path Cover 30 F1 31 F2 32 F3 33 F4 34 F5 35 F6 36 F7 37 F12 38 F13 39 F14 39 F15 40 F16 41 F17 42 Staples Run Out 43 For Stapler Cartridge UR1 43 For Stapler Cartridge UR2 or UR3 44 Stapling Cannot Be Performed Properly 45 For Stapler Cartridge U...

Page 12: ...xii Chapter3 Appendix 51 Consumables 52 About Consumables 52 Types of Consumables 52 Specifications 53 Index 54 ...

Page 13: ...Applications This chapter describes finisher applications and principal finisher functions For details of the operation method and the setting method of the printer driver refer to HC5500 User s Man ual for Printer Driver ...

Page 14: ...nd to 28 lb bond Up to 200 sheets can be loaded in the Cover Sheet Tray If Booklet is ON back covers cannot be added If Separate books is set in Details of Booklet either front covers or back covers cannot be added The paper size that can be loaded as front covers are the same as the paper size for the body of prints When loading front covers of a different size from the body of prints set the pap...

Page 15: ...loading Covers Depending on the combination of finisher functions load the covers face up or face down For adding covers to booklets Load the covers face down so that the first page is located on the left side For adding covers to prints other than booklets Stapler Punching etc Load the covers face up so that the punching or stapling position is located on the right side When using the Cover Sheet...

Page 16: ...4 When using the Interposer Tray of the printer load the covers as shown below ...

Page 17: ...5 1 Flow of Paper ...

Page 18: ...0g m2 16 lb bond to 58 7 lb bond for cover sheet Maximum Number of Sheets for Stapling For A4 A4 R B5 R letter and letter R 2 to 100 sheets For standard sizes other than those above 2 to 65 sheets If the number of sheets exceeds the maximum number for stapling printed sheets are output to the Stacking Tray without sta pling For paper shown below the maximum number for stapling is 2 to 65 sheets Pa...

Page 19: ...cally Relation to Punching The Stapler function can be used with the Punching function The selectable stapling positions are restricted according to the setting of Punching Flow of Paper Setting of Punching Stapling position OFF Left 2 positions Left top 1 position Top 2 positions Top left 1 position Top right 1 position Right 2 positions Right top 1 position Left Left 2 positions Left top 1 posit...

Page 20: ...d up to 220g m2 58 7 lb bond for cover sheet Relation to Stapler The Punching function can be used with the Stapler function In this case the selectable punching positions are restricted according to the setting of the Stapler function Punching hole Paper size and setting orientation that can be used for punching 2 holes initial set ting 3 holes 4 holes Setting of Stapler Punching position OFF Lef...

Page 21: ... The binding margin width can be set from 0 mm to 50 mm 2 in 1 mm 0 04 increments If the image exceeds the print area because of margin setting you can turn on Auto reducing to reduce the image size auto matically Flow of Paper The tray to which prints are output is switched according to the setting of Output Tray ...

Page 22: ...ted according to the stapling punching position and the paper setting orientation in the tray If you set the stapling position to Left top 1 position Right top 1 position or Top right 1 position on A4 R or A3 size paper stapling is performed obliquely Paper size and setting orien tation in tray A4 R B5 R Letter R A3 A4 B4 Ledger Legal Letter Original Portrait Landscape Portrait Landscape Paper out...

Page 23: ... orientation Paper weight 60g m2 to 105g m2 16 lb bond to 28 lb bond Designation of Print Face The print face can be selected Print inside initial setting The print face is located inside when the paper is folded Print outside The print face is located outside when the paper is folded First page in duplex printing ...

Page 24: ...12 Flow of Paper Either stapling or punching cannot be performed ...

Page 25: ...ts The number of sheets separated with the separate books function can be set The number can be set from 1 to 15 sheets 60 pages for Fold and staple and from 1 to 5 sheets 20 pages for Fold When creating a booklet from prints of 16 sheets 61 pages or more be sure to use the Separate books function If Separate books is set to OFF for prints of 16 sheets 61 pages or more stapling is not performed an...

Page 26: ...d turn it down Place a box or the like under the tray to store booklets To return the plate to its original position raise the plate and slide it toward the Finisher When the Booklet tray becomes full a message appears in the display of the printer Remove all the output booklets The maximum number of sets that can be output depends on the paper size and the num ber of pages ...

Page 27: ... 297mm x 182 mm to 432 mm 8 to 1111 16 x 73 16 to 17 If the following functions are set Stacking Tray cannot be selected Booklet Fold and staple or Fold is selected Offset Output Prints are output to the Stacking Tray at an offset position for each set Offset output is a function of the Stacking Tray This function cannot be used with functions that do not use the Stacking Tray such as Booklet The ...

Page 28: ... sheets of paper like the conference material etc Procedure for preparing the following material is described here Stapling at left top 1 position Offset output for each set Binding margin width 10 mm 3 8 with auto reducing Printed sheets or other sheets of paper can be added as front covers and back covers p 2 ...

Page 29: ...on the Main setting tab 4 Set the following items on the Fin isher tab Stapler Left top 1 position Offset output ON 5 Click the Details button for Stapler and set the following items if you need Put binding margin Place a checkmark Binding margin width 10 mm 3 8 Auto reducing Place a checkmark 6 Perform printing Stapled prints are output into the Stacking Tray Since the prints are offset for each ...

Page 30: ...is useful for making travel pamphlets advertisements leaflets handy manuals and catalogs Procedure for creating the following booklets is described here 2 fold and centre binding Stapler Centre binding margin 10 mm 3 8 auto reducing The capacity for stapling is 60 pages 15 sheets in total including covers Printed sheets or other sheets of paper can be added as the cover p 2 ...

Page 31: ...kmark from Col late Set the ejection mode on the Main setting tab 4 Set the following item on the Fin isher tab Booklet Fold and Staple The printer driver performs automatically the opti mum setting 5 Click the Details button for Booklet and set the following items if you need Put centre binding margin Place a checkmark Binding margin width 10 mm 3 8 Auto reducing Place a checkmark ...

Page 32: ...rinting Booklets with centre binding are output into the Book let tray 7 Press the Booklet eject button on the Finisher and remove the booklets The output booklets move to the right so that they can be easily removed ...

Page 33: ...11 Procedure for creating the following prints is described here The original size is A4 R Duplex printing is performed with the first page outside 1 Prepare data to be printed 2 Display the Print dialog box Select Print from the File menu 3 Enter the Number of copies and click the Properties button Be sure to clear the checkmark from Col late Set the ejection mode on the Main setting tab ...

Page 34: ...he Fin isher tab Paper fold fold 6 Click the Details button for Paper fold and set the following item Folding direction Print outside 7 Perform printing The data is printed 8 Press the Booklet eject button on the Finisher and remove the booklets The output booklets move to the right so that they can be easily removed ...

Page 35: ...23 Chapter2 Troubleshooting This chapter describes the method of removing jammed paper from inside the Finisher and the operation against jammed staples ...

Page 36: ...error number indicates the error type The number of digits of the error number depends on the error location Example of Error Number Description S00 000 Service Call Displayed when inspection or repair by service personnel is required Contact your local dealer or service representative X00 000 F00 Jam Error Displayed when a paper jam occurs in the Finisher X00 000 H00 Jam Error Displayed when a pa...

Page 37: ...ine except the relevant unit can be used Lighting location Message Solution A cover is not securely closed Check the location indicated by the error number and close the cover securely The Booklet maker unit is not securely installed Install the unit securely Lighting location Message Solution An error occurs in the Finisher Turn off the power and on again If the same message appears again contact...

Page 38: ...Paper Jam p 28 Lighting location Message Solution An error occurs in the Finisher Turn off the power and on again If the same message appears again contact your local dealer or service repre sentative At this time tell the error number indicated in the message dis play of the printer If the CANCEL key is pressed the machine except the relevant unit can be used ...

Page 39: ...ge dis play of the printer If the CANCEL key is pressed the machine except the relevant unit can be used Paper in the Cover Sheet Tray does not match the paper size specified by the printer driver Load proper paper and check the Operation Panel of the printer for the paper size that has been set in Menu 4 11 Cover Sheet Tray HC5500 User s Manual for Printer Main Body Paper in the Interposer Tray r...

Page 40: ... on the Operation Panel and the optional touch panel display are shown below Operation Panel of printer PS7R touch panel optional As shown in the figure below numbers that indicate paper jam locations are indicated on the screen Touch the number to dis play the method of removing jammed paper Remove all jammed paper until all the paper jam indicators are cleared because paper remains if any indica...

Page 41: ...pective indicated pages F8 F11 are not displayed Jam location Page referred to Printer H3 Paper Receiving section p 30 H4 Right Transfer Path Cover p 30 Finisher F1 p 31 F2 p 32 F3 p 33 F4 p 34 F5 p 35 F6 p 36 F7 p 37 F12 p 38 F13 p 39 F14 p 39 F15 p 40 F16 p 41 F17 p 42 ...

Page 42: ...he paper open the Front Cover of the printer and remove the paper from the side of the Transfer Roller because the paper might be torn 3 Close the Transfer Cover H4 Paper Jam at the Right Transfer Path Cover 1 Open the Transfer Cover 2 Open the Right Transfer Path Cover 3 Remove the jammed paper 4 Return the covers to their original positions ...

Page 43: ... Open the covers 2 Open 1a downward 3 Remove the jammed paper 4 If it is not easy to pull out the paper open the Transfer Cover and remove the jammed paper 5 Return 1a to its original position 6 Close the covers ...

Page 44: ... and remove the jammed paper while turning 1c counterclockwise 3 If it is not easy to pull out the paper raise 1d to lock it 4 While turning 1c clockwise remove the jammed paper 5 Return 1a and 1d to their original positions 6 Close the covers ...

Page 45: ...Open 1b to the right and remove the jammed paper 3 If it is not easy to pull out the paper raise 1d to lock it 4 While turning 1c clockwise remove the jammed paper 5 Return 1b and 1d to their original positions 6 Close the covers ...

Page 46: ... and remove the jammed paper 3 If it is not easy to pull out the paper raise 1d to lock it 4 While turning 3a clockwise remove the jammed paper 5 Return 1d and 3b to their original positions and then return 3d to its original position 6 Close the covers ...

Page 47: ... turning 3c clockwise remove the jammed paper 4 If it is not easy to pull out the paper open 3d and 3b to the left and remove the jammed paper 5 Return 3b to its original position and then return 3d and 3e to their origi nal positions 6 Close the covers ...

Page 48: ...36 F6 1 Open the covers 2 Raise 3g to lock it 3 While turning 3f clockwise remove the jammed paper 4 Return 3g to its original position 5 Close the covers ...

Page 49: ...37 2 F7 1 Open the covers 2 Open 4b to the left 3 While turning 3a clockwise remove the jammed paper 4 Return 4b to its original position 5 Close the covers ...

Page 50: ... 4 to the front side 3 Turn 4a until no paper comes out 4 Grasp and pull the green tab to open the cover and remove the jammed paper 5 Return the green tab to its original position and return the Booklet maker unit 4 to its original position 6 Close the covers ...

Page 51: ...39 2 F13 1 Remove the paper jammed in the Top Tray 2 Open and close the covers F14 1 Remove the paper jammed in the Stacking Tray 2 Open and close the covers ...

Page 52: ...40 F15 1 Open the covers 2 Turn 4a clockwise until no paper comes out into the Booklet tray 3 Close the covers ...

Page 53: ...the cover and remove the jammed paper 2 If it is not easy to pull out the paper open the left cover 3 Open 1b to the right and remove the jammed paper 4 Return 1b to its original position 5 Close the left cover 6 Return the cover of the Cover Sheet Tray to its original position ...

Page 54: ...move the jammed paper If it is not easy to pull out the paper do not pull it forcibly because the paper might be torn In this case open the left cover of the Finisher and remove the paper from the side of the Transfer Roller 3 Close the Transfer Cover ...

Page 55: ...dure For Stapler Cartridge UR1 1 Open the cover 2 Hold the handle of the cartridge and pull it to the front and up a little 3 Press the points indicated by the arrows 1 to flip open the cover of the cartridge 2 and remove the staple case 3 4 Insert a new staple case into the car tridge 5 Remove the sealing tape from the sta ple case 6 Close the cover of the cartridge ...

Page 56: ...ile pressing the lever to the right pull out the unit to the front 3 Hold the tabs located on both sides of the cartridge and lift the cartridge to the upper left 4 Hold the tabs located on both sides of the new cartridge and insert the car tridge into the unit Press the cartridge down until it clicks 5 Return the unit to its original position 6 Close the cover ...

Page 57: ...45 2 Stapling Cannot Be Performed Properly This section describes the measures against stapling failure When stapling results in these problems contact your local dealer or service representative ...

Page 58: ...the cover of the cartridge and remove the jammed staple CAUTION Take care not to injure your fingers or the like 4 If the jammed staple cannot be removed press the bottom of the car tridge in the direction indicated by the arrow to remove the staple 5 Return the cartridge to its original position Press the cartridge down until it clicks 6 Close the cover ...

Page 59: ...n both sides of the cartridge and lift the cartridge to the upper left 4 Remove the jammed staple CAUTION Take care not to injure your fingers or the like 5 Hold the tabs located on both sides of the cartridge and return the cartridge to the unit as it was Press the cartridge down until it clicks 6 Return the unit to its original position 7 Close the cover ...

Page 60: ...essage indicating replacement is displayed resulting in failure Be sure to perform this operation while the printer power is on When the printer is in the Stand by mode or Sleep mode press the Wake Up Key or Sleep Key on the operation panel to turn on the printer power If not the printer cannot recognize that the trash box in punching unit is emptied 1 Open the cover 2 Pull out the trash box in pu...

Page 61: ...e Finisher tab in the printer driver Add cover of HC5500 User s Manual for Printer Driver p 3 3 Paper is not loaded in the Cover Sheet Tray Check the paper types and the number of sheets that can be loaded in the Cover Sheet Tray and load the paper Add cover p 2 Setting of the Cover Sheet Tray is not performed For loading paper in the Cover Sheet Tray register the type of paper to be loaded using ...

Page 62: ...50 ...

Page 63: ...51 Chapter3 Appendix ...

Page 64: ...ng screen of RISO Console PS7R For details refer to HC5500 User s Manual for Console Types of Consumables Use staples recommended by our company Do not use improper consumables because they may cause failure or trouble Type of staple Quantity HC STAPLE 100 5000 pcs x 3 cases HC STAPLE BOOKLET 5000 pcs x 4 cases ...

Page 65: ...to 297mm x 182 mm to 432 mm 8 to 1111 16 x 73 16 to 17 Paper Weight Cover Sheet Tray 60 to 220g m2 16 lb bond to 58 7 lb bond Top Tray 46 to 210g m2 12 lb bond to 56 lb bond paper postcard up to 220g m2 58 7 lb bond for cover sheet Stacking Tray 46 to 210g m2 12 lb bond to 56 lb bond paper up to 220g m2 58 7 lb bond for cover sheet Booklet Tray 60 to 90g m2 16 lb bond to 24 lb bond paper up to 220...

Page 66: ...t of Options 53 Location for Installation iv vi O Offset Output 15 Operation Environment vi Output Tray 15 Overall Dimensions vi P Paper Fold 11 Paper fold 21 Paper Jam 28 Paper Jam Error 26 Paper Receiving Section 30 Punching 8 R Right Transfer Path Cover 30 S Service Call 25 Specifications 54 Staple 16 Stapler 6 Stapler Cartridge UR1 43 46 Stapler Cartridge UR2 44 47 Stapler Cartridge UR3 44 47 ...

Reviews: