Neo RIB2312 installation guide: 12148-A 01-17
|
23
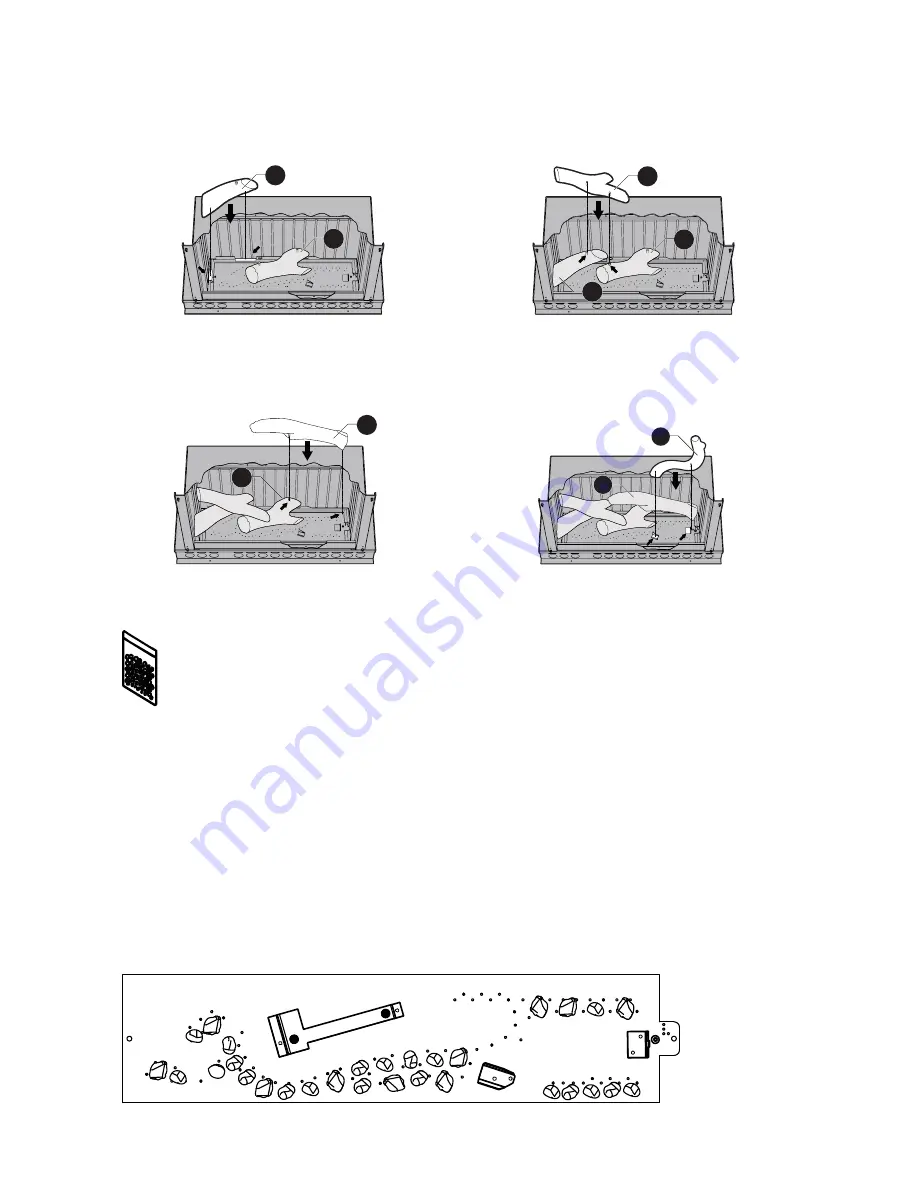
3. Select the short straight log with the single
locating pin and place onto the metal tabs
at the left and rear of the burner box—will
touch the burner box walls when correctly
positioned.
4. Select the thinner ‘Y’ log and fit into position
by linking up the two pin holes onto the two
pins of the first two logs. Ensure this log is
seated all the way down until it touches logs 1
and 2.
2
1
3
1
2
5. Select the longest log and line up the hole with
the pin of log 1. When correctly located this
log will be touching the burner box walls and
resting on log 1.
6. Locate the final bowed log and line up the hole
with the pin bracket to the right of the burner,
and locate the front of the log onto the stop
bracket. When correctly positioned it will be
touching both brackets, log 4, and the right
burner box wall.
4
1
5
4
Granule pack installation
The granules as well as being added to create a more realistic log flame effect (they
diffuse the gas flames through the burner ports) also assist in soot prevention and are
CRITICAL to the heater operating correctly. Never pour the granules directly from the
pack as dust particles from the bag may block the burner ports.
Natural gas installations
Place the granules evenly across the burner, use the whole pack.
ULPG installations
Carefully place 30 of the granules as close as possible to the front burner ports as shown on
the diagram below. DO NOT cover any of the front right side ports. It’s important this is done
correctly as incorrect placement can cause high yellow flames (dirty combustion) that may
cause sooting.
It is desirable that the flames touch the granules as this diffuses any ‘candling’ effect and
enhances the realistic log burning look of the heater.
Summary of Contents for Neo RIB2312L
Page 1: ...Neo Installation guide RIB2312N RIB2312L ...
Page 35: ......


