95
Maintenance
Air filter cleaning
The air filter prevents dust and debris from getting inside the projector. Never run the pro-
jector with the filter removed. It is recommended that the air filter is cleaned regularly.
• The message “Check the air filter for dirt.” is displayed every 100 hours. (If the usage time
exceeds 100 hours, this message is displayed for about 30 seconds when the image is
displayed for the first time after power is turned on. This display will be dismissed with any
operation.)
• Check out the filter and any debris is found, use the following procedure for cleaning.
WARNING
•
Request cleaning and maintenance of a ceiling-mounted unit from your sales
representative.
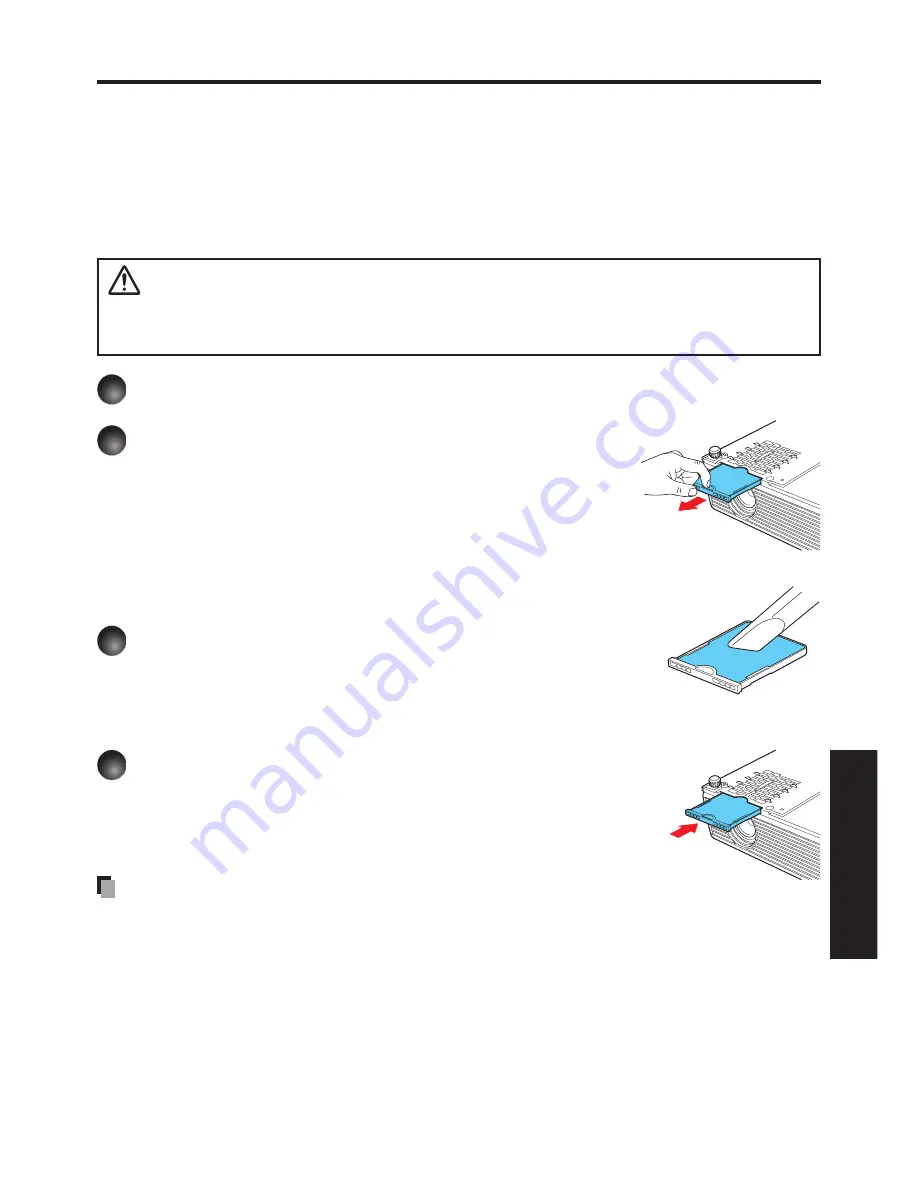
1
Unplug power cord.
2
Remove the air filter.
Pull out the air filter by holding the release knob
with your fingers as shown in the figure.
3
Clean the filter.
Carefully remove the dust and dirt from the air filter
with a vacuum cleaner or the like.
4
Replace the air filter.
Insert the air filter firmly until you hear a click.
Notes
• When dirt and dust build up in the air filter, the air circulation inside the projector is
affected and the internal temperature will rise, causing the projector to stop working or
malfunction.
• Push the air filter fully in. If the projector is used with the air filter only partially inserted,
dust and dirt will enter the interior and this could cause the projector to stop working or
break down.
• If you wash the air filer with water, make sure to dry it completely before replacing it.
• If the air filter becomes damaged, replace it. Contact your sales representative for a new
filter. If you continue to use the projector when its filter is damaged, dust and dirt will enter
the interior and this could cause the projector to stop working or break down.
Summary of Contents for IPSiO PJ WX3130
Page 1: ...IPSiO PJ X3130 IPSiO PJ WX3130...
Page 2: ...1 2 3 1 2 3...
Page 3: ...100V 100V...
Page 4: ......
Page 5: ......
Page 6: ...IPSiO PJ 1...
Page 7: ......
Page 8: ......
Page 9: ...1...
Page 10: ...10 p 43...
Page 11: ...11 24 p 42 20...
Page 12: ...12 J55022 H14 B...
Page 14: ...14 2 11 12 14 16 17 18 20 21 22 24 26 28 31 31 31 32 33 33 33 34 34 36 36 37 38 41 43 44 45 45...
Page 15: ...15 48 49 51 55 FAQ 56 56 56 57 57 57...
Page 21: ...21 R03 2 R03 2...
Page 22: ...22 4 2 p 42...
Page 26: ...26 1 AC IN 2 ON STANDBY 100V 1 2 ON STANDBY ON STANDBY...
Page 27: ...27 p 38 p 28 1 p 41 p 42 p 35 1 ON STANDBY 2 ON STANDBY ON STANDBY 3 4 5W 5...
Page 28: ...28 1 p 26 2 6 2 p 42 p 38 1 p 41 3 4 INPUT INPUT...
Page 29: ...29 1 p 41 INPUT INPUT 5 6 7...
Page 30: ...30 RGB p 52 XGA X3130 WXGA WX3130 XGA X3130 WXGA WX3130 DVD p 44...
Page 31: ...31 AUTO SET p 37 p 52 p 53 p 37...
Page 32: ...32 1 RESIZE RESIZE 2 RESIZE RESIZE 3 4 RESIZE RETURN 4 3 1 2...
Page 33: ...33 OHP MUTE MUTE PICTURE 1 2 3 1 2 3 p 37 SCREEN SIZE X3130 WX3130 4 3 4 3 Y PB PR S p 38...
Page 34: ...34 FREEZE FREEZE 000000 1 2 2 3 6 000000 6 4 6 5...
Page 35: ...35 1 2 2 3 4 OK 5 6 6 1 2 3 5 1 2 2 3 4 5 OK...
Page 36: ...36 MENU p 18 30 3 4 MENU RETURN 1 MENU 2 p 37 1 p 41 p 38 2 p 42 p 43 5...
Page 37: ...37 1 1 2 3 NTSC 2 US NTSC US JAPAN NTSC JAPAN 1 2 Y PB PR S 1 2 NTSC NTSC NTSC4 43 JAPAN US...
Page 38: ...38 X3130 WX3130 4 3 X3130 1024 768 WX3130 4 3 1280 800 Indonesia...
Page 40: ...40 1 2 3 4 OK 5 6 512 384 X3130 640 400 WX3130 1...
Page 41: ...41 1 30 ON STANDBY INPUT INPUT 1 Y PB PR 1 2 Y PB PR 2 S...
Page 42: ...42 2 p 22 OK CC1 CC2 CC3 CC4 T1 T2 T3 T4 p 35 1500m RETURN 10 LAMP TEMP 2 3 CC1 CC4 T1 T4...
Page 44: ...44 1 2 3 4 100 100 30...
Page 45: ...45 IPSiO PJ 1 1 p 10...
Page 46: ...46 1 2 1 3 4 2 5 3 6 3...
Page 47: ...47 7 4 2 8 3 1 9 p 43 1 2000 3000 p 41...
Page 48: ...48 p 46...
Page 50: ...50 p 21 p 21...
Page 56: ...56 FAQ FAQ http www ricoh co jp FAQ http www ricoh co jp support qa IPSiO PJ 1 IPSiO PJ 1 RGB...
Page 57: ...57 2 1 http www ricoh co jp IPSiO regist...
Page 58: ......
Page 91: ...91 Operations...
Page 104: ...JA JP EN JP 2010 11 Y001 6121C...


