82
Using the menus
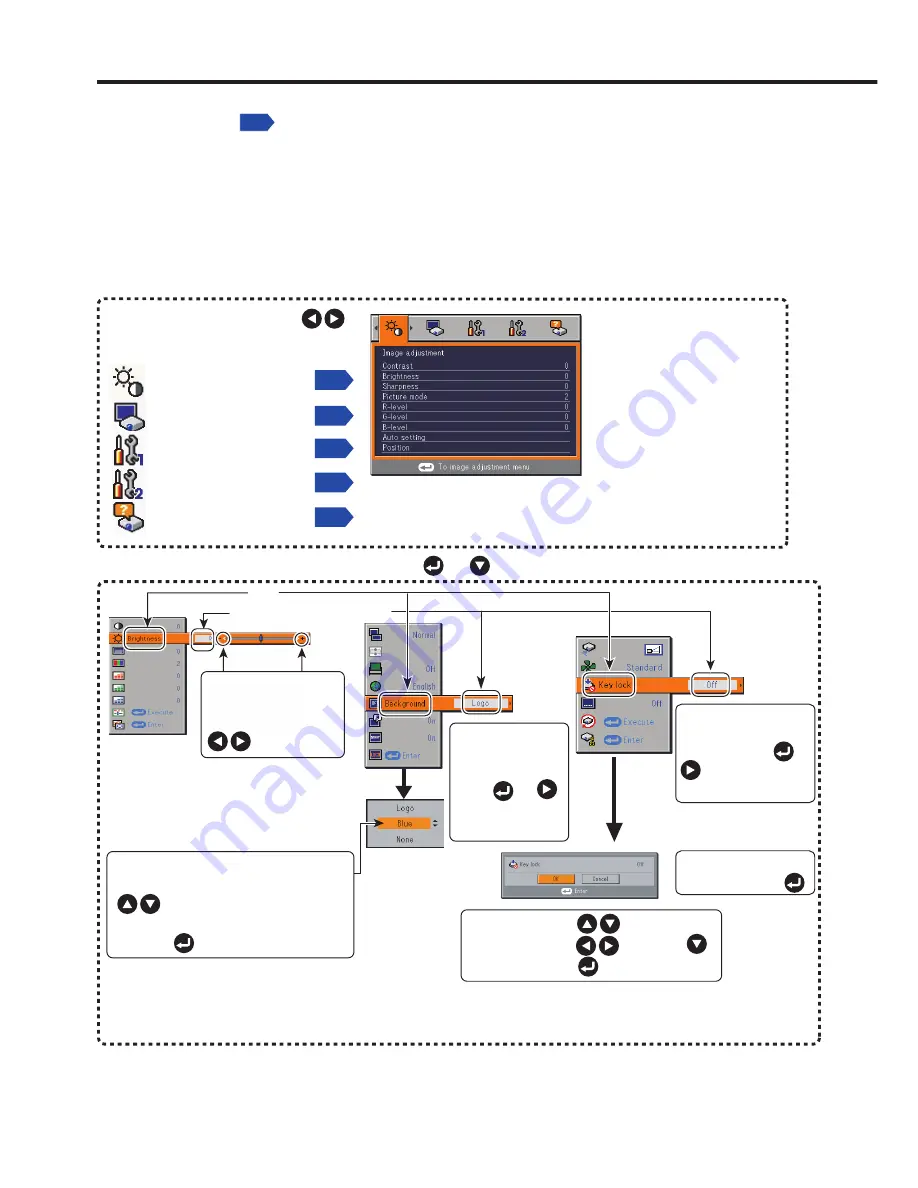
You can call up on-screen menus, and conduct a number of adjustments and settings using
the
MENU
button
p.64
on the control panel (main unit side) and remote control.
Setup using the Setting display
The menu shown below is for operation instructions purposes and might differ from the
actual display.
These marks
signify that there
are options.
Press or
to display a list of
options.
* When no item is
changed, press .
These marks signify
that there are setting
screens. Press or
to display a list of
setting screens.
Toggle items with .
Select items with and press .
Fix selection with .
Display the
Setting display
menu.
1. Press the MENU button
2. Select a Category
3. Adjustments & Settings
• The figure shows displays given for operation instructions purposes. As the display may differ depending on the item,
refer to the following applicable pages for the menu item you desire.
• To return to previous item, press the RETURN button.
Item
Adjustment/Setting Value
These marks signify
the items can be
adjusted/set by using
.
These marks signify the items can
be selected from the list by using
.
After an item is selected, apply it by
pressing .
Press or to open the menu.
4. End
Press the MENU button once more.
(The menu will disappear automatically after 30 seconds, if no operation is conducted.)
Select a category by using .
There are following 5 categories:
Displays the current
adjustments and
settings of selected
category.
Item shown with gray
cannot be adjusted with
the current input source.
p.83
Image adjustment
menu
p.85
Display setting
menu
Default setting 1
menu
p.88
Default setting 2
menu
p.89
Status display
menu
p.90
■
Summary of Contents for IPSiO PJ WX3130
Page 1: ...IPSiO PJ X3130 IPSiO PJ WX3130...
Page 2: ...1 2 3 1 2 3...
Page 3: ...100V 100V...
Page 4: ......
Page 5: ......
Page 6: ...IPSiO PJ 1...
Page 7: ......
Page 8: ......
Page 9: ...1...
Page 10: ...10 p 43...
Page 11: ...11 24 p 42 20...
Page 12: ...12 J55022 H14 B...
Page 14: ...14 2 11 12 14 16 17 18 20 21 22 24 26 28 31 31 31 32 33 33 33 34 34 36 36 37 38 41 43 44 45 45...
Page 15: ...15 48 49 51 55 FAQ 56 56 56 57 57 57...
Page 21: ...21 R03 2 R03 2...
Page 22: ...22 4 2 p 42...
Page 26: ...26 1 AC IN 2 ON STANDBY 100V 1 2 ON STANDBY ON STANDBY...
Page 27: ...27 p 38 p 28 1 p 41 p 42 p 35 1 ON STANDBY 2 ON STANDBY ON STANDBY 3 4 5W 5...
Page 28: ...28 1 p 26 2 6 2 p 42 p 38 1 p 41 3 4 INPUT INPUT...
Page 29: ...29 1 p 41 INPUT INPUT 5 6 7...
Page 30: ...30 RGB p 52 XGA X3130 WXGA WX3130 XGA X3130 WXGA WX3130 DVD p 44...
Page 31: ...31 AUTO SET p 37 p 52 p 53 p 37...
Page 32: ...32 1 RESIZE RESIZE 2 RESIZE RESIZE 3 4 RESIZE RETURN 4 3 1 2...
Page 33: ...33 OHP MUTE MUTE PICTURE 1 2 3 1 2 3 p 37 SCREEN SIZE X3130 WX3130 4 3 4 3 Y PB PR S p 38...
Page 34: ...34 FREEZE FREEZE 000000 1 2 2 3 6 000000 6 4 6 5...
Page 35: ...35 1 2 2 3 4 OK 5 6 6 1 2 3 5 1 2 2 3 4 5 OK...
Page 36: ...36 MENU p 18 30 3 4 MENU RETURN 1 MENU 2 p 37 1 p 41 p 38 2 p 42 p 43 5...
Page 37: ...37 1 1 2 3 NTSC 2 US NTSC US JAPAN NTSC JAPAN 1 2 Y PB PR S 1 2 NTSC NTSC NTSC4 43 JAPAN US...
Page 38: ...38 X3130 WX3130 4 3 X3130 1024 768 WX3130 4 3 1280 800 Indonesia...
Page 40: ...40 1 2 3 4 OK 5 6 512 384 X3130 640 400 WX3130 1...
Page 41: ...41 1 30 ON STANDBY INPUT INPUT 1 Y PB PR 1 2 Y PB PR 2 S...
Page 42: ...42 2 p 22 OK CC1 CC2 CC3 CC4 T1 T2 T3 T4 p 35 1500m RETURN 10 LAMP TEMP 2 3 CC1 CC4 T1 T4...
Page 44: ...44 1 2 3 4 100 100 30...
Page 45: ...45 IPSiO PJ 1 1 p 10...
Page 46: ...46 1 2 1 3 4 2 5 3 6 3...
Page 47: ...47 7 4 2 8 3 1 9 p 43 1 2000 3000 p 41...
Page 48: ...48 p 46...
Page 50: ...50 p 21 p 21...
Page 56: ...56 FAQ FAQ http www ricoh co jp FAQ http www ricoh co jp support qa IPSiO PJ 1 IPSiO PJ 1 RGB...
Page 57: ...57 2 1 http www ricoh co jp IPSiO regist...
Page 58: ......
Page 91: ...91 Operations...
Page 104: ...JA JP EN JP 2010 11 Y001 6121C...


