background image

-  - 

15


L. Maintenance: 


Very little maintenance is required to keep your inverter 

operating properly. You should clean the exterior of the unit 

periodically with a damp cloth to remove accumulation of dust 

and dirt. At the same time, tighten the screws on the DC input 

terminals.  

Summary of Contents for INVERTEK U SERIES DAI-1000U-12xx

Page 1: ...INVERTEK U Series Pure Sine Wave Inverter with UPS Mode USER MANUAL RICH ELECTRIC CO LTD MANUAL VER 2 0808...

Page 2: ...S 1 FEATURES 2 D INTRODUCTION 3 E NAME AND MAIN FUNCTION 4 F REAR VIEW 5 G CONNECTION AND TESTING 6 H INSTALLATION 7 GROUND FAULT CIRCUIT INTERRUPTERS GFCI S 9 I OPERATION 10 J OPERATING LIMITS 12 K T...

Page 3: ...bstandard wiring B Explosive Gas Precautions This equipment contains components which can produce arcs or sparks To Prevent fire or explosion do not install in compartments containing batteries or Fla...

Page 4: ...etal Causing a severe burn FEATURES z Microprocessor based design with absolutely accurate and stable frequency z Switch selectable 50 or 60 Hz output for all models z Very low harmonic distortion THD...

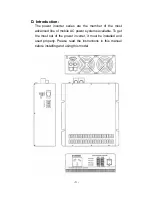
Page 5: ...are the member of the most advanced line of mobile AC power systems available To get the most out of the power inverter it must be installed and used properly Please read the instructions in this man...

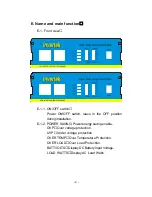
Page 6: ...F switch leave in the OFF position during installation E 1 2 POWER SAVING Power energy saving enable OVP Over voltage protection UVP Under voltage protection OVER TEMP Over Temperature Protection OVER...

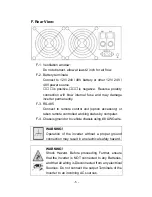
Page 7: ...remote control unit option accessory or taken remote controlled working status by computer F 4 Chassis ground or to vehicle chassis using 8 AWG wire WARNING Operation of the inverter without a proper...

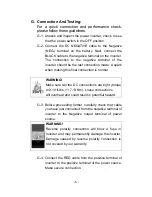
Page 8: ...final connection is normal G 3 Before proceeding further carefully check that cable you have just connected from the negative terminal of inverter to the Negative output terminal of power source G 4...

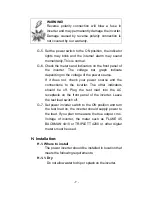
Page 9: ...ve the test load switch off G 7 Set power inverter switch to the ON position and turn the test load on the inverter should supply power to the load If you plan to measure the true output r m s Voltage...

Page 10: ...gs shavings are present These can pulled into the unit when the cooling fan is operating H 1 6 Close to battery batteries Avoid excessive cable lengths but do not install the Inverter in the same comp...

Page 11: ...rter is in bypass mode this connection neutral of the Inverter s AC output to input safety ground is not present so that the utility neutral is only connected to ground at your breaker panel as requir...

Page 12: ...rdance with the electrical codes or regulations applicable to your installation Cables that are not an adequate gauge too narrow or are too long will cause decreased inverter performance such as poor...

Page 13: ...graph indicates the voltage at the input terminals of the power inverter at low input current this voltage is very close to the battery voltage At high input current this voltage will be lower than th...

Page 14: ...ating or because it has been installed in a location which does not allow it to dissipate heat properly The power inverter will restart automatically once it has cooled off I 7 Overload indicator The...

Page 15: ...If the connections are good and the battery is charged but the voltage still drops below 11 volts you may need to use a larger battery K Trouble shooting K 1 Common problems Television interference Op...

Page 16: ...ad Reduce load No output voltage And voltage indicator in lower red zone Low input voltage Recharge battery Check connections and cable No output voltage Over Temp indicator on load less than 1500W Th...

Page 17: ...enance is required to keep your inverter operating properly You should clean the exterior of the unit periodically with a damp cloth to remove accumulation of dust and dirt At the same time tighten th...

Page 18: ...POWER SAVING MODE ON OFF 115V ON 50Hz ON OFF UPS MODE OFF ON 110V ON ON UPS MODE DELAY MODE POWER SAVING ON ON 100V 220V Model S1 S2 Function S3 S4 Output Voltage S5 Output Frequency OFF OFF DC AC OUT...

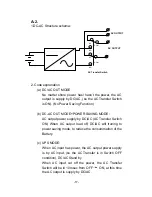
Page 19: ...DC AC AC Transfer Switch ON When AC output load off DC AC will truning to power saving mode to reduce the consummation of the Battery c UPS MODE When AC input has power the AC output power supply is...

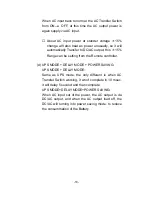
Page 20: ...is 15 Range can be setting from the Remote controller d UPS MODE DELAY MODE POWER SAVING UPS MODE DELAY MODE Same as UPS mode the only different is when AC Transfer Switch working it won t complete in...

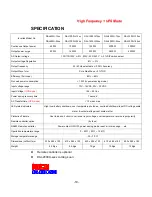
Page 21: ...ode Input voltage range 10V 16VDC 20V 32VDC Input Voltage UPS mode 126 93 Vac Power saving recovery time 1 second AC Transfer time UPS mode 10 msec max LED status indicators High Low battery shutdown...

Reviews: