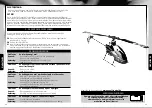
background image

SUITABLE FLYING ENVIRONMENT:

The location in which the helicopter is flown

should fulfil the following criteria:

• Never fly in residential areas. The model is 

suitable for use outdoors in little or no 

wind.

• Alternatively, it is suitable for use indoors 

in halls with dimensions of at least 20 x 

20 x 10 metres.

• When initialising take-off, make absolutely 

sure that all persons and animals –  

including the pilot – are at least 10 metres 

removed from the aircraft before flight 

begins.

• Always watch the aircraft, so that it 

does not fly into the pilot, other people 

or animals and injure them.

The model is delivered from the factory in Mode 2. We recommend that beginners do 

not change this setting. Experienced pilots may be accustomed to a different control 

mode. For this reason, the remote control can also be switched to Control Mode 1, 3, 

or 4. The control mode which is currently activated is shown in the top left or right of 

the display. The trimming changes in relation to the layout of the controls.


Control 2C (left)  


Control 2J (right)

Control Mode 1


A:

 Forwards/backwards and   

C:

 Thrust and


B:

 Rotation 


D:

 banking

Control Mode 2


C: 

Thrust and 


A: 

Forwards/backwards and 


B: 

Rotation 


D: 

banking

Control Mode 3


A: 

Forwards/backwards and 

C: 

Thrust and  


D: 

banking    

B: 

Rotation

Control Mode 4


C: 

Thrust and 


A: 

Forwards/backwards and 

  D: 

banking    

B: 

Rotation

2E

 Switch for control mode 

up

: Control Mode 2 or 4 (switch by pressing button 2M for 

an extend time)

2E

 Switch for control mode 

down

: Control Mode 1 or 3 (switch by pressing button 2M 

for an extend time)

8   ChangIng COnTrOl MODe

English

English

InsTruCTIOns FOr saFe FlYIng

GENERAL FLYING TIPS:

• Always place the helicopter on a level 

surface. An inclined surface can, under 

certain circumstances, negatively effect 

the helicopter during take-off.

• Always operate the controls slowly and 

with a gentle touch.

• Always maintain visual contact with the 

helicopter and do not look at the remote 

control!

• Move the thrust controller somewhat 

down again once the helicopter has lifted 

off from the ground. Maintain flying 

altitude by adjusting the thrust controller.

• If the helicopter lowers, move the thrust 

control slightly upward again.

• If the helicopter climbs, move the thrust 

controller down slightly.

• To fly along a curve, tapping the 

directional  controller very slightly in the 

respective direction often suffices.  

There is a general tendency during 

preliminary attempts at flight to operate 

the helicopter‘s controls too aggressi-

vely. Always operate the controls slowly 

and carefully. Never fast and fitfully.

• Beginners should first master trimming 

before attempting to master the thrust 

controller. It is not necessary for the 

helicopter to fly straight at first. It is far 

more important to maintain a constant 

height of approximately one metre 

above the ground by repeatedly tapping 

the thrust controller. Only then should 

the pilot practise steering the helicopter 

left and right.

7D

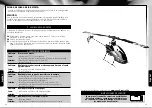
  Fly backward by moving the controller for forward/backward and sideways  

flight (2J) carefully backward.

7E

 Fly to the left by moving the controller for forward/backward and sideways  

flight (2J) carefully to the left.

7F

 Fly to the right by moving the controller for forward/backward and sideways  

flight (2J) carefully to the right.

7G

  Turn helicopter around to the left by moving the controller for thrust and rotation (2C)  

to the left.

7H

 Turn helicopter around to the right by moving the controller for thrust and rotation 

(2C) to the right. 

2F Switch for normal or 3D flight mode:

 In normal flight mode the motor is off when 

the control for thrust points all the way down. When the switch (2F) is switched to 3D 

flight mode, the motor runs continuously with 100% throttle, even if the control for thrust 

points all the way down. This switch may only be used while the helicopter is on the 

ground with the rotor rotating or while in the air. Otherwise, severe damage to the model 

can occur.

2H Motor Shut Down: 

If this ‚Emergency Off Button‘ is actuated, the motor is switched off 

immediately. This switch should only be used in order to minimise damage when impact 

with an obstacle appears to be unavoidable.

2O Assisted flight mode/3D: 

- Assisted flight mode activated - indicator (2R) illuminated continuously

- 3D flight mode activated - indicator (2R) flashes

Assisted flight mode entails automatic position correction, wherein the operator determi-

nes the tilt to a certain extent with the controls for forward/backwards and banking (2J). 

If the controls for forwards/backwards and banking are release, the model returns to a 

stable flying position. Pilots should always use this mode for their initial flying experiences.

All flight manoeuvres are enables with 3D flight mode. In this mode the forwards/back-

wards and banking controls no longer control the tilt angle of the model. Instead, they 

control the rate of rotation. For instance, forwards/backwards tilts the model forwards or 

backwards until it is upside down. 

Attention:

  The switch (2F) must also be activated for 

inverted flight. Stunt flying, particularly inverted flight, requires a great deal of practice.

2N Button for high and low control rotation rate: 

If the high control rotation rate is 

activated (‚H‘ in the left of the display), the model reacts with  

greater agility. Beginners should absolutely use the low 

rotation rate (‚L‘ in the left of the display).

2M Control Mode 3 and 4 selector switch: 

When this 

switch is pressed for an extended time, the function of the 

banking and rotation controls can be interchanged, which 

 corresponds to Control Mode 3 and 4. Pressing the switch again for an extended time 

returns the controls to the previous mode.

2P Hover Debugging: 

This function can only be used in ‚assisted flight mode‘. Normally, 

the model is delivered factory-trimmed. If, for whatever reason, the model should drift 

during stationary flight, you can correct it with this button. You activate Hover Debugging 

mode by briefly pressing the button three times in succession. Never activate this mode 

during flight. If Hover Debugging Mode is activated, you trim the model in the customary 

manner. Then land and briefly press button 2P once to save the settings. If the button is 

pressed and held for longer than 2 seconds, previously saved trim settings are reset to zero.

18

19

H/L

Summary of Contents for Control ACROBAT 3D

Page 1: ...ormity can be found at www revell control de Hiermit erklärt die Revell GmbH dass sich dieses Produkt in Übereinstimmung mit den grund legenden Anforderungen und den übrigen einschlägigen Bestim mungen der Richtlinie 1999 5 EC befindet Die Konformitätserklärung ist unter www revell control de zu finden Legge sui rifiuti elettronici Una volta concluso l utilizzo rimuovere le batterie e smaltire sep...

Page 2: ...orset schroevendraaier inbussleutel Ensemble rotor de rechange tournevis clé Allen Spare rotor set screwdriver Allen key Ersatzrotorset Schraubendreher Inbusschlüssel Radiocomando Emisora Zender Télécommande Remote control Fernsteuerung Istruzioni per l uso Manual de instrucciones Gebruiksaanwijzing Mode d emploi Operating manual Bedienungsanleitung Ladegerät USB Kabel und Akku Caricabatterie cavo...

Page 3: ...5 5A 5B 6 2I 6C 2L 6A 2C 2F 2H 2B 6B 2J 7C 2J 7D 7 2C 7A 2C 7B 4 4A 4C 4B 9 9A 9B 9C 2J 7E 2J 7E 2C 7G 2C 7H 8 Mode 1 Mode 3 A A C C B D D B Mode 2 Mode 4 C C A A B D D B ...

Page 4: ... die Reichweite von Kindern gelangen Bei der Entsorgung müssen Akkus entladen bzw die Batteriekapazität muss erschöpft sein Freiliegende Pole mit einem Klebestreifen abdecken um Kurzschlüsse zu vermeiden Wartung und Pflege Das Modell bitte nur mit einem sauberen feuchten Tuch abwischen Modell und Batterien vor direkter Sonneneinstrahlung und oder direkter Wärmeeinwirkung schützen Modell Fernsteuer...

Page 5: ... Unterlage und eine brandsichere Umgebung zu achten Den Akku vom Modell abstecken und die Fernsteuerung ausschalten Das USB Kabel an das Ladegerät 4A anschließen und in einen freien USB Port stecken 4B Nun den Akku von oben in das Ladegerät stecken Auf die Polarität achten Die Nut des Akkusteckers passt in die Aussparung der Aufnahme 4C Der Akku muss sich leicht in die Ladebuchse stecken lassen KE...

Page 6: ... und 4 Mit dieser Taste ist es durch längeres Drücken möglich die Funktion der Regler seitwärts und Drehung zu vertauschen was den Steuermodes 3 und 4 ent spricht Ein erneutes längeres Drücken schaltet in den in den vorigen Mode zurück 2P Hover Debugging Diese Funktion ist nur im unterstützten Flugmode verwend bar Normalerweise wird das Modell getrimmt ausgeliefert Sollte aus irgendeinem Grund das...

Page 7: ...Blatthalterschraube gegen den Uhzeigersinn lösen 9B Nun das Rotorblatt abziehen 9C Beim Einsetzen des neuen Rotorblatts darauf achten dass die Bohrungen über einander liegen Die Blatthalterschraube nur ganz leicht eindrehen Die Rotorblätter müssen sich noch leicht in den Blatthaltern drehen lassen 9 WECHSELN DER Rotorblätter FEHLERBEHEBUNG Problem Der Rotor bewegt sich nicht Ursache Schalter 2F od...

Page 8: ...tential malfunctions and defects When disposing of batteries they must be discharged or their capacity must be fully depleted Cover exposed terminals with adhesive tape in order to prevent short circuiting Maintenance and care Please only use a clean damp cloth to wipe off the model Protect the model and batteries from direct sunlight and or direct heat Never allow the model the remote control and...

Page 9: ...the assisted flight mode 2R continuously illuminated and the slow control rotation rate function L in the display is activated You can switch between Control Mode 1 and 2 with the switch 2E This means that the functions of the forward backwards and thrust controls are interchanged Please choose the appropriate setting before switching on the remote control Note Only minimal corrections of the cont...

Page 10: ...d 7E Fly to the left by moving the controller for forward backward and sideways flight 2J carefully to the left 7F Fly to the right by moving the controller for forward backward and sideways flight 2J carefully to the right 7G Turn helicopter around to the left by moving the controller for thrust and rotation 2C to the left 7H Turn helicopter around to the right by moving the controller for thrust...

Page 11: ...OTING Problem The rotor does not move Cause Switch 2F or 2H is activated The battery is too weak or depleted Remedy Deactivate switch 2F and or 2H Charge the battery Problem The helicopter stops and descends during flight for no apparent reason Cause The battery is too weak Remedy Charge the battery Problem It isn t possible to control the helicopter using the remote control Cause The ON OFF switc...

Page 12: ...ntion à ce que la maquette ne blesse personne Lors de leur élimination les batteries doivent être vides ou leur capacité de charge doit être nulle Recouvrir les pôles non protégés de ruban adhésif afin d éviter les courts circuits Entretien et soin Nettoyer le modèle avec un chiffon propre et humide Protéger le modèle et les piles de tout rayonnement lumineux direct et ou de toute source de chaleu...

Page 13: ... compartiment à piles 2Q 3B Insérer 4 piles de 1 5 V AA en respectant les indications de polarité à l intérieur du comparti ment 7 Pilotage Attention Avant chaque mise sous tension de la télécommande s assurer que le commutateur de vol normal vol 3D 2F et le commutateur d arrêt Moteur 2H sont poussés vers l avant et que le régulateur de poussée 2C est orienté vers le bas Avant de démarrer s assure...

Page 14: ...toujours être utilisé lorsqu une collision avec un obstacle semble inévitable afin d éviter tout dommage important 2O Mode Assisté 3D Mode Assisté activé la lampe témoin 2R est allumée en continu Mode 3D activé la lampe témoin 2R clignote rapidement Le mode Assisté consiste à utiliser une position automatique c est à dire que l inclinaison du modèle définie à l aide des régulateurs de vol en avant...

Page 15: ...C Lors de l insertion de la nouvelle pale veillez à ce que les percées coïncident Tourner lentement la vis de maintien de la pale Les pales doivent pouvoir tourner encore aisément dans le support de pale DÉPANNAGE Problème Le rotor ne bouge pas Cause L interrupteur 2F ou 2H est activé La batterie est trop faible ou vide Solution Die Schalter 2F und oder 2H deaktivieren Charger la batterie Problème...

Page 16: ...an de accu niet en maak ze niet open Er bestaat ontploffingsgevaar Houd de LiPo accu buiten bereik van kinderen Accu s moeten ontladen zijn of de accucapaciteit moet uitgeput zijn voordat u ze weggooit Dek vrijliggende polen af met plakband om kortsluiting te voorkomen Onderhoud en verzorging Neem het model alleen af met een schone vochtige doek Voorkom blootstelling van het model en de accu aan d...

Page 17: ...u uit de lader en trek de stekker van de lader uit de USB poort Na een laadtijd van 30 40 minuten kan de helikopter 5 à 7 minuten vliegen Waarschuwing De accu wordt gewoonlijk niet warm tijdens het laden Als de accu toch warm of zelfs heet wordt en of er veranderingen aan het oppervlak te zien zijn moet het laden onmiddellijk worden afgebroken 3 Batterijen plaatsen zender 3A Druk op de onderkant v...

Page 18: ...nop besturingsmodus 3 en 4 door langdurig op deze knop te drukken kunt u de regelaartoewijzing van de functies zijwaarts vliegen en draaiing verwisselen besturingsmodus 3 resp 4 Door opnieuw langdurig op deze knop te drukken schakelt u weer over op de vorige modus 2P Hover Debugging deze functie kan alleen in de ondersteunde vliegmodus worden gebruikt Gewoonlijk wordt het model getrimd geleverd Al...

Page 19: ...de klok in los met de meegeleverde inbussleutel 1 5 mm 9B Trek nu het rotorblad los 9C Let er bij het plaatsen van het nieuwe rotorblad op dat de boringen zich boven elkaar bevinden Draai de bladhouderschroef slechts zeer licht aan De rotorbladen moeten nog gemakkelijk in de bladhouders kunnen draaien 9 DE propellers VERVANGEN PROBLEEMOPLOSSING Probleem De rotor beweegt niet Oorzaak De schakelaars...

Page 20: ...as celdas de la batería no se deben dañar ni perforar Existe el riesgo de explosión La batería LiPo debe mantenerse alejada del alcance de los niños Las baterías deben estar descargadas o su capacidad agotada antes de poder desecharlas Cubra los contactos descubiertos con cinta aislante para evitar cortocircuitos Mantenimiento y cuidados Utilice solo un paño limpio y húmedo para limpiar el modelo ...

Page 21: ...nente Atención cada vez que se encienda la emisora se debe comprobar antes que el interruptor de vuelo normal y 3D 2F y el interruptor de Motor Shut Down 2H estén apuntando hacia delante y que la palanca de gas 2C apunte hacia abajo Antes de despegar se debe comprobar que están activados el modo de vuelo asistido 2R encendido de forma fija y la función de velocidad de control de rotación lenta L e...

Page 22: ...bstáculo para evitar daños mayores 2O Modo de vuelo asistido 3D Modo asistido activado La indicación 2R está encendida de forma permanente Modo 3D activado La indicación 2R parpadea de forma rápida Con el modo de vuelo asistido se reajusta automáticamente la posición de vuelo es decir que es posible controlar con la palanca de vuelo hacia delante detrás y vuelo lateral 2J la inclinación del modelo...

Page 23: ...y pierde altura Causa La carga de la batería es insuficiente Solución Cargue la batería Problema El helicóptero no se puede controlar con la emisora Causa El interruptor ON OFF 2K se encuentra en la posición OFF Las baterías se han colocado incorrectamente La carga de las baterías es insuficiente Solución Coloque el interruptor ON OFF 2K en la posición ON Compruebe si las baterías están colocadas ...

Page 24: ...hio di esplosione Tenere la batteria LiPo lontana dalla portata dei bambini Scaricare le batterie per lo smaltimento e o attendere che si siano esaurite Coprire i poli liberi con nastro adesivo per evitare cortocircuiti Cura e manutenzione Pulire il modellino solo con un panno umido pulito Proteggere il modellino e le batterie dall esposizione diretta alla luce solare e o dall effetto diretto del ...

Page 25: ...a 1G Cavo di collegamento batteria 1 ELICOTTERO Per collegare il radiocomando all elicottero questo deve essere prima acceso A tal fine inserire la batteria nel retro del vano batterie 1F e collegare il cavo di collegamento della batteria 1G con il connettore della batteria Non forzare e prestare attenzione alla polarità 5A Attenzione Posare il cavo di corrente in modo che non si incastri tra le r...

Page 26: ...re dovrebbe essere sempre utilizzato qualora un urto con un ostacolo appare inevitabile in modo da evitare danni consistenti 2O Modalità di volo assistita 3D Modalità assistita attivata L indicazione 2R si accende a luce fissa Modalità di volo 3D attivata L indicazione 2R lampeggia velocemente La modalità di volo assistita non è altro che un ripristino automatico della posizione vale a dire l incl...

Page 27: ...icare la batteria Problema L elicottero si ferma senza motivo durante il volo e cade Causa La batteria è scarica Soluzione Ricaricare la batteria Problema Non si riesce a controllare il velivolo con il radiocomando Causa Il tasto ON OFF 2K è su OFF Le batterie sono posizionate in modo scorretto Le batterie non hanno energia sufficiente Soluzione Portare l interruttore ON OFF 2K su ON Verificare la...

Page 28: ...zi di ricambio 5 2 3 6 7 8 17 11 14 16 18 11 20 19 21 2 5 43773 Rotor Set 5 20 21 43774 Control Rod 6 43775 Spindle Shaft 2 3 43776 Battery 16 43777 Landing Skid 18 43778 Swash Plate 7 43779 M ain Shaft with Gear 8 14 21 43780 Tail Boom with Motor 19 43781 Servo 11 43760 Canopy 17 54 55 Notes ...

Reviews: